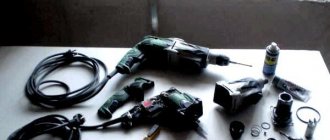
A hammer drill is designed for drilling holes in various materials, breaking walls, drilling rocks and roads. The tool is used under heavy loads and malfunctions occur over time. You can replace a failed rotary hammer with an inexpensive Chinese model. But if you have a branded instrument, then it’s a shame to throw it away. In order not to pay half the cost of a hammer drill for troubleshooting, you can do it yourself. No repair is complete without studying the structure of the tool and the procedure for disassembling it.
Perforator device
Regardless of function and design, rotary hammers have similar basic elements.
The device of a simple hammer drill with a network drive
The device of a simple hammer drill
- Power cord.
- Power button.
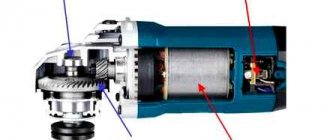
- Engine.
- Gearbox.
- Impact mechanism.
- Cartridge.
A barrel perforator has the same main components.
Device of a barrel perforator with a network drive
The barrel perforator has the same main components
The impact mechanism of the hammer drill can be made in two versions:
- impact mechanism with swing bearing;
Oscillating bearing mechanism - crank impact mechanism.
Mechanism with crank mechanism
A swinging bearing is also called a drunk bearing. This mechanism is used in light and medium hammer drills.
Impact mechanism with drunk bearing
The crank mechanism is used in heavy hammer drills.
Crank impact mechanism of a hammer drill
Hammer diagnostics
Take a multimeter, put it in dial mode and start testing with the power cord.
- Connect one probe to the end of the plug, the other to the contacts on the other end of the wire. When connecting to one of the contacts there should be a sound signal. Do the same with the other end of the fork.
- Check the power button on the contacts with the power cord and with the stator. Press the button trigger.
- Check reverse contacts.
- Connect the probes to the brushes to check the contact through the armature.
- Connect the probes to the stator wires and test them.
- If the contacts of the stator or brushes do not ring, and the buttons and power cord are working, proceed to diagnosing the commutator and motor windings.
Diagnostics of wires and buttons of a rotary hammer with a multimeter
https://youtube.com/watch?v=u3qayqobvnc
At the armature, first inspect the commutator and winding. If the wiring is melted, the burnt insulating varnish will leave black marks or a specific smell. You may see bent or crumpled coils or conductive particles, such as solder residue. These particles cause short circuits between turns. Commutator damage: raised, worn or burnt plates.
Carry out diagnostics with a multimeter:
- set the resistance to 200 ohms. Connect the probes of the device to two adjacent collector plates. If the resistance is the same between all adjacent plates, then the winding is working. If the resistance is less than 1 ohm and very close to zero, there is a short circuit between the turns. If the resistance is two or more times higher than average, then there is a break in the winding turns. Sometimes when there is a break, the resistance is so great that the device goes off scale. On an analog multimeter, the arrow will go all the way to the right. But digital won’t show anything;
Checking the integrity of the armature winding - determination of breakdown to ground. Set the device scale to maximum resistance. Depending on the tester, it can be from 2 MOhm to 200 MOhm. Connect one probe to the shaft, and the other to each plate in turn. If there are no faults, the resistance should be zero;
- do the same with the rotor. Connect one probe to the iron rotor body, and move the other along the plates.
Definitions of winding closure with the rotor body
The anchor can be saved if the balance is not disturbed. If during operation of the device you hear an intermittent hum and there is strong vibration, then this is an imbalance. This anchor must be replaced. And the winding and commutator can be repaired. Small short circuits are eliminated. If a significant part of the winding is damaged, it can be rewound. Worn and badly damaged lamellas should be sharpened, extended or soldered. In addition, you should not undertake anchor repairs if you are unsure of your capabilities. It is better to replace it or take it to a workshop for repairs.
Checking the performance of the stator with a multimeter:
- set the resistance mode to 200 ohms. Connect the probes of the device to the ends of one winding. One means an open circuit, and zero means a short circuit between the turns. If it shows resistance of more than 1.5 ohms, then check the second winding. Both windings should have approximately the same resistance;
- check that there is no breakdown to ground, that is, a short circuit between the winding and the metal stator housing. Set the multimeter to maximum resistance mode. Connect one probe to the end of the winding, the other probe to the metal stator housing. A unit indicates the absence of a breakdown.
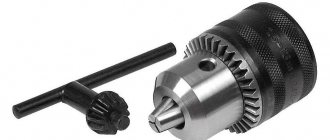
Disassembling the cartridge
The cartridge is perhaps the most important part of the tool. Tool manufacturers make the chuck in different patterns and attach it to the main part of the tool in different ways. Main types of cartridges:
- Camera type. A special key is used to insert and lock the drill bit attached to the tool.
- Cell Type To insert and secure the drill, simply twist the chuck.
- Quick release type with two or one hand. No special tools are required for installation or assembly.
Once you have determined the type of cartridge, try removing it. The type of cartridge doesn't really matter, the removal process is more or less universal:
- First we need to loosen the cartridge screw. To do this, simply press on the tool head.
- Take a screwdriver and unscrew the mounting screw.
- Secure the chuck in a vise and turn the spindle.
READ How to Disassemble Elti 18 Screwdriver
The hammer also requires lubrication and varnishing. Even if you use it once a year, lubrication will help prevent premature corrosion and damage to the tool.
Malfunctions and their causes
Frequent hammer drill malfunctions:
- does not turn on. Check the electrical circuit;
- The hammer drill doesn't hit. Damage to the impact mechanism;
- The tool does not turn or drill. Reasons: armature bearings, armature gear, gearbox;
- the drill flies out and doesn't stay in place. Faulty cartridge or raster bushing;
- sparking in the electrical housing. Reasons: violation of armature winding insulation, wear of brushes, commutator, clogging of brush holders;
- sparking in the area of the power button. Malfunction of button contacts or wires;
- The hammer drill is heating up. The reason is worn brushes, short circuit of winding turns, poor lubrication of the gearbox;
- The hammer drill does not hold the chuck. The retaining ring or retaining washer is broken.
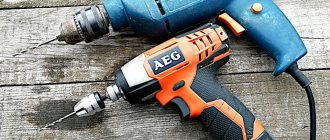
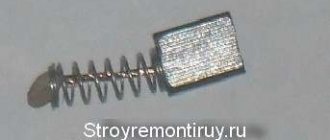
Replacing motor brushes
The main sign that it is time to change the brushes is the formation of increased sparking in the area of the electric motor commutator, rapid heating of the brush holders, and a burning smell. When the brushes are not worn out, the spark can only be seen under them. Otherwise, the spark is visible throughout the entire circle of the collector.
The presence of a spark around the commutator circle with unworn brushes is a sign of bearing wear, rotor or stator insulation failure, commutator plate burnout, stator or rotor burnout.
Another sign that the stator has burned out is the presence of sparks under only one electrode. If you have a tester, you can use it to check the stator and rotor: measure the resistance on the rotor and stator one by one. If it is the same on both windings, then everything is fine with the stator. If you notice clear signs of problems with the rotor or stator in your hammer drill, you will have to take the device to a service center for repair. As for the brushes, you can change them yourself.
Features of barrel perforator repair
Repairing a barrel perforator has the same principles as a simple one. The main difference is in the design and number of elements.
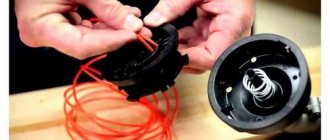
Replacing brushes
- Remove the bottom cover of the case and you will see plugs that need to be unscrewed.
Unscrew the plugs - The brushes have springs, so after removing the plugs, the springs will rise above the body and you can easily pull out the brushes.
Remove the brushes
Replacing brushes on a barrel perforator
Impact mechanism and gearbox repair
The main difference between a barrel perforator and a gearbox that is simple in design. Some models have an impact mechanism with a screw bearing.
Barrel perforator with a drunken bearing
Barrel perforator with a drunken bearing
But most rotary hammers have a crank impact mechanism.
Barrel hammer drill with crank impact mechanism
Crank impact mechanism in a barrel perforator
All gears and bearings must be inspected and lubricated. Change worn ones. To disassemble such a structure, you need to unscrew the bolts on the body. The barrel is knocked out of the body with a rubber hammer. The bearings are removed with a puller.
- After removing the barrel, you need to remove the raster bushing with the striker. To do this, it is not necessary to disassemble the entire case.
Raster bushing with striker - Using a wooden mallet, tap the ribs of the metal gearbox housing.
- The firing pin will come out first, then the bushing.
How to remove the firing pin and raster sleeve from a barrel perforator
Due to a faulty striker, the hammer stops hitting.
Drum perforator repair
Video: How to Disassemble the Zubr Rotary Hammer
- Advice.
- Puck.
- Spring.
- Ball.
Once the last part is removed, you will need to remove all the screws holding the case in place. Then remove the cover on the handle, if there is one, after which each wire should be disconnected from the starter. The brush holder is then removed.
Scheme of a perforator device.
The next step is to disable the transmission and housing until there is a gap through which the switch can be removed. Next, the device should be secured in a vertical position using whisks. This will allow you to get all the details from it.
You can use the services of an appropriate service to disassemble the seeder. By doing it yourself, you can save a lot of time and money on equipment repairs. During operation, follow the step-by-step instructions:
- Disassembly begins with the upper block, first removing the tip, washer, and at the end. Spring with ball.
- Once the ball is removed, you can begin to unscrew the screws that hold the body in place.
- Next, remove the cover on the handle, if there is one, and then disconnect each starter wire.
- Remove the brush holder.
- The gearbox is disconnected from the housing until there is a gap allowing the switch to be removed.
Punching modes
The final stage of disassembling the hammer drill involves vertically fixing the tool using pressure, after which all parts and spare parts are removed.
READ The Difference Between a Rotary Hammer and an Impact Drill
The instrument should be disassembled with special care, as it is important to remember the location of the individual parts and the sequence in which they are removed. You need to choose a special place for them, otherwise they may get lost, roll somewhere, and the blow will not be restored.
What can lead to disassembling the hammer drill
Even if the hammer is in good condition, it must be cleaned periodically for preventive maintenance. To do this, the device is disassembled, replacing worn parts. The process of disassembling instruments from different manufacturers is approximately the same, with the exception of some nuances.
Before disassembling the device, the causes of failure are determined, which may depend on the surface of the device. For example, very often the plastic shoe on the cartridge is in poor condition due to wear and tear.
The reasons for disassembling the blow may be instability, a burning smell, or strange sounds when using the tool.
This causes traffic jams. To prevent the problem, it is necessary to use long drill bits when working with the tool.
The main prerequisites for repairing the device and disassembling it may be the following:
- Tool instability
- Strange sounds appear when the device is turned on.
- The smell of burning.
- For obvious reasons, the device does not clog.
Having discovered these signs of malfunction, the question arises about the need to repair the device.
How to disassemble a gear strike
It is necessary to carefully distribute the gearbox together with the device body in different directions so that a gap is formed between them, which will be from 30 to 50 mm. To begin, switch the switch to the “perforator” position, only after this the switch is removed. Then remove the housing from the transmission.
Transmission. This is the element that transmits the rotation of the cartridge from the engine. This is due to the impact of the impact mechanism. The gearbox includes a set of gears that have different shapes. It can be cylindrical, worm or conical.
Disassembling the hammer drill gearbox: 1. Special ring, 2. Outlet sleeve, 3. Ring, 4. Ball, 5. Spring. Housing bearing shield: 22. Closing spring, 29. Ring, 30. Spring, 31. Lock.
The device unit, including the gearbox, has an electronic device capable of controlling speed. It also controls the frequency of the strokes. This element requires periodic inspection, lubrication and replacement of worn parts. Before disassembling the rotary hammer gearbox, the cartridge is dismantled, after which the mode switching lever must be turned off. This may require a flat blade screwdriver.
For example, to repair a gearbox or its stator, three bolts on the back cover of the tool are unscrewed and the cover is removed. The tool must be turned off before starting work. Be sure to pay attention to the condition of the brushes. However, you need to call the power button and cable.
If a breakdown is found after dialing the number, they proceed to inspect the cable as it should be checked for kinks. If there is no visual damage, check each core of the cable by unwinding it. After entering the gearbox, inspect the following parts and spare parts:
- Gears.
- Attacking.
- Piston.
Gradual disassembly and lubrication of the hammer gun.
It is important to pay special attention to your equipment. If worn items are found, they are replaced with new ones. If they are missing, they are thoroughly cleaned using “alcohol” or gasoline.
It should be noted that repairing lightweight rotary hammers is not as complex as more serious equipment, which only professionals can understand. When choosing a tool of any class, it is better to buy a model with a vacuum cleaner. This device saves the time needed to clean the instrument. Since the amount of dust will be minimal, it will be safer to use the tool.
READ Choosing a Cordless Screwdriver for the Job
Another problem is winding breakage, which is also associated with the appearance of dust. In this case, the tool is disassembled if you need to thoroughly clean and replace any items that cannot be repaired.
How to take a hammer apart to lubricate it
To prevent this, the device must be cleaned every two weeks by soaking it with varnish or lubricant. The choice of oil was made very carefully. Basic rules to consider when lubrication:
Types of bits and bits for hammer drills.
- You should buy a solution that is made by the same manufacturer as the impact drill itself.
- You can use diesel engine oil if varnish or special oil is not available.
- Brushes that are more susceptible to wear need to be replaced.
You need to disassemble the drill to replace the brushes, even if the tool is a fairly expensive model. To replace the brushes, the cam is disassembled according to the principle described above. After that, they find brushes that are worn out, remove them from the structure and put the rest in place.
It is best to use graphite brushes, which are the best and not too expensive option. Use graphite brushes, which have a long service life. Coal is relatively short-lived, but it comes into contact with other parts of the impact at a high level.
How to disassemble the tool holder
First you need to determine the type of perforated cartridge installed in the device. Different models are equipped with different cartridges, which can be SDS tips, high speed and cam. If there is a jaw chuck, a wrench is used to secure the drill bit, which is missing from the pin and quick release.
Disassembling the hammer drill: press the head of the screw to loosen it, unscrew the screw using a screwdriver, clamp the chuck in a vice and rotate the spindle.
Be sure to learn how to lock the part when replacing the cartridge. Fastening can be done using spindles or screw rods. With very strong fixation, it is impossible not to use additional equipment.
For an easy replacement method, you can do this using a hammer, screwdriver or wrench. When disassembling the tool holder, follow these steps:
- To loosen the screw, press on the screw head.
- You need to unscrew the screw using a screwdriver.
- The chuck is clamped in a vice and the spindle is turned.