Types of cartridges for drills, screwdrivers
Often, when carrying out drilling operations, hand drills and screwdrivers are used. When working with them, drills are used that have a cylindrical shank. The tail part of the drill is clamped using a collet mechanism.
Fixing the shank of a drill for a screwdriver or a drill of cylindrical and prismatic shape occurs by wrapping it around the chuck with its cams. Typically the mechanism has three cams and, accordingly, is called a three-cam mechanism.
To understand how to insert a drill into a drill, you need to determine the type of chuck installed.
There are two most common types of chucks for drills and screwdrivers:
- toothed chuck clamped with a key;
- chuck with quick clamping system.
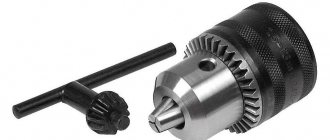
Key tooth chuck
Key chucks allow you to secure the drill in the clamps using a suitable key. The key is a rod with a lever with a small gear mounted on the rod. The chuck has a hole for fixing the key shaft and a circular toothed crown corresponding to the key profile.
In order to compress or unclench the cams, you need to insert the rod into the groove, place the gear on the teeth of the crown and rotate the key in the appropriate direction.
Usually all keys are identical and fit different tools, but there are exceptions. For example, some expensive brands make unique keys with individual sizes and profiles.
In any case, the key, due to its small size, is very easy to lose, and without it, inserting and removing the drill will be very difficult. Therefore, many craftsmen tie a key to the handle of the tool.
Keyless chuck
Drills and screwdrivers with quick-release chucks are convenient because they allow you to change drills without using keys. You can tighten and loosen the drill bit in the chuck jaws manually. The drill is simply inserted into the open clamping jaws, and then the chuck sleeve is rotated by hand in the appropriate direction to tighten.
There are single-coupling and double-coupling chucks.
To clamp two clutch chucks, you should hold the clutch closest to the tool body with one hand and rotate with the other.
With a single coupling chuck, all operations are carried out using only one hand. Knowing these subtleties of the chuck design, you should understand how to insert a drill into a screwdriver.
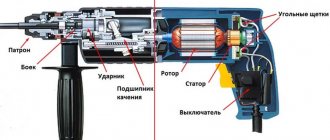
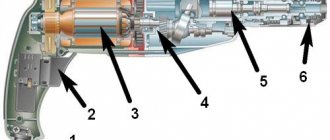
How does the chuck work in a drill?
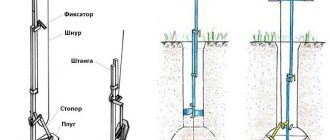
Drill chuck diagram.
Household drills and rotary hammers are mainly produced with fist chucks. They are a cylindrical body containing cams in the form of cones. An adjusting ring moves along the surface of the cartridge; when it rotates, the cams move closer to each other and move away, it all depends on the direction of movement.
Read also: Suspensions for sip wires
The foot is inserted into the free space between the cams. They close and firmly secure the drill in the chuck. Using the fist type, you can secure elements of various diameters in the chuck. The drill diameter range for household chuck drills is 8mm-10mm and 1.5mm-13mm.
The chuck clamps can be ordinary, that is, key, ring-gear or quick-clamping. A conventional chuck clamps using a key that forces a toothed drive and adjusting ring to move.
The quick-release chuck has a different design - the cams are driven by a metal sleeve with a corrugated surface. The sleeve rotates manually.
The keyless chuck may have locking elements that will limit the clamping force. Then the drill tip will lock into the tool with a characteristic click, or the lock button will work.
There are also single-coupling and double-coupling cartridges. In a single-socket chuck, the sleeve rotates relative to the drill body, and it is enough to fix only it. With two rings (couplings), the sleeve moves relative to the second ring, and it can move relative to the drill itself, so you need to fix the other clutch by twisting the sleeve by hand.
Types of cartridges for rotary hammers
Although a rotary hammer is a more complex tool compared to a drill and screwdriver, the system for fixing drills and drill bits in the chuck makes it quite easy to insert and remove equipment. The system for fastening equipment in a hammer drill chuck is called SDS (Special Direct System) .
There are three main types of cartridges:
- SDS-plus. The most common fastening system. Can be used on all inexpensive household hammer drills. The drill has two longitudinal grooves and two oval grooves. The fastening system is used in rotary hammers weighing up to 4 kilograms. The diameter of the shank is 10 millimeters.
- SDS-top. This method is used in rotary hammers weighing up to 8 kilograms and is characterized by greater reliability. The system is designed for high impact power. The shank is increased to a diameter of 14 millimeters.
- SDS-max. The fastening system is used on the most powerful rotary hammers. The drill already has three grooves and two oval grooves, and the diameter of the shank is 18 millimeters. Allows to withstand very high torques.
As can be seen from the description, these three systems are not interchangeable with each other, so you need to be careful when purchasing equipment. If you purchase a drill with the SDS-top mounting system, and your hammer drill has a chuck with the SDS-plus system, then you will not be able to install it on the hammer drill.
Installing a drill into a hammer drill
Please note that the hammer drill chuck is initially designed to accommodate drills, not drills. Standard drills have a cylindrical shank with a diameter that matches the diameter of the drill. The drills have recesses and slots on the shank and are made using the SDS system. Although drills for metal or wood with SDS shanks are also produced for rotary hammers.
Below are recommendations on how to insert a drill bit into a hammer drill:
- First of all, you should follow electrical safety precautions and disconnect the tool from the power supply.
- Next, you need to choose the right drill for a specific job. First, select a drill with an SDS system that matches the hammer drill chuck. Secondly, choose the correct drill diameter that will correspond to the size of the required hole.
- Clean the cartridge from dust and dirt. Check that there are no foreign objects or fragments of brick or plaster inside.
- Take the drill by the working part and point it into the chuck all the way until you hear a characteristic click. Lubricate the drill bit periodically before use. This will extend the life of your tool.
- Check whether the drill is seated tightly and whether clamping has occurred. To do this, tilt the hammer drill with the chuck down and pull the drill. If it does not fall out of the cartridge, then the fixation is reliable.
- Connect the tool to the network and carry out the planned work.
After completing work with the hammer drill, you also need to know how to remove the drill bit from the hammer drill. To do this, press your fingers on the top of the cartridge and pull it towards the body. The fixation will loosen and the drill can be pulled out.
The operations described above apply to drills and drills with the SDS fastening system. If there is a need to insert a standard drill, then a special adapter should be used. This adapter has a shank with an SDS fastening system, and its body is a collet chuck with a gear operating system.
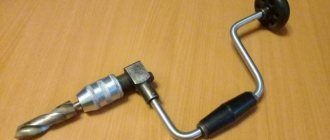
How to install a drill in a drill
How to insert a drill bit into a drill? Before inserting the drill, you need to turn the drill on idle and check its operation, then turn off the tool from the mains and inspect the chuck.
All manipulations for installing and changing drills must be carried out with a de-energized drill or hammer drill, since you can accidentally press the power button and damage surrounding objects or injure yourself.
Next, you need to manually rotate the sleeve counterclockwise so that the cams are spread as far apart as possible. In a clockwise direction they move as close to each other as possible. If rotation becomes difficult, the chuck requires lubrication.
After checking and eliminating all inconveniences, you need to insert the drill. The cams are set to a diameter that is literally a few millimeters larger than the working element. The next thing to do is to insert the drill into the socket as deeply as possible. In a quick-release chuck, locking occurs by manually rotating the sleeves clockwise.
At the same time, with your free hand, hold the coupling at the bottom stationary if it is a two-coupled chuck, or hold the drill with a single-coupled design. The sleeve rotates until it clicks or the button is activated. But if there are no alerts, you need to rotate to the limit with full use of forces.
The drill is installed in an ordinary chuck according to similar instructions. But the sleeve rotates in a different way. A special key is inserted into the sleeve hole of the cartridge. Moving the key clockwise will firmly seat the cutting object in the socket.
After strengthening, you need to check the fixation visually and by hand. The drill must be firmly fixed without dangling in different directions. There should not be even the slightest deviation relative to the axis. After all the steps and checks for installing the drill, the tool can be turned on and you can start working.
It is usually not difficult to remove the drill after use, but sometimes it gets stuck in the chuck. Quick-release sockets sometimes suffer from this drawback. In this case, you can hold the tool in your hand and tap the bottom of the chuck with your other hand, a small hammer or a gas wrench several times. Often this action helps to remove the drill if it is not removed by the usual rotation of the key or sleeve. But if this method does not help, then you will have to disassemble the cartridge.
Why does a drill bit fall out of a hammer drill?
Quite often, many people encounter a problem when the drill is not securely fixed in the chuck and begins to fall out of it. It should be said right away that if your tool is still under warranty, you should take it to the store for repairs. Next, we will try to figure out what is the reason for the drill falling out and how to deal with it.
This problem occurs for three reasons:
- factory defects in the manufacture and assembly of the hammer drill;
- wear of the cartridge locking mechanisms;
- improper handling of the tool during operation.
If the cause is a manufacturing defect, then the tool should be sent for repair when the problem is first detected. If the cartridge wears out, the only guaranteed way to correct the problem is to replace the cartridge. The drill most likely falls out due to wear of the locking elements in the chuck. Perhaps a repair shop will be able to replace the worn retaining balls, and then you will not have to change the entire cartridge. Such repairs will cost less.
To avoid the problem of the drill falling out, you need to handle the tool correctly when working. Do not forget to periodically lubricate drills and drills, and after work, clean the tool from dust and dirt. When performing work, keep the tool perpendicular to the plane and avoid distortions. Do not put too much pressure on the tool.
Installing a drill bit into a drill
The method of installing a drill bit into a drill will depend on the type of chuck that is available on the tool.
Let's look at how to change the drill bit in a screwdriver and drill:
- Disconnect the tool from the power source.
- Choose a drill suitable for the planned work. Clean the drill, especially its tail part, from dirt and build-up.
- Open the chuck jaws manually if the chuck is a quick-release chuck, or using a wrench if the chuck is of the gear type.
- Guide the drill bit into the chuck with the tail end until it stops.
- Next, fix the drill in the chuck depending on the type of chuck clamping mechanism.
- Check that the drill is securely fixed and that there is no significant play.
If you do not know how to change the drill bit in a drill, then follow the following instructions. Unplug the drill. Then open the jaws of the chuck, which will loosen the fixation of the drill. If you have just finished using the tool, be careful, the drill bit may be hot. Release the chuck depending on the type of fixation - manually or with a key. Remove the drill bit and replace it with a new one. To properly secure the drill, follow the instructions above.
Troubleshooting
In situations where the drill is used only for narrowly targeted purposes and occasionally, users tend to send it for repair at the first problem that arises. However, in most cases it is enough to be able to circumvent non-standard situations that arise. To fix minor problems, you need to know how to change the drill, whether it can be done without a key, and what to do if it gets stuck.
Replacing the drill
To carry out this procedure, you first need to remove the old drill according to the scheme described above, and then install a new one. Electric drills with quick-release chucks often have problems due to the fact that the drill is firmly stuck and it is impossible to unscrew the coupling. In this case, you can use a piece of fabric that will give greater adhesion to the coupling and try to unscrew it. If this method does not help, then you need to firmly fix the drill with your hand and hit the chuck tangentially in the direction of unwinding with the palm of your other hand, continuing to fix the tool.
Removing a drill without a key
Key chucks have a certain advantage - the drill fixation is very powerful, but there is also a disadvantage - you need to have a key at hand. If the key is not in place, this deficiency is quite easy to fill. You will need to find an object that can fix the cartridge on one side. This could be a nail, a Phillips screwdriver, a screw, or a hexagon of a suitable size. For the second half, you need to apply force with your hands and try to unscrew it - this way it is possible to pull out the drill without a key. But if you can’t do it with your hands, you can use a vice or a large gas wrench of a suitable size.
Drill stuck
There are situations when, upon completion of work, it is not possible to remove the drill. Neither unscrewing the couplings by hand if the chuck is a quick-release chuck, nor a wrench if the chuck is a key one, helps. You tried to turn on the drill and, using reverse, tried to reach the object, but it didn’t work. We fixed the drill tightly and tried to loosen the chuck with tangential blows, but this did not bring the desired result. So, it's time to turn to more massive equipment.
There are not many ways to remove a drill from a drill:
- Vise and gas wrench. The method involves using two gas wrenches or one wrench and a vice. It is necessary to firmly fix one half, and try to move the second with a key.
- Vise and hammer. One half is fixed in a vice, and the second is moved from a dead point with tangential blows of a hammer. With the help of generated vibrations and sharp point impacts, it is possible to solve the problem.
If the methods given above do not work, then you can completely unscrew the chuck along with the drill, secure it in a vice and, selecting a screwdriver or some kind of metal rod of the required diameter, knock the drill out of the chuck.
To learn how to properly secure a drill in a drill, watch the following video.
A drill is a tool that is needed to create holes in various materials. When using a tool, the question often arises about how to quickly change the drill bit in a drill. Replacement of the drill is also required when changing the operating mode. If you know how to do everything correctly, then there will be no problems.
Types of drills: a - spiral centerless, b - spiral with a center and undercutters, c - spiral with a screw center, d - centered, d - center, f - gimlet, g - countersink, h - slotted, i - plug.
Little tricks
Sometimes craftsmen may have a question about how to insert a drill into a screwdriver if the drill has a diameter less than the minimum allowable. If it is necessary to obtain very miniature holes in radio components, in plastic or metal, sometimes you have to use very miniature drills. And without additional tricks, it is unlikely that you will be able to clamp a drill of this size in the chuck.
The simplest way is to wind thin copper wire (0.2 - 1 millimeter) around the tail of the drill. If there is no thin wire, you can strip the insulation from the stranded copper wire and pull out one core from it. Wind the wire very tightly, turn to turn, without any gap. Trim the remaining length of wire.
One option in this situation is to wrap a piece of paper around a thin drill.
This will increase the diameter of the drill shank and ensure reliable clamping in the chuck jaws.