Design features of the pit drill
Pit drill device
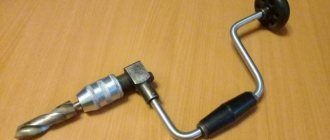
When making a pit drill, you must remember that in the classic version this unit consists of two parts. The first is the working body, the second is a vertical stand with a handle for easy grip. The basis of the unit is the pin. A strip of metal sheet in the form of a spiral is attached to its side plane. At the end of the pin there is a sharp blade made of durable materials.
When the handle rotates, the tool goes deep into the ground. It cuts small roots and moves soil to the surface using an auger mechanism. To dig a deeper hole, the stand is equipped with additional inserts. It’s good when the end of the pit drill is pointed, like a spear. In this case, he will perform all tasks more accurately and efficiently.
What tools and materials need to be prepared
To make a hole drill at home, you need to prepare the following materials and tools:
The device of a homemade auger drill
- a steel rod or pipe with a diameter of 8–12 mm and a length of 1–2 m. These parameters can vary depending on the depth and width of the drilled hole;
- metal sheet for making a screw. The optimal thickness is 1.5–2.5 mm;
- a rectangular piece of spring steel to make a knife;
- welding machine;
- a piece of rubber hose to form a handle;
- metal scissors;
- sharpener;
- pliers.
Vibrator from a hammer drill
To put the project into practice, you will need the following materials and tools:
- metal (steel) plate of the required dimensions, thickness from 50 to 70 mm;
- an iron rod or reinforcement (rectangular or round) of such length that it is possible to reach the bottom of the exposed formwork structure when pouring concrete;
- perforator;
- an old drill or a pick, a shovel, a chisel, even a crown;
- grinder with metal discs;
- welding machine with electrodes;
- ruler or tape measure;
- marker.
The minimum power of the hammer drill should be 1.5 kW - only such a tool will provide the required performance without overheating.
One side of the rod with a cross-section of 15-20 mm is processed so that it can be inserted into a punch chuck. A stainless steel plate is welded to the second side. For this you will need special electrodes.
It is better that the rod is also made of stainless steel. Concrete is an aggressive environment. Ordinary metal is highly susceptible to chemical attack and also wears out faster mechanically.
The sequence of manufacturing the tamping nozzle is as follows:
- Using a grinder, cut a rectangle of the required size from a steel sheet, and a piece of the required length from a round or rectangular rod;
- weld the plate to either end of the rod;
- cut off the drill seat with a small margin;
- weld it to the rod.
If you do not use an old drill, you will need to make a special adapter for the hammer drill chuck, or use machine tools to grind out a seat at the free end of the rod . The easiest way is to immediately use a drill of the required length. On the basis of a hammer drill, you can make more complex devices, for example, with a flexible shaft, which will additionally mix the working solution.
A homemade tamper for small-sized concrete (the simplest manufacturing option) is presented in the video.
How to make the working part of a pit drill
To make a manual hole drill with your own hands, you need to follow simple instructions:
- You need to select a circle of the desired size from a metal sheet. It is determined by the requirements for the functionality of the unit.
- Several pieces of metal must be cut to form a highly efficient work auger.
- In the center of the round workpiece, it is necessary to cut a small hole, the diameter of which should be greater than the thickness of the pipe or rod.
- An even cut is made along one side of the circle. The workpiece is stretched by the two formed sides in opposite directions.
- The spiral-shaped part is welded to the rod. It is necessary to ensure high strength of the seams in order for the hole drill to be reliable.
- The recommended angle of inclination of the propeller side to the vertical plane is 25–30 degrees.
- If there are several spirals, they are welded together.
- A hole is made at the end of the pole, which will ensure easy penetration of the unit into the ground.
Detailed drawing in projections of a hand drill
Making a pit drill with your own hands
Drawings and diagrams of a hole drill will significantly simplify the procedure for manufacturing the device, so they need to be given special attention. The main structural element of each device is the cutting part, which consists of two semicircular disks with sharpened edges.
The next unit is a rod made of a profiled pipe with a square cross-section. In some cases, it is replaced with scrap metal of the appropriate length. The optimal height of the structure should be at least 1.5 meters.
The rod needs to be extended with small sections of pipe, and it is important to think in advance about how to connect them. You should also consider what the handle will look like. As a rule, it has a T-shaped design and a length of 40 or 60 centimeters. The product is additionally equipped with a tip in the form of a drill, which is placed under the blades. Its task is to loosen the substrate, as well as center the tool during drilling.
Preparation of materials
Having understood the design of the hole drill, you can begin preparing materials . The classic model is created from pipes with the appropriate diameter. When using profiled products, it is 20-35 mm.
To create cutting blades, a saw blade from an angle grinder or sheet steel is used. The latter has a thickness of 4 mm. According to experienced craftsmen, it is better to create blades from saw blades. In this case, you will not have to make additional cutting edges. At the same time, the side edges are additionally sharpened for more productive loosening of the soil.
Any hard metal is used as a material for making a drill. In addition, you can get by with a regular sharpened rod by taking a piece of rod with a large diameter. You can also take a steel strip and slightly modify it, giving it the appearance of a drill. In some cases, combined options are used.
When creating a handle, it is advisable to give it the shape of a round pipe with a diameter that matches the size of your palms. The main requirement for this element is ease of use. The master should not feel discomfort when working with the device.
Create a hole drill from a saw blade
Cutting elements
At the stage of manufacturing cutting elements (blades), you need to decide what they will be. As a rule, these parts are:
- Removable.
- Non-removable (stationary).
The first option involves the presence of special shelves made of thick steel at one of the ends of the rod. They are placed at an angle, which is required to spread the knives in a plane at an angle of 30 degrees.
If you create a manual model or a hole drill for a tractor with your own hands, drawings and step-by-step instructions can become the most useful assistant. After familiarizing yourself with them, it becomes clear that, having attached the shelves, you will also have to arrange mounting holes. Next you need to make the same holes in the blades.
Holes are cut out in the central part of the disks to ensure a tight fit of the working elements to the rod. However, this option can only be considered when using monolithic structures.
Application of sheet steel
When trying to figure out how to make a hole drill with your own hands, you need to follow the instructions exactly and not deviate from the drawings. If high-quality sheet steel will be used to make the blades, then you first need to make a template from paper. A hole is drilled in the central part of the circle for further installation of the rod. The shape of the hole is determined by the type of rod and can be either square or round. Moreover, its diameter slightly exceeds the size of the rod.
Next you need to select the appropriate type of blades. They can have two halves, or be an open circle design with offset edges. To ensure better drilling efficiency, it is better to spread the edges at an angle of 30 degrees.
To process heavy and dense soil mixtures, the drill blades must be additionally reinforced with thick steel corners. The fact is that under the influence of serious loads they can become deformed and lose their serviceability.
Saw blades and modification of the device
If the hole drill is intended for a tractor, then a saw blade can be used as a cutting element. The main thing is that its diameter corresponds to the required parameters . Most modern disks are made of hardened steel, which is characterized by better strength characteristics and an elastic design. It is problematic to bend such a disk, so it is sawed into two parts and then moved at the required angle.
Such homemade manual hole drills are characterized by a high efficiency rate and a long service life. And even if an old saw blade is used as the cutting element, it will do its job perfectly, providing high drilling speed.
Many craftsmen understand that no matter how ideal the drawing or step-by-step guide may be, almost all homemade products require some modification. If digging holes is carried out in dense soil compositions, then large blades will not work. The fact is that they cannot cope with heavy soils and quickly become dull. To make the device more productive, blades of different sizes need to be welded onto its rod.
In the lower part, near the peak, small blades are strengthened, and after a few centimeters - larger ones. The optimal number of tiers is 3, and the size of the cutting elements should not exceed 50 centimeters. If this is not the case, then further work with the tool will be uncomfortable.
The final stage of production
To make a high-quality hole drill with your own hands, you need to pay due attention to the process of making a knife. It should be at the end of the hole drill. Therefore, this part will take on the entire load from cutting the soil. In order for it to serve for a long time and be able to effectively perform its functions, spring steel is used for its manufacture. This material is durable, wear-resistant, and does not require frequent sharpening.
The dimensions of the knife must correspond to the dimensions of the auger. A rotating sandpaper is used to sharpen it, and a welding machine is used to connect it to the base.
Dimensions of drill knives
How to make an electric hole drill
To make an electric hole drill with your own hands, you need to make a classic tool and equip it with an electric drive. With this device it is not at all difficult to drill a deep well (up to 3 m in dense soils).
Electric drilling rig design
In this case, the rotation of the hole drill will be carried out using a cardan transmission. To increase the safety of working with such a tool, you can install a coupling.
To make this unit more transportable, it is recommended to mount the main working units on a trolley. It is best to install the motor at one end of the support frame, and place the bracket at the other. Using this solution, it is possible to easily make a vertical stand, making all work easier.
Video on the topic: Buroyam from a walk-behind tractor
Publications on the topic
Making a mini excavator with your own hands
Making a receiver for a compressor with your own hands
How to make a trailer for a walk-behind tractor with your own hands
Electric models
If you want to create an electric drill for making holes in the ground, you need to have certain skills in the field of electrical engineering.
A gear motor can be used as an electric drive, which guarantees high drilling speed. By the way, to manufacture a highly productive device, you can remake an ordinary manual hole drill, created according to the above instructions. This is interesting: how to make a garden drill with your own hands.
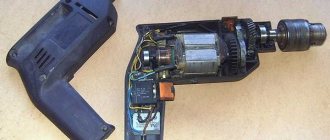
You can also try to upgrade the hammer drill by equipping it with a cutting disc to which a round pipe is welded. An adapter is ordered from a turning specialist to connect the power tool to the mechanical part. When processing the soil with such a tool, it is important to avoid roots, otherwise they can damage it.
If the drill is created for a powerful tractor, then it is better to use durable disks made of hardened steel or any other reliable metal. Their number is determined by the number of turns, and the sizes must be the same. Holes for the rod are made in the central part. On one side, the discs are welded and then stretched a little. On the other hand, they are boiled with a weld. On the outer disks it is necessary to strengthen the rings, and place the finished structure on the rod. Ultimately, the bottom edge is welded to the rest of the parts.
Also, craftsmen use an ordinary electric drill as a basis for a future drill. The “Rebir” model has proven itself to be excellent, demonstrating a power of 2 kW, which is supplemented by an auger. Due to the presence of a third cone in the drill, it needs to be finished with a lathe, making recesses on both sides. A drill with a third cone is welded to the adapter, and the drilling section is cut off.
This design option is characterized by large dimensions and impressive weight, so it is not entirely comfortable to use alone. For convenient operation, the equipment is equipped with an electric winch, and a radiator is mounted on the thyristor.