Main components of a garden shredder
To independently assemble a grass and branch chopper (shredder) at home, you must first understand the structure of the mechanism, as well as the principle of its operation. This will help you assemble the equipment correctly and, if necessary, make changes to its design.
A homemade unit, designed for grinding mown grass and sawn branches up to several centimeters thick, has the following main structural components:
- engine;
- knives mounted on the working shaft;
- frame (usually metal);
- protective casing;
- a box designed to receive cut vegetation;
- starting system.
The equipment itself can be made stationary or mobile. To create the latter option, you will additionally need wheels, as well as a handle. To make the frame, use metal corners or ready-made frames from workbenches. Boxes for processed vegetation are made from plastic buckets, tin, and bags. The protective casing around the knives should be thick and durable enough so as not to quickly wear out from the impact of grinding vegetation.
When processing plant debris, crushed pieces may fly out of the opening through which it is fed. Therefore, the neck is covered with a lid or simply with a cloth, for example, a bag.
The operation of the chopper is that rotation from the motor shaft is transmitted directly to the knives or through a chain/belt drive. The vegetation chopped by the blades enters the box. In this case, the final product is immediately ready for use.
According to the principle of operation, some homemade shredders are comparable to a meat grinder (they draw in and then grind organic matter), while others are comparable to a coffee grinder.
The design of a garden shredder - we will determine the most important parts of the unit
Crushing of material in a garden shredder is carried out using knives. In finished models, the knife is most often a metal disk with 2-3 cutting surfaces. A large amount of work quickly renders the teeth unusable and they have to be sharpened periodically - you must admit, this is not very convenient, and it also takes up your time. If you decide to make a garden shredder with your own hands, then you can avoid repeating these design flaws, but assemble a reliable, high-performance and, most importantly, durable knife.
We suggest using circular saws with carbide tips for this. You will need not one disk, but several, to assemble a system from them - a package. In ready-made garden shredders, the knife, as a rule, has a thickness of 3 cm, but we can make a package of any thickness - everything will depend on the number of saws purchased. On average, for a high-quality knife 6-10cm thick you will need 15-25 pieces. Each blade has many teeth, originally designed for sawing hard wood. Therefore, grass stems, leaves and branches will be the same to them as seeds. In extreme cases, if the teeth on your saw become dull, nothing will stop you from going to the nearest tool store and purchasing a replacement.
Circular saws can be successfully used as shredder knives
However, the knife is not everything. In order to set it in motion we need an engine. To quickly chop branches in small volumes, it is easier to use an electric motor. Its use may seem somewhat inconvenient due to the cable and the need to connect to an outlet, but it operates almost silently and does not emit exhaust gases. The walk-behind tractor has more power, so it is ideal for those cases where you need to crush coarse material often and for a long time.
Varieties of engines for assembling homemade products
Electric and gasoline engines removed from unused equipment are used as a drive for homemade products. Each of these two options has its own advantages and disadvantages. Models with an internal combustion engine are more convenient in that their operation does not require a nearby power supply. But in general, they are more expensive and have a more complex design than their counterparts equipped with an electric motor. Therefore, it is easier to make electrical equipment, and also more compact.
The maximum thickness of cut branches that a branch chipper can grind depends on the power of the electric motor installed on it and the characteristics of the knives.
- Models with a motor up to 1.5 kW are capable of grinding sticks up to 20 mm in diameter. They are designed for low intensity work.
- If an electric motor of 3 to 4 kW is installed, then such units can chop branches up to 40 mm thick.
- More powerful electric motors (over 4 kW) are used to make a shredder for wood with a diameter of 7-15 cm.
The drive of the last category is equipped with equipment if it is necessary to constantly perform large volumes of work associated with the processing of waste of various thicknesses.
To create a homemade shredder, you can use electric motors from an angle grinder, washing machine, or trimmer. They must be adapted to work from a stationary network with a voltage of 220 V. In order to grind material as thick as possible at home, it is recommended to equip the shredder with an electric motor of 1500 rpm with a power of about 3.5 kW. This parameter for internal combustion engines corresponds to 5-6 horsepower.
Motor from an old washing machine
Shredder design for branches and grass
The purpose of the unit is to quickly and safely grind plant debris. The main function is performed by the cutting block. The knives are driven by the engine directly or via a belt drive. The units are installed on a stable frame. The moving elements are covered with a casing. Two compartments are made for feeding branches and unloading chips.
Metal frame
A homemade shredder with a powerful electric or gasoline engine needs a stable, durable frame with space to install the engine and a rectangular support for the cutting unit.
To make the shredder frame use:
- profile pipe 25;
- corner at 30;
- channel.
Fasteners:
- ears for the engine,
- nuts,
- hairpins.
Engine
Full autonomy, work anywhere in the garden, independence from the outlet - the advantages of a gasoline engine. A homemade shredder for processing branches, tomato tops, and grass is equipped with a motor from a motor-cultivator or walk-behind tractor with a capacity of 6 liters. With. It is moved from one unit to another.
You need a gearbox that provides 90° rotation if the gasoline engine has a horizontal shaft and the chopper has a vertical shaft.
Electricity costs are lower than gasoline, so if there is a network on the site, an electric motor is installed on the unit. To chop branches 2-3 cm thick, a 3-phase electric motor of 2200-3500 W is sufficient. When making a low-power grass cutter, they take engines from household devices. They are removed from washing machines and vacuum cleaners.
Knives
The thickness of the branches processed by the shredder depends on the design of the cutting unit. In home-made designs, several options are implemented:
- to grind branches with a diameter of 7-8 cm, several cutters are installed on the shaft;
- hammer-type cutting block for grinding thin rods;
- the universal cutting mechanism is made of 15-30 circular saws mounted on a shaft;
- knives from factory garden equipment - brush cutters, lawn mowers;
- chop grass - trimmer line;
- stump crusher from a plane;
- two shafts with 3-4 steel knives for cutting branches of bushes and trees.
Homemade knives are made from springs.
Protective cover
To prevent chips from flying around, you need a protective cover. It is made from sheet steel with a thickness of at least 1.5 mm. Tin is not suitable for this purpose. During active use of the shredder, it quickly becomes deformed from strong impacts of wood chips.
Container for receiving sawdust
Old shopping bags, boxes, buckets, and bins are used to collect small garbage. For powerful units, the bunker is welded from steel sheets and riveted from galvanized steel.
Electrical wires and start/stop button
To turn on and off a homemade unit, use a push-button station designed for the appropriate current. Its purpose:
- turning off and turning on electrical equipment;
- changing the direction of rotation (reverse).
To connect the engine to a three-phase network, you need a five-core flexible copper cable in double insulation; for a single-phase household network, a three-core cable is sufficient.
Types of cutting attachments used
Homemade products, like factory units, are equipped with cutting attachments of various types:
- disc (with three blades);
- milling-turbine (universal).
The first type is flat blades. When they rotate, they grind plant debris. If you have to process branches, then such blades quickly become dull. Milling knives are a cutting shaft in the form of gears from circular saws. They grind dry waste from branches and grass well, and clog the cutters with wet waste. Milling-turbine cutting attachments can cope with thick and undried branches, but making them yourself is difficult.
At home, knives from lawn mowers or made from wood saws are often used.
It should be taken into account that the degree of processing of plant waste directly depends on the installed cutting attachments. The output is pieces of branches from 10 cm long or shavings or dust.
Types of DIY Gardening Devices
All homemade products can be divided into 3 types :
Chip cutters are designed for chopping branches and completely dried large green mass, that is, thick stems.
They are poorly suited for processing and grinding fresh or slightly dried green mass, that is:
More often the chipper is made in the form of a rotary chipper . We talked about how this device works, its operating principle, and how to make it yourself, and showed it on video in these articles:
A homemade device of this type effectively grinds branches of a certain thickness, turning them into small chips that can be used as :
The mulcher is designed for chopping fresh and dried green mass, but is not suitable for processing dry tops and any branches. Its basis is the line cutting module, which we talked about here.
Chopped green mass can only be used as decorative or agricultural mulch , which is where the name of the device came from.
The shredder is designed for coarse chopping of branches, so the finished wood chips are used only for heating.
Industrial shredders provide the ability to produce chips of normal size, but in home-made devices, the most important quality is considered to be simplicity of design and ease of manufacture, which causes an increase in the size of chips.
Garden shredder from washing machine
An old Soviet-made washing machine with a metal body is a technique that contains almost all the necessary parts for assembling a garden shredder. You only need knives with fasteners, as well as an extension cord.
To make a cutting attachment, you can use an old wood saw.
Tools you will need:
- angle grinder;
- pliers;
- spanners;
- screwdriver;
- electric drill;
- hammer;
- tape measure with marker.
The washing machine motor has a small power (different models have different power), which is indicated in the instructions for the household appliance or on the electric motor plate. Due to the fact that its value usually does not exceed 500 watts, with the help of the created unit it will be possible to grind only straw or grass.
A shredder from a washing machine is made like this.
- The body of the machine is cut to height so that it is convenient to work with the unit.
- At the bottom side, a rectangular hole is cut in it with a grinder, 20 cm wide and 7 cm high, intended for throwing out ground plants.
- Around the slot, a kind of casing is made of tin, which will direct the herbal mass into the collection container, while preventing it from scattering to the sides.
- They make legs.
- Attach the body to the stand.
- 2 holes with a diameter of 7 mm are drilled on the electric motor shaft. Then a threaded bushing is placed on it, as well as holes at the end more than 5 cm long, securing it with bolts.
- An electric motor is secured under the bottom of the box using studs and nuts.
- Inside the casing, knives are secured to a sleeve, placing them above the grass ejection hole or at the same level with it.
- The box is attached by welding or bolts to the stand.
The result will be a technique similar to the one shown in the photo below.
The start button will come from a converted washing machine. You just need to make sure to connect the extension cord of sufficient length.
The design and operation of a grass cutter from a modern washing machine is shown in the video
Drawing up a drawing
In order to avoid having to redo a partially assembled garden apparatus, you need to carefully draw up a drawing, taking into account the size and shape of all available parts.
This will be facilitated by countless forums where users discuss better configurations and technical solutions.
When drawing up a diagram, you can find the placement of mounting holes and welds. This will allow you to first make individual parts with pre-drilled holes, and then attach the appropriate units to them without adjustment.
Ready-made drawings can be found on the Internet, after which, based on them, you can make a new drawing with dimensions that will take into account the features of the available parts and devices.
The main advantage of this method is that it eliminates the need to independently determine and calculate the overall configuration of the finished device and the placement of the main parts.
Here are drawings of some devices that can be used as basic ones:
- Drawing 1 - This is a standard design for a stationary rotary wood chipper that works great as a garden chipper.
- Drawing 2 - This is the design of the 1st shaft of a two-roll shredder. With some modifications, it can also be used in single-shaft shredders.
- Drawing 3 – Design of a two-roll shredder.
- Drawing 4 – Drawing of a weed grinder with an electric motor, but instead of an electric motor you can install an angle grinder or a drill.
READ Stihl 180 Chainsaw Doesn't Reduce Speed Reason
Homemade grass grinder from a grinder
A grass grinder made from a grinder is a fairly simple and quickly implemented option. To implement the project, you will need to stock up on the following parts and materials:
- steel corners;
- metal container (regular boiling);
- homemade or ready-made knives (for example, from a lawn mower);
- fasteners;
- sheet metal.
Tools you will need:
- electric drill;
- welding machine and electrodes for it;
- an angle grinder to cut corners;
- spanners.
To assemble a shredder with your own hands based on an angle grinder, capable of grinding not only grass, but also branches up to 4 cm thick, it is recommended to use a power tool with a power of over 3 kW.
The creation of a grinding unit is carried out in the following sequence:
- cut the corners into pieces with a grinder;
- a frame resembling a chair is welded from them;
- weld a shelf from a piece of sheet metal;
- attach the grinder to the made frame (on the stand) with clamps, placing its shaft towards the top;
- cut a hole about 10 by 10 cm in the side of the boil-out;
- a sleeve, for example, made of tin, is attached to the slot, through which the ground plant mass will be dispensed from the container;
- make a hole in the center at the bottom of the boil;
- install the container on the angle grinder shaft and attach it with bolts or self-tapping screws to the metal frame;
- Place the knife or disc on the angle grinder.
The result will be the design shown in the photo below.
The dimensions of the corners are selected individually to make it convenient to handle the mechanism.
It should be remembered that the frame must be stable. The safety of working with the device will depend on this.
Place a bucket or other container under the pipe for dispensing chopped grass with branches while working with the unit so that the processed plants do not fly away.
The created device can be improved. To do this, you will need a grinder shaft attachment about 15 cm long with two knives: at the upper end and in the middle. The blades are separated by a mesh attached to the casing wall.
Common options for the simplest do-it-yourself branch choppers
Although it may initially seem that making a garden wood chipper is very difficult, but in fact this procedure is not difficult for a person who knows how to handle power tools.
You need to start making a garden shredder by preparing a detailed drawing. The sketch indicates the dimensions of each part and assembly that will become the basis of the tool. Making a drawing will simplify the procedure for building a chopper with your own hands. The photo below shows examples of drawings developed independently, on the basis of which the working tools were designed. They can be used as a basis for the production of your own modifications of shredders.
Diagram of a garden shredder with two drums
Diagram of a disk chipper
As a rule, few of those who decide to make a garden shredder on their own tend to spend a lot of effort, time and money on it. That is why the material discusses the simplest types of garden shredders, the construction of which any master can handle. The most common options for shredders are:
- From Bulgarian.
Every craftsman has this indispensable tool on his farm, from which you can make not only a circular saw, but also a branch chopper. The advantage of this tool is its powerful electric motor. It will be interesting for everyone to know how to make a garden shredder for branches from a grinder. - From an old washing machine
. If you plan to dispose of your washing machine, then we recommend holding off on this matter. After all, this device can be used to make a quite decent shredder of small branches and grass. - From a circular saw
- if the farm has this tool, then it can be used not only for sawing large logs, but also for chopping small branches, producing wood shavings and wood chips. - From a drill
— the capabilities of this universal tool can be expanded by making a garden crusher out of it. All you need to do is secure a two-blade knife in the chuck. - From a gasoline engine from a walk-behind tractor
- if the farm has a powerful electric motor, then it can be used to make a good shredder for crushing small and large branches.
Next, we will look at the instructions for making garden crushers for branches and grass with your own hands. Based on the options presented, you can choose the best one for yourself to implement at home.
Instructions for making a garden shredder from a grinder with your own hands
A large number of revolutions of a power tool such as an angle grinder can be used to chop small branches. To make a garden shredder from a grinder, you need to follow these steps:
- Take a steel plate 2-3 mm thick and 150x300 mm in size, and make a blank from it. To do this, you need to drill a hole with a diameter of 100 mm in the central part. To do this, you can use a drill, grinder and file.
- Drill 4 holes with a diameter of 4 mm around the perimeter. They are needed to secure the plate to the grinder.
- Using studs, nuts and washers, we attach the plate to the angle grinder.
- We fix the tool to the sheet with additional steel plates using a welding machine and bolt connectors.
- A rectangular hole is cut in the sheet, which is needed to feed the branches to the rotating disk.
- As the cutting part we use a 4-blade disk from a trimmer, attached to the tool spindle.
- The working part of the tool is ready, so all that remains is to make the body and test the unit. We use an old OP-35 fire extinguisher as the base for the body. Cut off part of the fire extinguisher and weld to it the mechanism obtained earlier from the grinder.
- The remaining projections are covered with steel plates.
- Weld a cylindrical base to the resulting hole, into which the material for grinding will be fed.
- At the final stage, weld the legs to the resulting tool and begin testing it. To avoid having to collect sawdust from the ground, place a bucket under the lower part of the tool.
The resulting grinder for branches can also be used for crushing various plant debris, such as flowers, grass, etc. As you can see, the procedure for making a crusher from an angle grinder yourself is not at all difficult and does not take much time.
Another version of a garden grinder made from a grinder is shown in the photo above. To make such a tool, you will need to put in even less effort. The disadvantage of structures made from angle grinders is the need to supply branches to the chopper in small quantities, so you have to spend a lot of time. However, this method of disposal is much more effective than chopping small sticks manually using an ax or pruning shears. Below is a selection of options for homemade shredders that can be used as a basis when designing your own tool.
Grass chopper made from an angle grinder and a tin can
A simple grinder for grass from a grinder
How to make a garden shredder for branches from a washing machine
To make a branch chopper from a washing machine, you will need a tank that will act as a hopper. In the central part of the tank, drill a hole of the appropriate diameter for the electric motor shaft. The cutting element is attached to the shaft and securely fixed. Knives can be made from high-speed steel.
The electric motor used from the washing machine has very low power, so the resulting design should be used for grinding small branches and grass. It is important to consider that the hole in the tank through which the ground branches and grass will come out must be of small diameter. The larger its diameter, the smaller the size of the crushed fractions.
Garden shredder made from a circular saw - DIY technology
An effective and high-performance shredder can be made from a circular saw, but its manufacture should be approached more responsibly. To supplement a circular saw with a shredder, you will need to do the following manipulations:
- Turn out a new shaft onto which the cutting blades for the circular saw will be mounted.
- At least 20 cutting discs are used, which must be mounted on the shaft with a distance of 10 mm from each other. To maintain this distance, plastic washers are used when placing disks on the shaft.
- The teeth of the discs should be arranged in a chaotic manner for more efficient crushing of branches from which chips will be obtained. Arranging the teeth in a row is strictly contraindicated, as it increases the likelihood of impacts. The optimal arrangement of crusher disks is in the form of a herringbone, which will not only ensure high grinding efficiency, but will also simplify the subsequent cleaning of the cutting elements.
- Particular attention is paid to the hopper and the receiving part, for the manufacture of which sheet steel and a welding machine are used.
- A pulley is attached to the shaft, which will be connected to the electric motor via a belt drive.
The appearance of the finished chopper for branches made from a circular saw is shown in the photo below.
It is also worth noting that the chopper is assembled on a separate frame and is rigidly fixed to the circular saw table by welding. In this case, the functionality of a circular saw is retained, which can be used at any time.
The resulting unit can be used for commercial purposes, because the crushed material is wood chips, which is used to prepare natural smoked meats. The video below shows a similar version of a crusher assembled from a set of saw blades driven by an internal combustion engine from a walk-behind tractor.
How to make a garden shredder from an ordinary drill
If the electric motor of an angle grinder can cope with crushing small branches, then when using an electric drill, it is important to understand that its drive is much weaker. You can use a drill to chop grass and leaves. The finished material is used to feed domestic animals, such as chickens. The principle of making a grinder from a drill is to perform the following manipulations:
- A wooden stool is used as a bed, in which a hole is drilled for installing a power tool.
- A plastic bucket will serve as a bunker. It will carry out the entire process of grinding the material.
- P18 steel is used to make the knife. The blades are sharpened at an angle, and the knife is mounted on a pre-prepared shaft made from an ordinary threaded rod.
- The shaft with the knife is mounted in the tool chuck, after which you can begin testing the homemade tool.
You shouldn’t expect high performance from such a tool, but for crushing grass and leaves, this is the best solution. After all, at minimal cost, you get an effective unit that can also cope with crushing feed pumpkin, corn and other crops for farm animals.
Instructions for making your own wood chipper from a gasoline engine
To chop large branches you will need an appropriately powerful drive. If the farm has an internal combustion engine (for example, from a walk-behind tractor or chainsaw), then it can be used to make a highly efficient and reliable machine for crushing branches with a diameter of up to 15 cm. Before considering the process of manufacturing such a unit, it should be noted that as a drive You can also use an electric motor of appropriate power.
The process of making a single-drum wood chipper with your own hands from a gasoline engine involves performing the following steps:
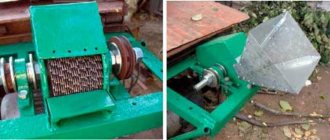
- Initially, the cutting mechanism is manufactured. Its components are such parts as a shaft, a drum blade, a pulley and a flywheel. All these components are fixed on a pre-prepared frame made of metal corners and a channel. The appearance of the cutting mechanism is shown in the photo below.
- The cutting element is created from a cylinder and six steel plates, which are welded to the walls of the base. Holes are drilled in the plates to which the knives will be attached.
- The knife for the crusher is made of high-speed steel R6M5 with a thickness of at least 5 mm, and is sharpened at an angle of 30-35 degrees.
- The knives are attached to the drum using bolt connectors. It is very important that during the rotation of the drum the knives do not touch the base of the structure, but at the same time the gap is minimal, as shown in the photo.
- Using two channels of equal size, a frame is made in which a shaft mounted on bearings is fixed.
- A pulley is attached to the base of the shaft on one side, through which the shaft will be driven by an internal combustion engine or electric motor.
- On the other hand, a flywheel is mounted on the shaft. It plays the role of an eccentric, increasing the torque, as a result of which the operating efficiency of the installation increases.
- Metal corners are used to connect the channels. The structure is attached to a base, which can be used as a table from a circular saw.
After manufacturing the cutting mechanism, you will need to install a gasoline engine and build a bunker for transporting the crushed material.
- The engine is mounted in the upper part of the structure using bolts. You can use an electric motor from a circular saw, which can be located in the lower part. The motor shaft is connected to the driven shaft of the cutting mechanism using a belt drive. The advantages of this method of transmission mechanism were already mentioned at the beginning of the material.
- Sheet steel is used as a receiving hopper, which is bent in the shape of the letter U and attached to the frame of the cutting mechanism.
- On the other side of the cutting mechanism, a square pipe up to 1 meter long and of the appropriate cross-section is installed. Along it, the crushed material will be directed to the exit.
- A hole is cut in the bottom of the pipe through which the crushed material will exit. Here you can weld hooks for hanging a bag into which the wood chips will immediately flow.
This completes the process of making a homemade garden shredder from an internal combustion engine. A similar design can be used to crush branches of various sizes. The resulting fractions of crushed material are used as mulch or fertilizer. You can watch the video to see what a DIY petrol wood chipper is like in action.
Grass cutter from trimmer
A garden shredder can be made using a gasoline or electric trimmer. In this case, the tool will work in an upside-down position. To create equipment designed to chop grass and thin twigs, you will need, in addition to a brush cutter with cutting attachments, the following materials:
- plastic or metal container with a volume of at least 50 liters;
- approximately 1 sq.m. steel mesh with small mesh size;
- about 3 meters of metal tube (aluminum or steel) half an inch in diameter;
- a piece of board or moisture-resistant chipboard, plywood of such width that the trimmer fits on it;
- clamps that will attach the brush cutter to the wooden base;
- self-tapping screws, bolts, nuts, washers;
- wooden blocks (5 by 5 cm is enough).
To assemble a chopping mechanism from a trimmer, you will need to use the following tools and devices:
- a screwdriver or screwdriver with bits;
- electric drill with a set of drills for wood and metal;
- an electric jigsaw with files for cutting metal or a manual equivalent;
- hammer;
- open-end or socket wrenches;
- punch;
- an anvil or a flat iron plate.
A punch is needed to make it convenient to drill holes with an electric drill. This tool is pointed at the point where the metal needs to be drilled. Then it is hit with a hammer. The drill does not slip out of the resulting recess when drilling a metal part.
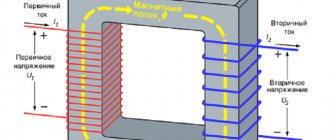
Hole punch set
Preparatory activities
A grass cutter from a brush cutter is manufactured in a number of stages. Initially, they are prepared in a container where the grass and branches will be ground:
- make markings on the bottom (along the perimeter) for four trapezoidal holes with rounded corners;
- drill holes with a cross section of 1 cm in each drawn segment;
- a jigsaw file is inserted into them and trapezoids are cut out;
- process the cuts with a file or sandpaper;
- a hole is drilled in the center of the bottom for the chopper shaft;
- a circle is cut out of steel mesh with dimensions according to the diameter of the bottom;
- using small scraps of boards or blocks, the prepared mesh fragment is secured to the container from below;
- Legs for the container are made from metal tubes, attaching them to the tank with bolts.
The wooden pieces are fixed with self-tapping screws, twisting them from the inside of the tank into metal jumpers between the cut trapezoids. In this way, the mesh is securely attached to the bottom of the container.
The legs are made in the following way:
- bend the tubes in a vice or using a pipe bender in the shape of the letter “P”;
- the ends of future supports are flattened with a hammer;
- 2 holes are drilled into them on each side (6.5 or 8.5 mm cross-section);
- fit the workpieces to the bottom of the container and mark the points of bolted connections;
- drill according to the hole mark;
- using bolts with washers and nuts, attach to the footrest casing.
After preparing the casing, in order to reduce the dimensions of the created mechanism, the following operations are performed:
- disassemble the trimmer, disconnecting the motor, rod and cutting attachment from each other;
- cut off a fragment approximately 20-40 centimeters long from the rod with the cable;
- collect the lawn mower;
- check the performance of the equipment.
Chopper assembly
If the trimmer works well after assembly, then it is used to create a grass grinder.
- The motor of the brush cutter is attached to the board with clamps.
- Fix the bar on a wooden base using clamps and a handle from a brush cutter.
- Connect the cutting attachment to the end of the rod, previously inserted into the hole at the bottom of the casing.
- They start the mechanism and test it in operation.
After these steps, you will get a unit, the photograph of which is presented below.
If the trimmer used to assemble the shredder is equipped with a gasoline engine, then the motor is placed on the base so that it is convenient to fill in fuel, start the device and regulate its operation (speed).
Cutting attachments are equipped with knives or fishing line - this depends on the thickness of the plant stems being chopped.
Assembling the chopper body from metal scraps
Now we had to think about how best to make the side walls of the case. It was decided to scald the plate with corners on three sides. The fourth must be left open, because it is through it that the chips from the ground branches will spill out. And then a large washer caught my eye, which I decided to weld in the center, reducing the diameter of the hole cut earlier. She came at the right time.
The corners were located as follows: a plate was welded on the inner edge, the second edge was directed upward. The washer is also located at the back. This is clearly visible in the photo example.
The corners and washer are welded, work is in full swing
Attaching brackets for fixing the angle grinder
Now it was necessary to think about how to fix the angle grinder in such a way that it could be removed at any time and used for its intended purpose. It turned out to be easy. For this, ordinary lock loops were used. Once upon a time I didn’t finish them, so they were left waiting in the wings. The grinder itself has holes for screwing in the handle on both sides. So it was decided to fixate with them. Having laid the angle grinder on top, I marked the locations of the lugs, after which they were welded. There is no need to be afraid that they will move a little. Subsequently, they can be slightly bent.
We weld the eyes for the lock on which the grinder will be fixed
But eyelets alone will clearly not be enough. In order to chop larger branches, more serious fixation will be required. To do this, it was necessary to weld two pieces of reinforcement, which would act as a continuation of the platform. Their task will be to firmly “hold” the handle of the grinder. They should be located parallel to the eyes with a slight narrowing, approximately diagonally across the square of the platform. This is probably not easy to understand in words, so there is a photographic example below.
This is how the pieces of reinforcement that secure the handle of the grinder will be located
The metal holding rods were thoroughly welded, after which it was possible to try the grinder on the platform. I had to bend the lugs a little to get them to fit exactly in the holes. After the bolts in them took their places, giving the structure a general appearance, it was necessary to think about how to secure the handle of the grinder to the reinforcement rods.
The fastening bolts securing the angle grinder through the eyes are screwed in
The answer came naturally - an ordinary bracket made of a hairpin with threads cut on both sides. It was welded to the reinforcement, and at the bottom there was a small plate with two holes into which these threaded edges of the bracket would go, clasping the handle of the grinder. And the nuts and washers will be tightened from below. The design is simple, but trouble-free, like a Kalashnikov assault rifle. Bringing my plans to life was a matter of five minutes - I found such a bracket with a plate, and therefore did not have to spend time on manufacturing.
The bracket is welded, now fixing the grinder on the platform is as reliable as possible
What else can a chopper be made from?
There are many different options for creating garden shredders with your own hands: from the simplest ones, which only allow you to grind grass, to more structurally complex, powerful units designed for wood up to 10 cm thick. Accordingly, the practical implementation of the plan will require different details, different amounts of time and money.
To assemble equipment for processing plant waste, in addition to the considered options for old or unnecessary tools or equipment, you can use the following devices:
- drill or hammer drill;
- an old working vacuum cleaner;
- unnecessary electric saw;
- motor from the pump;
- gasoline or electric walk-behind tractor;
- any electric motor of suitable power.
A drill with a hammer drill, if you use them to chop grass, you don’t need to redo it at all. It is enough to make only a nozzle with blades. The created device will work like a blender, grinding soft plant stems into a container in small portions.
How to start making a wood chipper
Starting work on creating a wood chipper with your own hands involves choosing the design of the equipment. After all, installations are divided into three main classes:
The next step is to select a suitable drive device. Electric motors or internal combustion engines are used as such. The use of a gasoline engine allows you to get not only a highly productive, but also a mobile unit. However, finding an internal combustion engine of sufficient power is quite problematic, which cannot be said about electric units. If you can’t find one on the farm, you can always buy used ones at an affordable price.
The thickness of the branches that can be chopped depends on the electric motor used. The greater its power, the correspondingly higher the capabilities and service life. When choosing an electric motor for making a wood chipper, you need to consider the following:
It is worth considering that the more powerful the unit, the greater the electricity consumption. If you are wondering how to make a branch chopper with your own hands for your home and garden, then choosing an engine with a power of more than 2 kW does not make sense. Logs with a diameter of 40 mm or more can be cut with a chainsaw and used as heating material.
When the design of the shredder and the electric drive of the appropriate power have been selected, you can begin to prepare the necessary parts. Usually, to obtain these, you cannot do without the help of a turner, but it all depends on the selected device configuration. The final stage in the production of a garden shredder is the preparation of the frame on which the drive and shredding mechanism will be placed.
The nuances of operating homemade equipment
A self-made shredder is essentially three in one: a chopper for branches, a straw cutter, and a mechanism for cutting grass. It helps to significantly facilitate household work associated with the disposal of plant waste, as well as feeding poultry and livestock.
If you have to process grass in small quantities, for example, for chickens, geese, ducks, then very simple devices that operate on human muscle power, for example, a hand pruner, are sufficient.
For homemade electrical equipment, it is recommended to install a separate differential circuit breaker to provide reliable protection against electric shock in case of unforeseen circumstances. In any case, when making a garden shredder yourself, you must follow safety regulations. It is also worth adhering to them during operation of the mechanism. Before working with equipment, it is recommended to wear goggles, suitable protective clothing and check that the structural elements are securely fastened. When creating a home-made unit, you should take into account the upcoming amount of work, as well as the nature of the vegetation being processed, in order to select an engine of the required power and the desired design of knives. This will allow the completed device to cope with the assigned tasks without any problems.
Why is it better to make a chopper yourself?
A rational solution for disposing of branches is to use a garden shredder. This is a special tool that is produced by modern manufacturers. The equipment operates from various types of drive devices, which can be used:
A significant disadvantage of factory equipment is its high cost, which is associated with the use of high-quality materials for production. Not every summer resident can afford a purchase of this kind, especially since its payback will take at least 5 years. The question of how to make a simple branch chopper yourself is becoming increasingly relevant.
The method of making garden tools yourself is in demand for a number of the following reasons:
Naturally, one cannot fail to mention the disadvantages of making a chopper yourself. The main disadvantage is safety, since the slightest miscalculation can result in serious injury or even cost a person’s life. That is why you should get down to business only with full confidence that you can make a reliable wood chipper. A description of the different equipment options presented in the material, which functions no worse than factory products, will help with this.