Types of cartridges for drills, screwdrivers
Often, when carrying out drilling operations, hand drills and screwdrivers are used. When working with them, drills are used that have a cylindrical shank. The tail part of the drill is clamped using a collet mechanism.
Fixing the shank of a drill for a screwdriver or a drill of cylindrical and prismatic shape occurs by wrapping it around the chuck with its cams. Typically the mechanism has three cams and, accordingly, is called a three-cam mechanism.
To understand how to insert a drill into a drill, you need to determine the type of chuck installed.
There are two most common types of chucks for drills and screwdrivers:
- toothed chuck clamped with a key;
- chuck with quick clamping system.
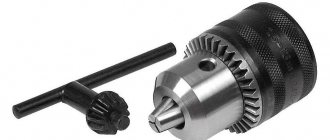
Key tooth chuck
Key chucks allow you to secure the drill in the clamps using a suitable key. The key is a rod with a lever with a small gear mounted on the rod. The chuck has a hole for fixing the key shaft and a circular toothed crown corresponding to the key profile.
In order to compress or unclench the cams, you need to insert the rod into the groove, place the gear on the teeth of the crown and rotate the key in the appropriate direction.
Usually all keys are identical and fit different tools, but there are exceptions. For example, some expensive brands make unique keys with individual sizes and profiles.
In any case, the key, due to its small size, is very easy to lose, and without it, inserting and removing the drill will be very difficult. Therefore, many craftsmen tie a key to the handle of the tool.
Keyless chuck
Drills and screwdrivers with quick-release chucks are convenient because they allow you to change drills without using keys. You can tighten and loosen the drill bit in the chuck jaws manually. The drill is simply inserted into the open clamping jaws, and then the chuck sleeve is rotated by hand in the appropriate direction to tighten.
There are single-coupling and double-coupling chucks.
To clamp two clutch chucks, you should hold the clutch closest to the tool body with one hand and rotate with the other.
With a single coupling chuck, all operations are carried out using only one hand. Knowing these subtleties of the chuck design, you should understand how to insert a drill into a screwdriver.
How to change / insert / remove the nozzle (bit), drill
After selecting the required attachment (bit) for the drill, taking into account the size of the screw head and the configuration of the recesses (straight, cross), it must be installed in the very center between the open cams, and secured in the chuck by turning the sleeve in a temporary direction. If a key type chuck is selected, then the key is installed in the recess on the chuck and then rotated along a temporary path until the nozzle is secured. The end of the nozzle is placed in the groove of the screw. Before starting the device, check the accuracy of setting the direction of rotation; the direction must coincide with the tightening of the screw.
READ How to check amps with a multimeter on a screwdriver battery
Increasing pressure on the start button regulates the optimal rotation speed. When the screw is fully immersed, the force limiting mechanics are activated and then the drill stops.
Types of cartridges for rotary hammers
Although a rotary hammer is a more complex tool compared to a drill and screwdriver, the system for fixing drills and drill bits in the chuck makes it quite easy to insert and remove equipment. The system for fastening equipment in a hammer drill chuck is called SDS (Special Direct System) .
There are three main types of cartridges:
- SDS-plus. The most common fastening system. Can be used on all inexpensive household hammer drills. The drill has two longitudinal grooves and two oval grooves. The fastening system is used in rotary hammers weighing up to 4 kilograms. The diameter of the shank is 10 millimeters.
- SDS-top. This method is used in rotary hammers weighing up to 8 kilograms and is characterized by greater reliability. The system is designed for high impact power. The shank is increased to a diameter of 14 millimeters.
- SDS-max. The fastening system is used on the most powerful rotary hammers. The drill already has three grooves and two oval grooves, and the diameter of the shank is 18 millimeters. Allows to withstand very high torques.
As can be seen from the description, these three systems are not interchangeable with each other, so you need to be careful when purchasing equipment. If you purchase a drill with the SDS-top mounting system, and your hammer drill has a chuck with the SDS-plus system, then you will not be able to install it on the hammer drill.
Installing a drill into a hammer drill
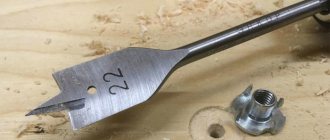
Please note that the hammer drill chuck is initially designed to accommodate drills, not drills. Standard drills have a cylindrical shank with a diameter that matches the diameter of the drill. The drills have recesses and slots on the shank and are made using the SDS system. Although drills for metal or wood with SDS shanks are also produced for rotary hammers.
Below are recommendations on how to insert a drill bit into a hammer drill:
- First of all, you should follow electrical safety precautions and disconnect the tool from the power supply.
- Next, you need to choose the right drill for a specific job. First, select a drill with an SDS system that matches the hammer drill chuck. Secondly, choose the correct drill diameter that will correspond to the size of the required hole.
- Clean the cartridge from dust and dirt. Check that there are no foreign objects or fragments of brick or plaster inside.
- Take the drill by the working part and point it into the chuck all the way until you hear a characteristic click. Lubricate the drill bit periodically before use. This will extend the life of your tool.
- Check whether the drill is seated tightly and whether clamping has occurred. To do this, tilt the hammer drill with the chuck down and pull the drill. If it does not fall out of the cartridge, then the fixation is reliable.
- Connect the tool to the network and carry out the planned work.
After completing work with the hammer drill, you also need to know how to remove the drill bit from the hammer drill. To do this, press your fingers on the top of the cartridge and pull it towards the body. The fixation will loosen and the drill can be pulled out.
The operations described above apply to drills and drills with the SDS fastening system. If there is a need to insert a standard drill, then a special adapter should be used. This adapter has a shank with an SDS fastening system, and its body is a collet chuck with a gear operating system.
Why does a drill bit fall out of a hammer drill?
Quite often, many people encounter a problem when the drill is not securely fixed in the chuck and begins to fall out of it. It should be said right away that if your tool is still under warranty, you should take it to the store for repairs. Next, we will try to figure out what is the reason for the drill falling out and how to deal with it.
This problem occurs for three reasons:
- factory defects in the manufacture and assembly of the hammer drill;
- wear of the cartridge locking mechanisms;
- improper handling of the tool during operation.
If the cause is a manufacturing defect, then the tool should be sent for repair when the problem is first detected. If the cartridge wears out, the only guaranteed way to correct the problem is to replace the cartridge. The drill most likely falls out due to wear of the locking elements in the chuck. Perhaps a repair shop will be able to replace the worn retaining balls, and then you will not have to change the entire cartridge. Such repairs will cost less.
To avoid the problem of the drill falling out, you need to handle the tool correctly when working. Do not forget to periodically lubricate drills and drills, and after work, clean the tool from dust and dirt. When performing work, keep the tool perpendicular to the plane and avoid distortions. Do not put too much pressure on the tool.
Installing a drill bit into a drill
The method of installing a drill bit into a drill will depend on the type of chuck that is available on the tool.
Let's look at how to change the drill bit in a screwdriver and drill:
- Disconnect the tool from the power source.
- Choose a drill suitable for the planned work. Clean the drill, especially its tail part, from dirt and build-up.
- Open the chuck jaws manually if the chuck is a quick-release chuck, or using a wrench if the chuck is of the gear type.
- Guide the drill bit into the chuck with the tail end until it stops.
- Next, fix the drill in the chuck depending on the type of chuck clamping mechanism.
- Check that the drill is securely fixed and that there is no significant play.
If you do not know how to change the drill bit in a drill, then follow the following instructions. Unplug the drill. Then open the jaws of the chuck, which will loosen the fixation of the drill. If you have just finished using the tool, be careful, the drill bit may be hot. Release the chuck depending on the type of fixation - manually or with a key. Remove the drill bit and replace it with a new one. To properly secure the drill, follow the instructions above.
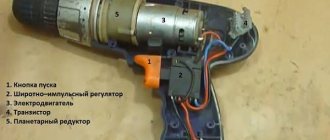
How to use a cordless screwdriver correctly
Naturally, the main feature of a cordless screwdriver is its mobility in operation. It can be used in places where there is no electricity or access to it is limited. When performing various types of installation, assembling furniture and other work, the Screwdriver will become an indispensable assistant. The presence of a second battery in the package allows you to continuously operate the screwdriver by using one and charging the second. When using any tool, you must remember to follow safety precautions, as well as to use it correctly, which will be discussed further.
To start working with a screwdriver, you need to fully charge the battery, no matter if it is a Makita or an inexpensive Chinese tool. It’s good if the screwdriver has an indication of the battery charge level, which will make using the battery convenient. To start charging, you need to connect the charger to the network; the green indicator light will light up. The battery has a special groove, thanks to which it can only be inserted into the charger in the correct way, which will protect the battery from reverse polarity. The battery must be installed tightly so that the contacts of the charger and battery are securely adjacent to each other.
After installing the battery into the adapter, the red indicator will light up, indicating the charging process. When charging is complete, the indicator will change color to green. After the battery is fully charged, install it in the screwdriver. So. you can start working. It is worth noting that the color of the indicators may differ from one manufacturer to another, but the process itself is always the same. Torque adjustment
A distinctive feature of the screwdriver is the presence of an adjusting ring, which is responsible for torque. This feature allows you to avoid excessive screwing in or stripping the screw slot. Thanks to a special mechanism, the chuck stops when the screw is tightened, and the engine continues to run. You can use the adjustment ring to set the drilling mode. In other positions of the regulator, the clutch will begin to slip with a certain amount of force. The engine speed switch (if equipped) allows you to use two speed modes with a lower or higher number of revolutions.
An absolutely necessary thing in a screwdriver. This switch is used to change the direction of rotation of the chuck. In the central position, the switch blocks pressing the start key. In the other two positions, the chuck will rotate clockwise and counterclockwise, allowing screws to be screwed in and out. This key is always located above the start button in such a way that you can change the direction of rotation of the cartridge with your thumb and forefinger without using your second hand.
Installing the bit into the chuck
Screwdrivers can have a keyless plastic or metal chuck, which greatly simplifies the process of installing the bit and removing it, however, many models have hex chucks, i.e. Allows you to directly insert a bit or tool without twisting. To lock a drill bit or bit into a keyless chuck, insert it into the screwdriver as far as it will go and tighten the chuck by hand. You can also hold the front of the cartridge and pull the trigger and the cartridge will unwind.
How to use a screwdriver?
The screwdriver is designed specifically for driving screws, self-tapping screws, and screws. His great dignity. autonomy, that is, there is no need for a socket and the cords should not be in the way. It runs on a battery, which is charged from AC power via an adapter (the process of charging the battery is similar to the process of charging a mobile phone). After charging the battery, press lightly and insert it into the handle of the tool.
READ How to Connect a Bosch Gas Heater
The batteries are nickel-cadmium, nickel-metal hydride and lithium-ion. Which one should you choose? Nickel-cadmium. the cheapest, but toxic. Lithium-ion. environmentally friendly, but expensive. Nickel-metal hydride is intended for professionals who, due to their duty, have to deal with repairs for a long time.
Replaceable tips, bits, are fixed in a three-jaw chuck manually NOT deeper than the top edge. To make it more convenient to hold the cartridge in your hands when attaching attachments, the cartridge is covered with ribbed rubber on top.
How to use a screwdriver? After the required attachment is installed, we put a self-tapping screw on the bit, place it in the right place, and press the screwdriver button. the self-tapping screw is twisted.
The screwdriver can be used as a standalone electric drill. You cannot drill with it for a long time, as the battery discharges quickly. But it is quite possible to make several holes in the profile or drywall.
And yet the main purpose of the screwdriver. tightening screws without drilling a profile. With a certain amount of effort, a self-tapping screw can drill through both aluminum and even steel profiles.
On the tool, if necessary, there is a button for smoothly changing the speed and a reverse button, if necessary. Unscrew the screw back.
The instructions instruct you to use a screwdriver after all settings have been made.
When turning on the tool, you cannot adjust the frequency and direction of rotation of the tip (bit). It is necessary to protect the tool from water entering it. The room in which repair work will be carried out must be well lit.
If the screwdriver operates from the mains, then the power supply must be stable and the outlet. in good working order to prevent electric shock or fire.
Do not touch grounded objects with a working tool to avoid electric shock.
It is necessary to work only with serviceable tools wearing work clothes and gloves. Do not use the device continuously to avoid burnout.
Little tricks
Sometimes craftsmen may have a question about how to insert a drill into a screwdriver if the drill has a diameter less than the minimum allowable. If it is necessary to obtain very miniature holes in radio components, in plastic or metal, sometimes you have to use very miniature drills. And without additional tricks, it is unlikely that you will be able to clamp a drill of this size in the chuck.
The simplest way is to wind thin copper wire (0.2 - 1 millimeter) around the tail of the drill. If there is no thin wire, you can strip the insulation from the stranded copper wire and pull out one core from it. Wind the wire very tightly, turn to turn, without any gap. Trim the remaining length of wire.
One option in this situation is to wrap a piece of paper around a thin drill.
This will increase the diameter of the drill shank and ensure reliable clamping in the chuck jaws.
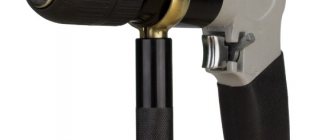
How to insert a bit into a screwdriver. Cordless drill/driver
Cordless drill/driver Bosch PSR 18 Li-2.
A fairly simple screwdriver for home use, the main advantage of the device is a universal lithium battery, suitable for a jigsaw and delta grinder.
Weight of the screwdriver including battery. 1.3kg. That is, He is not heavy, but not light either. In this case, the maximum moment. 46Nm, which is not bad at all.
The speed is adjustable, as in most other screwdrivers and drills. button. Also standard, there is a chuck rotation direction switch located nearby.
The screwdriver has a standard quick-release three-jaw chuck. The maximum drill shank diameter that can be clamped into a given chuck. 10mm.
The manufacturer does NOT recommend using this screwdriver for drilling large holes: more than 10mm in steel, more than 35mm in wood.
To fix a bit or drill in the quick-release chuck of a screwdriver, just fix the chuck with your hand and turn on the screwdriver at high speed. And the chuck will clamp the drill itself.
To remove a drill or bit, you need to switch the screwdriver to reverse, lock the chuck and turn on the screwdriver: the cams will open and release the drill or bit.
The torque limiting clutch has become standard in screwdrivers. At the top of the case, opposite the cartridge, there is an arrow that indicates the number. The larger the number, the greater the torque the clutch can withstand without tripping. There are a total of 10 clutch positions with different torque settings, plus a drill mode. In drill mode? If marked “DRILL”, the torque limiting clutch is disabled. And with the help of a screwdriver you can already drill.
This screwdriver has two speed ranges from 0.400 rpm and from 0.1340 rpm. The speed can be switched using the red slide switch at the top of the screwdriver, in the “backward” position, the screwdriver works in the first. low speed. If the engine is moved forward, the second speed is activated. In addition, the speed number can be seen in the windows next to the switch.
READ Which is Better Makita Or Metabo
A convenient option for a beginner. rotation direction indicator: two triangles at the top of the device will help determine in which mode the screwdriver is operating: a forward arrow means that the chuck rotates clockwise and accordingly turns the screw, if the backward arrow lights up, then the chuck rotates counterclockwise and turns out the screw.
The screwdriver has an indicator showing the charge level of the battery.
And nearby there is a “POWERLIGHT” backlight lamp, which will be a great help when working in poorly lit places.
Drill a wooden block in the “drill” mode, i.e. With the clutch disconnected. For a thin drill, you can turn on the second speed.
To drive a screw, you need to select a bit that is suitable for this type of screw. The main types of splines, pictured from left to right:
- 1) Philips,
- 2) posidrive,
- 3) straight,
- 4) star-shaped (torx),
- 5) hexagonal (hex).
In addition to the shape, the slots differ in size and for each slot size of a screw or screw, you need to take a bit of the right size.
So, the required bit is selected and clamped in the chuck, but to screw in the screw, you should turn on the first speed and set the clutch to limit the torque. In our case, for this diameter of screws we select position “17”.
The photo shows the result of screwing in a screw to different depths. When the screwdriver fully tightens the screw, the screwing force will increase and the torque limiting clutch will begin to operate. Thanks to this, the screw will not go deeper than necessary and will NOT split the block.
The lithium-ion batteries on which the battery is built are very good and you will NOT need to replace the batteries in the screwdriver for a long time.
Related posts in this category:
- Selecting a screwdriver
- Cordless jigsaw
- DIY screwdriver battery repair
- Cordless delta grinder