Without a chuck, the drill will not hold well in the structure of the tool and perform the task. This element differs in design and characteristics, and in order to choose it correctly, you will need to understand both.
What is it needed for?
The drill chuck is an important part that is responsible for reliable fastening of the equipment. Its design is designed to hold the drill tightly without letting go even with high torque. The chuck can be used to rotate a screwdriver or any other tool.
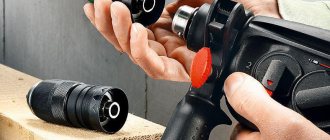
A keyed item assumes that an additional component is used for replacement. The key is made in a T-shape and is located next to the chuck. When turned, it moves the gear, which causes the collar to rotate around the lock, which is responsible for opening or closing.
Sometimes in a chuck design, the user turns a sleeve at the end of the drill to open and close the locking jaws. This fastening holds the working tool better and is easy to tighten by hand, using less force.
On some locks in the chuck design, the number of cams reaches up to six, and the more there are, the tighter the drill sits in its place. Of these, 4 are needed to hold the square bit. If the tool is used to solve household problems, then there are 3 cams and they are self-centering.
Characteristics
A user who frequently uses a drill should know and understand the sizes of chucks that are on the market. In addition to the difference in shank diameter, some require the purchase of a separate adapter or adapter.
By the maximum diameter of the shank you can understand how widely the clamping blades diverge.
In this case it is:
The first sizes are rare, the others are much more common. Based on the power and size of the drill, the manufacturer selects the optimally accessible shank diameter. If this is a small tool, the power of which is only 300 W, there is no point in putting a 0.16 cm chuck on it. If the user cannot clamp the required attachment with the existing chuck because the sizes do not match, then it becomes necessary to choose another one with a larger diameter.
It is worth taking into account the minimum permissible value of the shank diameter, which can be 0.5, 0.8, 1, 1.5, 2, 3 millimeters. It is worth noting that the value of 0.5 mm is found on cartridges that have a maximum value of 6.5 mm, and so on in increasing order.
Another characteristic that you definitely pay attention to when choosing a suitable cartridge is the seat. It can be of two types: threaded and conical.
Modern manufacturers prefer to use the first option in the design of the tool; the second is used on those drills where the maximum shank diameter is 16 mm.
The threaded connection plays an equally important role. It could be:
The most popular sizes are 3*8 and 1*2. They are used on shank diameters of 0.10 and 0.13 cm.
There is only one type of metric thread - M12, it is used for cartridges with a shank diameter of 0.1, 0.13, 0.16 cm.
Among the characteristics of cartridges, you can also select a seat, which is designated as:
In this case, the numbers are the diameter, which is written in millimeters.
The honing head also plays an important role, the design of which depends on the length and diameter of the hole.
They are available for holes:
Last but not least is the shaft, which can be fixed or flexible. The first is located in the drill body, the second is screwed on, its design contains a flexible hose, it allows you to use the tool in hard-to-reach places.
Design features
The design of the cartridge is based on the use of a cam or collet mechanism in its design. Thanks to the element on the tool, you can easily clamp attachments of different shapes and diameters.
The cartridge consists of several parts:
- cylindrical body;
- sleeve rotating on the outside;
- 3 clamping tabs.
The last element plays a very important role in the design of the cartridge, so it is made of high-quality and high-strength steel. All petals are the same size and shape; when the sleeve rotates, they close, fixing the nozzle being used.
This mechanism is simply irreplaceable when using round drills, as it prevents them from turning inside the chuck.
There are several types of collet chucks with jaws inside:
- quick-release;
- key (gear-crown);
- mini-cartridges.
Quick-clamping ones are used without an additional key, which is their main advantage. The user has the opportunity to replace the cartridge quickly and without additional tools. Clamping is done automatically, which allows you to significantly reduce the time for changing attachments.
Putting on a new cartridge + (Video)
After the cartridge has been dismantled, it must be replaced with a new one. To do this, perform the following steps:
1) For chuck threaded connection:
— a new cartridge is screwed onto the propeller shaft in a clockwise direction;
— the screw is tightened in the direction of rotation counterclockwise.
It is recommended to lubricate the threaded connections before installing the drum.
2) For cone connection:
- secure the drill in a vice;
— place the cartridge on the shaft;
- Using a hammer and mallet, install the part in place.
So, to remove the chuck from any drill, you need to know the procedure and be able to distinguish the design features of the connections. The only drawback of all these procedures is the need to replace the cartridge with a new one, because worn parts can no longer be repaired.
https://youtube.com/watch?v=bHoXg6OWKXc
Choice
Most portable drills have chucks screwed onto a threaded spindle that is connected to the drill and then held in place with a locking screw. To understand which element you need to buy to replace the old one, you need to open the petals to the widest point and look into the base with a flashlight. If you can see the screw at the bottom of the chuck, you should pay attention to the type of head. If it is missing, then it is probably a tapered spindle.
When purchasing, it is also worth considering that the element must provide the proper rigidity of the fastening, taking into account the number of revolutions. More expensive models reduce radial runout.
Last but not least is the ease of use of the chuck ; in this case, quick-release ones are in the first position, but when it comes to durability, it is better to buy one with a key.
If carbide drills are used, then the chuck must be self-centering, since such equipment has poor resistance to longitudinal bending. It is important to know that the rigidity of the fastening is always compared with the length of the nozzle and the material from which it is made.
Criterias of choice
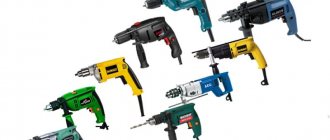
We choose a drill at the market or hardware store according to the following criteria:
- Rated power. You need to know this indicator in order not to accidentally overload the home electrical network and to understand how the device will cope with its work.
- Rotational speed. This indicator is calculated in the number of revolutions per minute. The resulting figure indicates the capabilities of the drill with different attachments when working with materials of different hardness.
- Speed adjustment. It is very convenient to use. With a special regulator you can set or smoothly change the required speed depending on the density of the material.
- Maximum drilling diameter. You need to know this figure so that immediately after purchase you do not render the device unusable by exceeding the permissible limit (ranges from 6 to 250 mm).
- Power mode. Cordless cordless drills are leading the market. They are easy and convenient to work with, they weigh little and have a wide range of functions. Network devices are tied to power supply.
Specifications
Many people are interested in how to choose a drill for the home. First you need to familiarize yourself with the technical parameters indicated in the device passport.
The power of the tool varies from 300-400 to 1400 W. The greater the power, the wider the capabilities of the device (you can easily drill wide and deep holes in strong materials). If you buy a drill to work with wood, the power of 400 W is enough. It must be remembered that the higher the power ratings, the heavier the weight of the device.
Rotation speeds in conventional models reach 3 thousand revolutions per minute, but in professional equipment they can exceed this figure. The more revolutions per minute, the more additional possibilities there are. High speed results in a smoother surface on the walls of the drilled holes. When polishing or grinding with attachments, high rotation speed plays a major role.
When choosing a cordless drill, you need to pay attention to the minimum battery capacity. The higher the number, the longer the battery holds a charge.
Depending on the purpose of the device (for professional or household use), the charging time ranges from 1 hour to 6-7. Often two chargers are included with the drill to avoid downtime: while one battery is working, the other is connected to the network.
The difference between a professional drill and a household one
Professional models differ from household models in terms of load limits (this is the time that the drill can operate without significant damage to the engine). Professional drills:
- designed for intensive use every day;
- have high performance;
- little wear;
- made from high quality materials;
- are expensive.
Such models are suitable for facilitating the work of construction professionals, since they have a rather narrow scope of application. Household appliances have the following differences:
- compactness and ergonomics;
- little weight;
- low productivity;
- versatility and multifunctionality;
- reasonable price.
Such models are great for home work, but you need to remember that during work you need to take short (but regular) breaks of a quarter of an hour. The total amount of work hours is no more than 4.
Design features
The design features of the handle also play an important role. Basically, the drill has a “pistol” handle at the back, but in this position the hand quickly gets tired. If the handles are located strictly at the center of gravity, then less effort will be required, and the accuracy of the work will increase.
Ammo
Modern models are equipped with two types of cartridges:
- Serrated. These are traditional cartridges. Their design is such that the drill is secured for some time with a special key, and this key can be lost at any time. But they clamp tightly.
- Quick-clamping. There are two types: single-sleeve (very easy to use) and double-sleeve (have a clamping and loosening ring). The drill is secured in such a chuck with one movement of the hand. True, their service life is shorter.
Adviсe
Before purchasing, it is advisable to hold the drill in your hands and check whether it is comfortable to work with. The material and location of the handle, the weight of the tool, and the smoothness of switching buttons also matter. It is better to purchase a drill immediately with accessories (drills, chucks, stops).
Tips for use
During operation, breakdowns often occur; for example, parts may fall out of conical types. If an element falls off the tool, you can easily correct the situation. To do this, it will need to be heated in oil to a temperature of 110 C. After this, it is put on the cone.
If the clamping tabs become jammed, the user will be required to remove the chuck, disassemble it, clean it and lubricate it well.
But if a runout occurs, it is better to replace the part with a new one than to look for the cause of the breakdown, since it is often not possible to restore the previous functionality.
It is worth remembering that it depends on the user how long the cartridge will last.
In addition, it plays a role:
- quality;
- operating features;
- how the user works with the tool.
Knowledgeable craftsmen use a tool such as a drill with the following types of chucks: key and quick-release chucks. A drill chuck is a mandatory device designed for fixing drills and other types of drill attachments. Torque from the tool's electric motor is transmitted through gears to the chuck shaft, which is driven into rotation. The product in question plays an important role, so it is important that the device is of proper quality.
Installing the chuck
Installation is in the reverse order. In the case of threaded fixation, you first need to screw the cartridge body onto the thread. Then tighten the control screw. Before doing this, it is advisable to drip a little sealant onto it. For additional fixation.
Installing the chuck on a Morse taper is simple and straightforward.
You need to insert the cone into the socket and hit it sharply. After insertion, check the fixation. In the future, during operation, the cone will settle even more.
Types of drill chucks
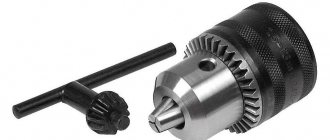
The following types of chucks are used for drills:
- Gear-crown or they are also called key. The main feature of this device is the use of a special clamping key to secure the nozzle.
- Quick-clamping. Clamping of the nozzle is carried out by manual rotation of the clamping sleeve. In turn, quick-release fasteners are divided into several types: double-clutch, single-clutch, and with a special retaining ring.
Gear-crown types are found quite often on electric drills, since a significant advantage of such a product is the quality of the clamping of the fixing nozzle. Such drill chucks allow you to install attachments with a diameter ranging from 1 to 16 mm.
Types of drill chucks
For household and professional drilling equipment, a keyless keyless drill chuck is used.
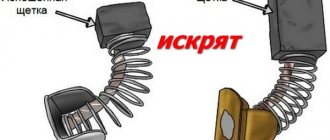
With such a clamp, you can change the drill in a couple of seconds without resorting to the help of a handy wrench. By pressing firmly with your palms, you loosen the mechanism, which will allow you to release the cutting tool from the chuck. The drill is fixed in the same way for further work. This type of chuck works due to a corrugated metal sleeve and a locking spindle.
The disadvantages of a quick-release chuck include unstable clamping. An already worn quick-release chuck does not properly fix large-diameter drills, which leads to turning. Typical for a round shank.
The key jaw chuck must be loosened and clamped with a special key, which can easily be lost over time in work situations. It is interesting that more experienced users of drilling tools prefer a chuck with a key, since a drill or cutter can be clamped “tightly”, for example, even in a vice.
When purchasing a drill, screwdriver or hammer drill with a key jaw chuck, immediately secure the key from the kit to the wire with insulating tape or tie it to a strong cord. There will never be any problems changing the drill.
Mini drill cartridges are very popular among radio amateurs. Such elements are sometimes placed on a drill or mini drill. Can be installed on any tool suitable for drilling. For example, jewelry makers will not be able to perform work without this fastener.
Most often, mini chucks are used for a light drill or household screwdriver. The optimal drill diameter for a mini chuck is from 0.1 to 4.5 millimeters.
It is very convenient to drill microcircuits, mini models and jewelry.
The mini chuck has the simplest design of a quick-release collet chuck. Most often made of brass.
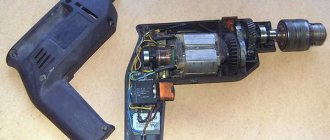
How to remove and change a cartridge with a threaded connection
A threaded drill chuck is installed on the shaft of a power tool and secured by the left-hand thread of the screw. You need to remove the damaged cartridge from this mount, but take into account the non-standard threaded connection.
The above-mentioned screw is located inside the cartridge; logically, you need to unscrew the cams as much as possible, in other words, “drown” them to the limit. This is what the action looks like in the photo:
How to further disassemble the drill chuck? Inside you can see the same screw that can be removed with a Phillips screwdriver. Having gained access to it, you need to unscrew it strictly clockwise with a good screwdriver. There are models of instruments where this screw is not installed. In this case, the cartridge is completely unscrewed from the shaft without any preparatory work.
A screw with a left-hand thread loses the clarity of its groove over time due to inaccurate changes in cutting tools. For convenience, you can hit the screw through the inserted screwdriver with a hammer. This action will deepen the groove without harming the tool.
When unscrewing, you can use a 14 key for convenience.
How then to remove the chuck from the drill? Everything is very simple: unscrew the screw or spindle with a left-hand thread and unscrew the cartridge itself by hand for replacement or repair.
Mounting methods
The chuck is attached to the shaft of an electric or manual drill in two ways - a cone connection and a thread, so there are a minimum of varieties here. In practice, there are devices with metric or inch threads, and on the body of the product, even the smallest one, there is always a marking.
For example, a designation of this type 1.5-15M13x1.2 is deciphered as follows:
- 1.5-15 is the diameter of the tail part of the cutting tool in millimeters;
- M13 - metric thread with a diameter of 13 mm;
- 1.2 - thread pitch.
When using a thread in inches - UNF and the diameter is indicated: 1/2”. This type of connection is considered international and is used in all instruments from foreign manufacturers. For special reliability, a stopper is placed on the shaft, in the form of a screw on the left thread - this must be taken into account when you are confused about how to disassemble the chuck of an imported drill. It only needs to be unscrewed clockwise.
The second method uses a Morse cone, which today is more often called an instrumental cone. The shaft has a conical part at the end onto which the device is mounted, and a small force must be applied for a tight connection. The marking is as follows: B10, where the letter indicates the use of a cone, and the number indicates the diameter of the tail of the cutting tool. This type of fastening is common with screwdrivers.
Further replacement of the drill chuck
It’s not difficult - purchase a chuck suitable for the drill and install it along the threads in the same sequence.
How to quickly remove the chuck from a drill is shown in this short video:
When replacing, take into account the type of connection. There are two of them:
The threaded chuck is installed on the tool according to the above diagram.
It is important to know that the threaded cartridge is marked with two types:
1.5 – 13 - marking of the minimum and maximum diameter for the cutting tool installed in the chuck.
When replacing, observe this marking. If the chuck from your drill shows a value, for example, 1.5 -13 M12, then you should change it to a chuck with the same marking.
The cone type of connection is a little simpler. When replacing the cartridge, simply push it in. The following varieties exist:
It is interesting that any cartridge in the tool store marked “B” means exactly the conical mounting base. The numbers on the marking (from 10 to 18) are the diameter of the lower hole.
How to remove a flare chuck from a drill? The easiest way. The cartridge is dismantled using a regular hammer, knocking it off the pin.
How to remove a chuck from an electric drill
The chuck can be attached to the spindle as follows:
- Cone mount. When a Morse taper (instrumental taper) is used. In this case, the shaft is made in the form of a cone, well polished and minimal effort is required to fit it. Example of marking: B10, where B is the symbol of the cone, and the number 10 is the diameter of the cutting tool shank. This type of fastening is most often found in screwdrivers.
- Threaded fastening. Threads can be metric or inch. If the M13 marking is stamped on the cartridge body, then the thread is metric, 13 mm. If it is inch - UNF indicating a diameter of ½ inch.
However, in order to protect the user 100%, the manufacturer of imported drills also fixes the chuck with a screw, which serves as a stopper and securely fastens it to the shaft.
The screw has a left-hand thread, and very often, when a drill is repaired by inexperienced people, the slot on the screw for the screwdriver is torn off out of ignorance, believing that it has a standard right-hand thread - so you need to unscrew it clockwise.
Knowing the design features of your own drill, removing the chuck does not seem to be a big problem.
In order to change this element, you need to prepare the following tools:
- Pipe wrench No. 2.
- Medium sized hammer. Approximately 400−500 gr.
- Spanners.
- Caliper No. 1, 2 or 3.
- A screwdriver with the required blade shape and section.
- Personal or velvet file.
- Sandpaper.
This list shows the minimum set of tools. It is very possible that during the work you will need something additional.
Threaded connection
Procedure for dismantling:
- Unscrew the locking screw counterclockwise.
- Unscrew the cartridge in the same direction. If there are grooves on the shaft, use a wrench to fix it.
- If the drill is jammed, then you should tap the cams from top to bottom with precise and light blows of the hammer.
- Installation of the device is carried out in the reverse order.
Having fixed the part of the equipment on which the cams are held with a pipe (gas) wrench No. 2, you need to rotate the shaft. The cartridge should unscrew easily after such “persistent” intervention.
Connection with a tool cone: dismantling step by step
Such dismantling is carried out using a hammer and a drift made of non-ferrous metal: brass, bronze, aluminum, copper. However, hammers of this type are still found.
Soft metal will not cause damage to the equipment in the form of nicks and deformations.
You need to do the following:
- Hold the drill with the handle up.
- Gently tap the back of the cartridge around the entire circumference with a hammer.
- After the device is dismantled, you need to clean the cone with fine sandpaper. Remove large nicks, if any, using a file.
- The new cartridge is inserted into its regular place and fixed with a blow from a wooden hammer (mallet).
For old drills made during the Soviet period, we can use another method. In them, on the shaft, between the tool body and the chuck, there is a fairly large gap, and there are flats on the shaft.
Locksmiths, as a rule, acted as follows:
- We inserted the key into these grooves.
- The clamping tool was dismantled by hitting the open-end wrench with a hammer.
The method, of course, is not the safest, given that the key can fly off along a trajectory unplanned by the locksmith and cause injury. There is also a type of drill where a slot is made in the body into which a wedge is inserted to knock out the chuck. Such drills may have two cones: one in the chuck and the other in the drill. These instruments are impressive in size and weight.
Taper drills are considered more accurate in critical drilling because the Morse taper is manufactured to a high degree of precision.
In addition, the conical chuck can be removed with a puller, since each such drill, which does not even have a threaded hole for a locking screw, has a through hole. And if you use a puller with a central pin and rest it against this hole, then by securing it to its counterpart, which has hooks in the form of powerful hooks, you can also remove the firmly attached cartridge. These pullers are used to remove, for example, bearings.