Where is it better to use a keyless chuck?
An important component of the drill is the chuck - it clamps the drill of the required diameter and ensures the correct rotational movements of the drill. There are types and varieties of chucks, depending on the method of clamping the drill - using a special key (used on powerful tools) and a keyless chuck. There are a huge number of drill manufacturers.
With frequent use, each electric tool requires periodic maintenance (prevention) and repair, regardless of:
- Manufacturer;
- Power;
- Appointments;
- And a power source.
With such a chuck, the required drill can be clamped in a couple of seconds without the use of additional power tools. By applying the effort of one hand, the head rotates, and it is necessary to turn the chuck, and the drill socket will increase, thanks to which you can pull out the unnecessary drill and insert the suitable one.
The quick-release chuck is convenient to use both in construction and at home.
Then, by turning the chuck, turn the cylinder again and fix the desired drill for work. If you change drills frequently, the chuck connector may become unusable and the drill will spin, complicating the work process. In this case, it is necessary to replace the cartridge.
Tips: how to change the chuck on a drill
There is a bolt inside the cartridge; you need to unscrew it using a screwdriver. There is a peculiarity here - you need to unscrew it in the opposite direction from the usual - to the right. If the bolt is difficult to unscrew, you can try to fill it with liquid key - it is quite possible that rust has appeared inside over time. After this, use a jerk to unscrew the cartridge directly. There are options when it is necessary to fix the axis on which the part is attached.
For this:
- It has special grooves;
- In this case, the axis will have to be secured with a key;
- And then with a sharp movement unscrew and remove;
- Next, you need to secure the new cartridge.
Before replacing, it is advisable to lubricate the axle so that problems do not arise next time. There should be no inconvenience during assembly. The main thing is not to forget to screw the bolt back in - we remind you that it is also screwed in an unusual direction - to the left. You can now continue using the drill.
It is important to compare drill chucks in the store before purchasing, as they may differ slightly in thread.
Sometimes situations arise when the breakdown of a drill is not related to the chuck connector, but something has gotten into it or is jammed. In this case, it is necessary to remove the cartridge (this process is described above), and then disassemble it for cleaning.
Instructions: how to disassemble a drill chuck
The instruments are popular in Russia and the countries of the former Soviet Union due to their good quality and inexpensive price. The Russian manufacturer, which produces both a drill-mixer and a screwdriver, distinguishes between impact and non-impact drills. The percussion is distinguished by the presence of an additional function - percussion movement.
Depending on the chosen model, it varies:
- Electric motor power;
- Chuck diameter;
- Rotational speed.
The simplest and most effective way to parse is as follows. You need to take a hammer drill, remove the boot from it, install the adapter and put the chuck on it, which was previously removed from the drill, press the chuck against the wall, not forgetting to put a rubber shock absorber between them.
Be sure to hide the cams located in the chuck (elements directly involved in clamping the parts) inside - screw them in.
Next, press it against the wall and turn on the hammer drill in impact mode. That's it, the cartridge is disassembled. We clear it of debris with which it was clogged - it is optimal to lubricate all the insides before assembly. An important point is not to confuse the jaws in the chuck; each jaw must be in its place.
Steps: how to remove the chuck from an Interskol drill
The Interskol drill has a number of advantages. It is light and easy to operate; when working at heights, it is possible to hang it on a belt, thereby freeing your hands. You can change the number of revolutions.
First of all, it stands in the most inexpensive segment in comparison with such competitors as:
There is a function for fixing engine speed: press the switch lever all the way, then press the lock button and release the lever. The speed will be fixed and you can continue to work, at this time you can concentrate not on the pressure of the drill, but on the material you are working with.
There are non-standard options for removing the chuck from a drill; for example, not all Interskol drills have special grooves in the axis for fixing with a key.
The main thing is to never hit the cartridge with a hammer or other tools when unscrewing - you can break not only the cartridge, but also damage the axle. So, first of all, you need to unscrew the bolt, as usual. Next, you can take a gas wrench, grab the edge of the part that needs to be removed, and either jerk or use slow progressive movements to unscrew the cartridge. In order to avoid the problem of the inability to remove the cartridge in the future, be sure to lubricate all parts with lithol or other lubricant.
Removing a threaded cartridge with a reverse screw
In order to remove the cartridge from the axle, we first need to unscrew the central screw. In order to gain access to it, you need to push the cams all the way. Then insert a wrench or screwdriver inside and “pull” it off with a sharp movement. The screw thread is left-handed. The screw itself is filled with sealant and is very difficult to turn.
In addition, it should be noted that in the work it is worth using a high-quality tool. When working with a Chinese screwdriver, the slot simply broke off. At the same time, the screw itself remained in the untouched position. Only a blow to the screw helped, after which the head moved and the process began. After unscrewing the screw, you need to remove the cartridge body itself.
Then you need to unscrew the cartridge itself from the thread. In this case, the thread is right-handed, opposite to the screw. It is very difficult to break the thread, as it “sticks” during operation. A significant amount of effort is required, but the process can be sped up.
In this case, you can use a hex key clamped in the chuck. This will allow you to lengthen the lever, and if there is a “reverse”, use the tool itself. To use the tool, you either need to hold the hexagon in a vice and turn it on, or hit it on the table while rotating at low speeds.
Conical
The Morse method of attaching a cartridge is one of the most reliable, but does not involve complex manipulations. The design perfectly withstands force loads along the axis both in conventional drills and in tools with an impact function. That is why it is so widespread in manufacturing plants.
The cartridge is dismantled in several ways.
- It is necessary to strike the cartridge body with a hammer from below. The main thing is that the blow is directed along the axis towards the landing site of the cutting element - the drill.
- Disconnect the chuck by wedging the surfaces: insert, for example, a chisel into the gap between the chuck and the drill body and, tapping it with a hammer, carefully remove the shaft. In this case, it is very important not to hit in one place, so that the shaft does not skew: gradually extending the chuck shaft, the chisel must be inserted into different places.
- Use a special puller, like those used to remove bearings.
Most hand drills with cone chucks have a shaft bearing mounted inside the tool body. But there are also models where it is located outside. In this case, removal should be done as carefully as possible, otherwise there is a possibility of damaging the bearing. If the shaft is stuck too tightly and cannot be removed, do not hit it with a hammer with all your might.
In these cases, it is recommended to try treating the surface with anti-corrosion agents - kerosene, aerosol WD-40.
Removing and replacing the cone chuck
Now let's look at how to remove a cone-type chuck from a drill. Such products are also called Morse cone, in honor of the founder. Typically, dismantling such options does not cause difficulties, but removal will require the use of a special device. With its help, you can easily and simply remove the cone chuck from the drill.
Even if there is no such device, then you can do without it. The dismantling process consists of the following steps:
- The tool is securely fixed in a vertical position so that the drill is directed downward.
- Using a hammer, it is necessary to apply light blows to the entire surface of the device to disengage it.
- Knockout is carried out until the device is completely removed from the cone.
After removal, it is replaced with a new one. This is done by hammering the product into place using a mallet and hammer. Replacement is most often carried out if one of the cams or springs is damaged.
Quick-release
Depending on the manufacturer and model of the tool, quick-release chucks are attached to the drill in two ways - screwed onto a threaded pin or fixed on special slots.
Don't miss: Should I buy a horizontal or vertical hammer drill?
In the first case, its removal is carried out in exactly the same way as a ring-gear device:
- lower the clamping tabs;
- unscrew the locking screw;
- clamp the hexagon or wrench in the chuck;
- Having fixed the base of the shaft, unscrew it with light blows of a hammer on the hexagon.
The second option with slots is used in modern devices and does not require the use of any tools for removal. Everything is done by hand in automatic mode, easily and naturally. You just need to firmly hold the top ring of the cartridge with your hand and turn the bottom ring counterclockwise until a click appears.
You can also navigate by special marks on the cartridge body. They indicate to what position the lower ring must be rotated to remove the device.
Gear-crown
Classic, refers to cam or collet type clamping devices. They clamp tools with a round shank and cylindrical workpieces for further processing. The main elements of jaw clamps are as follows:
- Cylindrical body.
- An adjusting ring or sleeve that rotates on the outer surface of the housing.
- A collet or cam mechanism in the interior of the housing.
Design and features of the toothed chuck
The classic drill chuck is a collet or cam type clamping device. They can hold not only various tools with a round shank, but also cylindrical workpieces for further processing. The main design elements of jaw chucks are:
- cylindrical body;
- an adjusting ring or sleeve rotating on the outer surface of the housing;
- a cam mechanism or collet installed in the inside of the device body.
Design of a jaw (gear-ring) chuck with a key
In turn, the collet mechanism, the elements of which are made of hardened steel, consists of three absolutely identical cams, which, when rotating the adjusting ring or sleeve, simultaneously approach each other, thereby ensuring reliable clamping of the tool shank. In the first models of chucks for mechanical drills, the collet jaws converged due to the rotation of the adjusting wheel; now an adjusting sleeve is used for this.
On one side, the drill chucks are installed on the shaft of the equipment used, and on the other, the tool with which the processing will be performed is inserted into them. Jaw chucks are primarily used to hold the following tools:
- drill;
- cutters;
- taps with small diameter shanks.
The drill chuck is designed to clamp bits with a cylindrical or hex shank
Analysis of a drill with a Morse taper
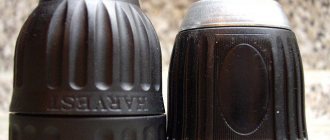
There are drill models that use a chuck not with jaws (jaw chuck), but with a threaded connection (or Morse taper). You can choose an adapter for it, or continue to work with this cone - it all depends on preference. In order to repair a drill or screwdriver, it is important to decide which cartridge. They have a similar appearance, so you need to look at the markings that are stamped on the surface of the part. If the cartridge is marked with the letter B, it is a device with a Morse taper. In this case, you can remove the cartridge using a drift and a plumber's hammer.
How to remove a chuck from a drill (video)
When choosing a drill in a store, pay special attention to the chuck - it determines what attachments you can use during the operation of the tool. It is also important to remember that with frequent use, a situation will arise when it is necessary to remove the cartridge, and it will require cleaning, lubricating it yourself and replacing it. Therefore, to prevent problems with removal in the future, it is advisable to unscrew the new drill and lubricate all parts with lubricant.
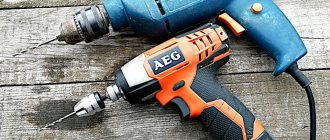
An electric drill is an indispensable tool attribute of both the home craftsman and the professional. Without this tool, it is difficult to carry out any work related to the production of something, as well as installation, dismantling, and so on.
Breakdown of a drill, even of a famous brand, eventually happens. And one of the most common failures of this power tool is the failure of the chuck: both the key and the self-clamping one.
Reasons for replacing the drill chuck
Sooner or later, any part, assembly or any mechanism becomes unusable.
In modern drills, such as Makita, Interskol, Bosch, and so on, the drill and other cutting tools, as well as all kinds of attachments, are fastened using a cam-type device . The cam mechanism consists of 3 or 4 cams, through which the tool is held in the drill chuck. If the device is quick-clamping, then the mechanism is tightened by hand, and if it is a key device, it is tightened with a special key.
There are also collet devices, but they are more applicable in metalworking production. They hold all kinds of tools needed for work.
Reasons for replacement:
- Runout during rotation. This indicates wear on the cams or front shaft bearings.
- Rotation on the shaft. The reason is damage to the thread, if the chuck is threaded, or wear of the tool cone.
In both cases it needs to be replaced.
Beating is a harmful and unsafe phenomenon; it can be characterized as follows:
- The cutting tool does not hold well in the drill, or any equipment.
- Drills jam (in the case when the cone is worn out).
- The holes are of irregular shape.
- The drill shanks wear out.
Main types of clamps
There are two main types of drill clamps:
- Tooth-crown. The shank is clamped with a special key.
- Quick-clamping. The clamping sleeve is actuated by manual rotation.
Jaw chucks, which are installed on modern drills, allow reliable fixation of devices with a shank diameter of 1-25 mm. A device of this type has virtually no disadvantages, the most significant of which is the rather high price.
The most popular clamping device installed on modern drills is the BZP, that is, the quick-release chuck. It takes a few seconds to fix the tool in the BZP, and a special key is not needed. The shank is clamped by manual rotation of the adjusting sleeve, on the outer surface of which there is a groove that facilitates screwing. To adjust the mechanical impact on the tool shank, this type of clamp is equipped with a locking device.
Serious disadvantages of BZP include:
- Rapid wear of its elements.
- Insufficiently reliable fixation of the shanks of drills with large diameters, as a result of which the tool rotates during operation.
But gear-rim products ensure reliable fixation. The only significant disadvantage of these devices is that they require a key, which is easy to lose. However, you can save yourself from this problem by securing this part to the drill wire with insulating tape or rope.
A very popular mini-drill clamp, which is installed on compact drilling devices. Mini-drills are preferred by jewelers. The mini chuck is included in the quick-release chuck category. It is made mainly of brass and is used for fixing tools with a shank diameter of 0.1-4.5 mm.
Gear-crown
Classic, refers to cam or collet type clamping devices. They clamp tools with a round shank and cylindrical workpieces for further processing. The main elements of jaw clamps are as follows:
- Cylindrical body.
- An adjusting ring or sleeve that rotates on the outer surface of the housing.
- A collet or cam mechanism in the interior of the housing.
The material used to manufacture the elements of the collet mechanism is hardened steel, and the mechanism consists of three identical cams that move closer to each other when the sleeve or adjusting ring rotates, ensuring reliable clamping of the shank. In the first models, the cams converged due to the rotation of the adjusting wheel, but now this role belongs to the adjusting sleeve.
The clamps on one side are installed on the drill shaft, and on the other side a tool is inserted into them, with the help of which the work is performed. Jaw chucks are mainly used to hold in them:
- cutters;
- drill;
- taps with small diameter shanks.
How to remove a chuck from an electric drill
The chuck can be attached to the spindle as follows:
- Cone mount. When a Morse taper (instrumental taper) is used. In this case, the shaft is made in the form of a cone, well polished and minimal effort is required to fit it. Example of marking: B10, where B is the symbol of the cone, and the number 10 is the diameter of the cutting tool shank. This type of fastening is most often found in screwdrivers.
- Threaded fastening. Threads can be metric or inch. If the M13 marking is stamped on the cartridge body, then the thread is metric, 13 mm. If it is inch - UNF indicating a diameter of ½ inch.
However, in order to protect the user 100%, the manufacturer of imported drills also fixes the chuck with a screw, which serves as a stopper and securely fastens it to the shaft.
The screw has a left-hand thread, and very often, when a drill is repaired by inexperienced people, the slot on the screw for the screwdriver is torn off out of ignorance, believing that it has a standard right-hand thread - so you need to unscrew it clockwise.
Knowing the design features of your own drill, removing the chuck does not seem to be a big problem.
In order to change this element, you need to prepare the following tools:
- Pipe wrench No. 2.
- Medium sized hammer. Approximately 400−500 gr.
- Spanners.
- Caliper No. 1, 2 or 3.
- A screwdriver with the required blade shape and section.
- Personal or velvet file.
- Sandpaper.
This list shows the minimum set of tools. It is very possible that during the work you will need something additional.
Threaded connection
Procedure for dismantling:
- Unscrew the locking screw counterclockwise.
- Unscrew the cartridge in the same direction. If there are grooves on the shaft, use a wrench to fix it.
- If the drill is jammed, then you should tap the cams from top to bottom with precise and light blows of the hammer.
- Installation of the device is carried out in the reverse order.
Having fixed the part of the equipment on which the cams are held with a pipe (gas) wrench No. 2, you need to rotate the shaft. The cartridge should unscrew easily after such “persistent” intervention.
Connection with a tool cone: dismantling step by step
Such dismantling is carried out using a hammer and a drift made of non-ferrous metal: brass, bronze, aluminum, copper. However, hammers of this type are still found.
Soft metal will not cause damage to the equipment in the form of nicks and deformations.
You need to do the following:
- Hold the drill with the handle up.
- Gently tap the back of the cartridge around the entire circumference with a hammer.
- After the device is dismantled, you need to clean the cone with fine sandpaper. Remove large nicks, if any, using a file.
- The new cartridge is inserted into its regular place and fixed with a blow from a wooden hammer (mallet).
Disassembling and lubricating the chuck
First you need to remove the chuck from the drill or drill press. His cams are spread apart, after which a Phillips screwdriver is inserted between them.
The cartridge is held in place by a screw with a left-hand thread. To remove it, you need to rotate the tool clockwise. Sometimes there are screws with torx slots, so you will need a corresponding screwdriver.
After removing the screw, you need to unscrew the chuck itself from the drill shaft. This is done counterclockwise. If the drill has been used for a long time, then twisting it by hand is not so easy. You will have to fix the shaft. Often the chuck has a chamfer for an open-end wrench, which will facilitate the removal process. If it is not there, then it is better to rip it off by clamping the cartridge with a pipe wrench.
After removing the cartridge, you need to turn it with your cams down and hit it in the center of the back with a small hammer. This is done by weight. You need to squeeze the outer clip of the cartridge with your hand and strike accurately with the striker. It will not be possible to rest it from below, since the clip does not have a protruding end. If the insides of the cartridge are rusty and won't come out, you should first use a penetrating lubricant like WD-40.
As a result, a clamping mechanism consisting of a base, 3 removable cams and a nut cut in half with slots for a special key should come out of the holder.
For ease of lubrication, the two-piece nut is set aside.
Next, the nut halves are installed in place, and the mechanism is returned to the cage. To assemble it completely, you need to hit the clip with a hammer until it sits. This is also best done by weight.
It happens that during dismantling the splines of the screw are worn out, then it is better to replace it or use a hacksaw to cut a new notch on it. If the chuck is lubricated from the very beginning after purchasing a drill, then it can be disassembled very easily and lasts much longer, so it is better not to postpone this procedure.
Don't miss: Cordless screwdriver - an indispensable assistant in the home
Replacement for drill Interskol
The Interskol drill is very comfortable and has an ergonomic handle. Low price is also a common reason for buyers to choose it.
Replacing a chuck on an Interskol drill does not present any particular problems:
- The locking screw is unscrewed. To do this you will need a powerful screwdriver with a Phillips blade. Before unscrewing, it is better to drop kerosene under the screw or use WD-40 lubricant. This method is effective because both of these substances have high penetrating ability and are able to dissolve dried grease or rust. It must be remembered that it is quite easy to damage the screw slot, as well as tear off its head. And if this does happen, you will have to drill out the screw either with another drill, or do it in a workshop environment using a drilling or lathe. When drilling a screw, you need to try not to damage the thread.
- An L-shaped hex key, 10 mm in size or larger, is clamped in the chuck with the short side.
- A sharp blow on the long part of the key should “rip” the stuck thread out of place. You should hit in a clockwise direction. Subsequent unscrewing is done by hand.
You cannot hit the chuck itself with a hammer: you can not only break it, but also deform the spindle. This will lead to the need to disassemble the entire drill and repair it in a specialized workshop.
On some models of drills of this brand, the spindle (axis) on which the chuck is mounted has special grooves (flat) for an open-end wrench. This allows you to securely fix the axle before unscrewing.
If there are no grooves, and the method of hitting the hex key did not help, it is best to partially disassemble the drill by unscrewing all the screws and removing the cover of the tool body.
You can fix the shaft as follows:
- Hold the large gear of the gearbox and the fan impeller with your palm. It is, of course, better to work with durable gloves.
- Unscrew the equipment.
After removing the old tool, installing the new unit must be done in the reverse order, not forgetting to lubricate the threads of the spindle and screw.
It is extremely undesirable to use Litol type lubricants, since when the next replacement comes, the difficulties will be even greater than if the threads were not lubricated at all. This should be done with graphite lubricant or simply machine oil.
Problems with the clamping mechanism
Before starting work, read the instructions for using the tool. This will help avoid many problems. Remember that the drill is not used for routing as the clamp cannot withstand such side load. Select the correct drill, pay attention to its sharpening, mark the center of the drill (using a core).
Sometimes during dismantling the clamp gets jammed . If so, the device is disassembled and completely cleaned and lubricated. This happens especially often after drilling holes in the ceiling, as debris spills into the clamp. If the clamp comes off, increase the tension in the cone joint. To do this, the unit is heated to 110º in the oven and then installed on a cold seat. There may also be beating that occurs due to uneven destruction of the cams or wear of the cone base. Here you need to replace the elements.
When disassembling the clamp, consider its type. After completing the required procedures, reassemble in the reverse order.
How to remove the keyless chuck
This type of equipment was invented by Bosch. These types of devices are widely used in many drills from Bosch, Makita, Hitachi, as well as in screwdrivers. They allow you to change drill bits easily and without much effort, which is especially convenient when working with a large number of drills.
You will need:
- Phillips screwdriver or straight.
- Hexagonal L-shaped key.
- Hammer.
Further:
- You need to unscrew the locking screw. Screws come in different screwdriver sizes.
- Clamp the hex key into the chuck with the short side.
- The drill or screwdriver must be placed on the edge of the table (workbench), so that the device does not lie on the table.
- Using a hammer, apply a sharp blow to the unclamped edge of the hexagon. Direction is counterclockwise.
Step-by-step instructions for analysis
Sometimes it becomes necessary to disassemble it for the following reasons:
- Severe blockage.
- The cartridge is jammed.
- Cam wear.
Practice shows that the simplest and most common method of disassembly can be carried out using a hammer drill.
Step-by-step instruction:
- Remove the boot from the hammer drill.
- We insert a small adapter.
- We push the hammer drill's cams inward, expanding the chuck to the maximum.
- Between the cartridge and the wall we place some kind of shock-absorbing material, a piece of structured polystyrene, for example, or rubber.
- We press the hammer drill together with the disassembled chuck and shock absorber against the wall.
- Turn on the hammer drill, putting it in impact mode.
- After a few seconds, the cartridge parts will be untwisted, that is, the cartridge will be disassembled.
- Now you should remove the cams and perform a visual inspection.
If a drill was used to drill into walls, then there is a high probability that dust, cement, small particles of brick, and so on will be present inside the equipment. It is necessary to remove all debris and, if necessary, wash the parts with kerosene. Then, after wiping the parts, lubricate them with grease.
It is important not to swap the cams. In order to avoid this, you should use markings, signing each of them, as well as the seats.
Next you need to do the following:
- We push our fists forward.
- We install a nut (consists of two crackers), with which you can use a wrench to unscrew and screw the cartridge into place.
- We hide the cams inside the device by unscrewing it.
- We install the cartridge clip in place.
- We press in the clip. This can be done in various ways, for example using a lathe. In this case, the front part of the equipment is clamped into the machine chuck, and the rear part is pressed by the tailstock. A simpler “home” method is as follows: take a massive metal plate, on which the disassembled equipment is placed. A thick washer made of non-ferrous metal is placed on its upper part. Applying light blows to the washer with a hammer, press the clip into place.
Disassembling the key chuck
The key cartridge can be disassembled in two ways: using a hammer drill and using a hammer.
Perforator method
In order to disassemble the cartridge in the easiest way, using a hammer drill, you must perform the following steps:
1. Spread the cams until they are completely hidden in the body.
2. Attach a blunt metal insert in the hammer drill of such a diameter that it fits freely into the threaded spindle hole of the chuck.
3. Rest the cartridge against a solid surface, having previously placed a shock-absorbing pad (for example, in the form of a rubber plate several centimeters thick). As a stop, you can use a thick metal plate held with your free hand, a table, a workbench, or the floor.
4. Start the hammer drill, and after two to three seconds the sleeve (shirt, adjusting sleeve) will be knocked off the chuck.
5. The cams can now be removed from the housing. Attention! When performing this operation, it is necessary to make appropriate marks on the body and on the cams so that they fall into place during assembly. Otherwise, the clamped drill will not be centered.
The disadvantage of this method: when knocking down the clip, some parts may fly apart (for example, a ring with teeth; it usually consists of two halves), and for an inexperienced user it will be more troublesome to put all the components together.
Having disassembled the cartridge, it is possible to clean it from dust, rust and dirt, as well as lubricate the parts.
The cartridge is assembled in the following sequence:
1. Manually extend the cams to maximum.
2. Place the two halves of the serrated ring into the corresponding groove in the housing.
3. Holding the ring with your fingers, you need to hide the jaws inside, turning the chuck body.
4. Put on the sleeve (shirt, adjusting sleeve) until it stops. This cannot be done completely. It must be pressed in with a hammer.
5. To do this, you need to install the cartridge vertically on a special washer so that the sleeve (shirt, adjusting sleeve) rests against it, and the body can freely pass into the hole. Instead of a washer, you can use a bench vise with jaws set to the required size or a piece of pipe of a suitable diameter.
6. Place a gasket on top of the chuck in the form of a thick plate of soft metal (aluminum or copper alloy), and use a hammer to press the body into the sleeve (jacket, adjusting sleeve). That's all. The chuck can be mounted on the spindle and operated.
Using a hammer
This disassembly method is very similar to the previous one, but not all users have a hammer drill, so you can use a hammer instead:
1. First you need to “hide” the fists inside, spreading them to the required position.
2. Install the cartridge vertically on an open bench vice to such a position that the body can pass between the jaws, and the sleeve (shirt, adjusting sleeve) rests against them.
3. Quickly heat the sleeve (shirt, adjusting sleeve) with a hair dryer. Instead of a hairdryer, you can use a blowtorch.
4. Place a shock absorber in the form of a soft metal plate (aluminum or copper alloy) on top of the cartridge.
5. Using a hammer, knock the body out of the sleeve (shirt, adjusting sleeve).
6. After this, clean and lubricate the parts and assemble in the order specified in the punching method. In this case, you can reheat the sleeve (shirt, adjusting coupling) using a hair dryer or a blowtorch.
The disadvantage of this method is the increased “traumatic” nature of the parts.
Also, it is advisable to use heating only in cases of extreme necessity, when it is impossible to knock down a sleeve (shirt, adjusting sleeve) without it. After all, exposure to high temperatures can lead to a change in the structure of the metal, which will make the parts soft.
What to do if the key is lost?
If the key is missing, removing the drill will be quite difficult. The easiest option is to deal with the problem with brute force. The parts of the clamping device are held by the right and left hands and rotated in opposite directions. However, if the chuck is tightened too tightly or the drill has been used for a long time, it is unlikely that you will be able to unscrew the thread.
During operation, parts of the power tool become hot and the metal expands. This leads to jamming. To make releasing the chuck easier, wait until the tool has cooled completely.
To enhance the applied impact, use various tools or homemade devices. Here are some ways:
- Experienced craftsmen loosen the cartridge with several tangential blows with the edge of the right palm. The drill is held with the left hand in a position with the drill facing away from you. The disadvantage of this method is that if you are not used to it, you can injure your palm. And even with a tightly tightened (and even more so misaligned or jammed) mechanism, this is not a way to deal with it.
Don't Miss: Magnetic Drilling Machine: Types of Magnetic Drilling Machines
- Select a metal shaft whose diameter allows it to be inserted into the hole on the chuck. For this purpose, you can use a nail, an old drill, or a hairpin. The main thing is that the metal is strong enough and does not bend from the applied force. The screwdriver is inserted into the slot of the cartridge and acts as a lever (the support goes to the shaft). It is enough to slightly loosen the thread, and you can pull out the drill by unscrewing the mechanism with your hands.
- The cartridge is clamped in a vice or held tightly with a gas wrench. The shaft is inserted into the hole, and then, applying muscular force, the mechanism is unscrewed or tightened.
The second method can help if the chuck is clogged with chips. Then its body is clamped in a vice, and the lever is lightly tapped with a hammer. Vibration causes parts to shift, and the mechanism becomes wedged.
The effectiveness of the described folk methods is significantly less than when using a factory turntable. But it is possible to tighten or loosen the locking mechanism once or twice in this way. After finishing the work, you need to purchase a new key from the store.
Classification of cartridges
The following types of cartridges exist:
- quick-release or self-clamping device;
- collet-type sds devices;
- cam
On a drill with a quick-release chuck, you can change a drill or other attachment quite quickly, without the need to use any additional devices. The cartridges of the first option are divided into single- and double-coupling devices.
Single-coupling devices have a shaft locking system that is activated during tool replacement. They have a significant negative point - very low strength of the fixation elements; the external parts of the cartridge are made of plastic, which greatly increases their damage and breakdown of the entire device.
Repair of this type of cartridge is not provided - only replacement.
Manufacturers use cam-type products on impact models and hammer drills because their design is stronger - they mainly use key-type chucks to securely fasten the drill.
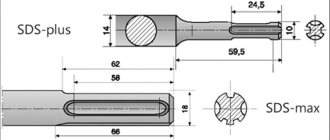
The collet-type chuck was created back in the 70s of the last century; its design differs in that there are two grooves in the tail part, and the drill must be deepened by screwing movements by 40 mm. There are 4 grooves: 2 fixing, 2 for guiding the wedges, the cutting tool is fixed with locking balls.
With a classic gear device, the tightening is adjusted using a chuck key that comes with the drill. To properly unscrew the cartridge, you must follow the recommendations of an experienced technician; to do this, watch this video:
How to disassemble the cartridge
The clamp with a threaded connection is removed taking into account the left-hand thread.
The threaded element is located in the internal part of the device, and therefore the clamping jaws are first moved apart as much as possible, thereby providing access to the fixing screw, which can be unscrewed with a regular Phillips screwdriver. In drills without this screw, the chuck is twisted from the shaft without the preparatory work described above.
The left-hand thread screw that secures the threaded chuck may wear out later. To restore connection reliability , it is recommended to do the following:
- insert a Phillips screwdriver into the head of the clamp screw;
- Using a hammer, lightly press the screw into the threaded hole.
These actions will not lead to damage to the drill mounting unit and will allow you to fix the clamping device on it more accurately and reliably.
Replacing the threaded cartridge can be done using a 14mm wrench. To avoid making mistakes, it is recommended that you familiarize yourself with the theoretical material and watch the corresponding video.
To replace a worn chuck, the old clamping device is removed from the drill and a new one is installed. Both regular and mini drills are equipped with chucks with threads and a cone connection.
When replacing threaded drills, it is important to take into account the markings, which look like this:
- 1.5−13 M 12×1.25;
- 1.5−13 ½ — 20 UNF.
The interval 1.5−13 indicates the minimum and maximum diameters of the cutting tool. The new clamping device must have identical markings to the previous one.
Mounting methods
The chuck is attached to the shaft of an electric or manual drill in two ways - a cone connection and a thread, so there are a minimum of varieties here. In practice, there are devices with metric or inch threads, and on the body of the product, even the smallest one, there is always a marking.
For example, a designation of this type 1.5-15M13x1.2 is deciphered as follows:
- 1.5-15 is the diameter of the tail part of the cutting tool in millimeters;
- M13 - metric thread with a diameter of 13 mm;
- 1.2 - thread pitch.
When using a thread in inches - UNF and the diameter is indicated: 1/2”. This type of connection is considered international and is used in all instruments from foreign manufacturers. For special reliability, a stopper is placed on the shaft, in the form of a screw on the left thread - this must be taken into account when you are confused about how to disassemble the chuck of an imported drill. It only needs to be unscrewed clockwise.
The second method uses a Morse cone, which today is more often called an instrumental cone. The shaft has a conical part at the end onto which the device is mounted, and a small force must be applied for a tight connection. The marking is as follows: B10, where the letter indicates the use of a cone, and the number indicates the diameter of the tail of the cutting tool. This type of fastening is common with screwdrivers.
Some drills are equipped with an adapter for the clamping mechanism, which allows drilling with maximum accuracy.
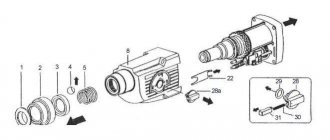
The structure of a drill and types of cartridges for it
So, the drill consists of:
- an electric motor that creates rotational motion;
- a mechanism that transmits this rotation to the clamping device;
- and the actual clamping device for the drill. It is this device called “cartridge” that interests us.
Before figuring out how to remove the chuck from a drill, let’s find out what they are - the algorithm of actions depends on this.
The most common is the gear-crown type. To secure it, a special toothed wrench is used, inserted into the hole on the chuck. The teeth of the key engage with the teeth of the chuck crown and, when the key is rotated, they strengthen or weaken the clamping of the jaws (cams) of the chuck.
Otherwise, such a chuck is called a clamping drill chuck, and is considered one of the oldest among the drill clamping mechanisms currently in use.
Next come the quick-release chucks - with one or two couplings and a locking ring. They use collets - cone-shaped elements consisting of three or more parts. Moving along the axis of the collet, the coupling compresses the “petals,” thereby securing the drill in them.
Clutches (clips) are metal and plastic, regular or reinforced, with or without automatic locking.
In fact, the drill chuck is a separate unit connected to the main drill mechanism by a shaft. The connection is made using a thread or a tool cone (the so-called “Morse taper”).
An indication of this or that type of fastening can be found in the instructions and/or on the drill body. For example, the designation 1.5-15M13x1.2 - the first two digits mean the permissible diameter of the drill shank (or other tool inserted into the chuck), M13 is the diameter of the thread (metric) connecting the chuck to the shaft, and 1.2 is the pitch of this thread . If the designation looks like 1.5-15 UNF 1/2”, we are talking about an inch thread. Domestic drills use metric threads, while imported ones (not all, of course) use inch threads.
If a cone is used to connect the shaft to the chuck, the marking contains the letter B (for example, B10 - tool cone, shank diameter 10 mm).
Given that different companies label their products differently, it is worth taking this difference into account. So, for a Makita drill-driver the marking will look like this: BDF456. B is present, that is, the chuck is fixed to the cone, D is the type of tool, drill, and F is additional capabilities, in this case a screwdriver.
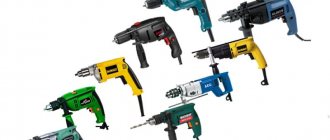
Let's look at the models of the most significant manufacturers on the market - Bosh, Makita, Interskol - what cartridges they use and how to remove these cartridges.
Cartridge mechanism problems
In modern drill models, such as Interskol or Makita, the drill or other attachments are secured by a chuck with a cam mechanism: 3 or 4 cams securely hold the cutting tool; they can only move along the axis of the drill shaft. The keyless chuck is adjusted manually; more complex designs used in modern drills are adjusted using a key.
During operation, a beating of the clamped bit may occur; the cause is wear of the cams during long-term operation. The tool is repaired as follows: you need to remove the device from the shaft; the same actions are necessary when the drill jams, because it can only be removed after completely disassembling the cartridge part of the product.
The following malfunction also occurs: the chuck rotates relative to the tool shaft. The reason for this behavior is damage to the threaded part of the device mount, or subsidence has occurred at the landing cone. The way out of this situation is to replace the cartridge with a working analogue.
Tool for work
Replacing a drill chuck is easy if you know the design of this unit and the methods for attaching it. To carry out repairs you will need a simple set of tools:
- bench vice, you can use not the standard one, but a smaller version for home needs;
- steel hammer;
- carpenter's mallet;
- pliers or pliers;
- medium size pipe wrench;
- set of wrenches;
- calipers;
- screwdriver;
- file;
- sandpaper for sanding.
The list shows the minimum set; there are situations when other plumbing equipment may be required.
Dismantling the cartridge
Depending on how the chuck mechanism is mounted, disassembly methods will vary.
Threaded connection
This structure must be disassembled in this order.
- Carefully unscrew the locking screw.
- We unscrew the cartridge counterclockwise, if the thread is tightened properly, we clamp the tool shaft in a vice. A gas wrench is used to unscrew it. Then we remove the device and inspect it for integrity and serviceability.
- If the drill is jammed in the jaws, then we apply not strong, but precise blows with a hammer using a drift on the cams from above.
Installation is carried out in reverse order. When screwing in a new device, the shaft must be secured against rotation with your free hand. Lastly, tighten the locking device. Video to help home crafters:
Cone connection
Removing the cartridge from the tapered part of the shaft is quite easy. The drill kit should have a special device for these purposes, but many experienced craftsmen use this method: they turn the tool over with the drill down, secure it, and evenly hit the back side with a hammer to knock the device out of the shaft.
After dismantling, you need to sand the conical surfaces using an emery cloth; if there are surface burrs, remove them with a file. The new cartridge is installed in place even easier - by hitting it with a mallet on top, it fits tightly into the joint.
Users need to remember that removing a drill or other attachment when it is jammed in a chuck requires certain skills and ability to handle plumbing tools, but in any case the device must be dismantled. If the chuck on the drill fails, it must be replaced.
The edges of the cartridge fixing screw are licked, what should I do?
What to do if the edges of the screw head are licked off inside the cartridge? A very common problem, which is quite possible to solve. First, let's look at the reasons why the edges on a screw lick off:
- Without reading the instructions, the owner tries to unscrew the screw counterclockwise. If there is a screw inside, then you should twist it clockwise to unscrew it, that is, vice versa
- Incorrectly selected tool, that is, a screwdriver with slots is used that licks the edges of the screw. Before use, you should select the correct screwdriver
- Poor quality screw. This usually occurs on cheap Chinese devices
However, if the edges of the screw are licked off, then do not rush to change the tool. There are different ways to unscrew it:
- If the screw head is cross-shaped, but the edges are smooth, then you can use a flat-head screwdriver. Manufacturers have provided for the possibility of the edges licking off, so you can unscrew the screw not only with a Phillips screwdriver, but also with a slotted screwdriver. Usually this method helps solve the problem
- Use a blow gun to try to clean out any dirt inside the head slots. Often a large amount of dirt accumulates in the cap, which interferes with a quality connection to the screw.
- Take a screwdriver and apply it to the screw head, apply several light but sharp blows. The screwdriver will go deeper into the head of the cartridge screw, which will increase the likelihood of it being unscrewed.
- Cut off a piece of rubber and place it on top of the cap, try to use a screwdriver to catch onto the remaining edges through it, and unscrew it
- If all the methods have been tried, then all that remains is to either disassemble the screwdriver or drill and then replace the executive body together with the shaft from the gearbox or cut the chuck with a grinder. Having opened access to the screw head, you can grab it with a hand vice and unscrew it. The cartridge must be replaced after this method
In this case, there is no need to replace the entire tool.