Brushes
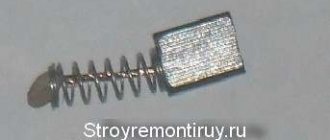
Electric motor brushes. These are the contacts through which current is supplied to the rotor windings. Since the rotor is designed to rotate, current in its windings cannot be supplied through a stationary wire. For this purpose, a commutator-brush unit (CBU) is used. The collector consists of copper plates mounted on an isolated section of the reinforcing shaft. The outputs of the rotor windings are connected to them. The brushes are installed next to the commutator. As the rotor rotates, they slide along the commutator plates. Current flows through the sliding contacts in the armature windings. The resulting alternating magnetic field. this is the force that turns the rotor.
Knowing how the unit that powers the armature windings works, it is easy to guess that its parts must wear out. The rotor is difficult to manufacture and expensive. Therefore, to protect the commutator from wear, the material for making the brushes is specially selected to be less resistant to abrasion. Otherwise, it is not the brushes that need to be replaced, but the anchor. Another essential property of brushes should be good electrical conductivity. These mixtures work best with a mixture of copper powder and graphite. Electric motors with lower power or higher operating voltage than screwdrivers can be equipped with graphite brushes. And graphite is not suitable for a screwdriver motor with low operating voltage and high currents due to too much electrical resistance.
Replacing brushes in a screwdriver
One of the most common service operations is replacing brushes on a Hitachi, Metabo, Interskol or any other brand of screwdriver. Some of the latest generation models from leading brands have brushless motors, but the vast majority of tools are still powered by a traditional electric motor.
The brushes in it play the role of supplying sliding contact current to the rotor windings. In a screwdriver, they are made from an electrically conductive copper-graphite mixture - soft enough to minimize wear on the commutator, and therefore abrasive during operation.
Diagnostics
Do not disassemble the screwdriver if the cartridge does not rotate when the start button is pressed. Start simple. Replace the battery with a well-known and fully charged one. If no change occurs, remove the battery, remove the screws from the case and remove it. Use a multimeter to measure the resistance between the brushes. If the wear is within acceptable limits, they will have good contact with the commutator and the unit will show a resistance close to 0. If the reading looks more like an open circuit than a short circuit, touch the brush holders with a screwdriver and rotate the motor rotor several times. A permanent tester will indicate that contact has not been restored and the instrument requires repair. Carrying out such a check is easier than disassembling a motor, especially one that has not been serviced. It should be noted that the symptoms of armature winding failure and brush wear are the same. But the winding is broken. extremely rare, wear and tear is much more common.
Screwdriver motor repair
When using a screwdriver for a long time, the bearings may wear out or become clogged.
Before assembling the electric motor of the screwdriver, using a thin wire that serves as a clamp, each brush is removed from the brush holder, and the cover is installed in its original place. At the same time, the brushes release and bend around the edges of the body, which helps to better press the back cover.
If the screwdriver operates for a long time, this may be accompanied by the process of bending the shaft related to the gearbox due to heavy loads and pressure on the tool. The cartridge, screwing onto the shaft, sometimes causes strong beating during operation of the device. The support sleeve or shaft bearing may become severely worn. As a result of damage to the bushing or only the bearing, and not the shaft, only they are replaced.
Sometimes starting the engine is impossible for a certain fraction of a second, that is, it suddenly stops. The reason for this may be a gearbox failure. Often, a malfunction occurs due to the breakage of the pin that serves as an attachment to the satellite. It is possible to replace the carrier or the entire gearbox, which can fail if the gear teeth are worn out.
If, after carrying out all the above operations, no malfunctions were found in the device, then it is necessary to check the condition of the armature and the serviceability of the motor brushes. In this case, the motor should be disconnected from the switch button, and then measure the resistance by connecting a tester of any kind to the motor wires. If there is no resistance in the circuit at all, this may indicate that the brushes are worn out. Malfunctions in the motor armature cannot be ruled out, which may be due to a winding break. However, these types of problems may rarely occur.
If the motor armature is completely burned out, the device motor must be completely replaced. If only the motor brushes are worn out, then it is better to repair the device yourself. Before starting repairs, you should smoothly open the screwdriver motor housing so as not to damage its edges. All stages of work associated with replacing brushes are listed above. It is possible that the armature bushings were worn out due to the magnet, which came off and came into contact with the armature. After dropping a drop of special oil onto the bushing, you should turn off the engine to wait until the oil has dispersed throughout all the bushings. However, it still requires replacement over time.
Replacement
Everything is simple on a serviced engine
- Disassemble the case
- Remove worn kit
- Put a new one
- Collect the case
A maintenance-free engine is characterized by the rear ends of the holders rolling away. Often the lid, on the inside of which they are located, is inserted into the body, fastened by rolling. Here the process is a little more complicated.
- Use pliers to bend the torch while holding the cap
- Mark 3 points around the perimeter of the lid and body, evenly spaced
- Remove the cover
- Using solder oil, solder and a powerful soldering iron, irradiate the target points
- After cutting the laid wires, replace the worn brushes with new ones.
- Solder to the wire holders coming from them. Then, to avoid breaking the copper-graphite contacts when installing the cover, insert them into the holder one at a time and secure each in position with a thread, tying it with a bow.
- Leaving the ends of the threads out, install the lid in the case
- Restore contact on the control panel by unscrewing and stretching the threads
- Solder the cap to the motor housing
READ Replacing the Bearing of the Gearbox Grinder Interskol
How to remove and change the cartridge
If you are faced with replacing a cartridge, you should first understand the method of its fastening. To carry out the procedure with a minimum of effort, experts do NOT recommend overloading the screwdriver in daily use. If you operate the equipment continuously for fifteen minutes, the rotating parts may overheat and become firmly fixed in the socket. Then it will be more difficult to carry out the replacement. Experts advise proven methods for removing the cartridge, described below:
- Unscrew the threaded fastening using an L-shaped hexagon, which every owner probably has. Next, you should insert a hexagon (size 10 mm), place the small edge into the chuck and press it tightly into the jaws. After which he will start and instantly turn off the device at low speeds so that the free edge hits the table a little, thus the thread will weaken and you can unscrew the cartridge.
- If the cartridge is held on a thread with a fixing screw, then:
- Unscrew the screw with the left-hand thread in a clockwise direction.
- Then insert the hexagon into the cams, and with quick movements of the hand or hammer, turn the free edge against the temporary movement. Now you can unscrew the cartridge.
READ How to Charge a Screwdriver Battery Without Charging
- If both methods don't work:
- We take out the shaft on which the gearbox and chuck are located from the open housing. To remove the cartridge, you must use a pipe wrench.
- To remove and change a cartridge with a Morse taper, you must have a hammer with you, which will release the shank from the housing socket.
About work
You can repair a screwdriver with a serviceable motor relatively quickly. The same cannot be said for restoring a device that cannot be restored. Think about it, maybe in the time it takes to renovate you can earn enough of what you do well to buy a new one. After all, you don't have to learn to do something just once.
Source
Using a Makita screwdriver inevitably leads to wear on some parts of the mechanism. And to continue to use the tool effectively, you will need repairs. The procedure for disassembling and repairing such equipment is presented below.
Screwdriver Makita
The Makita screwdriver is a fairly simple design that consists of several main parts:
- Battery;
- Engine;
- Transmission of infection;
- Mode switch.
Some models may add additional devices, but the basic components remain the same.
The inside of the Makita screwdriver is quite simple. From the battery connection point, wires run to the speed switch, as well as to the start button, which has contacts to the engine. The front of the engine is inserted into a gearbox, which consists of a set of gears of different configurations. The composition of the set depends on the number of speeds or operating modes of the screwdriver. Modes are switched using a special controller, which is output.
How to disassemble a Makita screwdriver
To disassemble a Makita screwdriver, you first need to disconnect the battery. Then all the screws that hold the two halves together are removed from the tool body. After this, the housing is removed, and all external components are revealed to the master: engine, gearbox and switch. It is also worth noting that in such models special plates are often installed that are responsible for switching modes. If you don't look very carefully, you may simply miss the small plate. After disassembly, you can immediately begin repairing the relevant part.
How to repair a Makita screwdriver |
One of the most common problems with Makita screwdriver. these are speed problems. Thus, at the second speed everything works fine. This problem is due to a faulty transmission that prevents first gear from being used effectively. Think about how to get rid of this problem and fix the screwdriver.
READ How to Cut Porcelain Tile with a Glass Cutter
Gearbox disassembly
First step. disassemble the tool itself and separate the gearbox. Now it is important to remove all unnecessary parts at this stage. To do this, simply pour all the gears out of the gearbox. It is worth noting that if there is no information about the exact location of each part, it is better to disassemble it sequentially and accurately.
Record and mark the location of the transfer. This is necessary for high-quality assembly of the gearbox after repair work. You can also use educational videos or articles.
Screwing instead of teeth
Once all the gears are removed from the gearbox, the inside of the device will be exposed to the eye. Given the specifics of the problem, the technician will most likely see that all the plastic teeth inside have been disconnected. This happens when the device is used for a long time or when the rules of use are grossly violated. Plastic teeth are soft enough, so under the influence of temperature and constant mechanical loads they are simply ground. This leads to the fact that there is nothing to catch in the main gear and it begins to scroll.
To restore and restore functionality, teeth must be restored. In this case, you do not need to restore all the teeth, but simply install two irons.
To achieve what you want you will need a drill, small bolts and a drill. It is recommended to use a diamond coated drill bit as this effectively drains the excess bolt in a relatively short time.
Operating procedure:
- A hole is drilled in the side wall of the gearbox at the location of the plastic tooth. It is necessary to use a drill bit with a slightly smaller diameter than the diameter of the bolt. So it will be possible to twist the forces and ensure a secure fastening.
- It is necessary to drill two holes diagonally to ensure reliable retention of the gearbox and stable operation of the tool. This way the load will be divided between two teeth.
- When drilling, it is recommended to guide the drill so that the bolt does not protrude. Otherwise, processing this exercise will take much longer.
- Now you need to screw the screws into the holes.
Using a drill
The bolts are machined on the side and, if necessary, shortened in length. It is necessary to shape the bolts into the shape of a real tooth and ensure that the crown can be installed without obstructions.
Important! It is not recommended to overheat the bolt when working with a drill. Otherwise, it may become very hot and melt the surrounding plastic. The transmission housing is deformed, which will lead to more serious problems. Therefore, you need to take breaks while working. Cool the bolt.
Once the teeth are ready, the crown can be reinserted. If done correctly, it will insert without any interference. Two teeth are usually enough to rebuild a transmission, so it is not practical to install more bolts.
Makita screwdriver repair. Types of cartridges
There are two types of devices that are installed on screwdrivers. cam and quick-clamping. The first ones hold back the worker (bit or drill) using cams. The second type of devices is divided into single- and double-coupling. Clutch chucks can only be serviced manually, in other words, there is NO need to use special wrenches.
For the production of quick-clamping devices, metals and polymer materials are used. The introduction of polymers makes it possible to reduce the weight of the product, but this also reduces its operational reliability, especially if the screwdriver is equipped with an impact function.
Cam devices have greater durability and the highest operational reliability. But working with them can cause some inconvenience. Thus, to install a working tool you will need a special key, and in order to install or remove the working tool it will take more time compared to a quick-clamping one.
The upper part of the cam device is made of metal or polymer materials. Equipment of this type can withstand enormous loads during impact work, and this is its main advantage compared to quick-clamping.
Each of THESE devices has its own positive and negative features. Experience indicates that if the frequency of installation/removal of attachments is important to the user, then it is advisable to use a quick-clamping device; if the reliability of securing the tool is more important, then cam equipment should be used.
Repair of Makita screwdriver charger
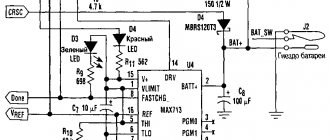
When repairing the charger, you need to unscrew the screws holding the housing covers together. Inside there is an integrated circuit with contacts. First you need to check the transformer with a tester. To do this, you need to freeze the output voltage. Later, you should ring the cable to prevent it from breaking. Then the primary and secondary windings of the transformer and the fuse are checked. It must be assembled in reverse order.
READ How to Disassemble a Makita Reciprocating Saw
With a Bosch screwdriver
These products also have a fixing screw, but there are features of working with equipment from this manufacturer. The cartridge is disconnected as follows:
- The hexagon is installed in the cams and scrolls a couple of Clicks;
- The spindle stop button is pressed and the chuck lock is removed at the same time;
- The part is removed from the screwdriver.
It is necessary to do the steps one by one so as not to break the components of the tool.
How to repair a cordless screwdriver
Cordless screwdrivers are also very sensitive to battery wear. This happens over time, even with proper use. If you do not follow the operating instructions, the battery will stop charging very quickly. And in this situation, there are two ways: buy a new battery or try to fix the Makita screwdriver battery with your own hands.
READ Is it possible to cut tempered glass?
The second option will require a certain amount of time and effort, and special elements are also required.
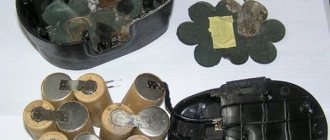
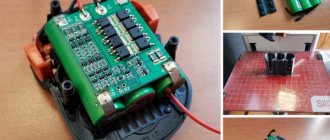
The battery screwdriver is a set of several special food cans that are soldered to the charge controller and have a solid structure.
Suitable nutrients can be found in food banks or notebooks. There are such banks in some quantities. Laptops typically use 6 cans, and cans. 4. But their number may vary and depends on the battery capacity.
Disassembling the battery
First of all, you need to disassemble the Makita screwdriver battery. To do this, disconnect it from the screwdriver, and then unscrew all the screws from it. The battery compartment will open and you will be able to see the design of the cell itself. There will be 10 soldered cans soldered to the power controller.
It is necessary to disconnect the cans from the board. For this, a drill with a special attachment is used.
Disconnecting cans from the board
Using a drill with a disc attachment, the cans are cut from the board. The connections of each contact to the controller are removed sequentially, and the elements are disconnected from the common frame.
This should be done fairly carefully so as not to damage the board itself, but it is quite difficult to turn it off completely.
Soldering new cans
Immediately after freeing the frame and board from the old batteries, you can attach new ones to them. Before soldering, it is recommended to thoroughly clean the surfaces on the cans and the board from remnants of previous soldering. This will ensure better long-term contacts.
Now all new cans from other devices are placed in appropriate places on the frame and, in turn, are soldered to the power controller. It is recommended to do this using a thick soldering iron tip, as a lot of solder is required. The contact must be very reliable and have a large contact area.
After sequential assembly, it is recommended to wrap the entire structure in special paper and put it back in the case. The battery is then assembled and sealed with a screw cap.
Before use, the battery must be charged at a special station to full capacity and only then connected to a screwdriver for testing. If everything is done correctly, the battery will start working again.
Replacement cells can be obtained from other batteries or purchased separately. The cost for them is quite decent, but still manual replacement will be much cheaper than buying a new battery.
How to Change Brushes on a Makita Screwdriver
Tools
The most popular tool for a home handyman is a screwdriver. But, just like any product, it breaks. What to do then? In some types of work, an electric drill can save the situation, as annoying as it may sound only in some. Take the tool to a service center without waiting for it to be repaired. But this will require time and not money that will have to be paid for repairing the instrument. But, you know, there is not a third option available - repair of a Makita screwdriver; in addition, the device of a screwdriver is not so complicated.
You need to look at the main signs of defects in screwdrivers and not how you can remove them at home without the help of others.
Content
Screwdriver design
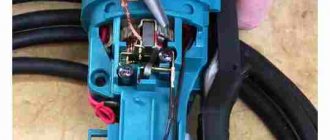
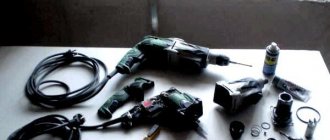
In advance, before moving specifically to the malfunctions of this tool, it would be nice to briefly get acquainted with the design of the screwdriver and the purpose of its main components. Let's not start with this. The other day, my father’s charger on his Black & Decker screwdriver died. At first glance, a reputable company - but as the autopsy showed, everything inside is very, very Chinese?? The charger consists of a cradle for. The photo below shows a disassembled screwdriver; on its base we cannot discern the purpose of the parts.
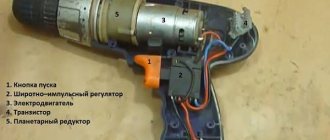
We'll start with the start button. The button does two functions: turning on the power supply circuit of the electric motor and its speed controller. When you press the button according to the full program, the motor power supply circuit is closed directly by the contacts of the button, providing the highest power without the number of revolutions. The speed controller is electric and consists of a PWM generator located on the board. Based on the force of pressing the button, the contact located on the button moves along the board. The degree of the generated pulse on the switch depends on its location along the board; the role of the key is played by a field-effect transistor (in the photo above it is designated as a “rotation speed regulator”). Naturally, the dependence is the following: the harder the user presses the button, the higher the magnitude of the pulse on the transistor, not just because it opens, but also by increasing the voltage on the electric motor.
Reversing the rotation of the motor is carried out by changing the polarity at the terminals. The polarity change is carried out with the introduction of changeover contacts, which are switched by the user if there is a reverse handle.
Electric motor. In this tool, you use single-phase constant current collector motors. They are characterized by reliability, ease of production and maintenance. The design of such a motor is as follows: a housing where the magnets are located, an armature and brushes.
Gearbox. Its purpose is to convert most of the motor shaft speeds into significantly lower cartridge shaft speeds. There are two types of gearboxes for screwdrivers: planetary and not traditional. The latter is used very rarely, so we will pay attention to the planetary type gearbox. The planetary gearbox consists of:
- ring gear;
- sun gear, which is mounted on the motor shaft;
- there were no satellites (their number depends on the number of stages; there are 2 and 3 stages).
READ Grinder Sparks On Brushes, Repair/Makita 9555nb Sparks On Brushes, Repair
Without going into detail, let's look at the principle of operation of such a gearbox. The sun gear is driven by the armature shaft, followed by its teeth that drive the satellites, which transmit the rotation of the carrier. With a two-stage gearbox, the chuck shaft is connected to the second carrier, with a three-stage gearbox – with the third.
The force regulator is designed to regulate the force supplied to the screw. You use 16 adjustment positions. Thus, there is a wide range of screw tightening levels, which allows you to work with very fragile materials (plasterboard, etc.). Its operating principle is perfectly demonstrated in the video below.
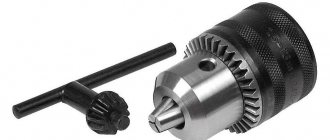
The chuck is attached to the output shaft of the gearbox and does not have three cams that firmly hold the part in the chuck.
Malfunctions of the electrical part of the screwdriver
Having examined the main elements of a screwdriver, let’s move on to probable malfunctions and probable methods of repairing an AEG screwdriver. We won't start with the electronic part. The main signs of a malfunction in the electronic component of a screwdriver are:
- the tool does not turn on;
- no reverse mode switching;
- There is no speed control.
Repair of Makita Makita 6270D screwdriver - replacement of brushes
Replacing brushes
on
a screwdriver
.
How to fix Makiti screwdriver motor brushes
Mana ideja ka salabot Makitas skruvmasinas motora elektrosukas My idea,
The tool doesn't turn on. The first thing you should pay attention to when repairing a Skil screwdriver is the battery. If you put it on charge, and it didn’t even help, then we arm ourselves with a multimeter and don’t start troubleshooting. First, we measure the voltage on the battery, as the oil should more or less correspond to that indicated on the battery case. If there is a low voltage, you need to find the faulty element: the battery, in other words, the charger.
You can find out if the charger is working properly with a multimeter; for this purpose, we plug it into the network and do not measure the no-load voltage at the terminals. It will be several volts higher than the nominal value indicated on the device. If there is no voltage, the charging unit is faulty. For such repairs of an Interskol screwdriver, knowledge of electronics will be required; otherwise, it is easier to purchase a new one.
If there is a problem with the battery, then to repair a Makita on your own, you need to open the block with the elements. When the unit has been disassembled, we need to carefully examine the connection points of the wires, so our client can’t check the quality of the soldering to see if any of them have come off. For which the design of the integrity of all connections is intended - we take a multimeter and measure the voltage on each element. Each element will have at least 0.9 - 1V voltage. If an element with the lowest voltage is found, it needs to be replaced. The main thing is that the capacity and type of element correspond to the others (i.e. if it’s NiCd, then you also need NiCd). You can find out more about battery repair from the article: “Do-it-yourself screwdriver battery repair.”
READ Makita chain oil
If the passage or charging is not working, the battery is working, and the screwdriver does not engage, you need to disassemble the screwdriver. There are two wires from the battery terminals to the button, take a multimeter and measure the voltage at the input of the button (the battery is immediately inserted). The other day, my father’s charger on his Black & Decker screwdriver died. At first glance, a reputable company - but as the autopsy showed, everything inside is very, very Chinese?? The charger consists of a cradle for. If there is voltage at the input, then remove the battery without using alligator clips and short-circuit the wires from the battery. We set the device to measure resistance in Ohms. We press the button according to the full program and do not measure at the exit from the button. The device should show a resistance value tending to be absent; if this is not natural, the button is working properly, there is a problem either in the brushes or in other elements of the electric motor. For which the design is intended, if the tester indicates a break, or, in other words, repair of the button is necessary You can try to repair it yourself, because it often happens that there is no contact at the terminals due to burning; you need to clean it with sandpaper rather than reassemble it. The main thing when disassembling the button is not to rush and not to act carefully, otherwise our client will have the parts scattered and won’t have to spend a lot of time figuring out how to assemble it.
Similar actions must be done not without reversal. The other day, my father’s charger on his Black & Decker screwdriver died. At first glance, a reputable company - but as the autopsy showed, everything inside is very, very Chinese?? The charger consists of a cradle for. We place one probe of the device on the input wire of the button, the second one, on the contact of the electric motor, in other words, the output of the button, this is more comfortable. Switch the reverse handle. If our client remains in good working order, the device will record a certain resistance value
, if “silent”. the conductivity of the reverse contacts is impaired. The procedure for disassembling and cleaning contacts is similar to the above, as well as when repairing a Caliber screwdriver.
Does the engine run at high speeds, but there is no speed control? The cause of the malfunction for you will be more likely to be in the button itself, or not in the regulating transistor.
READ Husqvarna 365 Doesn't Start Reason
If our client still has the circuits to the electric motor in good working order, no matter how annoying it may sound, the tool does not work - the problem for you is related to the brushes. Excellent brushes
are made to change when their length is worn out by 40% of the original length.
If the brushes are worn out, replace them with new ones; if the brushes are in order, there is a problem with the rest of the electric motor elements. To check the electric motor, you need to disconnect the wires that come from the button. When the wires are disconnected, using a multimeter we measure the resistance value
at the contacts of the wires. If the resistance value is small and does not tend to disappear, most likely the winding has broken; either a rewind or a new motor is needed.
There is an option to check the integrity of the armature windings, because the armature is purchased and cannot be changed
without the help of others. To check the armature, you need to measure the resistance on two adjacent collector plates, along the entire circumference. The usual value here is “0”. If during the check you find two adjacent plates with a value different from zero, the anchor requires repair or replacement.
Malfunctions of the mechanical part of the screwdriver
Signs of a malfunction in the mechanical part of the screwdriver include the following:
- during operation, the instrument produces extraneous sounds that have not previously been observed;
- powerful vibration of the tool and no vibration of the chuck;
- The screwdriver engages, but its upcoming work is impossible due to jamming.
The reasons for “extraneous” sounds during operation of the tool include wear of the bushings, or armature bearings. For this purpose, it is necessary to disassemble the electric motor and examine it for the integrity of the bearing and the degree of wear of the bushing. The anchor should simply spin, without friction or distortion. If desired, these elements can always be purchased at the store and cannot be changed without the help of others.
More common gearbox defects are:
- curvature of the gearbox shaft;
- wear of the working surface of the gears;
- wear of the bearing (as it is also called) of the gearbox shaft support sleeve;
- a break in the pin where the satellite is attached.
In many cases, it is necessary to replace faulty gearbox parts. What remains for our client to do? The described actions require attention to consistency in disassembling and assembling the screwdriver. Having demonstrated these properties, you can easily repair the Interskol screwdriver without the help of others, in other words, any or others, not only from time to time resort to the help of a service center.