Replacing brushes on a Colner 820ns hammer drill
If yesterday you thought you once bought a hammer or impact drill, you could use it for generations without warning and today the tool doesn't work, then it's okay, it was meant to happen. Any equipment needs maintenance, otherwise disappointment will come at the most inopportune time. One of the reasons why a tool does not work is the wear of its graphite brushes, and today we will tell you how to replace the brushes on a rotary hammer and briefly explain what they are and why they are needed.
Purpose and placement of brushes
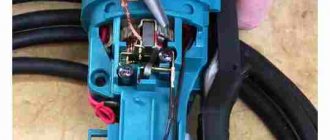
Contact brushes on a hammer drill (impact drill) are necessary to supply an electrical signal to the commutator fittings. Two graphite brushes allow you to switch the direction of rotation using a toggle switch above the trigger, but they are harmful to health and require timely replacement. The brushes are equipped with a contact tail and a spring for pressing against the commutator. The reason for rapid hand abrasion may be:
- — High spring stiffness,
- — Low quality collector, hard ribs that wear away graphite.
In the photo, the brushes are numbered 1 and 2, they are located in special cases to the right and left of the collector.
Replacing the brush
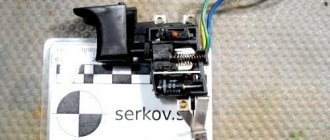
First, remove the top cover from the tool and remove the old brushes. Be sure (!) to turn off the hammer! Take the contact case with a small screwdriver, pull it out by hand and remove the remains of the old brush. Insert the new item into the pencil case, press it against the edge of the pencil case and lower the holder to its original position. Please note that there is a log at the end of the contact wire, and it must hit the mains contact, otherwise the current will not get to the commutator and the hammer will not turn on. Repeat the procedure with the second brush and the replacement is complete.
By removing the cover of the tool, you can do one more useful thing. Lubricate the drill drive shaft (3). Solid oil or special oil, which is included in the factory tool kit, is suitable for this; machine oil is not suitable due to its low viscosity!
Now you can get started without worrying about equipment delays when mixing putty or preparing holes for cornice installation.
Regardless of the brand of hammer drill and its manufacturer, sooner or later there comes a moment of failure. They are electrical and mechanical. The most common electrical problems. This is damage to the brush, which is easy to replace yourself.
Hammer
Brushes. These are parts that are conductors from the cable to the collector winding. The contact of these elements starts the rotation of the armature and regulates its speed. Using a rotating hammer or drill, they switch the direction of rotation using a switch. Even with the most careful use of tools, they tend to wear out and require replacement.
The most common causes of wear:
- Very hard spring
- Poor quality collector that wears out brushes with hard edges
If the power tool is used infrequently, the brushes can be changed once a year to prevent damage. If your tool is intended for intensive daily use, you need to review it. There are some signs that indicate their wear:
- The spark in the collector has increased
- The engine does not develop speed, and the impact power during operation has decreased
Why the beat will ignite
- Incorrect installation
- Worn condition
- Incorrectly installed brush holders
- Bad for a collector
- Parts are compressed too tightly
- The components used are not the same brand as the tool.
Any of the above reasons means: you need to disassemble the hammer and inspect it.
How to extend the life of a Bosch rotary hammer
Bosch rotary hammers require mandatory technical inspection and maintenance. To operate rotary hammers correctly, you must:
- prevent dust from getting into the cooling holes (you can wear a nylon stocking or use a vacuum cleaner);
- lubricate the drill shanks with special lubricant;
- do not overheat the power tool (if overheated, the lubricant crystallizes and stops lubricating the rotating parts);
- during intensive work, replace the rear rotor bearing every 6 months; change carbon brushes after 70 hours;
- when drilling holes in the ceiling, turn the hammer drill down and rotate it in this position to allow the lubricant to flow into place;
- After work, be sure to blow out the insides of the hammer drill with compressed air;
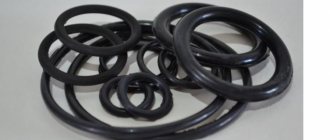
- change the rubber cuff on the hammer drill chuck more often;
- prevent sparks from appearing on the commutator brushes in idle mode;
- the duration of continuous operation should not exceed a 30-minute interval;
- Do not use the “Shock” mode often.
READ Replacing the Brake Ring on the Zubr Motoblock
When starting to repair a Bosch 2-20, 2-24, 2-26 rotary hammer, read the lubrication chart indicating lubrication points and lubricants.
Bosch hammer drill lubrication map
To lubricate Bosch rotary hammers, several types of lubricants are used, depending on the operating conditions of the components and parts.
Bosch rotary hammers use four types of lubricants:
- lubricant 1615430001 - for the gearbox and its cavity;
- lubricant 1615430002 - for gears, pendulum bearings, clutches;
- grease 1615430020 – for bearings (FT1V26);
- SAE 20 W lubricant – for rubber products.
Lubricants vary in viscosity and consistency.
Among Russian lubricants, we can recommend lubricants under the ringing name “Zubr”:
Domestic lubrication of drill shanks for Bosch
Bosch rotary hammers use 8 bearings: three rolling bearings pos. 13, 14, 67, a pendulum bearing (piston bearing) and four needle bearings pos. 60, 61, 62, 63.
Sectional diagram of a Bosch 2-26 rotary hammer
Assembling the mechanical unit and rotor
The rotor is attached to the assembled mechanical assembly. The rotor gears and impact mechanism assembly fit tightly into each other. To install the rotor into the mechanical assembly of the hammer drill, the helical gear of the rotor must be inserted into the inner housing until it contacts the helical large gear of the intermediate shaft. After assembly, rotate the rotor, checking for smooth rotation.
Connection of the rotor and the percussion barrel mechanism
The assembled mechanical unit is closed with a black plastic cover, pos. 819. The cover is secured with four screws, pos. 90, with the installation of a rubber sealing ring, pos. 77. Be sure to lubricate the rubber O-ring with SAE 20 W grease before installation.
It remains to connect the stator housing (green) with the mechanical block housing (black). The housings are connected with four screws.
Bosch GBH 2 26 DFR (Rotary hammer, electrical part)
At the last stage, carbon brushes pos. 811 are installed in the brush holders of the reverse switch pos. 16. The handle has a button position 4 for the speed controller.
Wires from stator windings pos. 101, 102 and power cable pos. 806 are connected to the button.
Rotate the impactor shaft (first by hand and then under power), and make sure that the rotor rotates smoothly and that the brushes do not interfere with its movement, evenly touching the commutator lamellas. The sparks in the area of the brushes do not have a tail, but spark evenly across the entire width of the working part.
It remains to close the cover, pos. 41, with two screws, pos. 77.
Assembling the rotor of a Bosch 2-26 hammer drill
On the repaired or new rotor, pos. 803, install the fan, pos. 5, and bearings, pos. 13, 14. To lubricate the rotor bearings, use Bosch grease 1615430020.
Replacing the brush
If it's time to change the brush in your seeder, you can take the tool to a service center for this task or do it yourself, which is quite simple. Replacing a service center has a number of advantages:
- High-quality work if it is a specialized center
- Original spare parts for your tool model
- Extending the warranty if it has not yet expired
- In addition to replacing the broken part, usually during maintenance, they will completely inspect the important internal parts, clean them and lubricate them
In addition to the advantages, repairing power tools at a service center has its disadvantages:
- If there is no guarantee, the work is paid
- Repairs will take time, you'll have to wait
- Service is not always available
If you are not satisfied with the inconvenience of repairing a tool in a specialized center, it is better to complete the task yourself.
The process of replacing parts is carried out in stages:
- The hammer drill, disconnected from the socket, must be unscrewed to remove the top cover.
- After this, using a small screwdriver, you need to easily hook the brush handle, remove it and remove the old parts.
- Insert the new ones into the holder, press them to the edges, and insert them inside the hammer drill.
- Make sure the brushes reach the contacts for smooth operation of the power tool.
- Close the cover and secure it with screws.
Tips from experts when repairing a drill
After replacing the brushes yourself, experts recommend:
- After abrasion, one replacement is subject to both
- During repairs, the collector must be cleaned of dust and carbon at the same time.
- When replacing parts, it is better to sand the manifold with fine sandpaper.
- It is best to place components that match the tool model
Replacing brushes with a rotating hammer. This is a simple process that can be easily done at home.
The hammer drill anchor is one of the most important parts of this type of household power tools. Unlike brush replacement, failure of the armature (rotor) is considered a technically more complex operation, the order of which is determined by the design of the valve, as well as its service life. Let us remind you that if all operating conditions stated by the manufacturer are met, the rotor is replaced in warranty workshops and only with branded spare parts.
How is the replacement performed?
Below we will present a simple algorithm that must be followed when replacing graphite or carbon brushes in a washing machine motor.
- Before starting work, you must make sure that the machine is turned off and the plug is not inserted into the socket;
- Next, you need to remove the back panel to remove the motor from the housing. This is done very simply, with just one tool that can unscrew the screws. It can be either a screwdriver or a screwdriver;
- When the panel is removed, you can immediately see the engine, but before you get to it, you need to remove the drive belt, which is located between the drum and the motor;
- The next step is to disconnect the motor connector and ground connector, after which you need to unscrew the two bolts that act as fastening the motor to the drum. Sometimes it can be very difficult to remove the engine yourself. In some cases, a flat-head screwdriver can help, which can be used to pry up the motor, thereby making it easier to remove. After removing the engine from the pins, it can be placed on the bottom of the machine, then tilt it slightly, thereby allowing the engine to easily come out of the housing;
- On the motor itself there are usually two carbon or graphite brushes. If the brushes for the engine are burnt out, the commutator will be black. In this situation, replacing the brushes is extremely necessary, since they are all worn out and remain on the commutator;
- To remove the old brushes, you need to unscrew the two bolts that are located directly above them. As a rule, after removal you will only be able to see the remains of the carbon brushes - a small piece of graphite or coal;
Before purchasing a particular set of spare parts, you need to pay attention to the manufacturer and the quality of the material from which they are made. You also need to be very careful about installation, since the service life directly depends on this.
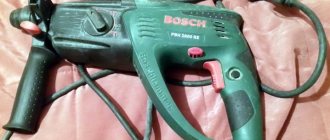
Photo report - replacing the brushes of the Sparky BPR 241CE rotary hammer (Sparky) with your own hands.
After five years of impeccable service, my Sparky began to malfunction.
Repair of Makita rotary hammer reverse switch
To repair the reverse switch, you need to disconnect the back cover. Carefully disconnect the wires from the button. Carefully inspect the switch.
Further disassembly involves removing the brush holder, after first freeing the brushes themselves. By removing the brush holder, you will get to the reverse switch contacts. Determine its condition and replace the contacts if necessary.
Another common electrical fault is poor contact between the stator and the lower contacts of the reverse switch.
Repairing the contact between the stator and the reverse switch
To remove the stator, you need to disconnect the gear housing (black) from the stator housing (green).
Remember! In the mechanical part of the rotor, the bearing is pressed with a special ring. Don't lose it when disassembling.
The green housing houses the stator. Looking into the middle, you will see two self-tapping screws 4x60, art. 266334-3, pos. 57, securing the stator to the housing. Unscrew them, remove the plastic stator protection for HR2450, art. 419201-3, pos. 58., free the stator. When you remove the stator, you will see the contacts on the stator and the reverse switch panel.
Thoroughly clean the contacts with sandpaper and treat with solvent or alcohol. Before assembly, bend the contacts so that they fit tightly into each other. Lubricate the contacts with a thin layer of technical Vaseline.
Reassembling the electrical part of the hammer drill is carried out in the reverse order.
It often happens that the machine stops rotating the drum. One reason for this may be wear on the brush. This article will tell you how to change brushes for electric motors of washing machines with your own hands. If the automation works normally and at the same time regularly fills water, but the drum does not work properly or rotates very weakly and makes strange sounds, then in this case, you can be one hundred percent sure that the problem lies in the wear of the carbon brushes. An error code may also appear on the display, which indicates that the motor is not operating properly, as well as the need for an electric brush.
To perform the replacement, you only need a Phillips screwdriver and a set of new brushes. Particular attention should be paid to the fact that it is best to use the original kit for installation, since such brushes will work well without damaging the motor and other parts. In addition, they do not have to be sharpened or filed to fit the size of a specific engine. The carbon or graphite brushes themselves can simply wear out or peel off.
Rotary hammers always work in extreme conditions. The operating life of rotary hammers depends not only on the correct operating conditions, but also on the reliability of the parts included in the product. But no matter how hard you try, over time the hammer drills begin to fail.
To properly repair a rotary hammer, you need to become familiar with its structure.
Repairing a Makita two thousand four hundred seventy and two thousand four hundred fifty rotary hammer can be done with your own hands by a person who has the skills of a mechanic and knows the basics of electrical engineering. Remember! Follow safety rules and turn off the hammer drill
from the network during parsing.
Makita rotary hammers two thousand four hundred fifty and two thousand four hundred seventy are assembled according to almost the same design and from the same parts. Repairing them is no different. For ease of repair, below is an assembly diagram and a catalog of parts for Makita rotary hammers.
Makita rotary hammer diagram two thousand four hundred
fifty and two thousand four hundred and seventy consists of mechanical and electrical parts.
The mechanical part ensures the transmission of torque to the drill bit, simultaneously creating a translational movement that creates an impact. The mechanical part consists of a rotation drive and an impact mechanism.
The electrical circuit of the Makita rotary hammer ensures the conversion of electrical energy into kinetic energy through the rotation of the rotor. The electrical part includes an electric motor, a power button with a speed controller, a reverse switch, and connecting wires.
The main malfunctions of a makita rotary hammer. Malfunctions of rotary hammers are divided into electrical and mechanical.
In this article we will consider all the malfunctions of the electrical part of Makita two thousand four hundred
seventy and two
thousand four hundred
and fifty and ways to eliminate them:
Electrical malfunctions of Makita two thousand four hundred fifty and Makita two thousand four hundred seventy rotary hammers Electrical malfunctions manifest themselves in the fact that when the rotary hammer is connected to the mains voltage, the tool does not turn on. The connection diagram for a Makita rotary hammer to the network is simple.
The electrical circuit of the Makita two thousand four hundred and fifty rotary hammer is a series connection of an electric motor, a start button and wires.
The makita two thousand four hundred and seventy rotary hammer circuit is similar.
Through the connecting cord pos. 72, a supply voltage of two hundred and twenty V is supplied through the switch pos. 68 and electric brushes through the brush holder pos. 66 to the lamellas of the electric motor rotor pos. 54, and through the contacts of the reverse switch pos. 60 to the stator winding pos. 59. The most common malfunction is the lack of contacts in the connections.
READ Drill Attachment for Cutting Thin Sheet Steel
Anchor structures of various types of drilling rigs
Anchor. It is the rotating unit of any induction motor. Considering that during operation the hammer drill experiences significant resistance to the material it destroys, the loads on the rotor often reach extraordinary values. Sometimes they cause a significant reduction in valve speed, resulting in immediate engine failure.
The resistance of fittings on a hammer drill to combustion is determined by its design. There are two types of perforation anchors:
- With wound rotor.
- Rotor cell proteins.
The short circuit of the armature winding is formed by rods, which, when assembling the rotor, fit into the grooves of its core. In this case, the ends of the rods are connected by a special rotor ring. This design has no moving contacts, which has a positive effect on the durability of the assembly.
The disadvantage of the armature of this design is the limited starting torque, which in relation to hammer drills requires limiting the intensity of use at the initial time after turning on the tool. Of course, this is impossible to keep in mind, so if you use the hammer drill carelessly, the longevity of the protein cell motor will be low.
The problem is solved by installing electric motors of protein cells on all rotating hammers. The number of poles of the armature winding in this case fully corresponds to the same parameters of the stator, and the contacts of each phase are brought out into the external circuit using carbon-graphite brushes. Replacing the brush. This is a relatively simple process that you can perform (for out-of-warranty equipment) yourself. In other cases, you should use the services of specialists. Often the price of this type of service is associated with the need for static and dynamic balancing of the armature on a drill, which uses special technologies and equipment.
READ How to cut drywall at home with a knife
What are brushes and what are they for?
Brush
– part of the electronic circuit for turning on the electric motor, a current conductor to the armature collector. Since the armature rotates due to the electric field, there cannot be a fixed connection, as in the stator. A way out of the situation was realized using pieces of graphite, which slide along the collector plates, thereby supplying current to the sectioned armature winding. In turn, a magnetic field is created in the winding of the latter. According to the law of magnetism, opposite poles attract, and this is what makes the armature move. As pictured below.
READ Adjusting Drill Speed Without Losing Power
But we can say that this is the weakest point of commutator electric motors, because the brushes are worn out during operation, and coal dust clogs the commutator - this leads to disruption of the normal operation of the electric motor.
The structure of the brush itself is very common: a contact terminal, a wire from the terminal to the working surface of the brush, and a spring that presses the surface to the commutator plate.
We’ve figured out the purpose of the brushes, now let’s look at their types. There are 3 types of current collection brushes. How to change the cartridge on a rotary hammer In fact, there are more of them - but they are not used in rotary hammers. For example, the so-called “generator” (copper-graphite, copper-carbon) brushes.
In a hammer drill
The following types of brushes are available:
- graphite - long service life, but due to the hardness of graphite, the “grinding in” is not perfect, and this causes the collector to suffer;
- carbon brushes for rotary hammers – good contact with the working surface of the commutator, but short service life;
- carbon-graphite brushes as a candidate for the two previous types.
Carbon brushes for Bosch rotary hammer
How to check the effectiveness of an anchor?
The sequence of this kind of routine maintenance is considered using the example of Makita brand punches, although other manufacturers do not have the fundamental features of such a tool.
The need to replace the armature may arise when the hammer drill does not produce the required number of revolutions, the rotor rotation slows down sharply, and characteristic sparks and cracks appear.
The motor armature consists of the following parts:
- A cylindrical element that is formed from tightly joined stamped plates of low-silicon electrical steel or Armco EA or EAA mild steel;
- The shaft on which the cylinder is mounted;
- Phase coils, the windings of which are offset relative to each other by an angle of 120 0;
- The sliding rings are mounted on the shaft, but are electrically isolated from it and from each other.
The armature on the hammer drill is in mechanical contact with the gears of the hammer drill, so to completely disconnect it, it is enough to disconnect the assembly from the worm, which is located on the rotor shaft.
The test begins with an external inspection of the collector plates: there should be no traces of soot or scratches on it. In this case, the motor brushes are considered to be working and cannot be replaced.
Slow rotation of the valve on the hammer drill can be caused by contamination of the bearing support washer; in this case, it is removed from the housing and thoroughly washed with technical solvent. Acceptable fluids are usually specified by the manufacturer in the drill's manual. It is necessary to clean not only the outer surface, but also the inner surface of the protective washer.
Although the outer armature winding is also protected from dust, you should check the condition of the winding cords and use a regular vacuum cleaner to clean their surface.
The integrity of the collector is checked by a tester. In accordance with the existing electrical circuit of the tool, all elements of the electrical circuit of the punch are checked. In the event of a short circuit, the armature must be replaced. For durable tools, the price of the issue is determined by the drill model: the warranty shop may not accept drills of a certain brand for repair, and you will have to send a request for the required anchor model to the manufacturer’s warehouses.
If the unstable operation of the hammer was caused only by contamination of its moving parts, then after thorough cleaning, assembly is carried out in the reverse order. In this case, make sure that the gear contact with the gear worm is complete and that the dust ring completely covers the outer bearing housing.
Other mechanical breakdowns and their elimination
In addition to breakdowns associated with the impact mechanism, other mechanical breakdowns may also occur in the hammer drill.
Mode switch
There are times when the unit mode switch fails. Basically, this occurs due to dust clogging of this unit. To repair the switch, you will need to disconnect it from the body (see how to do this above) and clean it from dirt. If you find any damage to the plastic parts of the switch, it will have to be replaced.
Helical gears
The reason that the device stopped working normally, namely, stopped drilling and chiseling, may lie in worn-out teeth on the rotor shaft.
If this happens, the teeth on the intermediate helical gear will also be worn.
This problem occurs when the tool is jammed or the clutch is malfunctioning. The breakdown is eliminated by replacing the intermediate gear and engine rotor.
The drill does not stay in the chuck
The reason that the hammer drill does not hold the drill lies in the breakage of the chuck and the wear of its constituent parts:
- deformation of the balls occurred;
- the restrictor ring is worn out;
- The retaining spring gave way.
You will need to disassemble the cartridge and replace problematic parts.
Drill stuck in hammer drill
The reasons that the drill is stuck in the chuck of the device may be the following.
- Before installing the equipment, you did not apply lubricant to its shank. You will need to move the sealing rubber of the cartridge and inject WD-40 into the place where the tool fits.
- Dust got under the balls. Perform the same operation as in the paragraph above.
- If you used a regular drill inserted into an adapter in a hammer drill, then also treat it with WD-40, wait a couple of minutes, and, lightly tapping the clamp surface with a hammer, loosen the equipment in different directions. Typically, after these steps, the clamping jaws open and allow the drill to be removed.
- The tool shank came loose. You will need to first add WD-40 and try to remove the drill. If nothing works, then you need to disassemble the cartridge and knock out the equipment. You can also use tips on how to remove a tool stuck in the device from this video.
Repair or replacement? The choice is yours!
A handyman with electrical experience can repair the fittings on a drill with his own hands. Start with troubleshooting. In the event of a break or short circuit in the turns of the armature winding, the reason for the “silence” of the punch or the slow rotation of its rotor (accompanied by intense sparking around the perimeter) is easy to establish: a tester. Sparking, as well as an attempt to turn the shock valve in different directions, is the result of short circuiting of part of the turns in the winding. If the spark has the character of a single, but long-lasting spark, the cause is a damaged wire or poor contact with the commutator itself.
When checking, you should also check for the possibility of damage to the valve body. When measuring actual resistance values, the values obtained must be at least several ohms.
During development of a hammer drill, significant imbalance in the axis of rotation of the valve is possible during punch operation. This fault is diagnosed after the open winding is not open. To do this, connect the drill to the rheostat and gradually increase the voltage to the nominal voltage. If during diagnostics the tone of the electric motor changes and the armature oscillations increase, rotor balancing is necessary.
Since it is almost impossible to rewind the anchor at home, it is recommended to use the services of specialized workshops. The price of winding an armature on a rotary hammer for most models (from Bosch, DeWalt, Makita, etc.) depends on the power of the tool and its performance (home or professional). If the drive power does not exceed 1000 W, the service will cost 1000. 1200 rubles, for a drive up to 1500 W. 1500. 1600 rubles, and for more powerful rotating hammers. Up to 2500 rubles. Comprehensive repairs (for example, replacing a bearing) can cost 3500. 4000 rubles. In this case, fault diagnosis in most workshops is free.
Video: Replacing Bosch Rotary Hammer Brushes
The most common causes of wear:
- Very hard spring
- Poor quality collector that wears out brushes with hard edges
If the power tool is used infrequently, the brushes can be changed once a year to prevent damage. If your tool is intended for intensive daily use, you need to review it. There are some signs that indicate their wear:
- The spark in the collector has increased
- The engine does not develop speed, and the impact power during operation has decreased
Why the beat will ignite
- Incorrect installation
- Worn condition
- Incorrectly installed brush holders
- Bad for a collector
- Parts are compressed too tightly
- The components used are not the same brand as the tool.
Any of the above reasons means: you need to disassemble the hammer and inspect it.
Replacing the brush
If it's time to change the brush in your seeder, you can take the tool to a service center for this task or do it yourself, which is quite simple. Replacing a service center has a number of advantages:
- High-quality work if it is a specialized center
- Original spare parts for your tool model
- Extending the warranty if it has not yet expired
- In addition to replacing the broken part, usually during maintenance, they will completely inspect the important internal parts, clean them and lubricate them
In addition to the advantages, repairing power tools at a service center has its disadvantages:
- If there is no guarantee, the work is paid
- Repairs will take time, you'll have to wait
- Service is not always available
If you are not satisfied with the inconvenience of repairing a tool in a specialized center, it is better to complete the task yourself.
The process of replacing parts is carried out in stages:
- The hammer drill, disconnected from the socket, must be unscrewed to remove the top cover.
- After this, using a small screwdriver, you need to easily hook the brush handle, remove it and remove the old parts.
- Insert the new ones into the holder, press them to the edges, and insert them inside the hammer drill.
- Make sure the brushes reach the contacts for smooth operation of the power tool.
- Close the cover and secure it with screws.
Tips from experts when repairing a drill
After replacing the brushes yourself, experts recommend:
- After abrasion, one replacement is subject to both
- During repairs, the collector must be cleaned of dust and carbon at the same time.
- When replacing parts, it is better to sand the manifold with fine sandpaper.
- It is best to place components that match the tool model
Replacing brushes with a rotating hammer. This is a simple process that can be easily done at home.
How to change brushes with a hammer, where are they?
The brushes of any power tool are part of the power circuit. And although brushes are the weakest point of commutator-type electric motors, they cannot be avoided, since they conduct current from the power source to the valve commutator.
The main reason for brush failure. Its abrasion during use. When the brush wears out and there is no contact with the commutator, the power circuit is interrupted and the tool stops working. In addition to this fault, there may also be a broken wire running from the terminal to the brush or a broken spring. But these are extremely rare breakdowns and can be eliminated without replacing the brushes, if the latter are in order.
Types of brushes in rotary hammers:
- Graphites. They have a long service life, but due to the hardness of the graphite, their abrasion is not ideal and this has a negative effect on the commutator.
- Coal. Maintains excellent contact with the commutator, but due to the softness of graphite has a short service life.
- Carbon graphite. As the name suggests, it consists of a mixture of graphite and coal; perfect option.
READ Which is Better Makita Or Bosch
When you need to replace your brush.
Typically, the supply of brushes in rotary hammers is designed for 80-120 hours of operation, but who will keep track of the operation of a home tool? In this regard, it is convenient to have a tool with a brush wear indicator or with an automatic shut-off function when the maximum wear is exceeded.
But even without these important features, you can determine that it's time to replace the brush:
Increased sparking in the collector area;
The tool does not work smoothly, periodically, as well as speed and power drop.
In these cases, you will need to obtain and inspect the brush assembly. If the defects described above are found, the brushes should be replaced. An additional condition when it is necessary to replace the brushes is that they are worn to a third of the nominal value (usually approximately 8 mm).
Please note the following: both brushes are ALWAYS replaced at the same time, even if one of them is fully functional.
The process of replacing punched brushes is simple and anyone can do it, especially those with power tool skills. The only thing is that not all models have the same approach to brush assembly. On some models you need to remove half the body (older models), while on others you only need to remove the back cover.
Some modern models have a special window covered with a plastic cover for replacing the brush assembly. In particular, these are some BOSCH models.
So basically the whole job of replacing brushes in a die is to find the location of the brush in your model, then carefully remove the brushes from there and carefully insert the new set back in.
After watching this video, you will understand the general working principle of replacing perforated brushes and, therefore, cope with the tool of your model.
How to properly disassemble and repair a Bosch rotary hammer with your own hands
The operating principle of the Bosch 2-26 rotary hammer is no different from rotary hammers of famous brands.
The rotating rotor transmits torque to the intermediate shaft of the mechanical assembly of the hammer drill, while simultaneously transmitting translational motion through the rolling bearing to the hammer hammer's impact mechanism and the impact impulse.
A rotational moment with a translational shock pulse is transmitted to the working tool. This principle is implemented in all rotary hammers.
But different companies that produce rotary hammers have their own design features.
Bosch rotary hammers are considered the best in their power tool segment. But nothing is eternal.
If your Bosch 2-20, 2-24, 2-26 hammer drill has stopped working, then you can restore it yourself. You need to have basic mechanic skills and a little understanding of electrical engineering. And another important detail is that the design of Bosch rotary hammers is so simple that it does not cause difficulties during repairs.
When repairing power tools, including repairing Bosch rotary hammers, strictly follow safety precautions when working with electrical appliances.
To make it easier to repair a Bosch rotary hammer, disassemble and reassemble it, study the tool assembly diagram:
Diagram of a Bosch 2-26 rotary hammer
Any disassembly of the Bosch 2-26 rotary hammer begins after inspection, test operation and identification of the causes of the device malfunction.
disassembly of a Bosch 2-26 rotary hammer
Disassembly procedure for a Bosch 2-26 rotary hammer
Since the disassembly procedure for Bosch rotary hammers is 2-20; 2-24; 2-26 is almost the same, let’s consider the order of disassembly using the Bosch 2-26 rotary hammer as an example.
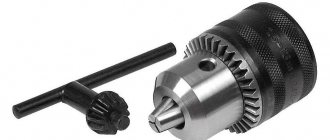
Disassembling the Bosch GBH 2-26 dre hammer drill begins with disassembling the quick release chuck.
Disassembling the quick release chuck
Bosch rotary hammers most often use two types of chucks: SDS-plus chucks and SDS-max chucks. The difference between them is the principle of clamping the tail part of the working organ.
The design of the Bosch hammer drill chuck differs in the design of the tool mounting rods depending on the SDS-plus or SDS-max model. In addition to the listed types of cartridges, there are SDS-top and SDS-quick cartridges.
Difference between cartridge mounting points
The procedure for disassembling the Bosch 2-26 hammer drill chuck is simple:
- remove the rubber tip pos. 34;
- remove the retaining ring pos. 87;
- remove the steel washer pos. 833;
- remove the conical spring pos. 833;
- Carefully, so as not to lose it, using a magnet, remove the barrel balls pos. 89.
SDS-plus cartridge
Carefully inspect all parts of the cartridge.
SDS-plus quick-release chuck in disassembled state
SDS-plus chucks were developed specifically for drilling tools. The diameter of the tool shanks is 10 mm, the length of the working tool is in the range of 110...1000 mm. The diameter of the drills lies in the range of 4…26 mm.
How to remove the mode switch
With the hammer on its side, remove the mode switch pos. 832.
First, turn the switch to the “Drilling” position, press the screwdriver all the way into the end of the switch button (it is red) and turn the switch counterclockwise to an angle of 70º.
While rocking the switch handle, pull the switch handle out of the housing.
Disassembling the impact mechanism assembly
Having placed the Bosch 2-26 hammer drill vertically on the handle, unscrew the four screws pos. 90 holding the cover of the mechanical assembly housing.
Press the end of the impact shaft and remove the cover. The lid is black plastic.
Now you need to remove the barrel pos. 821 and the intermediate shaft pos. 826. They are not secured by anything.
Next, using a screwdriver, you need to remove the bracket pos. 48 of the rolling bearing pos. 830. By the way, in simple terms it is called a “drunk bearing”. The following are removed sequentially: the sleeve pos. 26 and the “drunk bearing”.
We got to the drunken bearing
Disassembling the hammer mechanism barrel assembly
- dismantling the Bosch hammer drill barrel assembly begins from the side of the cavity, removing from it the cylinder pos. 26 with the hammer pos. 27;
- you need to remove the hammer assembly from the cavity;
- on the side of the chuck shaft, remove the lock ring pos. 85, the steel ring pos. 38 and another lock ring pos. 85;
- remove the spur gear pos. 22.
Impact mechanism assembly, intermediate shaft and bearing
Disassembling the cylinder
A hammer, pos. 27, is inserted inside the cylinder, from which the rubber ring, pos. 73, must be removed. During any disassembly, rubber parts must be replaced.
At the opposite end of the cylinder, a hinge, pos. 29, and two flat washers, pos. 41, are inserted.
Disassembling the intermediate shaft
The intermediate shaft is disassembled by removing the shaft, pos. 24, and pulling out the “drunk bearing” from the housing, pos. 77.
Bearings are removed with pullers or manually using a device.
Uncharacteristic malfunction of the Bosch rotary hammer
Bosch rotary hammers are very reliable. But there are malfunctions that are practically not encountered in practice. Below is one of them.
Bosch rotary hammer drills, but does not chisel
If the hammer drill has stopped hammering, but still allows you to drill, the most likely reason may be the destruction of a “drunk bearing”. This malfunction does not occur often and is not easy to find.
To fix it, you don’t need to go to a repair shop. Any person with the slightest knowledge of mechanics can fix such a malfunction.
New drunken bearing
First you need to disassemble the Bosch hammer drill down to the intermediate shaft. The disassembly procedure is given above.
By removing the intermediate shaft, you will get to the “drunk bearing”. The destruction of a rolling bearing is indicated by a broken race, scattered balls, or pieces of the race.
You take out the bearing, remove dirt and all parts of the destroyed mechanism.
You buy a new “drunk bearing”, and, having lubricated all the parts with new grease, replace and reassemble in the reverse order of the disassembly steps.
Disassembling the electrical part of the Bosch 2-26 rotary hammer
Disassembling the Bosch 2-26 rotary hammer, its electrical part, begins by removing the back cover on the rotary hammer handle by unscrewing three screws.
The next step is to remove the reverse switch.
Turn it to neutral and lift it towards you. The reverse switch is removed.
To remove the stator cover, you need to hold the mechanical unit in your right hand and the stator housing in your left hand, drag them in different directions, shaking them.
The stator cover will come off.
Separation of the impact unit with rotor and stator
To separate the rotor from the mechanical assembly, it is enough to drag these parts in different directions. The rotor is secured to the mechanical assembly by a small helical gear that is inserted into contact with a large helical gear of the mechanical assembly.
The rotor has been freed and you can carefully inspect the condition of the commutator and bearings.
Bosch hammer drill rotor
To remove the stator, simply remove the protective plastic protective casing and tap the end of the housing into which the stator is inserted with a wooden block or mallet. Before doing this, do not forget to unscrew the two screws securing the stator to the housing.
The stator has been removed, the rotor has been removed, you can begin to inspect them and defect all the parts that make up the electrical part of the Bosch rotary hammer.
When inspecting a disassembled Bosch 2-26 rotary hammer, pay special attention to the condition of the carbon brushes, plaque on the brush holders and the reliability of their fastening, the integrity of the reverse switch contacts, and the condition of the wire at the point of entry into the rotary hammer.
The length of the brushes should not be shorter than 8 mm. There should be no traces of sparking or carbon dust from the brushes on the brush holders; there should be no burnouts or damage to the contacts on the contacts of the reverse switch of the Bosch 2-26 rotary hammer.
Electrical part of a Bosch rotary hammer
This completes the disassembly.
I wish you success!
RussianUkrainianBelarusianOʻzbek tiliEnglish
Source: https://sdelalremont.ru/instrukciya-po-razborke-perforatora-bosch.html
Tools
Hammer. An indispensable assistant for any type of repair work. But, like everything under this sun, it also does not last forever. Sooner or later you will have to deal with its maintenance and repair. And the more carefully you respond to it, the longer it will last.
For example, your hammer has lost its power. What does this say? Is the instrument expected to be repaired or “its time”? In most cases this is probably normal. It's time to replace the brush in the hole punch.
What are brushes and what are they for?
The brush is part of the engine switching circuit, conducting current to the manifold valve. Since the armature rotates due to the electromagnetic field, there cannot be a fixed connection as in the stator. The output was made using pieces of graphite that slide across the commutator plates, thereby introducing current to the winding of the valve section. In turn, a magnetic field is created in the latter winding. According to the law of magnetism, opposite poles attract, which creates the movement of the armature. As shown below.
But we can say that this is the weakest point of the commutator motors, since the brushes are worn out during operation, and coal dust clogs the commutator. This leads to disruption of normal engine operation.
The structure of the brush itself is very simple: a contact terminal, a wire from the terminal to the working surface of the brush and a spring that presses the surface to the commutator plate.
We have analyzed the purpose of brushes, now we will consider their types. Collection brushes come in three types. In fact there are more of them. But they are not used in rotary hammers. For example, the so-called “generator” brushes (copper. Graphite, copper. Carbon).
The hammer drill has the following types of brushes:
- Graphite. Long service life, but due to the hardness of graphite, "splatter" is not ideal and the commutator suffers from this;
- Carbon brushes for rotary hammers. Good contact with the working surface of the collector, but short service life;
- Carbon graphite brushes as an alternative to the two previous types.
Carbon brushes for impact Bosch
When is replacement required?
As a rule, the operating life of brushes in household rotary hammers is calculated, according to the manufacturer, at 70.120 hours. But it is unlikely that the owner of the seeder will monitor the time the tool is used. In this regard, it is worth noting the convenience of such a function as the Makita hammer brush wear indicator. In addition, there is a tool with an automatic shut-off system if there is excessive wear.
But even if you don't have such a top model, there are signs that can indicate increased wear on the brushes. These include:
- — increased sparking in the collector;
- — Significant loss of hammer power, the engine does not reach full speed.
If something like this is observed. It's time to look at the condition of the brushes and commutator.
The note. Typically, for long-term use, tool brushes must be replaced when their height is reduced by 1/3 (approximately 8 mm) from the nominal height.
If you remove the brushes from the holder, you will see wear on both replacement brushes, even if the wear is not even. When replacing brushes, it is strongly recommended to clean the commutator of graphite dust and carbon deposits. The collector can be cleaned with gasoline (preferably for lighters, its quality is higher) or ethyl alcohol. When replacing the brush, be sure to rub it into the commutator. This will reduce the electrical arc (arc), which will have a positive effect on both the commutator and engine power. The lining is made of soft sandpaper mounted on the manifold. As the fitting rotates, the sandpaper smoothes out the rough edges of the new brushes.
Another important consideration when replacing brushes is the degree of hardness of both the brushes and the commutator. If you put soft (carbon) brushes on a hard commutator. They wear out quickly. Therefore, for replacement it is important to use branded brushes from the tool manufacturer.
When replacing, also pay attention to the installation of the brush holder. It consists of a profile, a clamp and a contact group. In this case, pay attention to the condition of the clamp spring; if you suspect that it is working and reliable, it is better to replace it with a new one. Fortunately, it's not expensive. For example, if the spring is weakened, it will not fit tightly enough to the commutator, which will increase sparking. And this in turn leads to premature wear of the collector plates. And if it bounces, it's time to make an electric motor for a good repair of the tool.
By the way, if only one brush sparks, the stator may have burned out. This is easy to determine; it is important to have a device to measure resistance. The stator has two windings, on average they have a resistance of 4 ohms each. If the resistance of both windings is the same, the stator is not damaged.
The replacement process itself does not need to be described, it is simple, and for most exercises the design allows for quick and easy replacement of the brush, for example with a Bosch hammer or any other, as shown in the video at the end of the review. Look for a special window on the case; it is usually covered with a plastic cover.
Replacing a brush: do it yourself or at a service center?
The simplest option. Contact a service center specialist, for example, to replace Hitachi rotary hammers, but not the cheapest ones.
Advantages of replacement at a service center:
- — quality, if in an authorized body;
- — original brushes, also if the center is allowed;
- — maintaining the warranty on the tool if it has not expired;
- – As a rule, all “vital” important parts of the tool are thoroughly inspected by cleaning and lubricating.
There are also disadvantages: you will have to wait, and if it is not a guaranteed job, you will have to pay. In addition, the service is not always nearby.
There is another way. With your own hand. For example, replacing the Skil Hammer is not difficult, but.
The note. “Attempts to repair the instrument yourself, outside of an authorized service center. Undoubted signs, which include: broken warranty seals, folds on exposed parts, mounting screws, body parts, etc.” Excerpt from the instructions for the drill.
READ The Hammer Doesn't Turn What's The Reason?
If the tool is under warranty, then it is better to take it into operation. You can do everything right, but who will guarantee that nothing will come of it? And you will have to repair them at your own expense. But this is just a warning not to open the tool before the warranty period has expired, as a rule, in high-quality models with moderate use, the brush will need to be replaced after the expiration date.
What are the benefits of replacing yourself:
- — speed, the tool is at hand and ready to work;
- — you save cheaper on the services of masters;
- — You don’t expect the tool to break, its condition is always under control, you just need to look inside;
- — Increasing the level of skill, including the maintenance of power tools.
The disadvantages include:
- — there are no guarantees of work performed;
- — There may be a problem with the original parts;
- — fear spoils something and this is the loss of nerve cells.
Actually replacing the brush. This is a simple and quick procedure and rotating hammer brushes are usually supplied with the tool.
Source
Hammer. An indispensable assistant for any type of repair work. But, like everything under this sun, it also does not last forever. Sooner or later you will have to deal with its maintenance and repair. And the more carefully you respond to it, the longer it will last.
For example, your hammer has lost its power. What does this say? Is the instrument expected to be repaired or “its time”? In most cases this is probably normal. It's time to replace the brush in the hole punch.
What are brushes and what are they for?
The brush is part of the engine switching circuit, conducting current to the manifold valve. Since the armature rotates due to the electromagnetic field, there cannot be a fixed connection as in the stator. The output was made using pieces of graphite that slide across the commutator plates, thereby introducing current to the winding of the valve section. In turn, a magnetic field is created in the latter winding. According to the law of magnetism, opposite poles attract, which creates the movement of the armature. As shown below.
But we can say that this is the weakest point of the commutator motors, since the brushes are worn out during operation, and coal dust clogs the commutator. This leads to disruption of normal engine operation.
The structure of the brush itself is very simple: a contact terminal, a wire from the terminal to the working surface of the brush and a spring that presses the surface to the commutator plate.
We have analyzed the purpose of brushes, now we will consider their types. Collection brushes come in three types. In fact there are more of them. But they are not used in rotary hammers. For example, the so-called “generator” brushes (copper. Graphite, copper. Coal).
The hammer drill has the following types of brushes:
- Graphite. Long service life, but due to the hardness of graphite, "splatter" is not ideal and the commutator suffers from this;
- Carbon brushes for rotary hammers. Good contact with the working surface of the collector, but short service life;
- Carbon graphite brushes as an alternative to the two previous types.
Carbon brushes for impact Bosch
When is replacement required?
As a rule, the operating life of brushes in household rotary hammers is calculated, according to the manufacturer, at 70.120 hours. But it is unlikely that the owner of the seeder will monitor the time the tool is used. In this regard, it is worth noting the convenience of such a function as the Makita hammer brush wear indicator. In addition, there is a tool with an automatic shut-off system if there is excessive wear.
But even if you don't have such a top model, there are signs that can indicate increased wear on the brushes. These include:
- — increased sparking in the collector;
- — Significant loss of hammer power, the engine does not reach full speed.
If something like this is observed. It's time to look at the condition of the brushes and commutator.
If you remove the brushes from the holder, you will see wear on both brushes, even if the wear is not even. When replacing brushes, it is strongly recommended to clean the commutator of graphite dust and carbon deposits. The collector can be cleaned with gasoline (preferably for lighters, its quality is higher) or ethyl alcohol. When replacing the brush, be sure to rub it into the commutator. This will reduce the electrical arc (arc), which will have a positive effect on both the commutator and engine power. The lining is made of soft sandpaper mounted on the manifold. As the fitting rotates, the sandpaper smoothes out the rough edges of the new brushes.
Another important consideration when replacing brushes is the degree of hardness of both the brushes and the commutator. If you put soft (carbon) brushes on a hard commutator. They wear out quickly. Therefore, for replacement it is important to use branded brushes from the tool manufacturer.
When replacing, also pay attention to the installation of the brush holder. It consists of a profile, a clamp and a contact group. In this case, pay attention to the condition of the clamp spring; if you suspect that it is working and reliable, it is better to replace it with a new one. Fortunately, it's not expensive. For example, if the spring is weakened, it will not fit tightly enough to the commutator, which will increase sparking. And this in turn leads to premature wear of the collector plates. And if it bounces, it's time to make an electric motor for a good repair of the tool.
By the way, if only one brush sparks, the stator may have burned out. This is easy to determine; it is important to have a device to measure resistance. The stator has two windings, on average they have a resistance of 4 ohms each. If the resistance of both windings is the same, the stator is not damaged.
The replacement process itself does not need to be described, it is simple, and for most exercises the design allows for quick and easy replacement of the brush, for example with a Bosch hammer or any other, as shown in the video at the end of the review. Look for a special window on the case; it is usually covered with a plastic cover.
Replacing a brush: do it yourself or at a service center?
The simplest option. Contact a service center specialist, for example, to replace Hitachi rotary hammers, but not the cheapest ones.
Advantages of replacement at a service center:
- — quality, if in an authorized body;
- — original brushes, also if the center is allowed;
- — maintaining the warranty on the tool if it has not expired;
- – As a rule, all “vital” important parts of the tool are thoroughly inspected by cleaning and lubricating.
There are also disadvantages: you will have to wait, and if it is not a guaranteed job, you will have to pay. In addition, the service is not always nearby.
There is another way. With your own hand. For example, replacing the Skil Hammer is not difficult, but.
If the tool is under warranty, then it is better to take it into operation. You can do everything right, but who will guarantee that nothing will come of it? And you will have to repair them at your own expense. But this is just a warning not to open the tool before the warranty period has expired, as a rule, in high-quality models with moderate use, the brush will need to be replaced after the expiration date.
What are the benefits of replacing yourself:
- — speed, the tool is at hand and ready to work;
- — you save cheaper on the services of masters;
- — You don’t expect the tool to break, its condition is always under control, just look inside;
- — improvement of skills, including maintenance of power tools.
The disadvantages include:
- — there are no guarantees of work performed;
- — there may be problems with original parts;
- — fear spoils something and this is the loss of nerve cells.
Actually replacing the brush. This is a simple and quick procedure and rotating hammer brushes are usually supplied with the tool.
Source
Diagram of the impact mechanism, its malfunctions and repairs
The impact mechanisms of rotary hammers differ in their design, depending on which family the devices belong to. Therefore, the repair of these mechanisms will take place according to different principles.
Barrel perforators
Rotary hammers with a vertical engine usually have an impact unit based on a crank mechanism (CSM). Below is a diagram of this type of impact mechanism.
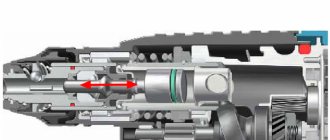
The following photo shows a section of the device, where you can see the location of the crankshaft.
The impact mechanism of a unit with a vertical motor may have the following malfunctions. The connecting rod mechanism has a separate bearing that is mounted on the cam of the wheel with an eccentric, but sometimes it can be located at the base of the connecting rod. In some models of rotary hammers, a plain bearing (instead of a rolling bearing) may be installed at this location, which requires constant lubrication. If it is not there, or it is already old, then this unit will wear out. During repairs, you will have to completely replace the connecting rod and eccentric barrel.
Another common problem is the firing pin breaking. This malfunction can be calculated if you notice that there is no longer any impact on your hammer drill. To get to the firing pin, you will need to completely disassemble the barrel of the device. It is done as follows.
- Disconnect the barrel from the hammer body, remove the cartridge (see description above). Tap the barrel on the table so that the piston falls out. Take a rubber mallet and knock the barrel out of the housing.
- Remove the retaining ring holding the bearing.
- Remove the bearing itself and lightly tap the table to remove the balls.
- After removing the 3 balls, you can pull out the raster sleeve.
- Also, as in the previous case, remove the balls located on the bushing, just do not confuse them with those that were removed earlier (these balls are smaller in diameter). After removing the balls, you need to insert a screwdriver into the sleeve and push out the firing pin.
Read also: How to install an interior door with your own hands
In this case, the firing pin is intact. But if it is broken, then replace it with a new one. You should also pay attention to the rubber seals and seals in the barrel body. If they are worn out, they must be replaced.
Pistol type hammer drills
The design of the impact mechanism in a pistol-type unit is slightly different from the same-purpose mechanism installed in a barrel-type unit.
Its main difference is that the piston is driven not by a connecting rod, but by a swinging (“drunk”) bearing. Therefore, the most common breakdown of this unit is the wear of a “drunk” bearing that needs to be replaced.
The next photo shows a destroyed “drunk” bearing, which is the reason why the hammer drill stopped hammering.
The swing bearing is removed using a flat screwdriver, which you need to pick up the bracket and remove it. After this, the bearing is easily separated from the gearbox housing.
When replacing a collapsed bearing, you should thoroughly rinse the gearbox, since it is in its housing that fragments of the broken part may remain.
After cleaning and installing a new bearing, apply a thick layer of lubricant to this block.
Also, the reason that the device does not hit can be a broken firing pin. To get it out, you need to remove the retaining ring that is visible in the hole.
Take a small screwdriver, pick up the ring with it, and move it to the right (towards the gear).
Do the same steps on the other side of the part. Next, insert a screwdriver into the hole in the part and push through the removed internal parts of the mechanism.
After this action, you can easily get the locking ring and the housing in which the broken striker is located.
If you disassemble this case, you will see the “culprit” of the malfunction, due to which the hammer drill does not hammer.
When assembling the impact mechanism, be sure to generously apply lubricant to all parts.