When installing plastic windows, doors, as well as sealing seams and insulating buildings, polyurethane foam is used. It is divided into household and professional, and is a special liquid that solidifies upon contact with oxygen. To work with professional cylinders, a tool called a mounting gun is produced. Not many craftsmen know how to use a foam gun, so you have to understand this in detail.
Foam gun design details and operating principle
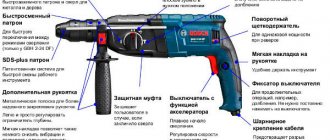
Before you master the use of a foam mounting gun, you will need to understand the internal structure and operating principle of this tool. The main design elements of the device in question are the following parts:
- Handle – used to hold the device in your hand, making it easier to use
- The trigger or trigger is an element that, when pressed, releases foam from the container
- The barrel is an elongated cylindrical tube, inside of which there is a channel for transporting a liquid substance from the container to the nozzle
- Adapter - a mechanism to which a cylinder with polyurethane foam is attached when using it
- The adjustment screw is an additional element that is present on all models of mounting guns. The screw is designed to adjust the speed and volume of foamed liquid supply. When the position of the screw changes, the trigger stroke increases or decreases
The photo below shows the design of the foam gun, indicating the main components.
The tool is operated by hand, so it belongs to the category of hand-held devices. The device is called a pistol due to its external resemblance to a firearm. The adapter for connecting a cylinder with a polyurethane composition is located in the upper part of the tool body. This arrangement is not accidental, since the container must be used upside down to ensure the release of liquid. Having understood the design of the spray foam gun, it will be useful to know the principle of its operation. First, let's look at the cross-sectional design of a spray foam gun.
Next, we will learn in detail what the internal components of the instrument in question are intended for.
- Nozzle or fitting - the tip of the barrel through which the polyurethane composition exits
- The barrel is an oblong part through which the polyurethane mixture is transferred from the adapter to the nozzle
- Needle rod - the internal channel of the barrel through which liquid foam is transported when the trigger is pressed
- Adapter - a device to which a cylinder with a polyurethane composition is attached
- Housing - the base of the device, made of metal or plastic
- Through hole - the inner chamber in which the linings are located
- Liners - connected to needle valve retaining sleeve
- Adjustment screw - designed to adjust the volume and speed of foam output
- A spring is a component of the adjustment mechanism, which, depending on the clamping force, ensures a high or low level of passage of polyurethane liquid
- Handle - an integral part of the body designed to hold the tool in the hand
- Retaining sleeve - connected to the adjusting screw spring and needle valve. Responsible for the quantitative supply of the composition to the nozzle
- Trigger - connected to a needle valve that moves when the part is acted upon
Knowing the external and internal structure of the tool in question, you should find out the operating principle by which the foam mounting gun functions. When the trigger is pulled, the needle valve located inside the tool barrel is displaced. The internal cavity of the barrel has a channel, which is filled with mounting foam when the cylinder is secured to the adapter. The movement of the rod helps to open the channel to the nozzle, as a result of which the passage opens and the release of the polyurethane composition. To adjust the speed and volume of foam supply, there is an adjusting screw (on all models). Its rotation in one direction or the other helps to weaken or compress the spring acting on the fixing sleeve.
This is interesting!
Polyurethane or polyurethane foam has another name - polyurethane foam sealant. This chemical composition received the name sealant due to its properties and application features.
Types of foam guns
Guns for working with mounting sealant are classified into two types - professional and household. Household appliances are often sold together with cylinders of polyurethane foam, and they are intended for one-time use. They are made of plastic or polyethylene, which allows foam to escape from the container. Household foam guns are used exclusively for ordinary cans that are not intended for use with professional equipment.
The advantage of household pistols is that they cost pennies. After use, they cannot be cleaned to be reused. In addition, if you start using polyurethane foam, it should be used up within 20-30 minutes. If this is not done, the gun nozzle will become clogged with the drying polyurethane compound, and it will be impossible to continue working with it.
This is interesting!
Many people do not know that if they start using household foam, they should use it entirely.
You cannot leave a started container for storage, as the foam will dry out inside. It is also impossible to store a container of foam for a long time, which will lead to the loss of its technical properties. The most common case of long-term storage of a foam container is a decrease in the volume of polyurethane liquid. Professional guns for polyurethane foam are the devices discussed in the material. The main advantage of such devices is that they are reusable. But first things first:
- Material of manufacture - to create professional guns for working with polyurethane foam, metal and plastic are used. Moreover, cheap device options are made from cheap materials, while expensive ones involve the use of high-quality metal and impact-resistant plastic.
- Disassembly - To ensure that the tool can be reused, the internal parts must be cleaned after use. For this purpose, the device is made dismountable, which allows, if necessary, to disassemble it in order to clean or replace faulty parts. To clean the foam composition inside the gun, you will need special dissolving liquids. However, such liquids are powerless if the polyurethane composition has dried out.
- Used to work with special cylinders. To operate a foam spray gun, it is important to consider the selection of the appropriate cylinder. They differ from a regular cylinder for a household gun in the presence of a threaded adapter. Using this threaded adapter, the cylinder is fixed to the gun adapter, ensuring a tight connection
Knowing the differences between the types of foam guns, you should understand in which case it is recommended to choose the appropriate options.
- To perform one-time work on blowing out cracks in walls or other structures, it is recommended to choose cylinders with polyurethane foam and disposable guns. After the cylinder is used up, it should be disposed of along with the plastic tool.
- If it is necessary to install a window frame, carry out sealing, insulation and other types of manipulations, then you should choose cylinders with polyurethane foam for professional guns. The use of a special tool affects not only the convenience of work, but also the efficient and economical use of material
When the main differences between household (disposable) and professional devices for working with polyurethane foam are known, an appropriate decision should be made - which is better to use in a particular case.
This is interesting!
Despite the significant differences between the types of mounting guns, they are affordable for everyone. The cost of professional devices for foam ranges from 500 rubles to 3000 rubles.
The procedure for using the unit for releasing polyurethane foam
1. Raise the ring for fixing the cylinder up along the thread until it stops. Screw in a full container of foam and lower the ring. There should be a short hissing sound. This means that the tool is ready for use.
2. Insert the barrel into the slot and pull the trigger. Experimentally select the amount of foam produced. To do this, you need to twist the nut located at the end of the housing.
3. When finished, close the feed screw as far as it will go. The locking needle inside the barrel will close the exit hole. Do not remove the container with the remaining foam. If you remove it, the mass inside the gun will dry out.
If the foam runs out and the container needs to be removed, the tool must be cleaned. To do this, remove the needle and wash all problem areas with cleaning liquid.
Poor quality tools, as well as improper operation, can cause breakdowns. In particular,
- air whistles when used;
- no foam comes out of the barrel.
In such situations, the clog is to blame. Remains of foam blocked the inlet/outlet. Repair work should be concentrated on the following areas:
- balloon toe;
- locking needle (ball) at the end of the barrel;
- supply valve (in the place where the cylinder is attached).
If the mounting foam has dried inside the barrel, then the tool must be disposed of in almost one hundred percent of cases. If individual parts listed above are damaged, the gun can be saved. To do this, unscrew the cylinder, release the pressure and expel the remaining foam. Problem parts are treated with cleaning liquid. Acetone is also suitable for this work. But it is unacceptable to use substances that cause corrosion and other damage to pistol elements.
You can purchase flushing fluid in a bottle. It is placed on the apparatus and the substance is “driven” through the system.
Where and for what are polyurethane foam mounting guns used?
The types of tools under consideration have found their application to perform various tasks. Most often, they are used by window and door installers, as well as builders. Moreover, their use is impossible without special cylinders with a polyurethane composition. Moreover, it should be noted that the polyurethane composition can be used both for sealing and insulation, and for gluing. Let's take a closer look at the purposes for which polyurethane foam is used with a gun:
- Sealing seams and holes that occur when walls are insulated with polystyrene foam or polystyrene foam
- Insulation of window and door openings, as well as elimination of drafts
- Bonding door and window frames, as well as sheets of polystyrene foam and expanded polystyrene when insulating walls
- Sealing joints
- Soundproofing
- Production of various designs, layouts, crafts, etc.
- Blowing out holes when installing air conditioners
- Filling cracks and other voids
The scope of use of foam squeezed out of a cylinder using a mounting gun is not limited to the above description. It is used always and wherever it is necessary to quickly and efficiently eliminate cracks or holes in the walls, from which a draft arises and mold appears. Some even use the material in question to blow out car exhaust pipes, doors, hoods and trunks, which is done in order to teach persistent violators of parking rules a lesson. However, such use of the composition is considered hooliganism, since getting rid of the sprayed and dried composition is quite problematic.
This is interesting!
When using foam, it is important to know one of its features - it is susceptible to losing its properties when exposed to ultraviolet radiation. That is why it is not recommended to apply foam where the sun will shine on it. If cracks or holes are being sealed on the outside of the wall, then after applying the composition, the areas should be covered with plaster.
How to use foam under the gun instructions
After purchasing a mounting gun and a special cylinder with polyurethane liquid, you will need to learn how to use them correctly. There is nothing complicated about how to use foam for a gun, and even a child can handle it. However, children should not be allowed to use polyurethane foam, since despite its harmlessness, the composition is a chemical substance that can cause serious injuries.
Instructions for using a foam mounting gun are as follows:
- The first step is to thoroughly shake the container of polyurethane liquid. Moreover, it is recommended to hold the balloon in your hand upside down.
- If work using foam is carried out outdoors at low temperatures, then the container should first be heated in a warm room. It is not recommended to store cylinders outdoors at sub-zero temperatures
- After these requirements are met, the tool is charged. To do this, remove the protective cap from the cylinder, and then screw the gun on top
- Rotate the gun all the way, you will hear a characteristic sound of air bleed
- After this, you need to take the tool in your hand, and the cylinder will be on top. This is the correct location of the cylinder when using the device. If work is carried out under the ceiling, then you should use a flexible connector, through which the gun remains in the same position
- After the cylinder is connected to the gun, you should pull the trigger and wait for the foam to come out through the nozzle. If necessary, adjust the release rate of the polyurethane composition using the adjusting screw.
- After this, we proceed to directly apply the foam to the required areas. To ensure a better connection of the foam with the surface on which it is applied, it should be moistened with water. Water helps improve adhesive properties. Few people know about this, so the composition is often applied to dusty areas, which leads to a decrease in the quality of gluing, sealing, etc.
- The tip of the tool is pointed directly at the seam and the trigger is pulled. If the foam flows weakly, you should tighten the adjusting screw, opening the nozzle holes to the maximum
- Filling the seams is carried out from the bottom up, while performing zigzag movements
- You should not fill the seam completely, as the foam tends to expand when it dries. This is important to consider, since when drying, the pressure of the material increases, which can lead to deformation of products that are blown with foam.
- If a long-lasting seam is blown with a polyurethane compound, you can find how the foam changes its consistency during the process. To ensure high-quality filling of the seam with foam, the container should be shaken periodically
- After finishing the work, you need to remove the empty cylinder from the gun and wash the device. For this purpose, special cylinders with cleaning liquid are used. A cylinder with a special liquid is screwed into the adapter, after which it is necessary to spray by making 5 short presses on the trigger. In this case, the barrel of the gun is directed towards the surface where the foam was applied. Also keep in mind that the cleaning liquid even corrodes paint, so the best option is to spray it on a concrete or brick wall
The outside of the gun should also be wiped with a cloth soaked in solvent. If it is necessary to check or further clean the tool, it can be disassembled. However, practice shows that there is no need to disassemble the gun if you use cleaning material in a timely manner.
When working with a tool, it is important to use protective equipment, namely:
- Gloves - not cotton
- Glasses
- Working clothes
- Respirator
If foam gets on the skin, do not rub it. To remove foam from the covers, you will need to use a cloth soaked in solvent. Another way to remove polyurethane foam from the skin is to wait until it hardens. It is easier to clean the chemical composition after it has dried than in liquid form. Glasses are needed to protect the eyes from contact with the composition, especially when working near the ceiling. When working with polyurethane foam, a harmful odor is released that is dangerous to humans. That is why, when frequently working with polyurethane foam in unventilated areas, you should use respirators.
Having understood the question of how to use foam under the gun, you can start working with the tool. After finishing the work and washing the device, do not forget to screw the adjusting screw all the way.
This is interesting!
Not all craftsmen know one very important feature of professional pistols, which is the possibility of long-term storage with a canister installed. A mounting gun with an unfinished container of polyurethane foam can be stored for more than a month. But at the same time, it is worth considering one important feature: polymerization of the spring occurs, which subsequently interferes with the normal functioning of the tool. You can store a gun with a charged foam cylinder if it is completely sealed, and if there are places where foam leaks, this will lead to it hardening inside the tool.
The device of the gun for polyurethane foam
A professional spray foam gun is a mechanical device, all parts of which have sealed connections and are equipped with valves. This is necessary to isolate the foam from interaction with oxygen until it leaves the tip. Upon contact with oxygen, a chemical reaction occurs, which leads to a significant expansion of the foam and its hardening.
Gun components for polyurethane foam:
- Tip. Attached to the end of the pistol barrel. Its diameter is 1/4–1/6 of the trunk diameter. This narrowing is necessary to create additional foam pressure at the exit of the gun. The tip is removable; if it breaks, it can be replaced.
- Trunk. Pistols are equipped with two types of barrels: collapsible and non-demountable. The collapsible barrel consists of two cylindrical tubes, which are located coaxially (one inside the other). The main indicator of the quality of pistol barrels is the degree of roughness of the internal surface along which the foam moves. The inside of the barrel should be as polished as possible. This will make it easier for the foam to move and clean the barrel when the job is finished.
- Adapter. The element connecting the foam cylinder to the gun. During the process of recharging the cylinder, the adapter often becomes contaminated with foam residues. It is located at the top of the pistol. This is caused by the need to balance the instrument in the equipped state. High-quality pistols are always perfectly balanced, making them very convenient to use. The adapter is a removable part that must be replaced if it fails.
- Trigger adjustment screw. This mechanism is designed to manually regulate the output of the rod, which limits the depth of the trigger press. This is how the foam coming out of the cylinder is dosed (some installers call this part “foam supply”).
- Barrel fastening nut. It has a fairly fine thread pitch and allows the barrel to be hermetically attached to the gun.
- Trigger. An actuator that presses on the rod and pushes the foam out of the cylinder.
- Handle. Made from various materials. Professional models are equipped with handles made of well-polished metal, which is easily cleaned of accidentally trapped foam. High-quality plastic handles also cope well with this task, but cheap plastic quickly wears out and gets dirty.
The spray foam gun consists of standard components, some of which are consumables and can be replaced - Smoothly and carefully remove the used foam container. Residual pressure should be released gradually - this is one of the rules for the safe operation of such equipment. After removing the cylinder, the adapter is cleaned with an acetone solution or a special foam cleaner.
Before disassembling the gun, you must remove the cylinder from it. - Remove the adapter. This operation is often performed using improvised means, such as a screwdriver. When doing this, care should be taken not to damage the surfaces of the gun parts.
The adapter is pressed onto a metal axis, so to remove it you need to apply a little force using a screwdriver or some other auxiliary object - Disconnect the barrel rod along with the tip.
The barrel of the foam gun is unscrewed using a wrench, for which there are special slots in its base - Remove the gun body cover. To do this you will need to unscrew the adjusting bolt.
To remove the cover you need to unscrew the adjusting bolt - Remove the inner cylindrical tube from the housing.
In order to remove the inner part of the barrel, you need to apply a little pressure on it from the tip - Smoking is strictly prohibited near the solvent and while cleaning the gun.
- The cylinder should not be left in direct sunlight or near heat sources.
- When working with a solvent, the stream should be directed away from you, and if the product gets on the skin or mucous membrane, you must immediately rinse the area with running water and take first aid measures according to the manufacturer’s instructions (usually contained on the cylinder).
- The adapter is carefully removed.
- A few drops of solvent (10–20) are poured into the gun.
- By gently pressing the trigger, the valve opens, allowing the solvent to flow further. While pulling the trigger, solvent can be added in the same amount.
- The gun is turned with the nozzle down to allow the solvent to flow naturally inside the barrel. You can leave the instrument in this position for 15–20 minutes. A subsequent inspection of the nozzle will indicate whether these actions were successful. If the solvent has reached the outlet of the barrel, the gun can be restored. To do this, you will still need a bottle of solvent, which is used in the same way as in the first case.
In order to clean the mounting gun, you can pour solvent into it and blow it through the barrel
How to disassemble a mounting gun
If you need to repair or simply clean the foam gun, you must first disassemble it. This is done quite simply - you need to follow the following sequence of actions.
How to Clean a Foam Applying Tool
The ideal option is to clean the gun with a special product. To do this, a cylinder with a cleaner is installed in place of the used foam cylinder. Pressing the trigger causes a jet of liquid to move in the barrel, which washes away the remaining foam. This procedure is carried out until a clean solvent appears at the outlet of the barrel.
To clean the gun, a container with a special product is installed in place of the foam container.
The mounting for solvent cylinders is standard and is suitable for all types of guns.
Professional installers recommend purchasing a solvent from the same manufacturer as the foam. This approach will provide faster and better cleaning. Different brands of foam and solvent may differ in chemical properties and may not interact well. This can make cleaning more labor intensive.
When using a solvent, remember that it is highly flammable.
If the work is completed, but there is no proprietary solvent and the foam on the gun begins to polymerize (harden), the cleaning process will take longer and require some effort. In such cases, any construction solvents (acetone, solvent and others) can be used to remove foam residues.
The time for complete hardening of the polyurethane foam after contact with air is indicated on the cylinder. This indicator is greatly influenced by the level of air humidity. With sufficient humidity, a five-centimeter layer of foam hardens within 2–3 hours, but final polymerization of the foam can last another 7 to 12 hours. In frosty or dry weather, the polymerization period increases to 24 hours.
For rough cleaning of the gun from dried foam, a construction (clerical) knife is suitable. With its help, the outer surface of the gun and its nozzle are cleaned. You need to work carefully to cause minimal damage to the polished parts of the tool. After removing the foam, the surfaces should be wiped with a soft cloth soaked in any solvent.
If you don’t have a special solvent at hand, rough cleaning can be done using a construction knife
After treating the external surfaces, you need to clean the gun valves from foam. Almost any construction solvent is also suitable for this.
You should not overuse solvents not intended for foam cleaning. Frequent processing of the internal parts of the gun with such improvised substitutes will lead to faster wear of the tool parts.
If the foam has completely hardened and the gun has been stored in this condition for a long time (more than three days at any humidity), you can also try to restore it. It is most problematic to remove completely polymerized foam. This can also be done with a regular solvent, for which it is necessary to disassemble the entire gun and clean each part from foam mechanically. Wire and acetone are used to clean the barrel. All actions are carried out carefully, without sudden movements.
If the foam inside the gun has polymerized, it can only be cleaned after complete disassembly.
It is quite difficult to clean the gun from frozen foam without damaging its surface. This method is a last resort. It is much more effective to buy a cleaner in a timely manner and use it for its intended purpose.
There is also a “folk” method for removing polyurethane foam from a gun and various surfaces. It involves the use of the drug Dimexide (Dimethyl sulfoxide), which is sold in any pharmacy and is inexpensive. When using it, you need to ensure that the contact of the drug and human skin is minimal, so it is better to work with rubber gloves. The drug is applied directly to the foam and left for 30–40 minutes. After this, the foam can be removed with a cloth. When using this product, you should remember the specific smell of Dimexide - some simply cannot stand it.
When using the drug Dimexide, you must be careful - the product causes skin irritation and has a very specific smell
If foam gets on your hands or other areas of the skin, it is more advisable to wash it off with vegetable oil, which must be applied to the surface to be treated, left for 30 minutes, and then wiped off with a rag. This method is the most painless for humans.
Video: how to clean foam from a gun
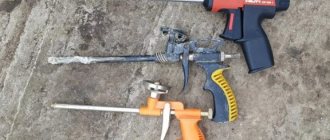
How to use foam without a gun - useful tips
Very often, craftsmen wonder how to use foam without a gun. There are times when, after purchasing a foam canister, a disposable pistol is lost. It can not only get lost, but also break, and going to the city and buying a cheap device is expensive and irrational. It will also not be possible to use a professional cylinder gun that is not designed for this purpose, so you need to look for a solution. There is a solution, and then we will clearly look at how to use polyurethane foam without a gun:
- To use a regular foam cylinder without a gun, you will need to prepare two things - a thin tube, the diameter of which must match the cylinder fitting, and a wide washer
- First you need to attach a thin tube to the fitting of the can.
- Place a washer on top of the tube, which should rest against the cylinder mechanism
- By pressing the washer, foam will be supplied from the cylinder through the fitting into the tube, which should only be directed to the required area
If you cannot find a plastic tube, then you should use a flexible hose or insulation from an electrical wire. The video below shows how you can easily use construction foam without a gun.
Another situation is when at the most inopportune moment there is no foam mounting gun at hand. It may get lost, broken, or not found at all. What to do in this case? The main thing is never to panic and turn to the Internet for help, because there are always smart thoughts that will help you get out of various situations. To use a professional foam canister without a gun, you must follow these steps:
- Initially, you should find a trunk through which the polyurethane foam will be released. As a barrel, you can use a flexible hose, tube or insulation from a wire. If a wire is used, the cores should initially be removed from it.
- Next, select a suitable size plastic dowel. The dowel will play the role of a trigger. When choosing a dowel, it is important to pay attention to its upper part, where the “skirt” should be present. This “skirt” ensures a hermetically sealed connection of the part to the foam container.
- Having prepared a hose from the electrical cable, and also using a dowel, you need to connect the two elements. The end of the dowel can be cut off if it is not possible to put the insulation on it from the cable
- After this, all that remains is to attach the resulting homemade structure in the form of a pistol, and resort to squeezing out the foam
Long-term or constant use of foam in this way is very inconvenient, but if you need to use the device for a short time, then every master can handle this task. Below is a video showing how to use polyurethane foam without a gun.
The life hacks described above will help you use a can of polyurethane foam when you don’t have a gun at hand. If you have not yet purchased a device for polyurethane sealant, then next we will consider the features of choosing the right tool.
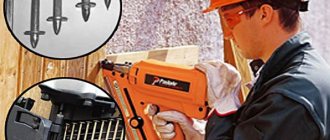
Construction and assembly gun - classification and scope of application
A specialized tool for driving dowel-type nails into durable surfaces of concrete, stone, brick and metal is called a construction gun. These devices are used to install ventilation and electrical equipment, plumbing and roofing. Working with a nail gun is a quick and convenient alternative to driving brackets or other fasteners into concrete walls, steel profiles and stone floors. In general, the mounting gun for repair is of the following types:
- A pneumatic tool is a device for driving staples for construction fastening of sound insulation of the roof of a house, other sheet materials, chipboard and fibreboard, suspended ceilings and other fabric. Pneumatic guns operate on compressed air (from a central compressor or from cylinders) and are widely used in insulating surfaces, installing mesh, and even in furniture making;
- A gas gun is a cartridgeless tool with a combustion chamber of butane-propane gases. The resulting blast wave intensively “pushes” the dowel into the mounting surface. They are used not only for durable materials, but also for drywall, wood and when installing light metal structures;
- Powder devices are loaded with special cartridges. Fastening is carried out by a classic dowel shot after hitting it with a special piston or under the influence of the direct energy of powder gases. A mounting gun for dowels usually involves a powder device.
The instructions for any mounting gun require mandatory and detailed study. Its main points relate to the strict requirements for tight contact between the “barrel” and the mounting surface - in some models it is impossible to fire a shot without putting pressure on the part being shot. In addition, accurate selection of cartridges is important - the depth of penetration of the dowels directly depends on the strength of the powder charge.
Photo of a gas mounting gun, elektroteh.by
Photo of a construction and assembly gun, elektroteh.by
Photo of a powder mounting gun, elektroteh.by
Photo - how to use a mounting gun, elektroteh.by
Photo of cartridges for a construction and assembly pistol, elektroteh.by
How to choose a foam gun
The tool in question has a simple design, so there are no difficulties with either selection or repair. Next, we will consider the main criteria that you should pay attention to in order to choose the appropriate mounting gun for polyurethane sealant.
- Tool manufacturer - choosing tools from well-known manufacturers is a 100% guarantee that the buyer will purchase a reliable device that will last a long time if used correctly
- Material of manufacture - if you come across a completely plastic pistol, then you should refuse to buy it. You should choose tools that are made of metal or metal and plastic. Moreover, the body and handle of the device are made of plastic, and the main working parts are metal.
- Type (collapsible or non-collapsible) - almost all versions of mounting guns are collapsible, which allows for their cleaning, maintenance and repair if necessary. If you see a foam gun that is not collapsible, then it is better not to buy it
- Leak testing is one of the most important parameters. If you buy an initially leaky tool, then in addition to the fact that polyurethane liquid will leak when working with it, you will also not be able to leave it with a charged cylinder for a long time. There are various methods for checking a gun under polyurethane foam, which we will consider in detail. When purchasing, remove the pistol from its packaging and pull the trigger. At the same time, you will hear the characteristic sound of air escaping. This is a sign that the device is sealed and worth buying. If the air does not bleed out, it means someone has already pulled the trigger before you, or the tool is not sealed. You can check this in other ways. To do this, install a flushing bottle on the device and make several presses. After this, inspect all connections. The absence of liquid drips other than the nozzle indicates the serviceability of the device. And the last way to check is after several pulls of the trigger, you need to remove the flushing bottle. The next day, pull the trigger, and if the remaining liquid comes out under pressure, then everything is in order with the tightness of the tool. If it simply leaks, then it is necessary to check the seals and, if necessary, replace them
When choosing, you should also hold the tool in your hand and make sure that it will be comfortable to use. The adjustment screw should move smoothly, and the barrel and channels should be made of stainless steel. Ultimately, you need to compare tool prices. It is not recommended to buy the cheapest one, since the manufacturer saved on parts during its manufacture, so such a device will not last long. The most expensive foam gun should be purchased if you plan to use it often; otherwise, it is not a rational waste of money.
For the manufacture of some parts of the instruments in question, non-ferrous metals such as brass, copper, etc. can be used, which affects the cost of the device. Well-known manufacturers of the instruments in question:
- Matrix
- Hilti
- Atoll
- Kraftool
- Stayer
Now you know not only how to choose a professional spray foam gun, but also which brand of device is best to buy. And be sure to read reviews about certain models on our website or on various forums.
Malfunctions of a foam gun and features of its repair
When working with the tool, malfunctions may occur, which will require some knowledge to resolve. Let's look at what malfunctions of a foam gun there are, how they manifest themselves, and how to eliminate them.
- When you press the trigger, the polyurethane consistency does not come out - if the screw on the tool is adjusted, then the reason may be that the internal cavity of the barrel, as well as the adapter channel, is clogged. Disassemble the tool and make sure that its internal parts are not clogged. If the tool is working properly, then the cause may be in the cylinder. Foam does not come out of the gun if the work is carried out in cold weather, and the cylinder has not been previously warmed up to room temperature. Install another cylinder to make sure the device is working properly
- Foam leaks when using the gun - such a malfunction indicates a violation of the tightness. In this case, you should resort to replacing the seals (if any), cleaning the parts, and also coating the threads with epoxy glue. If there is a foam leak, then you should not leave the gun with a charged cylinder for a long time.
- Foam comes out through the nozzle without pulling the trigger. This malfunction indicates that the nozzle has worn out. To repair the mounting gun, the tip must be replaced. First make sure that the adjusting screw is screwed in all the way
- The shut-off valve in the adapter is faulty. The adapter consists of a channel as well as a locking mechanism. When the foam container is removed, the ball-type valve closes, preventing liquid leakage from the instrument. To close the valve, a spring acts on the ball.
When a new cylinder is installed, the fitting rests against the ball, displacing it inward. In this case, the gun is filled with a polyurethane mixture coming out of the barrel. If the spring is worn out (which occurs due to the influence of foam), then when the spent cylinder is removed, the remaining foam will be released from the reducer. This type of malfunction can be solved by replacing the adapter, since manufacturers do not provide the ability to replace one spring.
- When the trigger is pulled, a small amount of foam comes out - This is often caused by a malfunction of the mechanism. Often such breakdowns occur on Chinese foam guns.
To repair, unscrew the adjusting screw and look where the washer is located. Details of the repair can be seen in the video.
Disassembling the tool is not particularly difficult, but it is important to take into account that it is strictly contraindicated to use a vice, as the plastic body of the tool can be damaged. When assembling the gun, it is recommended to use epoxy glue or sealant to improve the tightness of the joints.
If you are buying a foam gun for your home, you should also purchase a cleaning liquid along with it. It should always be used after finishing applying the foam. The liquid allows you to extend the service life of the tool and eliminate the need for frequent repairs or replacement of parts. After reading this material, you will learn the design of the tool, the principle of operation, features of selection, repair and correct use of the device. Give due attention to this simple tool to make your work efficient and productive.
How to use a gun to apply polyurethane foam from a can
To ensure high-quality installation of polyurethane foam, you must follow a number of rules:
- It is advisable to moisten the cleaned surface on which foam needs to be applied using a spray bottle (any household water sprayer will do);
- You need to test the foam flow rate in an inconspicuous place. If necessary, the feed intensity can be controlled using the adjusting screw;
- In order for the installation seam to be equal and tight, the tip must be constantly in the foam. If you periodically lift it, the seam will become intermittent and of lower quality;
- You should not release your finger from the trigger unless necessary. Such actions also lead to seam ruptures; In order for the seam to be straight and even, the gun must be driven continuously, pressing the trigger evenly
- On vertically located surfaces, foam is applied from bottom to top. Each previous seam is a support for the next one;
- during long-term operation, the container must be shaken periodically;
- Some experts recommend moistening the finished seam with water. A spray bottle is also suitable for this;
- replacing the cylinder is similar to the process of its initial installation. If the adapter is dirty with foam, it needs to be cleaned.
During breaks in work, it is necessary to clean the gun nozzle from residual foam using a solvent, a damp cloth or a clean rag. To do this, you need to tighten the gun trigger adjustment screw to prevent foam from flowing. The barrel must be removed, washed with solvent and reinstalled. A pistol with a completely unused cylinder can be stored for no more than 7 days. After this period, the foam begins to harden.
If the work is finished, and there is still foam left, you need to tighten the trigger adjustment screw on the gun and remove the cylinder from the adapter. It can be unscrewed with confidence; it has a built-in valve that will not allow any remaining foam to fly around. Then the external surfaces of the gun are washed with a special solvent. Foam solvent cylinders are equipped with a special nozzle, which is used for spraying onto the surface to be washed.
The cleaner bottle is equipped with a spray nozzle, which is attached to a plastic wire. Next, the solvent bottle is screwed onto the adapter (it has a standard fastening). When you press the trigger, the solvent enters the gun under pressure and washes all its internal surfaces from foam residues.
When cleaning the internal surfaces of the gun with a pressure cleaner, you must ensure that there are no people or open sources of fire in the direction of the jet exit. The best way to clean the gun is by pointing it into a trash bag.
If the foam in the cylinder runs out and work continues, the empty cylinder is removed from the gun and a new one is installed in its place. In this case, it is advisable to rinse the gun from any remaining foam with a cleaner.
How to load a pistol
The cylinder must be connected to the gun adapter in a vertical position. You need to remove the protective cap from the cylinder nozzle. Next, it is installed in the grooves of the adapter and turned until it stops. The gun is held with one hand, and the foam container is screwed in with the other. At the same time, a short hissing sound is heard, which indicates depressurization of the cylinder. After this, the gun is ready for use.
The cylinder must be screwed onto the gun in a vertical position
For safety, a number of rules should be followed:
- You cannot use a cylinder whose temperature is below 15 degrees. Before use, it must be warmed to room temperature. You can use warm water for this (not higher than 40 oC);
- if the ambient temperature is above +35 oC or below zero, it is advisable to wrap the cylinder with a clean rag for thermal insulation and safety;
- you need to screw the cylinder onto a cleaned adapter - this is necessary to ensure normal sealing of the connection;
- Before connecting to the gun, the cylinder must be shaken several times;
- After installing the cylinder, you need to pull the trigger and wait until the barrel is completely filled with foam. This takes a second or two. Excess foam coming out of the nozzle can be removed with a cloth.