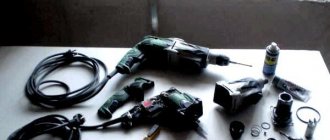
Mechanical malfunctions of the Bosch rotary hammer
When mechanical malfunctions occur in the operation of the tool, an extraneous unpleasant sound appears, sparking intensifies in the collector area, a burning smell appears, the tool heats up excessively, its power drops depending on the duration of operation and the impact on the material.
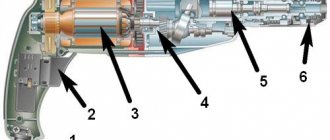
We will look at all the faults in the diagram of the Bosch 2-26 rotary hammer. Other models, such as Bosch 2-20, 2-24, differ in the design of the intermediate shaft and the installation of various bearings.
The hammer drill stops hammering, but drills
The hammer drill does not hammer under load or in idle mode for the following reasons:
- the rubber rings of the striker, striker, and piston are worn out;
- the rolling bearing race has collapsed;
- the cylinder and the firing pin of the percussion mechanism were destroyed;
- cut off the splines of the clutch mounted on the intermediate shaft;
The hammer drill has stopped drilling, but is chiseling
The main reasons why a rotary hammer hammers but does not drill are:
- the force of the conical spring pressing the clutch has weakened;
- the locking roller does not fix the large barrel shaft gear;
- does not hold the tool locking mechanism in the barrel;
- The hammer drill does not chisel or drill.
The main reasons why a hammer drill does not chisel or drill are:
- sheared teeth on the small rotor gear or on the large intermediate shaft gear;
- The rotary hammer electric motor does not work;
- there is no power to the hammer drill motor.
Now let's talk about everything in order
Let's consider options in which the hammer drill does not hammer, but drills
Wear of rubber rings on the striker, striker, piston.
This reason appears gradually as the rubber rings wear out. At first the blow weakens, then disappears altogether.
The malfunction is eliminated by replacing the indicated rubber rings with new ones.
For any repair of rotary hammers or their components, all rubber products must be replaced.
Repair kit for rubber sealing rings for a Bosch 2-26 rotary hammer
The rolling bearing race has fallen apart (drunk bearing)
If the drunk bearing pos. 830 is destroyed, the rotational movement of the intermediate shaft cannot be converted into the translational movement of the cylinder in the impact mechanism.
Eliminated by completely replacing the rolling bearing.
Friction bearing
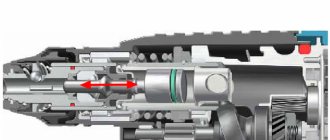
The cylinder, firing pin, and firing pin of the firing mechanism were destroyed
There are cases when the striker in the cylinder, pos. 26, gets stuck, which leads to destruction of the cylinder and the impossibility of creating air pressure in the barrel of the striker mechanism. And the second reason: destruction or breakage of the striker pos. 28, leading to distortion of the part and the impossibility of transmitting the shock impulse. Breakdowns are eliminated by completely replacing failed parts.
The firing pin is jammed in the piston, the piston is destroyed
The splines of the clutch, pos. 67, mounted on the intermediate shaft, were cut off
The malfunction can be eliminated by repairing the clutch or completely replacing it. When making repairs, the worn teeth on the clutch are filed down. To correct this defect, a round needle file and a drill are used. The coupling is clamped in the hand, and the tooth profiles are straightened using a drill with an appropriate file. The splines on the intermediate shaft are modified in the same way.
Restoring the teeth of the intermediate shaft clutch
Let's consider options in which the hammer drills but does not chisel
The force of the conical spring pressing the clutch has weakened
When the pressure force of the spring pos. 50 decreases, the clutch slips on the intermediate shaft without transmitting rotation from the small spur gear to the large gear pos. 22 of the barrel shaft pos. 821 of the impact mechanism. By the way, on different Bosch models, clutches are designed differently.
Details of the torque and translational impulse transmission unit
The locking roller does not lock the large barrel shaft gear
The large gear, pos. 22, is attached to the barrel shaft, pos. 01, with a roller, pos. 88, pressed against the shaft collar with a conical spring, pos. 80, and secured with a retaining ring, pos. 85.
The reason may be a weakening of the force of the conical spring pos. 80, destruction of the locking ring pos. 85, or loss of the fixing roller pos. 88.
Read also: Drawing of a wood concrete chip cutter
Gear pos.22 on the shaft pos.01 of the barrel pos.821 of the shock block assembly
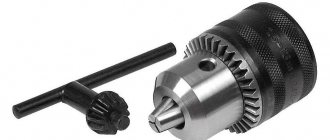
The mechanism for fixing the tool in the drill barrel does not hold the drill
Bosch rotary hammers use two types of chucks: SDS-plus and SDS-max. The difference is in the design of the locking mechanism.
The reason is the wear of the antennae of the chuck raster bushing, which makes it impossible to transmit the shock pulse to the working tool of the hammer drill.
Tool shanks for hammer drill chucks Bosch 2-26
Let's consider options in which the hammer drill does not drill or chisel
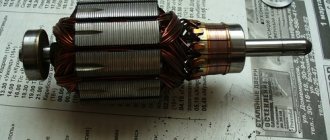
Sheared teeth on the small rotor gear
The gears rotate and the teeth on one of them, usually the small one, are cut off.
When the working tool jams and the clutch does not work properly, the gear teeth on the hammer drill shaft and the intermediate shaft wear out or are completely destroyed.
In this case, the rotor or large gear of the intermediate shaft is completely changed.
Bosch 2-26 hammer drill rotor with cut splines
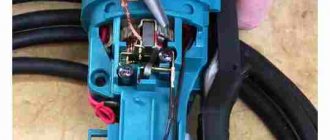
Hammer drill motor does not work
The reasons for a non-working electric motor may be:
- short circuit in the rotor, stator;
- destruction of carbon electric brushes;
- loosening of the brush holders;
- burnout of lamellas on the rotor commutator;
- breakage of the rotor or stator windings.
The listed malfunctions are eliminated by repair (manually rewinding the windings, replacing the commutator and desoldering the winding leads) or replacing the rotor, stator, and carbon electric brushes with new ones. The majority of malfunctions in the electrical part of the Bosch 2-26 rotary hammer are confirmed by increasing sparking in the collector area.
The length of serviceable electric brushes cannot be less than 8 mm. When replacing one brush, the second should change automatically.
The rotor or stator windings can be rewound yourself at home.
Burnt rotor manifold of a Bosch rotary hammer
No power to the electric motor of the Bosch rotary hammer
The cause of this malfunction is a break in the wire supplying power to the electric motor. Most often, a break occurs at the point where the cable enters the hammer drill. The wire should be replaced with a new one or repaired. The malfunction can be determined using a tester. If there is no tester, the fault can be found using the power phase and a screwdriver with a neon indicator lamp. Connecting the power wires one by one, at the other end, using a neon screwdriver, determine the presence or absence of a phase.
The power button for the hammer drill does not work. Determined by a short circuit tester.
Most often, the failure of the punch button is caused by a short circuit of the filter capacitor. It is best to replace the button with a new one.
Power cord pos. 5 at the entrance to the tool
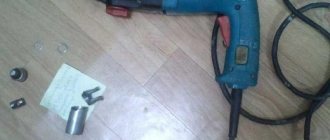
Self-repair of Makita hammer drill barrel with a selection of spare parts
Even very reliable Makita rock drills will break down over time. Even if any breakdown is fixed, you just need to have straight arms and assertiveness. Apart from electronic defects, rotary hammers are also subject to mechanical damage. Operating hard rock drills in a dusty environment will reduce service life and require user intervention for preventive maintenance.
Repair of the mechanical part of the Makita rotary hammer two thousand four hundred fifty and 2470
Any tool repair begins with determining the nature of the malfunction and dismantling it.
The Makita two thousand four hundred 50 and two thousand four hundred 70 hammer drills can be repaired by a user who has the basic skills of a mechanic and is familiar with electrical safety requirements.
This article discusses the mechanical part of the Makita rotary hammer, the main faults and methods for eliminating them. Dismantling the mechanical part
rotary hammer
Makita
2470
To get to the mechanical part of the hammer drill, you need to pull out or disassemble the cartridge.
Disassembling the cartridge is quickly released, place the strike on the back cover of the case on a tabletop covered with a clean cloth or paper. Using tweezers or a screwdriver, remove the rubber tip 35, item 1.
Carefully release the ring spring, pos. 2, coupling cover, pos. 3, and iron ring, pos. 4. You will reach an iron ball with a diameter of seven mm pos. 20.
Now you can remove the mechanical housing. It's dark. Using a screwdriver, remove the four screws on the end of the housing.
Holding the dark case with your right hand, press your thumb against the end of the shaft from which the cartridge was disassembled. The plastic housing can be simply removed.
Next you need to remove the box shaft.
To disconnect the mechanical part from the electronic part, you first need to remove the electronic brushes. At the bottom of the housing, the rotor is held in place by electronic brushes that need to be removed.
After checking that the electronic brushes are separated from the rotor blades, use a screwdriver to pry the iron body of the hammer drill off the edge of the greenish plastic body.
Now we move on to disconnecting the rotor from the mechanical part
drill. The rotor is contained mechanically by helical gears of the gearbox. If you take the rotor body in one hand and the mechanical body in the other and pull in different directions while swinging, you will separate the two units.
You will receive such a unit in ancient oil. Then unscrew the two M4 bolts with a hexagon × 12 p. 43, art. 266273-7 with internal hex head. Remove the shaft with intermediate gear 10, pos. 80, art. 226399-7.
from the inner body pos. 49, art. 153687-8. Remove old grease from parts.
You will get such a mountain of unblemished parts. Now take a close look at the parts, discard the rubber rings immediately after selecting new ones.
READ How to Drill a Concrete Wall with a Drill
Replace faulty parts with new ones.
General electrical faults of the Bosch 2-26 rotary hammer
Failure of a rotary hammer in the electrical part is accompanied by the appearance of a burning smell, strong heating of the tool during operation, the appearance of large sparks in the area of the rotor commutator of the rotary hammer, and poor operation of the reverse switch.
The operation of the hammer drill is influenced by the condition of the carbon brushes, the reliability of the fastening of the brush holders and their correct installation.
A burning smell appears when the stator or rotor windings are short-circuited.
A drop in power of a rotary hammer with increasing load is typical when there is a break in the rotor windings or when the carbon brushes are short.
The heating of the hammer most often results from a short interturn circuit in the stator or rotor.
Large sparking in the commutator area is caused by interturn closure of the rotor or burnout of the commutator lamellas.
Malfunction of the reverse switch occurs due to burning of its contacts.
But the main reason for all breakdowns is untimely implementation of technical routine maintenance and replacement of carbon brushes.
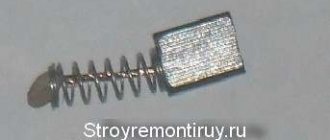
Carbon brushes require replacement after 70 hours of operation or when worn down to 8 mm in length.
General view and dimensions of the carbon brushes of the Bosch rotary hammer
We have given the main reasons why Bosch rotary hammers fail. We may not have described all the breakdowns of Bosch rotary hammers.
If you know other faults with Bosch 2-20, 2-24, 2-26 rotary hammers, please share with us.
Video of replacing a raster bushing in a Bosch 2-26 chuck Video of replacing an armature in a Bosch 2-26 hammer drill
A hammer drill is a complex device consisting of electrical and mechanical components. Constant use of this unit can lead to various breakdowns and malfunctions, especially if preventive maintenance is not carried out. To extend the service life of the tool, as well as to prevent unexpected breakdowns, you should periodically disassemble the hammer drill and carry out diagnostics. If it happens that the hammer drill refuses to function, then you should not rush to purchase a new unit, even if your tool is already ten years old. It can be taken to a repair shop, but the cost of the services will be quite high. This article will tell you how to repair a rotary hammer yourself.
Tips for avoiding similar cases
When using high-quality drills, the drill in the hammer drill will never get stuck. But at the same time, you need to beware of fakes, because now there are a lot of them. And in order to prevent such incidents, it is recommended to carry out trial work with the resulting device.
If after drilling 3-4 holes the drill comes out relaxed, it means the product is of good quality. When the shank comes unraveled, most likely the tool will not be disassembled when removing the device, because the deformation will be small. You need to be careful and not even miss when the drill starts moving along the trunk with enormous force.
There are cases when a massive hammer drill is used to make holes in materials for which the inserted drill is not adapted. Then even a high-quality drill will not withstand such loads and will break apart.
Source
The main malfunctions of a rotary hammer and their external signs
Repairing a rotary hammer with your own hands is not difficult, especially if you have some knowledge of electrical engineering. This unit is a device in which electrical energy is converted into mechanical energy. This means that breakdowns can occur in both the electrical and mechanical parts. The design of a hammer drill resembles the design of an electric drill, only instead of a primitive gearbox consisting of a pair of gears, it contains an entire gear mechanism. Through this mechanism, the torque from the electric motor shaft is converted into reciprocating movements.
Wear or failure can occur in any part of the hammer drill. Before starting repairs, it is important to assess the type and cause of the breakdown. This is an important condition from which repair activities should begin. Determining the type of failure is often not difficult, but sometimes it is necessary to disassemble the device case.
The hammer drill has its weak points, which results in breakdowns in most cases. Sometimes breakdowns occur due to the technician himself, if the device is not operated correctly, or unforeseen situations arise during operation. It is necessary to highlight the main types of faults in the electrical and mechanical parts of the hammer drill. Common types of mechanical failures include:
- No rotating or drilling function.
- The nozzle is stuck in the chuck.
- The nozzle is not fixed in the chuck.
- The occurrence of extraneous noise during operation of the unit.
Read also: Powerful heater for a summer cottage in winter
Electrical faults include:
- No signs of engine operation.
- Increased sparking of brushes.
- The appearance of a burning smell.
- The appearance of smoke during operation of the tool.
When starting to repair a rotary hammer, you should first clean its body of dirt. This is necessary in order to prevent dust and dirt from getting inside the instrument.
Electrical faults
Before disassembling the hammer drill, you need to find out what is causing the malfunction.
After all, if a hammer drill refuses to work, then the reason may be hidden in a banal lack of voltage in the outlet. That's right, troubleshooting should start from smallest to largest. If the tool does not function and does not show any signs of life, then the reason is 100% hidden in the electrical part. Let's look at the main types of faults in the electrical part of the hammer drill, and also find out the features of their elimination.
- No network and damaged network cable. First you need to make sure that there is voltage in the outlet. This can be done by connecting any other household appliance. During the work, the power cable could be accidentally broken with a hammer drill. As a result of broken contact in the wire, the tool will not function. The situation can be corrected by replacing the wire or restoring its integrity. To determine such a breakdown, you should use a tester in dial mode.
- Start button malfunction. The cause of the malfunction may be banal oxidation of the contacts in the start button. To do this, you need to remove the back cover of the tool. If no visible violations of the button are detected, then you can check its serviceability with a multimeter. You can clean the contacts or replace the button assembly.
- Washing brushes. The brush assembly belongs to the category of replaceable parts, therefore, if the brushes are significantly abraded, sparks and a burning smell may be observed. The length of the brush should not be less than 8 mm, so they must be replaced. To replace the commutator brushes, it is necessary to remove worn parts and then install new ones in their place. Replacing electric motor brushes is not often done, since their design is made of graphite. The more often the tool is used, the less frequently the brushes need to be replaced.
- Damage to the speed controller. In this case, the entire assembly should be replaced. But this type of breakdown is quite rare.
- Motor malfunction. This is the worst thing that can happen to a power tool. A burnt-out electric motor can only be repaired in specialized workshops. But you shouldn’t make hasty conclusions about a motor malfunction. After all, the reason for its non-functioning may be carbon deposits on the collector. Oxides and carbon deposits should be removed, and then a test run should be carried out. If in this case nothing helps, then you need to ring the motor armature using a tester. The interturn resistance must have a certain value. If a short circuit is detected or if the device shows infinity, the armature must be replaced or repaired in a workshop. The reason may also be a malfunction of the stator, which also consists of copper windings. The presence of a break or short circuit is checked in the same way using a multimeter.
The stator winding can be rewound at home if you have an idea of its functioning. Rewinding the stator will cost several times less than buying a new electric motor.
It is important to know! When disassembling a power tool, remember that it must be disconnected from the mains.
Mechanical breakdowns
Disassembling the hammer drill may also be necessary if mechanical breakdowns occur. Before proceeding with repair actions, you must first make sure that the breakdown lies precisely in the mechanics of the hammer drill. Let's consider the main points of mechanical malfunctions of a rotary hammer, as well as the features of their elimination:
- Gearbox malfunction. The lack of diagnostic procedures in frequent cases leads to the failure of any part of the gear mechanism. It is necessary to disassemble the tool and then determine the type of malfunction. At the end of the repair work, the gearbox should be lubricated, having first cleaned it of the previous one.
- Cartridge malfunction. If the nozzle does not clamp, then the reason should be sought in the cartridge. In this case, there is no need to disassemble the entire tool. Often, failures in the cartridge occur due to clogging of the inside. The hammer drill chuck can be repaired if all internal parts are intact.
- The mode switch is faulty. It is necessary to disassemble and identify why the switching of modes between drilling and jackhammer does not occur.
These are the main mechanical components that can cause tool malfunction. In addition, there are other types of mechanical failures, depending on the reasons.
- No impact hammer mode. If the drill rotates together with the chuck, then the floating bearing is the cause of this problem. To resolve the problem you will need to replace it. If the cause of the problem does not lie in the floating bearing, then overload could cause the steel striker to split. In such a situation, it is necessary to replace the striker. Another reason for weakening shocks may be wear of the piston group. In this case, you need to replace the broken part.
- The chuck does not rotate. If, when starting the device, the hum of the electric motor is heard, but there is no rotation of the shaft, then the cause may be a jammed gearbox. You cannot keep the tool turned on in this mode, as the motor will burn out. It is necessary to disassemble the tool and identify the cause of the jamming.
- The drill does not stay in the chuck. The cartridge needs to be repaired.
- The hammer drill does not hold the chuck. Sometimes this happens, so it's important to be alert. If the nozzle comes off together with the cartridge, then the cause is wear of the fastener housing. The situation can be corrected by installing a new retaining ring.
Features of barrel perforator repair
A barrel hammer has the appearance of a barrel, which is due to the vertical location of the engine at right angles to the impact mechanism.
Repairing a barrel perforator is almost the same as a conventional tool. The only difference is in gaining access to certain units.
- To get to the gearbox and piston, you will need to remove the plastic cover at the top of the tool.
- To get to the motor, you will need to remove the bottom casing or cover.
- The brushes are replaced through special holes on the sides of the cylinder.
It is important to know! Barrel hammer drills do not have a drilling function, as they are intended exclusively for complex and heavy work. This in some way makes it easier to carry out repair work, in particular, the gearbox.
Some useful tips
To avoid frequent tool breakdowns, you should change every 20-30 minutes of work, with breaks of 10 minutes. After all, engine overheating is one of the common causes of electrical breakdowns.
Read also: Which automatic machine to put into the house
During the work, the reliability of fixation of the nozzles should be monitored. When drilling large holes, work should start with small diameters to lighten the load on the tool. It is better to drill through holes gradually, resorting to the use of short nozzles, gradually replacing them with long ones.
In conclusion, it is worth noting that it will not be possible to avoid tool breakdowns, even if you perform regular diagnostics. But in this case, you can definitely be sure that your tool will not let you down.
How to repair a hammer drill if it doesn't work. We find out the reasons for tool failures
The construction industry is developing and adding new tools every day. Over the course of a couple of years, a rotary hammer . In fact, this is an ordinary drill that is armed with an impact effect. Once a day, the second employee encounters defects.
Design
The difference between a regular drill and a hammer drill is that a hammer drill has a strong impact function, which helps you work with tougher materials. The power of the tool's push allows the master to waste less physical strength. One of the reliable assistants in the household, solving household and repair problems is the representative of Makita electrical equipment.
READ How to Correctly Cut a Channel Using a Grinder
The Makita device consists of motorized and electrical parts. Its body is divided into two colors: black and green. Under the black part there is a mechanical unit, and under the green part there is an electrical installation unit.
The mechanical half is responsible for the following functions:
- shaft torque supply;
- torque;
- shock push;
- transmission of torsion from the rotor to the tool itself.
Makita power tools are the most powerful construction equipment for heavy, intensive loads, with three functions: drilling, crushing, impact drilling. The device has anti-vibration, which is not typical for every instrument. The assembly includes an individual dust protection system.
Specifications:
- weight – 2.04 kg;
- The SDS system makes it possible to attach drills;
- beats 4500 times per minute;
- movement power – 2.7 J;
- power supply from the network – 780 W.
How the start button changes
To replace the start button, you need to remove the cover covering the electrical equipment of the hammer drill. Then you should disconnect the contacts of the conductors connected to it and pull the button body out of the seat. Install a new button in this place, connect the contacts and assemble everything in reverse order.
Removing the cartridge
Disassembling the hammer drill begins with removing the cartridge. As a rule, this is an SDS-plus system cartridge, which is disassembled using a flat-head screwdriver. In this case, there should be no drill or chisel in the chuck.
There are times when the drill gets jammed and it is not so easy to get it out. Then you need to carefully tap the cartridge around the circumference using a rubber hammer and pour a few drops of lubricant like WD-40 inside. After a few minutes, try again, the drill should come out easily. After this, you can begin to disassemble the cartridge itself. Procedure:
- Pull the plastic skirt down.
- Use a screwdriver to remove the rubber protective boot.
- Unclench and remove the retaining ring located behind the boot.
- Remove the plastic boot, spring, locking plates and balls.
- Clean all parts from old grease and store them in a clean place.
Disadvantages and malfunctions of the rotary hammer
To understand the shortcomings and defects of power tools of this type, our well-coordinated team looked at several favorite brands and determined the reasons for the most common breakdowns:
- Excessive wear of the working element;
- The appearance of cracks on the handle and body;
- Rechargeable models have short-lived batteries;
- Frequent wire kinks in electronic models;
- Problems of the impact mechanism and its interaction with the everyday;
- Fragility of bearings, chuck, parts with teeth, safety clutch.
Hammer doesn't work
- A short circuit that led to the combustion of the rotor or stator;
- Complete wear of carbon electric brushes;
- The brush holders are weakened and do not hold them;
- The lamellas on the collector are burnt out;
- The winding on the rotor, or stator, has broken;
- Battery failure;
- The power cord is kinked.
The winding is done in-house. If you decide to replace the brushes, buy two at once; whatever you choose, one or both are damaged. If a short circuit occurs, replace the burned parts with serviceable ones. If the difficulties lie in the wire or battery, buy new ones and mount them next to the old ones.