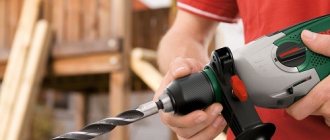
The Makita hammer drill is an excellent tool that can be used at home and professionally. The manufacturing company is Japanese; for assembly they select only high-quality materials that meet all the necessary requirements. It is quite possible to repair a Makita rotary hammer with your own hands.
Makita tools are reliable and of excellent quality
The procedure for disassembling and assembling the tool
How to disassemble a Makita hammer drill at home? You can assemble and disassemble the device yourself.
Disassembly
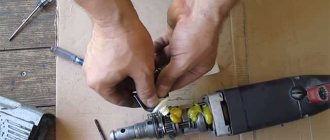
The disassembly process is simple, it is important to follow the entire sequence step by step, so that later you can correctly return everything to its place:
- Remove the quick release distributor.
- Unscrew the screws connecting the gearbox body of the mechanical section.
- Remove the black cover by first pressing on the front of the shaft.
- Remove the mechanical part from the green side - to do this, first unscrew the three connecting screws that hold the cover. After this, remove the cover, remove the carbon brushes and release the brush holder springs.
- After the mechanical unit is released, it is required to disconnect the rotor, which is fixed in it and is pulled out with a slight rocking.
When this process is completed, the disassembly of the mechanical block of the shock assembly continues: you need to remove a couple of bolts located in the housing. Then the intermediate shaft must be disassembled. To do this, the following parts are pulled out sequentially according to the diagram:
- ring, bearing,
- gear with straight teeth,
- friction bearing,
- flat washer,
- bearing 606,
- retaining ring S-707,
- compression coil,
- clutch.
The next step is to disassemble the shaft of the chiselling barrel, which is pulled out of the body, and the cylinder itself is taken out of it. The next steps are to remove the piston connector, flat washers and firing pin. If desired, you can disassemble the shaft itself; the process is also recommended to be carried out sequentially, carefully placing all the parts on the table.
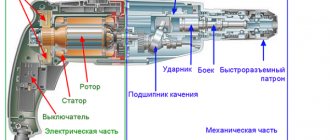
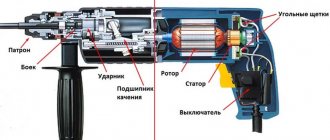
Afterwards, the electrical part is disassembled, in which the stator, switch, rotor, carbon brushes and holder for them are removed.
Important! Before disassembling the Makita hr 24 50 hammer drill, experts recommend preparing additional tools that may be required during the procedure.
Before disassembling, it is recommended to carefully examine the product
Assembly
The assembly of the device occurs in the opposite order strictly according to the list. It is recommended to first apply fresh lubricant to all parts and clean the body with gasoline. If necessary, all damaged parts are replaced with new ones.
Mode switch
To carry out disassembly, remove the T-shaped latch on the switch handle. Use a 2mm screwdriver for this. You need to very carefully tighten the tabs of the latch. She is pulled out. The red latch must be held so that it does not fly out under the action of the spring.
After performing these steps, the switch handle should be turned to the extreme left position. So its protrusions will coincide with the grooves of the editor body. The switch is easy to remove. The retainer is removed along with the spring. The rubber ring on the switch handle should be pryed off with a thin screwdriver and removed. It prevents lubricant from leaking out of the housing.
The assembly diagram of the Makita 2450 rotary hammer in the switch area assumes a certain sequence. All parts and the seat are cleaned of old dirt. Thickly lubricate two metal pins and a rubber ring. It is put on the switch. A spring is inserted into the handle, then a latch. It should not pop out when the latch is installed into the housing.
Read also: Bracket for drill drilling machine
The switch is then inserted into the gearbox. In this case, the handle is directed to the sector between the designation of the combined mode and the impact. It will not insert all the way. The switch should be turned to the drilling mode and a little further. In this case, you must remember to press the lock button so that it does not interfere with movement.
Then turn the switch clockwise and press the latch all the way.
Causes of breakdowns
There may be several reasons why a device fails. The following are considered the main ones:
- Getting inside dirt, moisture, dust.
- Hardening of the lubricant, which is located inside the device and helps easier operation.
- Long-term use, use in harsh conditions.
- Constantly switching modes from one to another.
It is also worth paying attention to increased noise during operation - such a phenomenon is often a warning that there are problems with the operation of the device.
The uniqueness of the Makita interior
The design provides a safety mechanism to limit the spread of dust during repair work. In order for the tool to continue to work without loss of quality, you do not need to constantly clean the “Start” button and other levers and parts from debris.
READ How to disassemble a Makita df331d screwdriver chuck
But the main thing is that Makiti allows every owner. it's to feel like a real man, the owner of your home. The financial costs of maintaining the device are also a pleasant surprise. The cost of the new product is low.
How to change the cartridge
Replacing the cartridge will not take much time. Experts recommend trying to fix it first. If this option is not possible, then it is worth replacing the part as follows:
- A cartridge is screwed onto the device.
- Place a screw in the socket.
- Carefully tighten everything using a screwdriver.
The procedure is carried out strictly in a certain sequence
Do we disassemble the hammer drill chuck or replace it with a new one?
- 1 cartridge
- 2 Replacing the cartridge
- 3 The drill is not fixed
- 4 Repair or replacement
Breakage of a hammer drill chuck is rare, but always inopportune. It’s good that the malfunction of this unit can be easily fixed on your own. But for this you need to know its structure.
Cartridge
All electric hammer drills are equipped with simple and reliable SDS chucks. Their prototype was designed by engineers from the West German company Bosch. Therefore, the abbreviation in the name is derived from the German words: Steck, Dreh, Sitzt. Which in this case means “insert”, “turn”, “sits”. There are currently five modifications of this design:
- SDS. For attachments with a Ø 10 mm shank, which has 2 longitudinal grooves to prevent rotation. The insertion depth of the shank is 40 mm. This design works well with attachments that have SDS-plus shanks.
- SDS-plus. Leader in frequency of use among rotary hammer cartridges. Designed for attachments with a Ø 10 mm shank, which has four grooves (two long ones - against rotation and two short ones for fixing them from falling out). Insertion depth – 40 mm. This type is used on light hammer drills. It can work with nozzles Ø 4–32 mm, lengths from 11 cm to 1 m.
- SDS-top. A rare species. Installed on medium hammer drills. The nozzle for it has a Ø 14 mm shank, equipped with two long and two short grooves. The alignment depth is 70 mm, with a drill diameter of no more than 32 mm.
- SDS-max. It is found on hammer drills only slightly less frequently than the leader. Designed for drills with a diameter greater than 2 cm. Used mainly with heavy hammer drills. The shank for it, Ø 18 mm, is inserted 9 cm, has three long and two short grooves.
- SDS-quick. This type is designed for a quarter-inch hex shank instead of slots, equipped with lugs. It can even hold drills and bits. Until 2009 inclusive, it was installed exclusively on Bosch Uneo. The drills for it are not made thicker than 1 cm.
- SDS-hex. Only peaks and chisels have shanks for working with it. And only jackhammers are equipped with them.
The designs of hammer drill chucks and electric drills have nothing in common. The drill chuck clamps the drill with movable jaws. In a hammer drill, the drill is secured against rotation by guides that fit into the grooves of the shank.
The latches made of spring-loaded balls prevent it from falling out. To fix the drill, you need to insert the shank into the hole in the chuck. And, pressing the nozzle, insert it inside until it clicks.
To remove the drill, pull the plastic skirt towards you.
Replacing the cartridge
If you don't have a drawing, take pictures of the disassembly process with your phone. This will save you from errors during assembly. To work, you will need the following tools: a flat-head screwdriver, pliers with long jaws, a hammer and an open-end wrench.
Procedure:
- Remove the rubber tip from the end.
- Using a screwdriver, remove the first retaining ring.
- Pull the plastic coupling housing down (as you would to change a drill bit).
- Remove the second retaining ring in the same manner as the first.
- Remove the clutch cover.
- Remove the spring, locking plates and balls.
- If you can do without replacing the entire assembly, then place the steel parts in a suitable container and fill with kerosene.
The chuck is usually attached to the spindle using a thread. Clamp it using a vice or a gas wrench. And rotate the spindle with an open-end wrench beyond the edges. If there are no edges, then disassemble the body of the hammer drill, fix the spindle and rotate the chuck.
Carefully. Do not place the tip in kerosene. Since its rubber is not oil resistant, it will not withstand prolonged contact with it.
Installation and assembly of the unit occurs in the reverse order.
The drill is not fixed
There may be several reasons why the chuck does not hold the drill shank. Below we list the most likely ones.
- Worn housing, locking plates or balls.
- The detent spring is weakened or broken.
- Drying or thickening of the lubricant due to dirt, preventing the movement of the retaining balls.
Important. During assembly, do not lubricate the parts with petroleum jelly. It is used only for preservation. Lithol is the best lubricant.
If you do not have spare parts, repairing the cartridge will be simple in just two cases:
- When the balls wear out.
- And when the lubricant, having lost its plasticity, prevents the movement of parts. In other cases, it is easier to find a replacement unit than to repair it.
Source: https://pro-instrument.com/ruchnoj/remont-i-zamena-patrona-u-perforatora.html
Replacing brushes
If the location of the brushes gets very hot, then most likely this part requires replacement. It is recommended to first check the condition of the elements: replacement is carried out if they are completely worn out. The procedure will require a high-quality electrical screwdriver.
The device is disassembled according to the described instructions, after which new parts are placed in place of the old brushes.
Attention! Some models differ in the clamping mechanism, so it will have to be removed before replacing.
It is recommended to treat all parts with fresh lubricant.
Troubleshooting
Makita produces tools that are highly reliable. However, in some cases problems arise, so you need to know how to deal with it:
- The chuck does not turn. A similar situation is possible in case of damage to the engine or motor. You will need to disassemble the product and inspect it carefully. Sometimes the reasons may be a broken start button or shorted coils.
- Doesn't hold the drill in the chuck. In most cases, the problem lies in old parts or a damaged cartridge. It is recommended to disassemble the device and look for a solution to the problem. Sometimes it is enough to replace some parts with new ones.
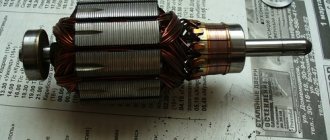
- Replacing the anchor. In this case, the procedure is carried out in several stages. First, open the cover at the back, remove the brushes, and disconnect the gear housing. After cleaning the parts from dirt, replace the armature with a new one, after which rubber shock absorbers and a new air intake plate are put on. Assembling the hammer drill.
- The tool does not chisel. Often the cause is a broken floating bearing or a split striker. In both cases, parts will need to be replaced.
- Replacing the start button. A damaged start button requires replacement. To do this, you will have to disassemble the device - remove the cover, disconnect the contacts, remove the old button and replace it with a new element. Then put everything back together in reverse order.
- Overheating during use. A similar situation occurs when the device is used incorrectly. If unpleasant odors occur, it is recommended to disassemble the device and check everything.
If necessary, parts are replaced with new ones
Timely repair of a hammer drill: how to properly disassemble a Makita hammer drill?
You will reach a steel ball with a diameter of 7 mm, pos. 20.
Now you can remove the housing of the mechanical part. It is black. Using a screwdriver, unscrew the four screws at the end of the housing.
Holding the black body with your right hand, press your thumb on the end of the shaft from which the cartridge was disassembled. The plastic case can be easily removed.
Next you need to remove the gearbox shaft.
To disconnect the mechanical part from the electrical part, you must first remove the electric brushes. Remember! The rotor is held in the lower part of the housing by electric brushes, which must be removed.
After checking that the electric brushes are disconnected from the rotor slats, use a screwdriver to pry the metal housing of the hammer drill at the border of the green plastic housing.
Now we move on to disconnecting the rotor from the mechanical part of the hammer drill. The rotor is held in the mechanical part by helical gears of the gearbox. If you take the rotor housing in one hand and the mechanical part housing in the other and pull in different directions, rocking, you will separate these two assemblies.
You will get a knot like this in the old grease.
Next, use a hexagon to unscrew two M4×12 bolts, item 43, art. 266273-7 with an internal hex head. Pull out the shaft with intermediate spur gear 10 pos. 80, art. 226399-7.
from the inner housing pos. 49, art. 153687-8. Clean the parts from old grease.
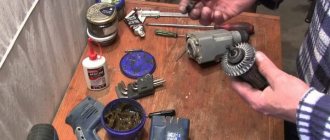
You will end up with such a mountain of clean parts. Now carefully look through the parts, immediately throw away the rubber rings and pick up new ones.
Replace defective parts with new ones.
Mechanical malfunctions of makita 2450 and makita 2470 rotary hammers
Common mechanical malfunctions of Makita rotary hammers include:
- destruction of the quick release chuck;
- bearing failure;
- damage to the impact mechanism;
- wear of the hammer drill barrel;
- wear of the rubber striker and striker;
- gear failure.
Repair of a hammer drill chuck is carried out to replace the boot and rubber ring, as well as a conical spring and a steel ball that clamps the working tool (drill). This is indicated by the fact that the working tool? namely the drill, is poorly held in the chuck.
The main reason is wear of the steel ball 7.0 pos. 20, art. 216022-2. Ball wear occurs from contamination of the cartridge bore due to dust and dirt getting inside.
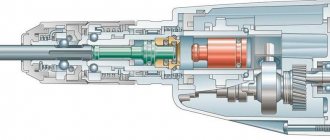
The general view and design of the Makita hammer drill chuck is shown in the photo below.
Repairing a makita 2450 hammer drill chuck with your own hands is easy. The cartridge must be disassembled, freed from old grease, discarded rubber parts, and replaced defective ones.
More complex faults require knowledge of the mechanical structure of the Makita 2450 rotary hammer.
Having determined the nature of the malfunction of the Makita rotary hammer, proceed to disassembling the mechanical part, called the gearbox.
Disassemble the mechanical part according to the attached video. Free it from old grease. Carefully inspect all parts, their integrity, and level of wear. All rubber products require replacement during any disassembly.
Let's consider repairing a hammer drill barrel. Let's analyze the mechanism completely. Video of disassembling, lubricating and assembling a Makita hammer drill
Repair of parts of the Makita 2450 hammer drill barrel
Remember! The rotor is held in the lower part of the housing by electric brushes, which must be removed.
At the next stage, the rotor must be disconnected from the removed mechanism. The rotor is detached from the mechanism simply by pulling it out, since it is held in place by the friction of two helical gears.
It turned out to be such a dirty knot.
Now we need to separate the impact mechanism shaft.
Most often, the rubber rings and the firing pin, pos. 24, compressor spring pos. 18. and cylinder parts. This is how barrel parts wear out and break down when the tool is used incorrectly.
Let's consider the most complex malfunction - failure of the impact mechanism. Characteristic signs of failure of the impact mechanism are the absence of impact and the unpleasant noise of the rotary hammer operating in the “Impact” mode.
This malfunction is typical for those rotary hammers that, during operation, were strongly pressed against the surface being processed.
Having disassembled the gearbox, we remove debris and pieces of foreign objects. We find the faulty part and clean everything of old grease.
Very often the firing pin, item 24, art. 324396-8, included in the barrel. metal ring pos. 27. art. 324216-6.
Discard damaged parts, replace with new ones, and cover with a thin layer of lubricant. The parts are ready for assembly. But more on that in the next article.
I wish you success!
Is it worth repairing the hammer drill yourself or is it better to send it to a service center?
Should I repair the device myself or contact a service center? This question interests many people. If you wish, you can easily deal with problems at home by replacing the necessary parts. Service specialists will not always correct the error quickly, but you will have to pay a lot.
In some cases, services only replace them with licensed parts, which also cost a lot, so you’ll have to “fork out for it.” It is best to initially check the device completely yourself, and only if it is impossible to do everything yourself, visit a service center.
The Makita rotary hammer is an excellent device for working at home. If necessary, you can independently cope with the problems that arise, disassemble it and replace the necessary parts.