Using a Conductor
You can drill a deep hole in a perpendicular sample using a special device - a jig. Moreover, such activities are carried out not only on a flat base, but also on rounded parts of workpieces, at corner points.
Components of the conductor:
- A core that allows you to make markings for a drill.
- Plastic stencil.
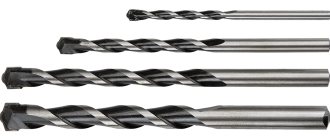
- There are 6 guide bushings, the diameters of which correspond to 4 mm, 5 mm, 6 mm, 8 mm, 10 mm, 12 mm.
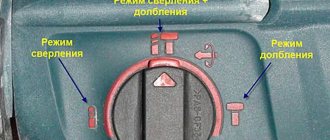
Features of the position of the jig for drilling in different areas of workpieces
The technology of drilling holes in a pipe using a jig.
- For rounded parts, a recess without corners is used, located on the bottom of the device.
- At corner points and on cylinders it is worth using the V-shaped element included in the kit.
- To fix the middle end line of the part, you need to install 2 nails in the corresponding grooves at the corner points of this device. The jig is rotated so that the fasteners connect to the edge of the element. The central part of the sleeve, intended for drilling a hole, is placed in the middle of the end part of the part.
A core is taken to mark the center point of the groove.
- Place the named element in the middle of the hole and fix the stencil on it.
- Place the bushing on this post with the flared part up, its diameter corresponds to 4 mm, and insert it into the template. Such a part must be centered and pressed against the material using a clamp.
- Remove the core along with the bushing from the template, which should not move.
- The guide sleeve is placed in a stencil of a certain cross-section.
- Using a drill, a hole of a certain depth is made.
Read also: Stripper for thin wires
The simplest guide attachment for a drill with your own hands
When considering this attachment option, you should take into account the fact that you will not need to spend any money to implement the idea. But along with this, there will be special difficulties in making a guide for the drill. But at the same time, the created device can only serve for a short time.
READ Hammer Stops Chiseling But Drills Cause
It is important to note that it should not be considered as a full-fledged addition to the tool. In the event that you have to create a hole at a considerable distance from the workshop and there are no other alternative devices, then it is with the help of such a nozzle that you can most effectively solve the problem. In addition to this, it will bring significant benefits to those home craftsmen who do not work with a drill very often.
Making a homemade device
Devices for drilling wood: a - use of a stop for drilling holes in round workpieces; b - use of a stop for drilling holes in a vertical plane; c - template for drilling the end and plane of the workpiece: 1 - workpiece; 2 - template; 3 - holes in the template; 4 - clamp with which the template is attached.
In practice, drilling a groove at a right angle can be very difficult. Often, many craftsmen use special devices for this. However, these options are often designed for specific types of drilling equipment. Some are suitable for hand drills with slots for additional handles, while others are suitable for cordless ones.
There are also universal options, but they are expensive. People who make furniture cannot do without this device. For a person who makes something on rare occasions, the cost will be quite high.
You can make such an assistant yourself, from the remains of chipboard. The initial blank of such a device looks like bars stuffed on the base of this material.
Here you will later need to drill holes to help the drill find the correct point and angle. A small part of the material is installed end-to-end on the main panel.
Before assembling the device, it is worth making a mark for 3 holes with different sections.
Options for using a guide for drilling.
Take 3 screws, the diameters of which correspond to 5 mm, 6.3 mm and 7 mm. According to these dimensions, grooves are drilled at 3.5 mm, 4 mm and 4.5 mm.
Next, the device is assembled. Holes are drilled for the first holding component, which is immediately secured. Afterwards, a groove is made for another holder. At the time of drilling, a chipboard block is placed between these two parts to create more accurate results for the second element. The device, made independently, must be strong and should not move in all directions.
Such a device will allow you to make grooves only as a drilling device to create a right angle at the end of the panel. To center the drill and drill a hole on a flat base, an additional device is made from this material. To do this, 3 holes with a diameter of 3.5 mm, 4 mm and 4.5 mm are drilled in a chipboard block. Next, marks are fixed on the prepared panels, the drill must pass through the object, and a groove is outlined.
As soon as the markings are made correctly, you need to lower the device onto the panel and place the drill, maintaining a right angle. Now you can drill.
Read also: Starting the engine with reverse
The grooves in the end part are made in the same way. The drill passes through the assistant, the hole is marked, the structure is firmly connected to the side of the manufactured object, after which the drill can be used.
How to drill through a concrete wall with a regular drill
There comes a time in every person’s life when it is necessary to make repairs to a house or apartment. And then the question arises about remodeling the space: moving sockets, updating wiring and drilling other holes to bring the design project of the room to life.
In the process of performing work, a variety of tools and drills are used. Of course, customers always prefer more powerful models. There is a large selection of tools on the market that can be used to organize work.
Testing two ways to drill a vertical hole with a drill.
How to drill through wood carefully
Wood is one of the “easiest” materials when working with a drill. However, there are some subtleties here too.
- The drilling speed directly depends on the type of wood. Loose, not too hard types of wood will be suitable even for a low-power device. Of course, the expected diameter of the hole also plays a role - the larger it is, the more powerful the drill is needed.
- In order to make large holes, you need to use special core drills. Their diameter can exceed 120 mm. As for depth, on average crowns are suitable for materials up to 20-22 mm thick, but there are also special models that can cope with thicknesses of more than 60 mm.
- If you need to make a blind hole rather than a through hole, then Forstner drills, which are available in diameters from 1 to 5 cm, are perfect for this.
We should also talk about drilling timber. Although it is convenient to fix it for further drilling, the large thickness of the material creates certain difficulties. Drilling timber for further fastening in the dowel holes. For a standard beam 18 cm thick, it would be best to take a drill with a diameter of 25 mm and a length of 36 cm.
You will need to drill slowly, at low speeds. In terms of power, a 1300-1500 W drill is perfect. If the beam is not very long, then two holes on each side will be enough. If the length of the beam for the dowels is long enough, then it will be necessary to make an additional hole in the center.
After the holes are made, you can drive the dowels into them using a hammer or small sledgehammer.
Safety precautions
Compliance with these rules guarantees that the work will be successfully carried out without harm to human health. Before any work, it is important to inspect the surface. If a small element is being drilled, then most likely it will need to be secured in a special vice. For example, if we are talking about timber. Never place a work element in a poorly fixed spindle.
There should be no hanging ends on the worker's overalls. The shirt is usually tucked into the trousers. Under no circumstances should clothing be cleaned during work, as this can lead to serious consequences. Masters use protective glasses - masks to protect the skin of the face and eyes.
To prevent the tool from slipping out of your hands while working, you must wear gloves. If the drill is massive, then it is best to carry out work with rubber gloves. They not only help ensure that the instrument does not slip out of your hands, but also prevent various injuries to the skin of the hands.
Be sure to hold the tool with both hands. Do not work while standing on stairs or other poorly secured surfaces.
Do not use blunt equipment, this leads to an increase in construction time. Do not insert or remove a drill using an adjustable wrench as this will damage the chuck and tool.
Do not use the drill in snow or rain, even light rain - this can lead to a short circuit and electric shock.
Whatever work needs to be done with a drill, it is important to remember that the quality of the work performed directly depends on taking into account the features of drilling. The main thing is to believe in yourself and not stray from the planned work plan.
How to drill into tiles with a drill
Ceramic surfaces have proven to be particularly fragile coatings. The outcome of drilling in such areas is determined by the quality of laying the tiles themselves.
READ Drill sparks inside when working
If the master performing the work did not make mistakes during installation work, then the drilling process should proceed without interference. Proper installation means one in which no empty zones are formed between the wall and the coating.
If there are voids between the tile and the wall, the tile may burst or break off during drilling.
We start by choosing a drill. There are specialized attachments for ceramics and glass, but you can also use equipment for concrete with pobedite coating. It is important that the concrete drill is new enough, otherwise it will slide along the tiles and scratch the base, which will lead to damage to the masonry.
The process of drilling tiles should take place at low speeds to prevent chipping of the glaze coating of the decorative surface. After drilling the ceramics, change the drill; if you are using a drill for ceramics, make a hole in the wall.
Practical recommendations from experts
Drilling diagram for a concrete wall.
In order for the drill to stand exclusively vertically when drilling openings, use a square. It is placed strictly at a right angle, in parallel with the drill.
Regular carpentry work involves purchasing a special stand that will hold the power tool perpendicular. The stand allows you to control the depth of the grooves.
To firmly fix the wooden block, you should use a vice or a workbench. Holding the material in your hand is not at all safe: at the moment of processing, the dry base can crack and split, injuring the master.
To ensure a smooth entry groove, it is recommended that any remaining board be placed under the base of the groove so that it can be discarded later. The product can be drilled. This technique works well for flat surfaces.
Drilling a hole straight at a 90 degree angle is not an easy task. It may take a lot of effort to keep the drill level and vertical. BullseyeBore suggests doing this using several laser concentric rings.
The BullseyeBore drill uses a simple red laser to project three rings onto the surface where you intend to drill. To keep the drill as level as possible during the process, watch the three rings. The inner two will remain in the same position no matter how the drill is tilted, but the outer one can move. By aligning the position of the largest ring relative to the two smaller ones, you will ensure that the drill is in a strictly vertical position, and the hole will turn out just perfect.
In addition, concentric rings can provide information about the depth of the hole. The distance between the large and middle circles will precisely indicate the drilling depth. If at the beginning there is a picture like this:
In the middle of the process the circles will come closer together:
And in the end they will simply merge:
The attachment looks like a small transparent disk with a connector for easy installation on any drill. Lasers, optics and batteries are already built inside. The disc is smooth, lightweight and impact resistant.
Manufacturers are now developing a model where all the filling will be implanted into the drill chuck.
How to drill at 90 degrees with a drill
Anyone who has ever worked with a drill or screwdriver knows that drilling a hole exactly 90 degrees by hand is very difficult. This happens because we see the drill only from one side, and we can only align it in two planes. My idea is simple - using two small mirrors (they work like mirrors in a wardrobe) you can achieve an almost exact 90 degree drilling.
All you need to make a mirror drill guide is two small mirrors, two wooden blocks and double-sided tape or mirror glue. Regular glue cannot be used because it can damage the mirror.
You just need to glue the bars together at 90 degrees.
Now all that remains is to attach the guides to the drilling site and simply align the drill “by eye” parallel to your reflections. Even a slight deviation of the drill in one of the planes will be immediately visible. This is how easy it is to drill holes by hand, with precision almost like on a drilling machine. Another advantage of such a mirror guide is its size; with its help it is easy to drill a hole on both the wall and the ceiling.