Operating principle
An electric drill makes the drilling procedure quite simple. To do this, you need to attach the drill to the marked surface and press the start button. In this case, the chuck holding the drill will begin to rotate via an electric motor. When the hole is ready, you need to release the button and remove the drill from the hole. To screw in and unscrew screws, it is good to know how to use a mini drill used as a screwdriver. On such models, convenient levers are installed to switch the engine into reverse mode. This is very practical when working with fasteners.
In addition, most modern drills have a speed switch that allows you to drill different materials. The design of such tools includes a gearbox with several gears of different sizes. Changing the speed is achieved by connecting the motor shaft to one of the gears using a switch. The only drawback of the network device is its inability to work without a power source. In such cases, you can remember how to use a hand drill or use a battery-powered model.
How to use a hammer: insert a drill, break down walls, sharpen a drill, etc., useful video
The hammer drill was invented in 1851 as a tool for the mining industry. In 1932, Bosch introduced the first electromechanical impact drill for construction work in Germany. Since then, Bosch hammers have been mass-produced; other firms acquired production licenses. The main functions of a hammer drill are drilling, drilling and hammering. How to use a hammer when performing different types of work?
Operating principle of the punch
The innovative essence of the invention of the hammer drill lies in the fact that the impact force is created by the tool itself. This is due to the conversion of engine rotational energy into translational motion of the piston. The piston sets the drummer (drummer) in motion, who directly performs the work.
READ Electronic Drill With Speed Control
Depending on which tool is used, which mode is activated, the hammer can drill, drill or operate in jackhammer mode.
The rated power of the punch ranges from 1.5 kJ to 20 kJ. If you imagine that a 1 kg weight is dropped from a height of 1 m onto the floor, it will hit the floor surface with a force of 1 kJ. Accordingly, a 20 kg weight will hit with a force of 20 kJ.
Instructions for use
Hammers are widely used in the modern construction industry, having been replaced by monotonous and inefficient manual labor. But its use poses certain risks that you need to be aware of before starting.
Working with a rotating hammer requires caution
First of all, you need to work with the working tool in the normal manner permitted by the manufacturer. The power supply must be equipped with a cable whose cross-section is suitable for the energy consumed.
After transporting the seeder in cold weather, wait at least half an hour to soften the lubricants inside the mechanism.
The operator performing the work must be healthy. Before starting work, you must read the instructions for the device and safety rules.
Basic operating modes of a rotary hammer
Hammers operate in several basic modes and are switched by the operator depending on the work being performed.
Die working mode: drilling, drilling, punching
Drilling
This is done after switching the controller to the appropriate mode (drilling icon). The vast majority of rotary hammer models are equipped with a function for gradually increasing the speed of the working shaft. The speed is controlled by the start button. With a slight push, the speed gradually rises from zero. When you press the button all the way, the speed becomes maximum.
Depending on what material you want to drill, it is recommended to adjust the drilling speed or drill bit. Yes, wood products are best drilled at high speeds, metal products at low speeds, and concrete or stone at medium speeds.
Most often, a drill is used to drill into stone or concrete. This is due to the fact that the chuck device for fastening the drill has a play along the longitudinal axis, intended for the hammer drilling function. Therefore, when drilling holes in wood or metal, it is not always possible to achieve the desired accuracy. The drill may hang slightly.
For precise drilling, a jaw chuck with an SDS shank is recommended. A drill without edges is fixed in a jaw chuck, which is inserted into a hammer drill. The jaw chuck is included or sold separately. With an interchangeable chuck you can drill any holes and materials.
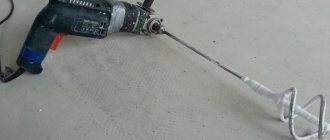
In drilling mode, you can use the hammer drill as a mixer to mix various building mixtures. From paint to light plaster and gypsum compositions. A great convenience is that the speed and direction of rotation are easily adjustable.
Drilling
Drilling mode is activated by moving the switch register to the middle position (the drill and hammer icon must be selected). Usually indicated by a drill and hammer symbol applied to the body at the same time. Drilling is used for cutting concrete and stone materials. Not only can you make holes, but you can also create channels for running electrical and other cables in plaster or brick walls.
Because drilling comes in many different forms, engineers have developed many attachments to handle different conditions. All of them are united by the presence of a special shank that is combined with an SDS cartridge.
Impact mode is used for installation and disassembly. The mode switch is indicated by a hammer icon. When operating in this mode, the working shaft does not rotate. There is only forward movement of the tool.
Ensure regression
The reverse function allows you to switch the direction of rotation of the cartridge in different directions.
Reverse at hand
Often when drilling reinforced concrete structures, the drill rests on the reinforcement and enters it along with the blade. To release it, a reverse switch is provided, which makes it possible to turn the drill in the opposite direction and continue drilling, bypassing the reinforcement. Usually the reverse button is located right next to the start button of the device.
The reverse mode turns the hammer drill into a screwdriver that can be used to tighten and loosen bolts, nuts and screws of any size and configuration.
Additional Tool Features
In addition to the above, the standard set of options in a modern drill includes:
- Ruler for determining the depth of the hole;
- Lever for fixing the working position of the start button;
- Safety coupling. Stops the engine when the seeder jams.
And also in the design of each device there are systems:
- Dust collector. Impellers on the engine with a system of dust channels;
- Vibration dampening. Special springs between the body and the power unit;
- Electronic control of operation and monitoring of the condition of brushes on the electric motor commutator.
An important rule, failure to comply with which can lead to failure of the hammer. Switching modes should only be done after the tool has come to a complete stop.
Operating modes
Most modern models of electric drills are designed for two main operating modes. Moreover, the first mode (drilling) is considered standard, and the second mode (impact drilling) is auxiliary. In normal mode, such a drill is capable of performing both plumbing and carpentry work. And the impact drilling mode is used if it is necessary to drill a hole in a concrete or stone surface. These are the main ways to use a drill for its intended purpose.
The mechanism that carries out the impact during impact drilling consists of two ratchets. They are located coaxially. When switching to the impact drilling mode, these elements interact, aimed at creating a translational movement of the working shaft. For this mode, special drills with pobedit tips are used. The impact mechanism is triggered by the force applied to the drill. It should be between 10 and 15 kilograms. Here's how to use the drill with the hammer on.
What is a drill?
Professional and household
Like other power tools, drills fall into two main classes. Professional and household.
Professional drills must work for hours without a break, they are made as comfortable as possible for long-term work, and durable materials are used in construction. The cost of such exercises is several times higher than household exercises.
Household drills are made from less durable materials, the gears may be plastic, and the motor is small. Forced. The device weighs less, but work with it should be interrupted every 15 minutes. It will overheat.
Easy and shocking
The simplest drill has one operating mode. The chuck with the drill fixed in it rotates, the drill forms a hole in the material. This mode is the main one for 90% of tasks solved at home or in the country. Such drills are called seamless, they account for 20% of all devices sold.
READ How to lubricate a Makita hammer drill
To increase the attractiveness of household tools, manufacturers have included another operating mode. Percussion. When you press on the tool, the drill makes not only rotational, but also reciprocating movements. 80% of home exercises switch to shock mode, but its benefits are small. The forward movement of the drill will only help when drilling light building materials.
AC or battery
If the electric motor is powered from the mains, the master is connected to the outlet. The radius of the tool's work area determines the network cable and extension cords available in the truss. It is not always easy to drill a pole in a summer cottage or remove wire from an apartment panel. But an electric drill always provides the specified drill power, which does not depend on batteries.
The drill is tied to a socket.
Cordless drills give the user an additional degree of freedom. Attach the hinge to the garage door or lightly polish the seams on the door. The downside is the batteries, which need to be charged. An unloaded tool is reluctant, the drill rotates slowly and gets stuck. Batteries last no more than three years, lose capacity and wear out.
Various drills. Screwdrivers. Mains and battery are provided. They have a special transmission that reduces the speed and increases the torque of the tool. A 100 mm long screw is driven into a pine beam in half a minute. The adjustable clutch stops turning when the screw is fully tightened.
Drilling metal
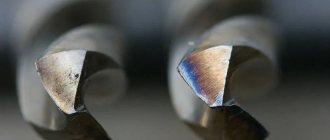
First of all, it is recommended to select a drill designed for this type of work. Metal drills differ in the grade of steel from which they are made, as well as the sharpening angle. Only such drills are suitable for working with cast iron, steel or stainless steel. Drilling in metal is carried out at low speeds. This allows the drill to heat up less and dull more slowly.
If you know how to use the drill correctly, then as a result, chips should smoothly flow out of the hole in the shape of a spiral. The process of drilling metal will be more efficient if pressure is applied to the drill. Before starting the process, a notch is applied to the place where the drill is placed with a core. This is necessary for better adhesion to metal.
What to choose?
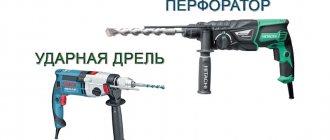
A hammer drill and an impact drill can perform each other's functions. However, replacing a hammer drill with a drill can lead to rapid wear.
The choice of tool directly depends on the material with which you will need to work: In such a matter, it is better to proceed from the purposes for which the construction tool is purchased. If you need to do housework around the house, a functional drill will suffice. For long-term, constant and large-scale work, it is better to use a hammer drill.
- if the work involves processing concrete structures or objects made of similar materials, then it would be preferable to choose a hammer drill;
- A drill is suitable when working with wood or steel products.
Drilling wood
To work with wooden surfaces, you need to purchase drills designed specifically for this purpose.
After applying the markings, the drill is placed at the designated point and, with a little effort, the speed is turned on. Ideally, the drill will sink smoothly into the surface of the wood. Sometimes you have to make holes of considerable depth. In this case, the drill must be removed periodically, discarding the chips. Otherwise it may get pinched. Similar rules explain how to properly use a drill when working with wood.
Drilling concrete
When working with concrete, it is recommended to use safety glasses to avoid small fragments getting into your eyes. To work, you need to have special drills, at the base of which there is a pobedit tip, which has high strength. Working with concrete is accompanied by a lot of dust, which can be reduced by wetting the work surface with water. This background information is necessary to understand how to use an impact drill.
Drilling is carried out when switching to impact mode, while setting the tool to medium speed. When drilling concrete, force must be applied to the drill, but the load must be transferred smoothly. If you need to make many holes in concrete, then it is better to use a lightweight hammer drill. The drill does this kind of work with great difficulty.
How to use an impact drill
- How to use an impact drill
- What is the difference between a drill and a hammer drill?
- How to choose a drill
An impact drill is a special type of tool. It is designed for drilling holes in metal, wood and plastic. Outwardly it looks like an ordinary drill, but it includes a special mechanism that, during operation, forces the drill (clamped in the chuck) to produce pushing movements, similar to a hammer blow. Such actions are necessary to perform work with concrete, brick and other stone materials. Mainly used for punching holes up to 15 mm in diameter.
Brick
A drill is much better suited for drilling materials of this class due to the lower hardness of the surface being processed. When working, drills with pobedit tips are also used, and safety glasses are worn over the eyes. The instrument is switched to impact mode and set to medium speed.
Drilling is carried out using a load on the drill. At the same time, you can act more confidently. The surface of the brick is much softer than that of concrete, so drilling occurs with less effort. A drill operating in impact mode can easily cope with this task.
A drill is one of the most necessary helpers in home repairs. There is nothing particularly difficult about using it.
Drilling different materials
In order to drill a metal surface efficiently and quickly, you need to choose the right drill - the sharpening of the cutting edge differs significantly, as does the grade of steel from which the cutting tool is made. When working, you need to set the speed to low, and the pressure should be strong, but such that the drill does not break. The location of the proposed drilling is marked with a mechanic's core. It is necessary to make a small recess so that the drill firmly clings to the metal and does not “walk” along its surface.
When drilling concrete or brick, you must turn on the impact mode and be sure to use a respirator, because there will be a lot of dust.
In order to drill through the tiles, some craftsmen use a thin wooden plank. We mark the location of the hole on the tile, then place a wooden spacer and carefully drill so that the delicate surface does not crack. Using this method, you can drill tiles in the bathroom or kitchen; the drill is set to maximum speed.
When you need to make large holes in wood, you use drills with a thicker diameter or special attachments. Some specialists use a powerful, but low-speed (no more than 600 rpm) drill to tighten screw piles in their garden plots. Installation is carried out by gradual pressing into the ground with simultaneous screwing of a pre-assembled pile structure, using special nut heads of various diameters.
How to use a drill
To get a hole you need:
- Outline the future entry of the drill. For a hole perpendicular to the surface you need a square.
- Install a drill of the required diameter and attach it to the mark.
- Slowly press the start button and press down on the tool.
- Remove the drill from the hole and then release the button.
To drill at an angle to the surface, you need to fix it at the desired angle. For greater precision, use a clamping stand. It will secure the device at an angle.
Features of the work also apply the surface material for drilling.
Working on metal surfaces and thick plastics:
- Select the desired type of drill.
- The pressure on the drill is insignificant at low speeds.
Work on concrete and stone materials:
- Select the required type of drill.
- You need to select medium speed, holding the device at an angle of 90 degrees.
- You need to press lightly on the drill.
- When drilling concrete, it is best to use the “impact” mode of the drill and wait until the tool cools down after finishing drilling. For tiles and hollow bricks, on the contrary, this mode is not needed in order to prevent the material from splitting.
- To reduce the amount of dust, it is recommended to moisten the surface with water.
Working on wood, ordinary plastic:
- Choose a suitable drill.
- Use high speed for wood, low speed for plastic.
Video: How the Drill Works Video
Equipment
The simplest equipment consists of one. The drill itself. If the manufacturer offers additional products. This is a big plus. The kit may include:
- The suitcase is an excellent package for storage and transportation. Tools and accessories are neatly packaged and free of dust.
- Set of tools. This is a basic set of the most popular drills for wood, metal or concrete.
- Laser level. Attached to an impact drill, necessary for marking holes in the wall.
- Nozzle with nuts. Grinding and cutting discs.
- Additional handle. It is screwed to the body; for this purpose, the master holds the tool with the other hand, for example, when drilling concrete.
- Depth sensor. A straightedge pin screwed to the body will prevent the drill from going further than measured.
- Spare brushes. The commutator motor operates from moving contacts. Carbon brushes. This part wears out over time. It’s good if the manufacturer has prepared a replacement.
READ Connecting a drill without a button directly
Additional features
Engineers implement additional functions in electric drills that make work convenient and safe. The most important features:
- Smooth start. The commutator motor starts in short circuit mode, during which currents are generated in the network and the commutator brushes burn out. The regulator will gradually increase the speed to maximum, the tool will last longer.
- Automatic speed control. The electronic circuit maintains a constant drill speed regardless of the applied load. The drill processes wood and metal equally smoothly.
- Closing switch. If the seeder is driven by a grinder or machine, the motor must run continuously. The lock button frees up the wizard's hands.
- Reverse motor. This convenient function will help if the drill is jammed at the exit from the metal. The master presses the lever, the direction of rotation of the drill changes to the opposite (reverse). The tool is released.
- Cartridge brake. When the technician removes his finger from the start button, the cartridge continues to rotate by inertia, and it is dangerous to touch it. The braking system stops the cartridge immediately after the engine is turned off.
Other important criteria
When choosing an electric drill, pick it up. In a good drill, the handle is equipped with rubber pads and fits comfortably in the palm of your hand. Buttons and switches are easy to press, the cartridge rotates smoothly, and does not hang in the longitudinal direction.
Types of drills
Types of drills are distinguished by the type of work they allow to perform:
- Regular. For plumbing and carpentry work.
- Percussion. For hard stone materials. The motor of such a drill gives the chuck simultaneous rotational reciprocating movements.
- Hammer. The principle of operation is similar to that of an impact drill, but the crushing mechanism is different and the efficiency is higher.
It should be noted that rotary hammers, despite their more powerful operating mechanism, are not without disadvantages:
- High price;
- High power consumption;
- Complexity of operation and mechanism;
- Heavy weight;
- It is impossible to perform precise work;
- Regular lubrication and cleaning of tools.
In order to determine what type of drill you need, you need to understand what types of work are planned.
It should be noted that when using special attachments instead of a drill, the electric drill will also perform other operations. The main ones are: grinding, polishing and milling work, sharpening, screwing in screws, kneading.
How different types of electric drills work
There are several types of electric drills: hammerless drill (regular), mixer drill, impact drill, screwdriver type drill. All of them are popular in their category. Most of them are in demand in the renovation of apartments or houses.
Important! The operating principle of all models of modern drills is similar, with the exception of the specific nuances of impact electric drills.
- Hammerless drill. Used for drilling in not particularly durable materials: plywood, plastic, wood.
- Mixer drill. It has a more powerful torque, which can be used not only for drilling holes, but also for stirring cement or paint. Equipped with a more powerful gearbox. Because of this, the tool is noticeably heavier than a hammerless drill.
- Hammer drill. From the factory it was intended for making holes in dense wood and metal. It can replace a hammer drill.
- Drill-driver. It has adjustable torque force, making it possible to twist screws and screws. It has gained high popularity among furniture assemblers. In normal everyday life, it can replace a screwdriver.
Before you buy yourself a new electric drill, it is worth paying attention to what types and types of drills are available on the market. It is necessary to specifically decide for what purpose you need to buy a drill, since prices for different types can vary greatly.
Useful articles, news and reviews on our Yandex Zen channel
Safety precautions when working
A drill is a source of danger, as a result of which it is necessary:
- Inspect the device for damage.
- Make sure that drilling will not damage the installed communications.
- Do not work in damp areas.
- Do not allow the instrument to get wet.
- Fix the drill tightly in the chuck, remove the key, and secure the workpiece well in a vice.
- Avoid excessive pressure on the tool body, and also ease the pressure when removing the drill from the hole.
- Use goggles, gloves, and a respirator.
- Upon completion of work or to replace the drill, you must wait until the rotation of the chuck has completely stopped and disconnect the tool from the power supply.
- Sweep the chips obtained during drilling only with a brush.
What is a drill usually used for?
The main purpose of an electric drill is to drill various materials. Calculations of technical indicators when designing new models are carried out based precisely on this task.
During operation, the electric motor rotates the chuck with the drill clamped in it. The speed of movement is regulated using a special rheostat controlled by a start button. The direction of movement can be changed by switching the reverse lever. The function of changing the direction of rotation will help if the drill jams at the exit from the material. In addition, with special attachments, the drill can be used as a screwdriver - tighten and unscrew screws.
Drills often have two or more speeds. This is achieved using a gearbox connecting the engine to the working shaft. Changing the gear ratio of the gearbox leads to a change in the rotation speed and power of the working tool.
Video: drill - a look from the inside
Power tools in this category usually have two main operating modes. Standard drilling mode and hammer drilling. Normal mode is used during plumbing and carpentry work. Impact drilling is designed for making holes in stone walls, concrete and brick.
The impact mechanism of the drill consists of two coaxially located ratchets, which, when interacting, give the working shaft additional translational motion. In this case, special drills with carbide tips are used at the end of the working part. The impact force of such a mechanism depends on the external pressure on the drill. In order for drilling to proceed quickly, a force of 10–15 kg must be applied to the body.
Drill attachments and their installation
In addition to drilling holes, an electric drill is capable of performing many other diverse operations. For this purpose, various attachments have been developed and produced, with which you can grind, polish, cut or sharpen. All attachments are attached to the drill chuck, just like a regular drill.
Polishing attachment
Designed for polishing surfaces using abrasive materials. This can be sandpaper or a felt base onto which GOI paste is applied. The attachment is a rotating flat surface that is used to process the material being sanded.
Attachments for rough cleaning of materials
Wire attachments (brush brushes) are used to clean metal surfaces (for example, pipes). They are a cylinder on the surface of which there are rigid bristles made of metal wire. They are produced with bristles of different hardness, ranging from thin wire to pieces of cable.
Cricket attachment
The attachment, called a “cricket,” turns the drill into metal nibblers.
Using a “cricket” you can cut holes in metal sheets up to 1.6 mm thick. The attachment has proven itself very well in roofing work, when it is necessary to adjust and cut metal sheets of a given shape.
Video: metal scissor attachment “Cricket”
Nozzle - file
A nozzle made of abrasive material can significantly facilitate work when performing work on sharpening parts, fitting grooves and holes. Available in a wide range of sharpening stones of various shapes and sizes. Among the nozzles there are conical, cylindrical, flat, spherical stones.
Milling attachments
Drill attachments designed for milling work on wood or plastic are also called cutters. With their help, you can make a groove, groove, recess of specified dimensions.
According to their shape and purpose, cutters are divided into:
- cylindrical;
- disk;
- end and end;
- shaped.
The type of cutter is selected for a specific task in accordance with the density of the material and the power of the electric drill.
Other attachments
For cutting materials
There is an attachment that can be used to cut wood, metal or plastic. The operating principle of its mechanism is similar to that of an electric jigsaw. The kit includes a set of files with different shapes and numbers of teeth. This attachment can easily handle cutting wooden boards up to 20 mm thick, as well as chipboard or plywood. For cutting more massive workpieces, it is still better to use a jigsaw.
For drilling large holes
For drilling large-diameter holes, special devices and tools are produced that can be used as accessories for an electric drill. To make large holes use:
- crowns - steel cylinders with teeth or coating - for wood, stone or tile;
- feather drills - metal plates with a center and two blades - for wood and plywood;
- beam drills - long pins with spiral grooves - for drilling thick wooden beams;
- Forstner drills - a specially shaped tool with numerous cutting edges - for precise and clean holes in wood.
For tightening fasteners
Drill attachments designed for screwing in screws, bolts and nuts have become widespread and widely used. Their diversity is comparable only to the huge range of products that exists in the world of fasteners. With these attachments, provided that the speed range of the drill includes low-speed modes, the electric drill turns into a full-fledged screwdriver or impact wrench.
Drill mixer
We also cannot ignore such a useful practical function of an electric drill as using it as a mixer when mixing paints, plaster and other mixtures.
Using a special mixing whisk, you can successfully add the desired shade to paint at home or stir wallpaper glue. In addition, lightweight building mixtures such as gypsum or putty can also be mixed using a drill.
It should be remembered that excessive overloads on the drill can damage the main mechanism of the tool - the electric motor. It is not recommended to use a drill as a mixer when mixing heavy concrete mixtures. There are special concrete mixers and mixers for this purpose.
Drilling machine
The drill can be used as a drilling machine. Drilling workpieces will be much more convenient. Stores sell ready-made stands with a drill clamp, feed lever and vice.
You can make a drilling machine from an electric drill with your own hands. Such a machine consists of a bed, a vertical stand, a rotation mechanism and a feeder. Despite the simplicity of the design, the machine significantly increases the accuracy of processing parts.
Video: do-it-yourself drilling machine from a drill
Among the numerous attachments for electric drills produced by industry, there are also such “exotic” specimens as a pump attachment for pumping liquids or a special attachment for plucking poultry feathers. In everyday life, they are not as often in demand as carpentry and plumbing tools, which are used in almost every home.
An electric drill can save you money and energy. For home and occasional work, you do not need to buy several professional machines. Special attachments will make the tool universal: drilling and cutting, grinding and turning, kneading and chiseling - this is not a complete list of operations available for the drill. To make work a joy, you must follow safety rules
The choice of tool for repair largely depends on the degree of professionalism of the master. A user whose specialty is construction and repair always clearly and clearly knows what kind of electric tool, what power and design he needs. In the case of an ordinary home craftsman with some experience in carrying out repairs, he hesitates, takes advice on which drill to choose or which hammer drill is better to buy. If you are faced with a repair for the first time and you urgently need to drill something, then the concepts of “impact drill” and “hammer” are identical for you; it is unlikely that any non-professional understands that these are two different tools, because their functions are very similar. Yes, in principle, there are no identical opinions among professionals. Often professional builders “give their vote” for the hammer drill, advising to use only it. But, at the same time, many good craftsmen believe that it is better not to use a hammer drill in drill mode at all, because it is much more complex, heavier and more expensive than a drill.
Read also: How to put rivets on clothes
Preparing for work
The readiness of the drill for operation is determined by the following conditions:
- the device is connected to an outlet (for drills powered by an electrical network);
- the battery is charged and installed in the compartment (for cordless tools);
- a drill is installed in the chuck.
You can press the start button to check the power. If the chuck rotates quickly, then electric current is supplied to the motor and the tool is ready for use. If the cordless drill chuck rotates slowly, the battery is discharged and needs to be charged.
How to insert a drill correctly?
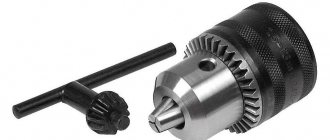
To correctly insert the drill into the chuck, you need to know the following. The hole intended for clamping the tool is no more than 2 cm deep. The deeper the drill is set, the more securely it will hold in the chuck. There are two types of chuck clamping mechanisms:
- manual, tightened by hand;
- key, wrapped with a key.
In recent years, household drill models have been equipped with a manual (quick-release) chuck - it is simpler in design and quicker to operate.
To install the drill in the chuck you need to follow these steps:
- Turn the cartridge counterclockwise. The jaws should move apart to a distance slightly larger than the diameter of the drill.
- Insert the drill bit between the jaws until it stops.
- Smoothly turn the chuck clockwise, making sure that the drill is clamped evenly on all sides.
- Tighten the jaws by hand or with a wrench.
Video: how to insert a drill and secure it
When fixing the drill in the chuck, considerable force can be applied, especially if the drill has a large diameter. It should be remembered that you will then have to do the reverse operation to remove the drill or replace it with another one. When clamping the drill, look for the “golden mean”: fasten the drill securely, but so that it can be removed from the chuck without any problems. The required effort is easily determined after a little practice - muscle memory kicks in.
Read also: How to determine the type of steel
How to remove a drill from a chuck?
Before removing the drill, make sure that the drill is unplugged from the outlet and ensure that you do not accidentally press the start button of the cordless tool. The drill should be pulled out only after the rotation of the chuck has completely stopped.
If the drill is equipped with a keyless chuck, the steps to remove the drill are as follows:
- Remove your finger from the start button.
- Wait until the rotation of the chuck has completely stopped.
- Grasp the cartridge by the base with one hand. With your other hand, turn it counterclockwise.
- When the jaws of the chuck have moved far enough apart, remove the drill.
- Carefully place the drill on the table, making sure that it does not roll away.
If the drill is equipped with a keyed chuck, do the following:
- Turn off the drill and wait for the chuck to stop.
- Insert the key into the chuck hole.
- Turn the key counterclockwise so that it moves the cartridge.
- Unscrew the chuck by hand so that the jaws release the drill.
- Remove the drill from the chuck.
- Place the key in the hole on the wire so it doesn't get lost.
Video: how to change a drill
Basic drill malfunctions and ways to eliminate them
No matter how perfect the technology, sooner or later, there comes a time when the technological resource is exhausted, and one or another part requires replacement.
An electric drill is no exception. Here is a list of possible, most common problems:
- Motor malfunction (power supply is OK, but the motor does not rotate).
- Wear or burning of the carbon brushes (the brushes spark strongly when the device is operating).
- Failure of the engine support bearings (the hum of the motor is heard, but there is no rotation, or the cartridge rotates intermittently, with a grinding noise).
In addition, the reasons for the unstable operation of the electric drill may be related to the integrity of the power cord or a stuck start button. Such problems can be solved by replacing the cable and preventatively cleaning the button from debris and dust.
To repair a drill at home, you will need many special tools, including electrical ones. If they are not there, it is cheaper to send the drill to a service center for repairs. Replacing carbon brushes is within the capabilities of a home craftsman. In all new drill models, the designers have provided quick access to the brush attachment point and easy replacement.