Main screwdriver malfunctions and their causes
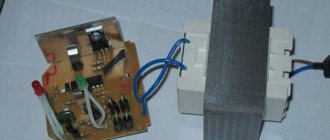
Below is a picture showing the internal structure of the battery device.
Screwdrivers can be equipped with both commutator electric motors and brushless motors (they do not have electric brushes).
If your screwdriver breaks down, then the malfunctions of this device may be the following.
- Device is not working. First of all, the electrical plug or cable may be faulty, the battery may be completely discharged or faulty. This problem can also be caused by burnt-out motor windings, a faulty start button, or worn brushes.
- When the device is operating, it sparks strongly. There may be a malfunction of the armature or motor commutator, as well as problems with the brushes.
- The battery discharges quickly. You will need to check the batteries included in the battery pack using a tester.
- The device turns on spontaneously. Most likely the start button is faulty.
- The engine brake does not work. In this case, it is necessary to replace the button or transistor, since these elements are responsible for braking.
- Chuck backlash. Most often, runout is caused by bending of the gear shaft.
- The ratchet doesn't work. Possible causes: worn ratchet locking blades, broken ratchet pins or springs.
- The cartridge rotates. A malfunction of the gearbox, namely its gears, can cause a situation where the cartridge slips. Also, the malfunction of this unit is the reason that the running motor does not turn the spindle.
- The chuck is jammed and it is impossible to unscrew and remove the drill or bit. As a rule, jamming of the clamping jaws occurs due to insufficient lubrication or breakage of the internal parts of the chuck.
All faults, except for the electrical plug, can only be eliminated after disassembling the device.
How to replace brushes
Each of the graphite brushes is located at the end of the motor near its connection with the button. Graphite brushes are located at the end of the motor on the side connected to the button. The brush can be located in the middle of the engine housing under the rear covers or outside. If the wear of one brush is at least 40%, then two are needed. You also need to check your contacts. If the brushes have wear, this is indicated by:
- the engine runs jerkily;
- the occurrence of sounds unusual for working equipment;
- the appearance of sparking and a burning smell.
How to disassemble a screwdriver for repairs
To disassemble the device, follow these steps:
- disconnect the battery pack from the device body;
- unscrew all the fasteners holding the 2 halves of the device together;
- remove the upper part of the housing;
- remove all contents from the device body;
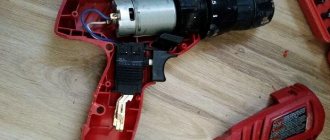
- carefully disconnect the start button from the housing without damaging the wires connecting it to the engine;
- remove the speed switch;
- disconnect the motor, gearbox, coupling and cartridge by unscrewing the 4 screws;
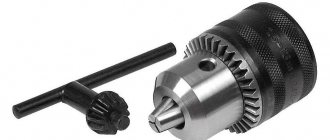
To unscrew the cartridge, you will need to unscrew the screw, which can be seen inside the mechanism when the cams are unclenched. The screw should be unscrewed clockwise since it has a left-hand thread. After this, the cartridge must be unscrewed from the gearbox shaft by turning it to the left (right-hand thread).
Features of engine repair
Screwdrivers use DC motors, which are manufactured using a cylindrical housing with magnets. The body contains an armature with a winding and brushes. To check the engine, you should disconnect the gearbox and the wiring that comes from the button, and measure the resistance of the armature winding using a tester. If there are no readings, then this indicates that there is a break, and in the case of an extremely low value, we can talk about a short circuit. Resistance values must be measured at the shaft end and plate surface. It must be greater than zero. A faulty armature can cause the tool to shut down during operation, and loss of power, sparking, and smoke may also occur.
It often happens that if the engine breaks down, the gear may be fine. Since many engines have a pressed gear on the shaft, it is quite difficult to remove it. To do this, you can use a special puller or use improvised means. Do not use pliers or a nail puller for this, as this may bend the shaft and damage the gear teeth.
- You can take a profile or channel and make a longitudinal section on it using a grinder.
- Insert the shaft into the groove slot perpendicular to the profile and pry off the gear.
- Place the profile on two bars so that the engine hangs down.
- Use a nail and hammer to gently tap the gear off the shaft.
- The removed gear must be put on the shaft of the new engine, using a hammer and a hard surface to put it on.
Diagnostics and troubleshooting of the electrical part of the screwdriver
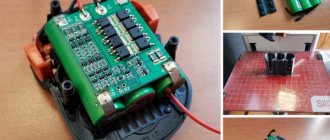
If you have a battery-powered device, then the first thing you need to do is check the batteries in the battery pack by disassembling it. There are collapsible and non-dismountable blocks. In the second case, you will need to carefully insert a screwdriver into the place where the walls of the block are glued and, slowly, separate them.
Next, you need to measure the voltage on all “banks”. The voltage rating is indicated on the body of each battery. The voltage should be slightly lower than specified, but the same on working batteries. Faulty batteries will differ significantly from the rest in the voltage they produce - they will need to be replaced. New batteries can be purchased online.
It is important to solder them correctly, that is, in series: the plus of one battery is connected to the minus of the other, and the plus of the second to the minus of the next, etc.
If you are the owner of a networked screwdriver, then the verification algorithm is slightly different. First, you will need to unscrew the body of the device and remove one half of it. Take a tester and “ring” the power cord for a break. If the cord is working, you need to check the start button. With the button pressed, check whether there is a circuit at its output contacts. If the button is faulty, it will need to be replaced or repaired. How to do this will be discussed further. If the button is working properly, the problem may lie in the electric brushes or the motor.
Button repair
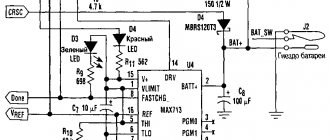
Below is an electrical diagram of a cordless screwdriver.
From the diagram you can see that 2 wires from the battery go to the button, and 2 wires come out of it to the engine. Also, 3 wires from the transistor responsible for adjusting the speed are connected to the button. To understand the structure of the screwdriver button, it must be disassembled. All wires going to this part do not need to be soldered. They will not interfere with disassembly.
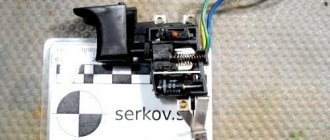
Remove the push mechanism (red) from its seat. Do this with gentle rotational movements, while simultaneously pulling the part in the direction opposite to the button, making sure that the joke does not break.
Next, remove the button cover. In the places indicated by arrows in the figure, use a knife and a screwdriver to pry and push out the latches, and then remove the cover.
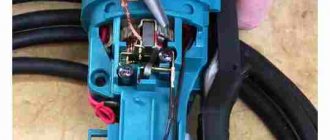
After removing the cover, you will see the reverse compartment. But the button mechanism will still be unavailable. Using a soldering iron, separate the 2 elements (indicated by an arrow in the following figure).
Carefully pull out element number 1, then remove the cover that covers the compartment with the device’s activation mechanism.
Holding the return spring, remove the mechanism from the housing.
In the faulty button you will see erased contact pads.
The contact pads wear out quickly due to the poor quality of the metal. Fine metal dust from actuated contacts accumulates between them and shorts out the pads. As a result, the device starts spontaneously.
Use cotton wool soaked in alcohol to remove metal dust. If this fails, you can scrape it off with a knife. After these steps, the spontaneous startup of the device will stop.
If the speed controller does not work, it means the transistor has burned out and needs to be replaced.
Replacing brushes
To check the condition of the brushes, it is necessary to disassemble the engine by bending the “antennae” located at the end of the housing.
Next, lightly tap the motor shaft with a hammer to knock the rotor out of the housing.
In this case, the cover in which the electric brushes are located will first be removed.
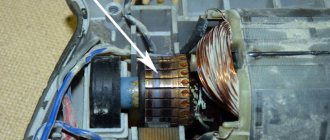
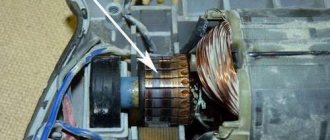
The next photo shows that the collector is black. This means that it will become contaminated with dust from the brushes. As a result of contamination of the commutator, as well as the grooves between its plates, engine power drops and the brushes spark. It is necessary to wipe the collector with cotton wool soaked in alcohol and clean the grooves with a needle.
The following photo shows what a clean manifold looks like.
If the brushes are worn out, they will need to be replaced. It is difficult to find original brushes on sale for some models of screwdrivers. But you can find brushes that are suitable in size, then use a sharpening machine to trim them and connect (solder) them to the brush holders.
Sometimes, to replace the brushes, you will need to cut a groove into them. It depends on the way they are attached.
To better understand how brushes are replaced, you can use the following video.
Engine brake repair
The engine brake is a device that stops the rotation of the armature when the start button is released. In screwdrivers, this function is implemented by closing the plus and minus of the motor when the button is released. As a result, a large self-induction occurs, and the spindle locks (with large sparks from under the brushes). If engine braking does not work, then the control transistor or start button will need to be replaced.
Elimination of mechanical breakdowns
Mechanical breakdowns of a screwdriver include malfunctions of the ratchet, gearbox and chuck of the device.
Ratchet repair
If the ratchet on the screwdriver does not work, you will need to disconnect it from the gearbox to troubleshoot. Sometimes special rods are installed in the coupling, which regulate the force, and in some devices, instead of rods, 2 balls are installed in each hole. They are pressed by a spring, which, when the adjusting ring is tightened, presses on the balls.
In most cases, repairing a screwdriver ratchet consists of cleaning its components from dirt and applying new lubricant.
Screwdriver gear repair
If unusual noises are heard in the gearbox, or the spindle rotates jerkily, with slipping, then the fault may be faulty gears of the mechanism, ground off teeth on its body.
Gears most often break if they are made of plastic (used in cheap devices). If this happens, they must be replaced.
In the next photo you can see the gearbox structure.
The reason that the spindle does not rotate when the engine is running may be wear of the plastic teeth inside the gearbox housing.
To restore the functionality of the mechanism, it is necessary to disassemble the gearbox (it is better to photograph the disassembly process) and screw in a small bolt ground to the required size in place of the worn teeth. The place where you will install the bolt must be marked. It should be located strictly opposite the plastic tooth located on the inside of the case.
Make the same markings on the back side of the case, opposite the first.
Next, drill holes in the marked places.
Screw bolts of the required length into these holes, first grinding them down so that they are flush with the other plastic teeth. After adjusting the bolts, you can assemble the gearbox by applying the required amount of lubricant to the gears. At this point, the repair of the screwdriver gearbox can be considered complete.
Gearbox disassembly and repair
Components of gearboxes:
- gear;
- carrier;
- satellite.
Metal and plastic are used to manufacture these elements. Ring gears are cylinders that have internal teeth along their entire diameter. The satellites move in the direction of the teeth.
The first carriers have two gears at each end. The first are sun gears, which are the drive gears of the engine. They are located between the satellite on the first carrier. The second solar ones on the opposite side go between the satellite on the second carrier. For two-stage gearboxes, the second carriers are connected to the shafts on which the cartridge is mounted. Three-stage gearboxes have one more mechanism. Each of the parts is located in the middle of the ring gears.
Rotation is transmitted from the engine to the satellite of the first stages via a sun gear. The first carrier rotates the second stage of the satellite. If there is a third stage, rotation is carried out by the second carrier. The satellite at each stage rotates in ring gears. The last carrier rotates the cartridge shafts. Each torque shift results in a reduction in speed.
Disassembling the gearbox is carried out as follows:
- The cartridge is removed.
- The body unwinds.
- The gearbox is disconnected from the engine.
- The plate is removed.
- All parts are removed from the device body.
- All bolts connecting one and the other half of the gearbox are unscrewed.
- We correct the spring diameters using pliers in order to improve gear engagement.
- We disassemble the coupling by removing the retaining ring, washers, and bulk bearing.
- We remove the shaft.
It is best to arrange each removed part on the gearbox that is being disassembled in order, so that in the end it will be easier to reassemble it.
- If during operation the screwdriver makes suspicious sounds or vibrations, then the gearbox may have defects. When working with such a tool, it is necessary to press it excessively and work with side pressure. Such improper operation leads to bending of the gearbox shaft and the occurrence of noticeable runout. In case of such breakdowns, a complete replacement of the unit is necessary.
- Possible wear of the support sleeve and shaft bearing requires replacing these elements with similar parts.
- A broken pin on the satellite leads to noise vibrations and causes an instant stop in the engine. Such a breakdown requires replacement of the carrier and gearbox.
- When the teeth on a gear wear out, it is important to consider replacing the gearbox.
Often, in the process of repairing gearboxes, tool owners only carry out cleaning and lubrication. However, you do not need to be overzealous with this, otherwise it may cause problems with the operation of the equipment.