How to repair a screwdriver with your own hands? + (Video)
For example, if the tool stops turning on, then you first need to check the health of the battery.
If the breakdown does not disappear when you place the device on charge, then you will have to arm yourself with a multimeter and start scanning the device in search of the root cause. First of all, take a look at the voltage value indicated on the device body and compare it with the measurement readings on the battery. The data should be approximately the same. If the voltage is too low, then most likely the problem is hidden in the charger or battery pack. For example, the charger can be checked using a multimeter by connecting it to the network and taking measurements at the terminals of the device at idle
It is important that the voltage criterion is slightly greater than the nominal one. In a situation where there is no voltage, then the culprit of the breakdown is definitely the charging unit
Interskol screwdrivers suffer from this fairly common problem. In general, correcting the defect will require specific knowledge of electronics or require the purchase of a new unit.
If you discover a battery problem, for example, with a Makita screwdriver, you can open this block with your own hands, where the power elements are located. As a result of the opening, you should conduct an examination of the connecting wires and ensure that the soldering is of high quality. If no visible defects are detected, then using a scanner you should measure the voltage in each element. The values should show 0.9 - 1V voltage power. If a block with a low voltage reading is found in a row, it must be replaced.
DIY Bosch screwdriver repair
Manual installation of fasteners has always been a labor-intensive and painstaking task. Therefore, space technologies very quickly found their application in terrestrial conditions. A screwdriver has become the most sought-after tool in almost every household. But the simplicity of the design and reliability of the tool does not make the mechanism invulnerable.
During operation, a number of problems arise that you can fix yourself or contact service center employees.
READ How to Lubricate the Hammer Gearbox
The purpose of all parts and components of the tool - what they are called
If a screwdriver breaks down, then before you repair it, you need to figure out which specific part has failed. To find out the malfunction yourself, you need to understand the purpose of each unit and its design parameters.
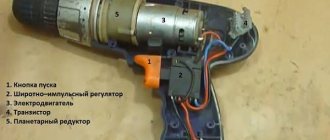
- The start button is where the tool starts working. This mechanism performs two options - it turns on the power circuit, that is, it supplies voltage to the electric motor, and also regulates the number of engine revolutions. The harder you press the button, the faster the chuck will rotate. An electronic PWM generator, which is installed on the board, is used as a speed controller. When you press the button, the contact moves along the board. A field-effect transistor is used as a contact, which plays the role of a rotation speed regulator
- Electric Motor - Portable tools use single-phase brushed-type DC motors. The advantages of these units include high reliability and ease of maintenance. An electric motor consists of magnets (playing the role of a stator), an armature and brushes. The use of magnets significantly reduces the cost of the unit
- Reverse - this option is implemented by changing the polarity at the terminals. To prevent the user from manually changing the polarity, the design of the tool uses changeover contacts in the form of a switch. This switch is located near the Start button.
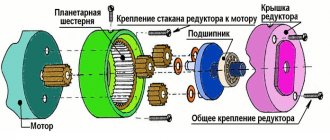
- A gearbox is a set of gears that increase the torque of the cartridge or reduce the speed. Shuriks use two types of gearboxes - planetary and classic. Classic ones are similar to those installed on drills, only they are very rarely found in screwdrivers. More popular are planetary gearboxes, consisting of a ring (intermediate) and sun gear, as well as satellites. The sun gear is driven by the motor shaft. Its rotation sets the satellites in motion, transmitting torque to the ring gear. Depending on the number of speeds, planetary gearboxes can be two-stage or three-stage. The more speeds, the more expensive the tool will cost
- Force regulator - usually 16 force positions are used, but there are also models that have a larger number. The ability to screw a screw into wood depends on the amount of force. If you need to screw a screw into drywall or other soft materials, then a lot of force will not be required, so the regulator can be set to positions from 1 to 7
- The cartridge mechanism has a simple operating principle. The device consists of three cams that securely fix the installed attachments. The advantage of quick-clamping devices is the high speed of changing attachments
- The case is a plastic impact-resistant structure, inside of which all the components are located. To repair the device, you need to disassemble the housing. For this purpose, manufacturers produce housings made of two parts, connected with screws
- Battery - Manufacturers make two types of portable batteries, nickel-cadmium and lithium-ion (like those found in cell phones). Lithium-ion batteries are longer lasting and more reliable, but they cost 3-4 times more than nickel-cadmium batteries. Typically, a screwdriver comes with two nickel-cadmium batteries, which is due to their short service life
This is interesting! If you come across batteries that have a one-piece body design, this means that they are not intended for self-repair.
If a screwdriver breaks down, it is not difficult to repair it at home, if only you can find the breakdown. Frequent problems with screwdrivers include battery failure, replacing which can cause some difficulties. Let's look at mechanical and electrical faults, as well as the features of eliminating them on your own.
How to Disassemble a Makita Screwdriver
Innovative technologies in construction are developing more and more often; everyone has long known that a screwdriver is your indispensable assistant for both the most experienced specialist and the novice craftsman.
Thanks to it, you can simply tighten various screws and self-tapping screws when assembling furniture structures, as well as performing repairs on equipment and apartments. The fact that no matter what kind of equipment burns out over time is no longer news to us, so it’s easy to disassemble a screwdriver and try to repair it in makeshift conditions. But only without fanaticism, be careful when disassembling, especially such models as: interskol sell 12er 01, interskol sell 18er.
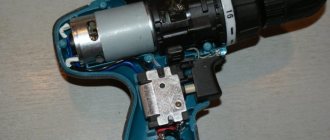
What problems can be corrected at home? How to recognize one or another breakdown? To give definite answers to these questions, first we will understand the internal mechanism of the tool. The main protruding element is the power button. It is used to start the device and also to configure the speed and direction of rotation of the working part - the chuck.
The speed is adjusted using an electrical device based on a transistor. The speed of rotation is directly proportional to the force of pressing the button. The reverse is started by changing the polarity of the electric current at the terminals. Typically, a screwdriver is equipped with single-phase commutator-type motors that operate on continuous current. Motor means housing, magnets, armature and brushes.
The rotation from the motor goes to the gearbox. Then he converts the high engine speeds into low cycles on the shaft, and a cartridge with active bits is fixed in the personal computer. The gearbox is used traditionally, as on an ordinary drill, and in particular planetary. Now the traditional gearbox is practically not used, we don’t have to stop and move on. The planetary mechanism contains:
9.Replacing brushes on a Makita screwdriver.
When working with a brush screwdriver, natural wear of the brushes occurs over time. They are located inside the electric motor and have a graphite base. Of course, brushless screwdrivers have already been invented. Which gets rid of this problem forever. But let's get back to our brush replacement. They are not expensive and you can replace them yourself. The screwdriver needs to be disassembled. Replace the brushes in the electric motor. You can also make brushes with your own hands by removing them from any non-working electric motor and bringing them to the required size using a file. After replacing the brushes, reassemble the screwdriver and give your engine a long service life.
How to disassemble the cartridge + (Video)
If the cartridge fixation is conical, then it is simply removed - by carefully hitting the block body with a hammer. If the fastener is threaded, the following steps will be needed:
- Unscrew the screw with the left-hand thread in a clockwise direction.
- We squeeze the hexagon in a vice, place the key on it and hit it with a hammer. Likewise, the cartridge should move from its original position. You can choose one more option:
- Place the screwdriver on a flat surface, on a table, for example.
- Turn it on.
- Observe whether the cartridge has moved from the table. when struck by a hexagon.
It also happens that all of the above methods do not work, and then there is only one thing left to do - disassemble the screwdriver, after which:
- Remove the gearbox and spindle;
- Place the assembly in the clamps of a vice;
- Take a pipe wrench and then disconnect the chuck.
And if there is debris in the gearbox, then that’s what you need to do.
https://www.youtube.com/watch?v=Y_BuGSHAEeM
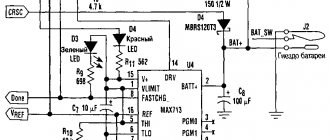
Charger repair
There are several most common charger breakdowns:
- fuse burned out;
- network cable refraction;
- broken primary winding of the transformer;
- broken diodes.
Having disassembled the charger of the tool, you can see the step-down transformer and the circuit board. Using the mains wire, the voltage passes to the primary winding of the transformer. The thermal fuse operates in series with the mains winding, causing overheating to occur first and protecting the winding from breakage. During the secondary winding, the voltage is directed to the diode bridge. When current is passed through the charger, yellowness appears near the diodes. The transformer windings overheat and the diodes break down.
- Use a multimeter to measure the resistance on the primary winding. If it is absent, the circuit may be broken, as a result of which the voltage does not reach the primary coil. The fuse is located under the transformer insulation near the wires that connect to the network. Next you need to check it using a tester.
- When the fuse is intact, you need to check the power cable. Alternatively, it can be interrupted.
- If the mains cable is solid, it is recommended to check the winding. If there is a breakdown, the transformer will need to be replaced.
Operating principle and main components
Before you start repairing a screwdriver with your own hands, you need to understand the principle of its operation and what parts it consists of. The main difference between a screwdriver and other power tools is the use of a mechanism that stops the rotation of the working part of the device. This happens when the maximum resistance configured for the instrument is reached. This value is not constant and can be adjusted. There are two types of device:
- operating from a 220 volt network;
- using a rechargeable battery.
Regardless of the type of device, their operating principle is the same and is based on the transmission of torque. It determines which fastening tool the screwdriver can tighten. To increase torque, devices use gearboxes with a large gear ratio, but the rotation speed is reduced. For screwdrivers operating on AC power, the torque value is related to the power consumption of the tool. The main parts underlying the device of a screwdriver, be it Makita, Hitachi or Bison, are as follows:
- electric motor;
- push button;
- speed controller with reverse;
- chuck;
- the electronic unit;
- gearbox
The electric motor rotates the spindle at a set speed using a planetary gearbox. The torque is controlled by a clutch, and a chuck or hex holder is placed on the spindle. A replaceable device called a “bit” is installed in this cartridge. The screwdriver is controlled by an electronic circuit and reverse switching.
Reverse occurs by changing the polarity of the power supply. The motor is a single-phase continuous current commutator motor. This motor is designed to be connected to an alternating current network. The field winding is connected in series with the armature winding and is divided into two parts. One turns on before the anchor, and the other after it.
The tool uses a planetary type gearbox. The gearbox includes sun and ring gears, satellites, and carrier. The electric motor shaft rotates the sun gear, which transmits torque to the satellites, and they directly affect the carrier.
The gearbox is available in one- and two-stage types. In the second case, a double carrier connected to the shaft is used. The design of two carriers and satellites is located in the middle of the ring gear. It is fixed through special grooves on the body. Along the entire perimeter, the lugs of the ring gear rest against spring-loaded balls through the ring. The load control mechanism acts on the ring through a controlled spring, the force of which is changed by moving the regulator.
Speed control is performed using a pulse circuit assembled on a pulse-width modulation (PWM) chip. The controller controls a field-effect transistor operating in switch mode. The pulse frequency is changed using a variable resistor. The resistance value of the resistor depends on the force applied to the button.
The screwdriver clutch is a ratchet. If the load on the cartridge exceeds the permissible value, the load regulator is activated. The spring force becomes insufficient to hold the ring gear, and it comes off the balls. The electric motor begins to rotate the gear idle. When switching to electric drill mode, this gear is turned off and does not participate in the work.
The battery consists of several elements installed in one housing and connected in series. The case has a special latch that allows you to quickly remove the battery.
Mechanical breakdowns - how to fix them
Faults in the mechanical part of the tool are easier to detect than in the electrical component. This is due to the fact that any mechanical defects are audible. The main signs of mechanical malfunctions of the devices in question include:
- The occurrence of extraneous sounds
- Vibration and chatter of the chuck
- The tool motor can be heard running, but the chuck does not rotate
To repair the device and eliminate mechanical faults, you will first need to disassemble the housing. Knowing the design of a screwdriver, it will not be difficult to eliminate any breakdowns that occur in the mechanical part. If extraneous sounds occur, which indicates the cause of wear on the bushings and bearings of the motor armature, then these elements need to be replaced. When the bearings and bushings wear out, they need to be replaced, but first you need to buy these parts. Difficulties may arise when purchasing, since it is almost impossible to find spare parts for outdated models of tools.
This is interesting! Before installing a new bearing, it should be well treated with lubricants, for example, Litol-24 or Solidol, or even better with special lubricants.
In addition to bearing failure, the gearbox on the screwdriver may break. A number of malfunctions of this device include:
- The gearbox shaft bends due to heavy loads
- The working surfaces of the gears wear out
- The pin on which the satellites are attached breaks
- The bearing or support sleeve of the gearbox is worn out
Most often, it is the gearbox that fails, or more precisely, its component parts—gears. The causes of gearbox failure are:
- Incorrect use of the tool
- Heavy loads for which the device is not designed
- Lack of lubrication
- Material from which the devices are made
If the screwdriver is “old school”, that is, its gearbox consists of steel gears (instead of plastic), then it is advisable to repair it rather than buy a new one. To do this, you need to disassemble the device, inspect it and find the cause of the malfunction. When repairing a gearbox, it is necessary to clean the mechanism and parts from obsolete lubricant and apply new lubricants. If there are damaged gears, they need to be replaced. Do not rush to dispose of faulty gears, as you will need to buy the exact same parts (use them as a template).
This is interesting! If the tool has plastic gears, it is not recommended to replace them with steel ones. The reason is that plastic gears break under heavy loads, which protects the engine from combustion. If the device has metal gears installed from the factory, this indicates that the engine has a large power reserve.
To avoid unnecessary questions when independently repairing the mechanical part of screwdrivers, there is a table below that shows the main signs of mechanical faults, as well as ways to eliminate them.
| Symptoms of tool malfunction | Troubleshooting methods |
| The occurrence of extraneous sounds and hum | If extraneous sounds begin to appear when using the tool, this indicates wear of the bearings. To eliminate the breakdown, you need to check the integrity of the motor armature bearing and gearbox. If the bearings are in good condition, you should also check the integrity of the bushings, as they also wear out. Most often, the bearing shaft support sleeve wears out. |
| Vibration | Curvature of the reduction shaft, which contributes to the occurrence of strong beating and vibration. To solve the problem, you need to disassemble the case, assess the damage and make the appropriate decision to replace the part. |
| Clamp chuck failure occurs | If runout of the cartridge is detected, then you need to check the quality of its fixation. The part is fastened with a bolt, which is located inside the part (to see the bolt, you should separate the jaws). To screw the cartridge, the bolt must be rotated not to the right, but to the left, since it has a reverse thread |
| Jamming | If the tool is jammed, as indicated by the operation of the motor, but the chuck does not rotate, then you need to disassemble the housing and check the integrity of the gearbox. Jamming of the tool indicates displacement of the satellites, a violation of the integrity of the gears, or a violation of the integrity of the bearing. To fix the breakdown, you need to disassemble the screwdriver and find the cause of the jamming |
| Cracking and spinning at switch position | Gearbox malfunction. To eliminate it, you need to disassemble the tool and inspect the integrity of the mechanism. |
https://youtube.com/watch?v=Jr_xq9ZvvdE%3F
Details
How to repair a screwdriver
One of the most common problems with Makita screwdrivers will be problems with working at first speed. At the same time, everything will work perfectly on the second, and this problem is due to the fact that the gearbox in the tool is faulty, which does not allow the first speed to be used effectively. We suggest considering how to get rid of this problem and repair the screwdriver.
How to disassemble the gearbox
First of all, you should definitely disassemble the tool itself and separate the gearbox. Next, it is important to remove all other parts that are unnecessary at this stage. To do this, you simply need to pour out all the gears from inside the gearbox, and it should also be noted that if there is no information about the exact location of all the parts, it is better to disassemble it carefully and sequentially. Also, do not forget to write down and mark the location of the gears. This is required for high quality assembly after repair work has been completed. You can also use educational articles or videos.
How to screw in bolts instead of teeth
How to repair a Makita screwdriver? After all the gears are removed from the gearbox, the inside of such a device will open to the eye. Taking into account the specifics of the problem, the technician will most likely see that all the plastic teeth on the inside are worn off. This will happen during long-term use of the device, or if there was a gross violation of the rules of use. Plastic teeth are very soft, because under the influence of temperatures and constant mechanical load they will simply grind down. This can lead to the fact that the main gear has nothing to cling to and it begins to scroll. To restore and repair functionality, you will need to restore the teeth. In this case, it is not necessary to restore all the teeth; installing a couple of iron ones is enough. In order to achieve what you want, you will need a drill, drills and bolts. It is advisable to use a drill coated with diamond, because it makes it possible to effectively grind off the excess part of the bolt in a short period of time.
The work order is as follows:
- At the location of the plastic tooth, a hole will be drilled in the side of the gear wall. It is required to use drills with a slightly smaller diameter than the diameter of the bolt. This way you can screw it in with reinforcement and also ensure secure fastening.
- A couple of holes are required to be drilled diagonally to ensure reliable gear retention and stable tooling performance. Thus, the load will begin to be distributed over both teeth.
- When drilling, it is advisable to point the drill slightly downward so that the bolt does not stick up. Otherwise, it will take much longer to process it with a drill.
- Next, you should firmly screw the bolts into the holes that are created.
After completing all such manipulations, the tooth blanks will be ready. Next, you should properly process them and give them the desired shape. This is done using a drill.
Using a drill
The bolts should be screwed in and processed from the sides using a drill, and if necessary, shortened to length. It is required to give the bolts the shape of a real tooth and provide for the installation of the crown without any problems.
Please note that it is not recommended to overheat the bolt using a drill during the working process. Otherwise, it can become very hot and melt the surrounding plastic. The gear housing will begin to deform, which can lead to a more serious problem, and so during operation you will need to take a break so that the bolt has time to cool.
As soon as the teeth are ready, the gear ring can be inserted back. If you do everything correctly, it will be inserted without any interference. Two teeth are usually enough to restore the gearbox to working order, so screwing in a huge number of bolts is not logical.
How to properly repair a screwdriver battery
Screwdrivers that operate not from a 220 V network, but from a battery, are also heavily subject to battery wear. This will happen over time even with proper use. If you do not follow operating rules, the battery will stop holding a charge pretty soon.
In such a situation, there are a couple of options - buy a new battery or try to repair the Makita screwdriver battery yourself. By the way, the second option will require spending a certain amount of time, effort, and will also require the presence of specialized elements. The battery in a screwdriver is a large set of a certain number of specialized power banks, which are soldered to the charging controller and form an integral structure. Corresponding power supplies can be found in laptops or power banks. There are still the described banks in a certain quantity. But laptops have 6 cans, but a power bank only has 4. But the number may be completely different and depends on the battery capacity. If the master has excess elements of such lithium batteries, then you can use them to repair the battery in a screwdriver.
How to disassemble the battery
At the very beginning, you need to understand the battery in the Makita screwdriver. To do this, it will be disconnected from the screwdriver, and then all the screws will be removed from it. The battery case opens and you can see the design of this element. There will be 10 cans located there, which are soldered together and soldered to the controller for power. It is necessary to disconnect all banks from the board. To do this, use a drill with a special attachment.
Removing cans from the circuit board
Using an electric engraver (drill) with a disk attachment, cans can be sawed off from the board. Next, you should sequentially remove all connections of all contacts with the controller, and also the elements should be disconnected from the common frame. You need to do the work as carefully as possible so as not to damage the board, but forcefully to disconnect it completely.
Soldering new cans
Immediately after the frame and board have been freed from the old power elements, new ones can be attached to them. Before the soldering process, it is recommended to thoroughly clean the surfaces on the cans and on the board itself from remnants of old soldering. This will make it possible to achieve ideal contact for a long time.
Now all the new cans from the remaining devices are placed in special places on the frame and soldered one by one to the power controller. It is recommended to do this using a thick tip on a soldering iron because a lot of solder will be required. The contact must be very reliable and have a huge contact area. After proper assembly, it is recommended to wrap the entire structure in special paper and place it in the previous case. Next, reassemble the battery and close it with the cover, which will be attached with screws.
Before use, the battery should be recharged at a special station to 100%, and only then connect it to the screwdriver for testing. If everything is done correctly, the battery will be functional again. Replacement cans can be taken from another battery or purchased separately. The price for them is quite high, but still manual replacement will cost you much less than buying a new battery.
How to repair a gearbox yourself
A gearbox is a mechanism that is practically impossible to repair. We are talking about repairing a screwdriver gearbox with your own hands. For example, the wires can be soldered and a button attached. Here the way out of the situation is to replace faulty parts. Also, if the speed switching occurs late or in some cases does not switch, you can try to lubricate the gears in the gearbox. When disassembling, you may come across debris that interferes with the normal operation of the planetary mechanism.
You can lubricate the gears with such improvised material as antifreeze. Well, it’s better to do this with the “original” lubricant. It can be found in the store or service center of the company to which the device belongs. The price of a tube is usually not high, and it should last for several maintenance of a screwdriver or other equipment.
Screwdriver gear diagram
Disassembling the screwdriver gearbox:
- It is necessary to remove the cartridge. The most convenient way to do this is with a 10 mm hex key.
- It is necessary to clamp the short end of the key into the chuck, and then perform a short run with the tool so that the key hits the table surface at full speed of the electric motor.
- But this method is suitable for a screwdriver, where the gearbox somehow starts. If the mechanism is faulty, you need to clamp the spindle in a vice. In this position the gearbox can be disassembled.
Now you can carry out the planned operations - lubricate parts or perform replacements, provided that new elements for the screwdriver are available.
It is not recommended to take gears or couplings from other models, as there will most likely be a discrepancy, although it may not be visually visible. It is not recommended to work with a screwdriver for a long time at high speeds, as this will most likely lead to breakdown.
In this article we will look at a screwdriver from the famous Makita brand, describe its technical characteristics and general structure, talk about the main problems and malfunctions that arise during the operation of the tool, as well as how to diagnose a breakdown and repair this or that element with your own hands screwdriver.
How to Assemble a Makita Screwdriver
Repair of chuck and other parts of Makita screwdriver
Next, we will look at a screwdriver from the well-known brand “Makita”, describe its technical properties and general design, talk about the main dilemmas and defects that arise during the use of the tool, and of course, how to diagnose a breakdown at home and repair what is also called another element screwdriver.
Description, general information
produces various power tools, among which are screwdrivers. The company began its history in the 20th century, and to this day it continues to amuse consumers with its high-quality products. It is necessary to consider the general features and properties of the models of this office.
Makita screwdrivers are very powerful. The average speed for different models is about 2300 rpm, which is a good indicator compared to other brands. The weight of most instrument models is 1.5 kg.
Its low weight means that in fact, such equipment will be comfortable to work with. The manufacturer also took care of the convenience of working in poorly lit rooms, making most models backlit with LEDs. Separately, it is worth highlighting the type of handle for holding these tools on the weight.
You, they are made of rubber, so they are comfortable to hold in your hand, and accordingly, the work process is much easier.
The disadvantage of these screwdrivers is the powerful vibration of the handle during operation, as well as their short-lived batteries. Already today, the cost of the products of this company is quite high, which is important for the Russian consumer.
Diagram, device of a Makita screwdriver
Let's look at the screwdriver design on a certain model 6271D. The diagram of this model is presented in the figure below.
Scheme 1
The diagram shows:
- Shift lever
- Housing assembly
- Nameplate
- Screw
- Spring
- Reverse shift lever
- Start button
- Contact terminal
- Screw
- Keyless chuck
- Gearbox assembly
- Electric motor
- Screw
- Housing assembly
- Charging node
- Battery
A modern screwdriver is a super-technological device. Fundamental design elements:
- Removable battery
- Rubber coated handle handle
- The most powerful electric motor
- Iron planetary gearbox
- Soft start button
- Reverse switch button
- Torque regulator
These are the main components of the screwdriver design, which are included in the basic package of any screwdriver model.
Disassembling a Makita screwdriver
To disassemble the screwdriver you will need a Phillips screwdriver and a little personal time. To completely disassemble a screwdriver, you need:
- unscrew mounting screws
; - remove the composite start button mechanism;
- remove the electric motor together with the gearbox;
- disconnect the gearbox from the motor by unscrewing the bolts holding them together.
To disassemble the battery of a screwdriver, you need to unscrew the bolts connecting the case, otherwise divide the connections of the case on the adhesive base using a soldering iron. Inside the battery there are several nickel-cadmium batteries that have a certain capacity and carry a charge. If the battery is repaired, they need to be replaced with new ones.
How to repair the gearbox in Makita 6271 \ Restoring the 6271 gearbox
In Makita
6271 the gearbox has failed in this case
video
I will show you how to return it. We will need it for this purpose.
Changing the screwdriver gearbox. (Replacement gear screwdriver on Makita 8280d)
When replacing the gearbox assembly, the cartridge was removed and the inside of the housing was cleaned. I hope this video
was exciting for you.
The cartridge is changed using a screwdriver and a hex key. First, you use a screwdriver to unscrew the mounting screw in the cartridge, rotating it clockwise. Then the hexagon is inserted, the reverse button is engaged, clamped, and later the cartridge simply gives in.
Malfunctions of the Makita screwdriver
More frequent breakdowns of a Makita screwdriver are as follows:
- The screwdriver won't engage. Here, well, what remains to be done clearly for our client. First you need to examine the battery, in addition to the contacts and connections in the case, and the wiring. A multimeter will help you check.
- The reverse button does not work. This means that you cannot either tighten or unscrew screws and bolts. Here you need to check the resistance of the button with a multimeter by placing probes on the input and output wires of the button.
- The speed controller does not work. In this case, the speed will be either constantly reduced or constantly increased. The regulating transistor or brushes will be to blame here. A visual inspection of the parts is required.
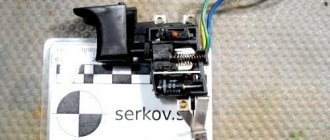
Repair of Makita screwdriver button
The tool's on/off button is a complex electrical mechanism. It consists of several components:
- start buttons;
- reverse buttons;
- speed switch buttons;
- buttons for smooth engine start.
When repairing a button, you first need to disassemble it by unscrewing the screws securing the case
and disconnecting the battery. As a result, you need to check the connections and contacts for contamination and clean them. If cleaning the contacts does not help to resolve the problem, the button assembly should be replaced.
Repair of Makita screwdriver charger
When repairing the charger, you need to unscrew the screws holding the housing covers together. Inside there is an integrated circuit with contacts. First you need to check the transformer with a tester.
For this purpose, you need to measure the voltage at the output. Later you should ring the cable to prevent it from breaking. Then the primary and secondary windings of the transformer and the fuse are checked.
It must be assembled in reverse order.
Repair of Makita screwdriver battery
When repairing the battery, use a Phillips screwdriver to unscrew the screws securing the case. There are several cans inside the case. Using a visual examination, you need to look at them and identify irregularities in geometry, such as swelling, for example. We test the banks using a multimeter to determine the presence of residual charge. If it is missing, the bank is replaced with a new one.
Repair of the Makita screwdriver gearbox (diagram)
To remove the gearbox, you need to disassemble the housing by unscrewing the screws with a Phillips screwdriver. We take out the start button, the reverse switch button, and disconnect the bolts securing the motor to the gearbox.
Then you need to remove the contents of the gearbox (different gears) and the speed selector washer. When inspecting an empty gearbox, special attention should be paid to the teeth located around the circumference of the gearbox housing.
For which the design of their wear is intended, the gearbox will not be able to perform its function: the speed switch does not work correctly. To restore the teeth, you need to use small bolts, inserting them into the unique plastic area.
The gearbox must be assembled in reverse order. The gearbox diagram is shown in the figure below. He presents a general diagram of the gearbox.
Brushes for Makita screwdriver
The brushes used for the screwdriver have a graphite base. Their price currently varies between 2 and 5 USD. e. They are located in the electric motor housing and consist of two graphite cubes mounted on iron plates. With intensive work, they wear out and wear out.
When performing repairs at home, there is an option to sharpen them with a ratfile from brushes from another tool, for example, a car starter. After recessing, they should be inserted into the brush holder and placed in the area, assembling the engine.
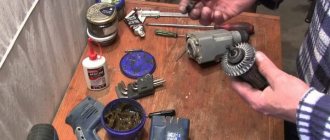
Makita quick release chuck
This chuck is used to clamp bits with a cylindrical shank. This cartridge is easy to install. It installs with almost one hand movement. Suitable for drills with diameters from 1 to 10 mm.
This is a movable structural element in the instrument, which is why it often breaks. To disassemble it, you need to read the tips described in the first article on disassembling the cartridge using a hex wrench and a Phillips screwdriver.
The cost of this product is about 20 USD. e.
The material in this article came out great.
Here we outlined to our client the possible problems that arise when using screwdrivers from the Makita office, told us how to remove them with our own hands, and separately talked about the various structural elements that make up the base of any screwdriver. The article contains diagrams of the gearbox and the general design of the screwdriver. We hope that the information will be useful to you.
Source: https://ctln.ru/kak-sobrat-shurupovert-makita-video/
A little about how to convert a battery from cadmium to lithium and who needs it
Let's talk about how to convert the battery yourself from one type of battery to another. There are many videos on the Internet on this topic, where they talk a lot about the advantages of using lithium in a screwdriver. However, unless you use the tool intensively and constantly, there is absolutely no point in using a lithium battery. Lithium-ion batteries tend to “age” faster than cadmium, and simply will not have time to exhaust their service life under conditions if the tool is used occasionally.
Converting a screwdriver battery using lithium batteries may be necessary for professional craftsmen who use the tool every day and need powerful power sources. Of course, if you really want to, you can solder the battery to lithium, but whether this will be advisable is up to you to decide. Read more about which batteries are best for a screwdriver →
Thus, you can not only disassemble the battery of any screwdriver, but also solder two bundles into one, which will last as long as possible, and you will not have to buy a new battery in the near future.
The performance of a converted battery, provided the elements are properly soldered, will be no worse. The main thing is to treat the process with patience and maximum care, so that during the first experiment you can finish the job with minimal losses and solder everything correctly. If you manage to collect everything, this will be an additional incentive to continue your experiments in the field of electronics. Assemble the battery yourself once - and you can save on buying new batteries for your screwdriver in the future.
Elimination of mechanical breakdowns
Mechanical breakdowns of a screwdriver include malfunctions of the ratchet, gearbox and chuck of the device.
Ratchet repair
If the ratchet on the screwdriver does not work, you will need to disconnect it from the gearbox to troubleshoot. Sometimes special rods are installed in the coupling, which regulate the force, and in some devices, instead of rods, 2 balls are installed in each hole. They are pressed by a spring, which, when the adjusting ring is tightened, presses on the balls.
In most cases, repairing a screwdriver ratchet consists of cleaning its components from dirt and applying new lubricant.
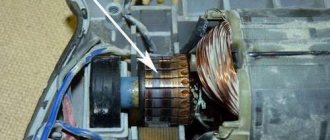
Screwdriver gear repair
If unusual noises are heard in the gearbox, or the spindle rotates jerkily, with slipping, then the fault may be faulty gears of the mechanism, ground off teeth on its body.
In the next photo you can see the gearbox structure.
The reason that the spindle does not rotate when the engine is running may be wear of the plastic teeth inside the gearbox housing.
To restore the functionality of the mechanism, it is necessary to disassemble the gearbox (it is better to photograph the disassembly process) and screw in a small bolt ground to the required size in place of the worn teeth. The place where you will install the bolt must be marked. It should be located strictly opposite the plastic tooth located on the inside of the case.
Make the same markings on the back side of the case, opposite the first.
Next, drill holes in the marked places.
Screw bolts of the required length into these holes, first grinding them down so that they are flush with the other plastic teeth. After adjusting the bolts, you can assemble the gearbox by applying the required amount of lubricant to the gears. At this point, the repair of the screwdriver gearbox can be considered complete.
Keyless chuck repair
To begin repairing this unit, you must first remove the chuck from the screwdriver. To do this, complete disassembly of the screwdriver is not required. How to unscrew the quick-release chuck was described above.
Frequent chuck malfunctions include incomplete exit of one of the jaws, as shown in the following photo.
The cause of the malfunction may be a worn thread on the nut that clamps the cams, or worn teeth on the cams themselves. To verify this, you will need to disassemble the cartridge.
Disassembling and repairing the screwdriver chuck is done as follows.
- It is necessary to hit the part protruding in its center with a hammer. In order not to deform this part, you can lay a small piece of wood.
- Separating the top will not be sufficient and further disassembly of the cartridge will be required. To do this, you need to lightly clamp the bolt into your fists and hit it with a hammer.
- When the inside of the cartridge falls out, its disassembly is considered complete. You will see a nut consisting of 2 halves. Most often, malfunctions in the cartridge occur due to this part. The thread on it wears out and the cams slip when tightened. Therefore, incorrect alignment of the latter occurs.
Also, the threads can be worn out on the cams, which, like the nut, need to be replaced. But if you do not find the necessary parts to change them, you will need to completely replace the cartridge. When assembling the cartridge, the cams must be installed at the same level, in a compressed state, after which a nut consisting of 2 halves is put on, and after that the entire structure is placed in the housing. When the problem is fixed, you can assemble the screwdriver.
Removing the keyless chuck
Another component that requires close attention is the keyless chuck. It happens that it also fails. Repair consists of replacing it. To remove the quick-release device, you need to unscrew the screw inside the chuck. Please note that the screw has a left-hand thread, so it must be unscrewed by rotating clockwise.
Then a hex wrench is inserted into the chuck with the short side, clamped and with a sharp blow of a hammer it is torn off the thread. After this, it is unscrewed along the thread by hand. She is normal, right.
After reading the article, we can conclude that the best screwdrivers for use in the household are tools manufactured by Bosch. They practically never fail. Their main problem is natural wear and tear due to long-term use or neglect.
Battery bank: troubleshooting
It is not difficult to detect battery damage. It is enough to measure its voltage after full charging. The voltage on one can is 1.3 volts - the voltage of a fully charged battery of 12 cans should be 15.6–15.7 volts. If the voltage is insufficient, this is a signal to further check the battery:
- To do this, you need to unscrew the fastening screws on the case and remove the cassette with cans.
- Visually inspect galvanic cells for oxidation and damage.
- Then you need to measure the voltage on each bank. If there is no voltage on one or more, they must be replaced immediately.
- Armed with a soldering iron, you need to remove everything that might interfere with removing the broken can: the positive wire and the temperature sensor. To avoid short circuits, it is better to insulate the power wire.
- Now you need to disconnect the plates welded to the battery and align them for more reliable contact.
- After this you need to tin the contacts. To reduce heating time and temperature, it is advisable to use F38m flux. A small amount of it is applied to the contact plate and liquid solder is added. Spreading over the surface, it makes contact. This must be done on both sides on the upper and lower contact plates.
- After this, you need to prepare the battery bank itself. Apply flux at the point of contact with the contact. The plate with heated solder must be pressed against the can at the upper end. And you need to do the same with the bottom contact.
- After this, it is necessary to restore the temperature sensor and positive contact. Then begin assembling the repaired battery.
Repair of a Makita screwdriver gearbox (diagram)
To remove the gearbox, you need to disassemble the housing by unscrewing the screws with a Phillips screwdriver. We take out the start button, the reverse switch button, and disconnect the bolts securing the engine to the gearbox. Then you need to remove the contents of the gearbox (various gears), the speed switch washer. When inspecting an empty gearbox, special attention should be paid to the teeth located around the circumference of the gearbox housing. If they are worn out, the gearbox will not be able to perform its function: the speed switch will not work correctly. To restore the teeth, you need to use small bolts, inserting them in place of the original plastic ones. Reassemble the gearbox in reverse order. The gearbox diagram is shown in the figure below. It shows the general diagram of the gearbox.
READ How to beat tiles in the bathroom with a hammer drill
Disassembling a Makita screwdriver
To disassemble the screwdriver you will need a Phillips screwdriver and a little personal time. To disassemble the screwdriver completely, you need:
- unscrew the housing mounting screws;
- remove the composite start button mechanism;
- remove the electric motor together with the gearbox;
- disconnect the gearbox from the engine by unscrewing the bolts holding them together.
To disassemble the screwdriver battery, you need to unscrew the bolts connecting the case, or separate the adhesive-based connections of the case using a soldering iron. Inside the battery there are several nickel-cadmium batteries that have a certain capacity and carry a charge. If the battery is repaired, they must be replaced with new ones.
The cartridge is changed using a screwdriver and a hex key. First, you use a screwdriver to unscrew the mounting screw in the cartridge, rotating it clockwise. Then the hexagon is inserted, the reverse button is turned on, it is clamped, and then the cartridge gives in easily.
Diagram, device of a Makita screwdriver
Let's look at the design of a screwdriver on a specific model 6271D. The diagram of this model is presented in the figure below.