Adjusting the fuel system of a walk-behind tractor
If fuel is not supplied to the cylinder, then the first thing you need to check is whether there is enough fuel in the tank. You also need to check whether it is supplied to the carburetor. To do this, remove the hose from the inlet fitting of the device. If we are talking about a K45 type carburetor, you should press on its quencher so that fuel begins to pour out through the drainage hole.
If fuel does not enter the carburetor, then you need to turn off the fuel supply valve, completely disassemble it and remove accumulations of dirt from the mechanical cleaning filter. To achieve maximum purity, all components must be treated with gasoline. The fuel valve is reassembled and returned to its original location.
If fuel enters the carburetor, but is not supplied to the cylinders, it is necessary to check the correct operation of the fuel valve, as well as the presence of dirt on the jets.
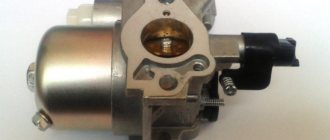
To deal with the carburetor of a gasoline walk-behind tractor of the KMB-5 type, you need to remove it from the engine and empty the fuel from the float chamber. Through the fitting (see figure), through which gasoline is supplied, it is necessary to supply the air mixture, having previously installed the carburetor in the working position. The passage of air should proceed unhindered, and when the carburetor is turned over, it should stop completely. These features indicate the full functionality of the part.
Rice. 2. Carburetor KMB-5
Details in the figure: 1 – fuel supply fitting; 2 – upper body; 3 – throttle valve; 4 – idle needle; 5 – jet; 6 – lower body; 7 – air damper; 8 – screw fixing the tie; 9 – maximum throttle needle; 10 – spray element; 11 – float; 12 – fuel supply valve.
The fuel level inside the float chamber can be adjusted using the float tongue. Ideally, it should vary from 3 to 3.5 centimeters.
To purge the jets, you need to unscrew the screws responsible for full and low throttle. Cleaning the carburetor parts begins by unscrewing the screws holding the upper housing. The lower housing is removed, the fuel supply valve is washed with gasoline, and dirt is blown out of the nozzles with a pump. It is necessary to check whether the float is intact. It is strictly forbidden to use rags during the cleaning process.
After cleaning is completed, the housings are connected. It is necessary to ensure that the spray tube fits clearly into the hole located on the upper body. Open the throttle valve and check how well the assembly is done. The screws securing the upper housing are tightened tightly. After the assembly process is completely completed, the carburetor should be adjusted. This will significantly improve the performance of a heavy walk-behind tractor with attachments, since correct operation requires the perfect adjustment of all its parts.
If a DM 1.08.100 carburetor is installed on the cultivator engine, then the method for adjusting it will be as follows:
- You should tighten the low throttle screw 10 (Fig. 3) all the way and turn it away from you half a turn.
- Then you need to tighten the full throttle screw 9 and completely unscrew it 2 turns.
- Unscrew screw 4 (Fig. 4) for minimum engine speed right up to the lever stop in the boss of the carburetor body and tighten it 2 turns.
- Start the walk-behind tractor engine, and then adjust stable operation at maximum speed after warming up with screw 9.
Do not allow the engine control lever to disengage. Move it to the minimum throttle (speed) position and, by unscrewing screw 10, set a stable idle speed. This completes the setup.
Rice. 3. Scheme of carburetor DM 1.08.100
Rice. 4. DM carburetor outside
That's basically the whole renovation. The main points of adjusting the main parts of the walk-behind tractor are considered. Use our manual (instructions) and prevent malfunctions. Adjust your walk-behind tractor or cultivator with pleasure!
Source
Lever of the centrifugal regulator in the Neva walk-behind tractor - 2M
Can you tell me how to correctly set the regulator lever on the centrifugal regulator. I had such a problem. I wiped the carburetor and linkages in the walk-behind tractor and turned the regulator lever on the centrifugal regulator, the one that tightens the centrifugal regulator with a bolt and nut. I tried to set it in different ways. It works at very high speeds, then I achieved that it starts normally when the air damper is closed and the speed does not fluctuate, but when I open the air damper, the gas starts to float and if I lower the gas, it stalls. At the same time, the throttle valve floats within wide limits. I also foolishly bent the lever with the spring through which it is connected to the rod that compresses the centrifugal regulator. In general, I’m sitting now and racking my brains about how everything should interact. Check your email and you will find the answer there.
Regards, Alexey
Thank you very much, Alexey! I checked my email and read your reply. I will try it over the weekend.
I fiddled around over the weekend, but still didn’t win. I disassembled and washed, cleaned all the holes in the carburetor with fishing line. I collected it, but the result is the same. There were glimpses of answers on the forum where the K-45 carburetor was mentioned. Maybe someone who has taken it apart can tell me about the idle jet. It is located on top, there is also a rubber ring on the screw. So my question is whether it depends how much it is screwed in, because it has one through horizontal hole and one small jet from below to this horizontal one. I screwed it all the way. Is it correct?
I repaired everything.
Hi all. motoblock Neva, carburetor 45, bought used, removed and disassembled the carburetor - there is a lot of dirt, but the question is different 1 - the lower bar that goes to the regulator was removed 2 - the lever is dangling on the regulator itself - apparently the bolt is not tightened and the question itself is how correctly set the bar on the carburetor that controls the choke and how to set and secure the lever on the regulator
Good afternoon Help, I have the same situation as I once had before: Centrifugal regulator lever in the Neva - 2M walk-behind tractor. Maybe tell me how to correctly set the regulator lever on the centrifugal regulator. I had such a problem. I wiped the carburetor and linkages in the walk-behind tractor and turned the regulator lever on the centrifugal regulator, the one that tightens the centrifugal regulator with a bolt and nut. I tried to set it in different ways. It works at very high speeds, then I achieved that it starts normally when the air damper is closed and the speed does not fluctuate, but when I open the air damper, the gas starts to float and if I lower the gas, it stalls. At the same time, the throttle valve floats within wide limits. I also foolishly bent the lever with the spring through which it is connected to the rod that compresses the centrifugal regulator. In general, I’m sitting now and racking my brains about how everything should interact. There is no book. You emailed the dokpva member instructions. If possible, help me too. Thanks in advance.
vai72 wrote: Good afternoon! Help, I have the same situation as I once had before: The centrifugal regulator lever in the Neva - 2M walk-behind tractor. Maybe tell me how to correctly set the regulator lever on the centrifugal regulator. I had such a problem. I wiped the carburetor and linkages in the walk-behind tractor and turned the regulator lever on the centrifugal regulator, the one that tightens the centrifugal regulator with a bolt and nut. I tried to set it in different ways. It works at very high speeds, then I achieved that it starts normally when the air damper is closed and the speed does not fluctuate, but when I open the air damper, the gas starts to float and if I lower the gas, it stalls. At the same time, the throttle valve floats within wide limits. I also foolishly bent the lever with the spring through which it is connected to the rod that compresses the centrifugal regulator. In general, I’m sitting now and racking my brains about how everything should interact. There is no book. You emailed the dokpva member instructions. If possible, help me too. Thanks in advance.
And me, if possible. I will be very grateful
How to adjust the carburetor on different walk-behind tractors?
It is recommended to regulate and configure the dosing unit when the first interruptions in engine operation occur. The process of setting up the carburetor depends on the brand of walk-behind tractor.
Neva
In general, the process of adjusting engine speed of Neva walk-behind tractors involves the following sequence of actions:
- tightening the low and full throttle screws all the way;
- installing the throttle valve until a gap forms between the base and the air duct;
- starting the engine;
- setting the control lever to minimum speed;
- adjusting the throttle screw until the minimum idle speed is reached;
- adjusting the idle screw until maximum idle speed is reached;
- alternating minimum and maximum until continuous engine operation is obtained;
- switching the power unit control lever to gas;
- adjusting the screw responsible for the quality of the mixture.
This scheme is suitable for K-45 carburetors, which are installed on the Neva MB-1 and MB-2 models.
Agro
Small agricultural machinery units from Ufa are also popular among domestic farmers. They are valued for the high quality of components, low price and uninterrupted operation. The Agro brand mechanisms are equipped with a powerful UMZ-341 engine working with a K-45R single-chamber float carburetor.
The principle of operation of the dosing unit is very simple: when idling, the flow of gasoline is minimal, in operating mode - power is supplied according to the instructions to maintain the functionality of the walk-behind tractor. If the engine is unstable, it is necessary to adjust the carburetor:
- Start the engine and warm it up for a few minutes.
- Unscrew the screw that regulates the idle speed until the engine almost stalls.
- Tighten the screw to ensure stable operation of the motor.
- Adjust the position of the throttle valve, obtaining a minimum gap between it and the body of the metering unit.
- By changing the position of the “quality screw”, achieve maximum engine speed.
- Adjust the throttle position again.
An indicator of the serviceability of the internal combustion engine will be the stable operation of the engine at idle and at operating speeds.
MTZ-09
The equipment of the Minsk Tractor Plant is valued by domestic farmers for its stability in operation. However, it can also fail over time. If there are problems with the engine, especially if the unit has been idle for a long time, you have to adjust the carburetor.
- Start the engine and wait until it warms up completely.
- Screw the maximum and minimum gas bolts to maximum, and then unscrew them one and a half to two turns.
- Move the control lever to mode XX (minimum speed) and make sure that the engine does not stall.
- Use the idle screw to adjust the idle speed. There should be no extraneous noise in the engine.
- Use the maximum power regulator to level the maximum crankshaft speed.
- Use the fuel screws to adjust the fuel supply.
- After obtaining optimal performance of the internal combustion engine, tighten all screws.
The life of the carburetor coincides with the operating life of the engine itself. Setting up this unit and its maintenance can extend the life of the engine. By adjusting the dosing unit, you can achieve stable operation of the equipment and reduce fuel consumption.
Carburetor Maintenance
The performance of the equipment depends on regular maintenance of the dosing unit. Its components are very sensitive to the quality of fuel and do not tolerate dirt. The main task of mechanics is to adjust idle speed. Secondary – cleaning of external and internal surfaces.
Most often, calibration jets become dirty. This occurs due to foreign substances entering the fuel system. They can be found both in gasoline and in the air entering inside. Replacing filters will help reduce the risk of contamination of the dosing device. Moving parts fail due to abrasion.
If “floating” speeds appear in the operation of the walk-behind tractor, dips in torque, or the unit begins to start intermittently, then it’s time to adjust the carburetor. By increasing the crankshaft rotation speed, the appearance of low idle speeds is “treated”. This is done by turning the adjusting screw under the throttle valve clockwise. If, on the contrary, the speed needs to be reduced, then turn the screw counterclockwise.
When adjusting the adjusting screw does not help, the system is disassembled and the fuel level in the float chamber is adjusted to normal, focusing on the position of the float. Exceeding the gasoline level is indicated by the appearance of dark smoke from the exhaust pipe, as well as traces of unburnt fuel on the spark plugs. Such malfunctions require adjustment of the float position: for this purpose, the spring mechanism of the needle valve is bent.
While the dosing unit is disassembled, its internal surfaces are cleaned and moving parts are replaced if they wear out.
Dosing unit device
Carburetors installed on walk-behind tractors have a general operating principle and design. They have four main nodes:
- Float chamber. This is where the gasoline needed to run the engine comes from. When its level reaches a certain point, the float cuts off the fuel supply.
- Mixing chamber. It saturates the air with fine gasoline dust, which is formed due to the rarefied atmosphere in this unit. Due to the reduced pressure in the chamber, fuel is drawn into it from the float system. It passes through the nozzle, turning into fine dust.
- Throttle valve. It is she who regulates the rotation of the crankshaft and meters the flow of air from the cylinder. If the engine speed of the walk-behind tractor fluctuates, then at a minimum, you should check the condition of the cable on the handle of the cultivator, which regulates the position of the damper.
- Idle speed regulator. This screw is a support for the throttle valve drive. By screwing in the regulator, the engine idle speed is increased.
How to clean a carburetor?
Before disassembling the metering unit, completely clean the outside of it and drain the remaining fuel from the gas tank. Then they proceed to removing the system. First, remove the air filter and supply pipe. Next, you need to disconnect the throttle valve drive and remove the carburetor. Maintenance of the dosing unit goes through four stages:
- Cleaning the glass in the settling filter from oil deposits.
- Removing the float from the float chamber. To do this, unscrew the fuel nozzle and remove the bushing under it. Before removing the float with the needle, remove the support axis.
- Soaking the carburetor body and jets in acetone or white spirit. Rinsing plastic parts in gasoline and then cleaning them with a soft brush or rag.
- Cleaning the dosing hole. To do this, use a thin needle or wire.
After cleaning, the system is assembled and adjusted.
Suspension type - slip or roller?
Yes. The advantage of a skid suspension is that the pressure distribution on the track is uniform throughout the entire track. We have no dips, the track is fully tensioned. There are pressure points on the roller suspension - where the roller is, there it presses. In other places the caterpillar sags and loses its footing. Thus, the skid suspension increases speed in deep snow. Another plus: the skid suspension is as open as possible and snow comes out of it well compared to a roller suspension. There is a big disadvantage of the slick suspension: if it is not lubricated with snow, it starts to burn and the slick pad can be killed in 1 trip, burned, or simply wiped off.
Adjusting the walk-behind tractor carburetor
Instability of the engine speed of the walk-behind tractor indicates that the carburetor needs adjustment. The need to perform this procedure, as a rule, arises before the start of the agricultural season, when the equipment has not been used for a long time, or after it, when the walk-behind tractor has been subjected to significant loads for a long period of time. Before proceeding with adjustments, it is necessary to warm up the engine. The actual work process looks like this:
- The screws regulating low and maximum throttle are screwed in completely, after which they are loosened by about one and a half turns.
- The engine starts and warms up for about 10 minutes.
- The lever that controls the operation of the power plant must be set to the minimum position, but the motor should not stop.
- The throttle valve adjusting screw will help you adjust the minimum idle speed so that the engine operates stable, without any extraneous noise or stopping.
- Rotating the screws makes it possible to accurately determine the amount of combustible mixture that enters the engine.
- Tightening the screw helps enrich the mixture, while unscrewing it, on the contrary, increases the volume of air entering the engine;
Using the idle screw, you should adjust the maximum idle speed. The same should be done with minimum speed, using the throttle stop screw. The essence of this adjustment is that the damper screw allows you to adjust the angle at which it is closed;
The lever responsible for controlling the engine should be moved to the “gas” position. If the operation of the walk-behind tractor still cannot be called stable, the full throttle screw is adjusted until the ideal speed is observed. However, the maximum permissible number of propeller revolutions is 2.5.
The accuracy of carburetor adjustment can also be determined by how the spark plug looks after a short period of operation under load. If the working mixture is ideal, then there will be no soot or traces of fuel on the spark plug, which indicate that the fuel mixture is too lean or, conversely, too rich. It should be noted, however, that carbon deposits or traces of fuel on a spark plug can indicate not only incorrect adjustment, but also more serious problems with the walk-behind tractor, including a faulty ignition or cooling system.
Adjusting the valve clearance of the walk-behind tractor
Over time, under significant loads, the valve clearance of the walk-behind tractor engine changes. The reason for this may be wear and tear of parts. Insufficient distance leads to the fact that the valve timing stages change significantly, as a result of which it is not possible to achieve a sufficient compression ratio, the power plant operates intermittently and does not reach the declared power. In particularly serious situations, even deformation of the valves can be observed. If the gap is too large, then significant mechanical noise is recorded, the gas distribution phases also change significantly, the valves open for too short a time, due to which the cylinder does not fill properly, power drops, and malfunctions occur. Adjustment of the gaps is necessary as soon as the engine operation becomes incorrect or occurs with significant noise. Ideally, the engine being adjusted should be cool.
So, first you need to get to the flywheel. It is on this part that the value of the top dead center is marked. The flywheel is hidden under the casing, and therefore you will have to remove it. Before removing the casing, the oil bath of the air filter is removed. You can make the task easier when removing the casing if you secure all the latches with rubber bands. Use a wrench to unscrew all the bolted connections, after which the cover can be removed without any problems.
Carburetor care, replacement and repair
Sometimes, in order to bring the carburetor for a walk-behind tractor into a stable, working condition, adjustment is not enough, repair or replacement is necessary.
It happens that the carburetor air damper does not close completely. To eliminate this problem, you should monitor the operation of the drive. If jams are found, remove them. Moreover, given that the carburetor supplies fuel and, therefore, drives the walk-behind tractor itself, you should carefully monitor the condition of this part and properly care for it.
To avoid serious carburetor damage, you must constantly monitor its operation. In addition to adjusting the idle speed, you need to regularly clean the carburetor and replace worn parts. Since the carburetor interacts with the fuel mixture and air, the cause of its contamination may lie in either the first or the second source.
To make the degree of contamination significantly less, you can use filters, which should be cleaned and changed as needed. In addition, the quality of the fuel also has a significant impact. Poor quality flammable fluid can lead to damage to parts and premature replacement. If the need arises, a carburetor for a walk-behind tractor can be purchased at the automobile market or store. Its replacement, adjustment and cleaning are also carried out by specialists.
- https://tehnika4sad.ru/motobloki/karbyurator-ustrojstvo.html
- https://dm-st.ru/node/177
- https://pro-motobloky.ru/motobloki/karbyurator.html
Video: Adjusting the Motoblock Speed Control
On the flywheel you can see marks indicating TDC, as well as the values of 5, 10 and 20 degrees. The 20 degree mark indicates the injection of a combustible mixture. The flywheel should be brought to top dead center, guided by the relevant section. The valve cover is unscrewed and removed.
The following tools should be used during the setup process:
- Screwdriver;
- 10mm wrench;
- Blade 0.1 mm thick.
According to the technical data sheet, the engine valve clearance of the cylinder block is from 0.1 to 0.15 millimeters, and therefore can be adjusted very precisely using a shovel. However, it should be noted that some blades are 0.8mm thick, which is unacceptable. The exact value can be found using a micrometer or from the information on the manufacturer's website. The regulation is as follows:
Screwdriver; Loosen the nut, insert the blade and begin tightening; You should focus on the blade while carefully tightening the nut; The adjustment is carried out until the free play of the valve is eliminated. It should fit fairly snug. Reassemble the casing in reverse order, install the oil bath in place. If all manipulations were performed without errors, the engine will run smoothly and without unnecessary noise
If all manipulations were performed without errors, the engine will operate smoothly and without unnecessary noise.
Setting up with various devices
There are several types of distributor testing, each of which involves its own device.
Strobe
Strobe light for distributor
One of the popular testing options is with a strobe light. The device is connected to the car's electrical network. Be sure to remove and plug the vacuum corrector hose. The engine starts and warms up to the required degree, at which it will confidently keep the speed at idle. Then the clamping bolt of the distributor housing is loosened, and the strobe light is directed to the crankshaft wheel.
The distributor rotates until the mark on the pulley is opposite the mark on the GDS mechanism. The distributor housing is fixed in this position.
Bulb
An ordinary light bulb can also become a tuning device. This is a standard option, instructions for which can be found in public auto literature. The main thing is the presence of a 12-volt light bulb and two wires. The crankshaft is rotated as needed, the crankshaft wheel is placed in a given way, the slider is installed opposite the armored wire of the 1st cylinder.
The light bulb is connected as follows: after turning on the 4th speed, one of the wires is connected to the wire running from the distributor to the coil. The second wire is integrated with the vehicle ground. You should also remember to loosen the locking bolt and remove the central wire from the distributor cap.
Spark
Distributor spark
For experienced car enthusiasts and professionals, the spark can be a reference point for adjustment. The crankshaft is placed in the correct position, the main armored wire is pulled out and placed at a distance of 5 mm from the mass.
Again, the retaining bolt is loosened, after which the ignition is turned on. The distributor body rotates along the emergency path by 10-20 degrees. After this, the distributor carefully rotates back until a spark strikes. This is the moment of truth - the distributor body is fixed in this position.
Aurally
Again, this is a method for the experienced. For some cases it is not suitable, since it does not give entirely accurate readings. However, this setting can help you get to a populated area. This type of adjustment is carried out as follows: the internal combustion engine is started, the retaining bolt is loosened. The housing is rotated so that a position is found at which the speed of the power plant will be maximum. The distributor should be fixed a few degrees according to emergency conditions.
At the end of any of the above methods, a final check is carried out. Its purpose is to verify and diagnose the final results. They are checked on the car while driving. The internal combustion engine warms up, and on a flat section of the road the speed increases to 40-50 km/h. After engaging 4th speed, the accelerator pedal is sharply pressed to the floor. The car, after the characteristic clicking of the engine, will gradually increase speed.
Checking the distributor with a strobe light
If no sounds are heard, you will have to turn the distributor against the emergency position by one notch. This procedure must be carried out until this noise appears.
By learning how to adjust the distribution in several ways, you can significantly improve your knowledge in the field of auto repair.
Watch a video review on how to configure the distributor to make it work better. By the way, the video also describes the process of modernization.
Setting up and repairing the ignition system
How to properly adjust the system? If you don’t know how to set the ignition on a Tavria, then we are ready to teach you how to do it. The principle of setting the SZ is to change the position of the distributor in relation to the installation scroll. Before you start tuning, you need to open the hood and look at this snail and distributor. Place marks on each element - this will allow you to return everything to its place if you make mistakes during the repair process.
The setup procedure looks like this:
- Get behind the wheel, install the key in the ignition of your Tavria and start the engine.
- Then, with the power unit running, you need to slightly turn the switchgear - first in one direction and then in the other direction. At this moment, you need to listen to how the engine is working, whether the speed dynamics have changed. You need to catch the moment when the engine speed is at its maximum. Usually this is not a specific point, but a place at half a division on the site. The most optimal ignition is located in this range. If the power unit of your car is experiencing detonation, then try setting the ignition later.
- Then the distribution unit must be fixed in this position, and then the performance of the internal combustion engine must be diagnosed in different operating modes.
- When the distributor is secured, you need to drive around a little. Accelerate the car to approximately 60 km/h, shift to fourth gear, then slow down to approximately 40 km/h and press the gas pedal sharply again. At this moment, detonation should appear, but literally for 1-2 seconds, no more. If this is so, then we can consider that half the work is done.
- In addition, you also need to check the power of the internal combustion engine. If the engine power is not particularly high, you can try again to adjust the distributor drive. In this case, you will need tweezers, since they will make this task much easier. If you look at the distributor, you will notice that the cut for it on the drive is slightly shifted to the side, so you should not make mistakes and install the drive incorrectly (the author of the video is the Repair Brands channel).
How to adjust the carburetor on different walk-behind tractors?
It is recommended to regulate and configure the dosing unit when the first interruptions in engine operation occur. The process of setting up the carburetor depends on the brand of walk-behind tractor.
In general, the process of adjusting engine speed of Neva walk-behind tractors involves the following sequence of actions:
- tightening the low and full throttle screws all the way;
- installing the throttle valve until a gap forms between the base and the air duct;
- starting the engine;
- setting the control lever to minimum speed;
- adjusting the throttle screw until the minimum idle speed is reached;
- adjusting the idle screw until maximum idle speed is reached;
- alternating minimum and maximum until continuous engine operation is obtained;
- switching the power unit control lever to gas;
- adjusting the screw responsible for the quality of the mixture.
This scheme is suitable for K-45 carburetors, which are installed on the Neva MB-1 and MB-2 models.
Small agricultural machinery units from Ufa are also popular among domestic farmers. They are valued for the high quality of components, low price and uninterrupted operation. The Agro brand mechanisms are equipped with a powerful UMZ-341 engine working with a K-45R single-chamber float carburetor.
The principle of operation of the dosing unit is very simple: when idling, the flow of gasoline is minimal, in operating mode - power is supplied according to the instructions to maintain the functionality of the walk-behind tractor. If the engine is unstable, it is necessary to adjust the carburetor:
- Start the engine and warm it up for a few minutes.
- Unscrew the screw that regulates the idle speed until the engine almost stalls.
- Tighten the screw to ensure stable operation of the motor.
- Adjust the position of the throttle valve, obtaining a minimum gap between it and the body of the metering unit.
- By changing the position of the “quality screw”, achieve maximum engine speed.
- Adjust the throttle position again.
An indicator of the serviceability of the internal combustion engine will be the stable operation of the engine at idle and at operating speeds.
MTZ-09
The equipment of the Minsk Tractor Plant is valued by domestic farmers for its stability in operation. However, it can also fail over time. If there are problems with the engine, especially if the unit has been idle for a long time, you have to adjust the carburetor.
- Start the engine and wait until it warms up completely.
- Screw the maximum and minimum gas bolts to maximum, and then unscrew them one and a half to two turns.
- Move the control lever to mode XX (minimum speed) and make sure that the engine does not stall.
- Use the idle screw to adjust the idle speed. There should be no extraneous noise in the engine.
- Use the maximum power regulator to level the maximum crankshaft speed.
- Use the fuel screws to adjust the fuel supply.
- After obtaining optimal performance of the internal combustion engine, tighten all screws.
The life of the carburetor coincides with the operating life of the engine itself. Setting up this unit and its maintenance can extend the life of the engine. By adjusting the dosing unit, you can achieve stable operation of the equipment and reduce fuel consumption.
Source
Centrifugal ignition timing regulator for VAZ 2108, 2109, 21099 cars
The centrifugal regulator is an element of the ignition system of the carburetor engine of VAZ 2108, 2109, 21099 cars.
Purpose of the centrifugal ignition timing regulator
The centrifugal ignition timing regulator in the contactless ignition system of engines 2108, 21081, 21083 of VAZ 2108, 21081, 21083, 2109, 21091, 21093, 21099 is designed to automatically increase the ignition timing when the load on the engine increases (increasing crankshaft speed) in order to obtaining greater effect (more power) from the most complete combustion of the fuel mixture.
Location by car
The centrifugal ignition timing regulator is located inside the ignition distributor (distributor), on its axis.
Centrifugal regulator device
The centrifugal regulator consists of two flat weights attached to a support plate mounted on the distributor shaft. The edges of the weights rest against the protrusions on the other - the driven plate of the regulator. The driven plate, in turn, is connected to the support plate through two springs. On the driven plate there is a round screen, the slots in which, when rotated, pass through the gap in the Hall sensor. Which forms an impulse to the switch and then to the ignition coil about the need to give a spark to one or another spark plug.
Operating principle of a centrifugal regulator
When the distributor shaft rotates, the centrifugal ignition timing regulator also rotates. Under the influence of centrifugal force, its weights begin to diverge to the sides. The higher the engine speed, the more the weights move apart.
The weights with their edges act on the protrusions of the driven plate of the regulator. From this, the driven plate, overcoming the resistance of the springs, rotates together with the screen at a certain angle in the direction of rotation of the roller. As a result, the slots in the screen pass through the gap of the Hall sensor earlier, which generates earlier impulses to the spark plugs, that is, the ignition timing increases.
Divergence of weights when rotating the centrifugal regulator
When the shaft rotation speed drops, the weights converge, the springs return the driven plate with the screen back, the pulse from the Hall sensor arrives later, the ignition timing returns to normal (See “Setting the ignition timing on VAZ 2108, 2109, 21099”) .
Combined operation of a centrifugal ignition timing regulator and a Hall sensor
Malfunctions of the centrifugal regulator
Basically, the centrifugal regulator is plagued by two malfunctions:
— jamming of weights;
— weakening of the springs of the weights.
A malfunction of the centrifugal regulator leads to a drop in car engine power, unstable idle speed and increased fuel consumption, since the ignition timing no longer corresponds to that required in this mode. To check the centrifugal regulator and eliminate the malfunction, you will have to disassemble the ignition distributor (change the springs or eliminate the cause of the sticking weights). In some cases, it is more expedient to replace the centrifugal regulator or ignition distributor assembly.
Applicability of the centrifugal regulator on VAZ 2108, 2109, 21099 cars
— On engines 21081 of VAZ 21081, 21091 cars, an ignition distributor 40.3706-10 with a red mark on the cover was installed. On engines 2108, 21083, the ignition distributor is 40.3706 or 40.3706-01. They have different characteristics of the centrifugal ignition timing regulator (see “Notes and Additions”).
Notes and additions
— Dependence of engine crankshaft speed and changes in ignition timing by the centrifugal regulator.
| Distributor 40.3706 | Distributor 40.3706-10 | ||
| 1000 rpm | 0 — 2° | 1000 rpm | 0 ± 2° |
| 2000 rpm | 9 ± 2° | 2000 rpm | 10 ± 2° |
| 3000 rpm | 15 ± 2° | 3000 rpm | 17 ± 2° |
| 4000 rpm | 19 ± 2° | 4000 rpm | 22 ± 2° |
| 5000 rpm | 22 ± 2° | 5000 rpm | 27± 2° |
| 6000 rpm | 24 ± 2° |
— Fine tuning and adjustment of the centrifugal regulator is carried out on special stands. It is not practical to produce it at home.
More articles on the ignition system of VAZ 2108, 2109, 21099 cars
— Malfunctions of the distributor of VAZ 23108, 2109, 21099 cars
— Malfunctions of the contactless ignition system of VAZ cars
— Applicability of spark plugs on VAZ cars
— Checking high-voltage wires of VAZ cars
— Checking the vacuum ignition timing regulator