Any tool, regardless of model and brand, will sooner or later break down. A screwdriver is no exception: individual parts and assemblies wear out over time, and without proper care or under force majeure circumstances they may fail.
The main functional load when operating the tool is distributed through the gearbox between the engine and the chuck, so if something happens to the gearbox, the work will stop. In order not to spend money on repair services, it is enough to use the advice of specialists to restore the operation of the unit yourself.
Design and principle of operation
device
is a complex mechanical transmission unit through which the axis of the motor-power unit transmits torque to the cartridge.
Two or three transmission stages are installed in the gearbox.
The design of the “household” dual-mode screwdriver assembly includes:
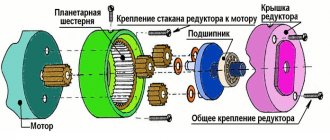
- The plastic case is a small drum that is mounted on a cartridge. The body itself is fixed motionless, and the chuck shaft is inserted into a clamp on one of the transfer plates;
- 2 or 3 transfer plates (carrier) - a round metal plate, on one side of each there are 3 protrusions for small gears. On the other side of one of them there is a clamp for the chuck shaft, and the other (or 2 others) has another so-called. a “planetary” gear that rotates three small gears;
- 6 or 9 small gears (three each: they can be of the same or different thicknesses) are the so-called “satellite” gears, which are installed and rotate freely on the projections of the transfer plates. With their teeth they interact with the sun gear located between them and with the ring gear, which is located on the inner surface of the housing;
- ring gear - a metal ring with teeth on the inside and small protrusions on one of the rings on the outside. It is placed on these protrusions and ball bearings on the inner surface of the housing.
The parts are lubricated, assembled in series and installed inside the ring gear, which lies inside the housing drum (it has a seal with recesses for ball bearings and gear lugs). After this, the surface of the open satellites is covered with a metal washer, in the center of which there is a hole into which the engine shaft enters with another gear attached to it.
During operation of the screwdriver, the gear wheel on the motor shaft rotates the upper satellites, and they, spinning around their axis and, along the ring gear, respectively, transmit movement to the next carrier. Depending on the number of plates and small gears, the rotation speed will decrease proportionally.
Charger repair
There are several most common charger breakdowns:
- fuse burned out;
- network cable refraction;
- broken primary winding of the transformer;
- broken diodes.
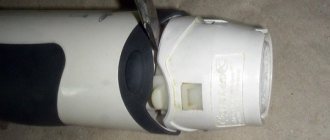
Having disassembled the charger of the tool, you can see the step-down transformer and the circuit board. Using the mains wire, the voltage passes to the primary winding of the transformer. The thermal fuse operates in series with the mains winding, causing overheating to occur first and protecting the winding from breakage. During the secondary winding, the voltage is directed to the diode bridge. When current is passed through the charger, yellowness appears near the diodes. The transformer windings overheat and the diodes break down.
- Use a multimeter to measure the resistance on the primary winding. If it is absent, the circuit may be broken, as a result of which the voltage does not reach the primary coil. The fuse is located under the transformer insulation near the wires that connect to the network. Next you need to check it using a tester.
- When the fuse is intact, you need to check the power cable. Alternatively, it can be interrupted.
- If the mains cable is solid, it is recommended to check the winding. If there is a breakdown, the transformer will need to be replaced.
Kinds
As can be seen from the design of the gear unit, they are divided depending on the number of transfer plates into:
- two-stage.
- three-stage. In this case, another plate with a “planetary” gear and 3 satellites is added to the design.
Reference. The number of speed modes of the device depends on the presence of stages, and this, in turn, will affect its cost.
Another indicator by which gearboxes are divided is the material from which their parts are made.
In the production of satellite gears the following is used:
- plastic. Such structures are relatively lighter, but their reliability is lower than that of their metal counterpart;
- metal. They are durable and with proper care and lubrication they will work like a clock.
Important. The disadvantages of metal parts are a continuation of their advantages - they are heavier than plastic ones and are more expensive. Moreover, if a screwdriver is used without violating the operating rules 2-3 times a year, the master most likely will not feel the difference in what material the gearbox parts are made of.
Malfunctions that occur with a screwdriver
Most modern screwdrivers are equipped with a standard device of the same type. For this reason, they all have the same faults. Among the main defects that indicate tool failure are problems with:
- battery malfunction;
- brush wear;
- broken buttons;
- cartridge runout;
- unsuccessful attempts to turn on/off;
- the occurrence of interruptions.
Each such breakdown can be easily repaired on your own, if you have experience in using measuring and soldering instruments. Remember that in certain situations, complete replacement of components is not excluded, since not every part is sold separately.
Video “How to disassemble a screwdriver”
DIY repair
In a home workshop, repairing a gearbox is not so difficult. Repair comes down to disassembling the unit into individual parts, checking the integrity of their structure, purging and lubrication, followed by reassembly. The process is divided into the following stages:
- Separating the gearbox from the engine and removing it (usually together with the chuck) from the screwdriver housing.
- Unscrewing the housing and removing the locking washer.
- Sequential removal of satellite gears and transfer plates (2 or 3, depending on the design).
- Removing the ring gear and checking the ball bearings (they can roll around the entire seal, but should not roll out beyond it).
After removing all the parts, they must be cleaned of “old grease,” wiped dry and made sure that they are not damaged.
Then the craftsmen recommend folding them in the reverse order “dry” and making sure that when the satellites rotate, the chuck spindle also rotates. If the rotation is carried out without twisting, then it can be assembled back.
First, bearings are placed in the recesses in the housing, onto which the ring gear is installed. Then, one at a time, the transfer plates are placed, with the satellites installed on them, and the locking washer is placed on top.
Cartridge
The mechanical part of the tool, designed to attach attachments and transmit rotational motion to them.
Usually installed on the threaded part of the spindle. Can be secured with a screw, clamp or ratchet. High-quality models have a lock that allows you to clamp a drill or bit without additional twisting. Almost all modern screwdrivers in the professional and amateur segment are equipped with a three-jaw self-clamping chuck with self-centering. This allows you to quickly change attachments and securely attach them for long and intensive work. Inside the chuck there is a hexagonal hole for fixing the shank of the nozzle. Usually the attachment occurs between all three cams by slightly rotating the coupling.
To install the nozzle, you need to grab the lower coupling and start turning the upper one - this allows the cams to unclench. To speed up the process, you can fix the nozzle by holding the upper coupling and pressing the start button to clamp, the reverse button to release.
Important! Some manufacturers equip the screwdriver with a magnetic holder for bits without mechanical elements. It is convenient to install a screw depth limiter on such a chuck, but with frequent and intense loads, play appears.
What and how to lubricate?
During assembly, each part is lubricated with synthetic (semi-synthetic) or mineral lubricating paste (grease). These substances differ in viscosity and durability. The smaller it is, the more often the parts have to be coated again. After the gear unit has been disassembled, it is recommended to coat each element with lubricant separately, gradually assembling the unit together. The lubricant is applied with a brush and distributed over the entire surface of each part.
Another way is to use specialized gear oil. Oils have a liquid consistency. They are used in the same way as lubricant, or sometimes they are poured into the gearbox without disassembling it, if a special hole is provided for this in the design of the screwdriver.
Thus, having understood the structure of the gear unit of an electric screwdriver, removing it from the tool, checking all the parts and, if necessary, changing the lubricant on them will not be difficult even for a novice craftsman. If you carry out this operation regularly 1-2 times a year, the risk of screwdriver failure will be minimal.
Spindle speed adjustment
Some screwdriver models have additional adjustment of the rotation speed limit. This allows you to avoid overvoltage in the operation of the tool. It can have 3-4 operating modes, the pulse converter operates in the range from 0 to 1250 rpm. Adjustment usually occurs using a special plate on the lower clutch of the chuck; in some devices it is possible to adjust the forced braking of the spindle. Stopping is ensured by shorting the motor winding to a resistor.
How to disassemble an Interskol screwdriver
The tool includes many working elements. Among the most important are the following:
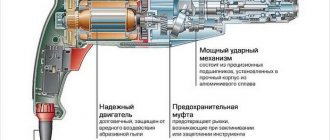
- Electric motor. The electric motor includes brass bushings and a steel armature. Several turns of winding and a gear are attached to the armature. At the bottom of the armature there are graphite brushes, through the use of which current is transmitted to the collector.
- Gearbox. Designed to transmit rotation using mechanical transmission. Can be presented in the form of a 1 or 2 stage gearbox. As a rule, screwdrivers use 2-stage gearboxes. You can repair the Interskol screwdriver gearbox yourself, taking into account the recommendations of experienced craftsmen.
- Accumulator battery. Consists of several small batteries. They are connected in series. Different models may have different compositions, which affects the power and duration of operation without intermediate charging. In order to extend the life of the battery, it must be charged correctly, which depends on the composition of the element. Experts recommend that after purchase, perform 3 full battery charging cycles, each of which is performed after the battery is completely discharged.
- Cartridge. Screwdrivers use quick-release chucks. It can be attached in several ways (threaded, screw, Morse taper). This indicator determines the quality of the tool attachment clamp and the method of its dismantling.
Before starting any repairs, it is necessary to carry out an operation such as disassembling the Interskol screwdriver. To do this, it is recommended to follow the following sequence of actions:
- Disconnect the battery.
- Separate the cartridge, spring and rotary housing. In this case, you should pay attention so that the balls do not roll out.
- Unscrew the bolts connecting the 2 halves of the housing (they are located around the perimeter of the housing).
- Carefully remove all elements located inside the housing.
- Disable the start button.
- Remove the speed switch and adjustment clutch.
- Remove the electric motor.
Only after this will it be possible to repair any part of the screwdriver.