Installing a plow on a walk-behind tractor
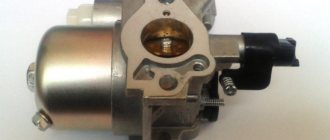
The design of any plow, regardless of its size and shape, contains a hitch through which the device is attached to the walk-behind tractor. The hitch can be stationary or universal. The second type of element is considered the most optimal option, since it provides more opportunities for adjusting the plow.
Regardless of the type of hitch, installation of the structure on the walk-behind tractor is always performed in the same order. To attach a plow to a walk-behind tractor, proceed in the following sequence:
- First, install the walk-behind tractor on stands - you can use bricks or logs for this;
- Attach the plow hitch to the towbar of the walk-behind tractor so that the holes on both elements coincide with each other;
- Secure the hitch to the tow bar with bolts.
Many beginners believe that the more securely the plow is attached to the walk-behind tractor, the more efficient the work of the attachment will be. However, practice shows that too rigid a connection will only worsen the quality of plowing. The fact is that when operating a plow, forces act on it that go perpendicular to the plane of the blade. Because of this, resistance arises, which pushes the plow away from the walk-behind tractor. To eliminate this, when installing the plow, you need to leave a horizontal play of about 5 degrees.
Installation and configuration of the plow
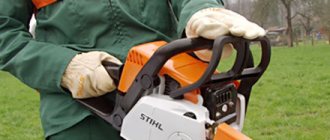
Before you start plowing the land, you should attach the plow to the walk-behind tractor. To do this, you need to connect them using a special hitch (usually it is not included in the package and is sold separately).
Here is a detailed video instruction on how to prepare a walk-behind tractor for plowing:
The plow should be connected to the walk-behind tractor only on a flat surface. Thanks to this, proper grip can be achieved. Otherwise, the overall structure will be assembled at an angle and the plow will not function properly.
Then the plow should be adjusted for plowing. In its correct position, the field board should be parallel to the furrow line.
Here is a detailed video instruction about the main problems and nuances that may arise when adjusting the plow:
The depth of the arable land can be set using special bolts by moving them in a vertical longitudinal plane. The depth can be adjusted after you have started plowing. However, you should be careful and be sure to follow safety instructions.
The plow can be operated both when the walk-behind tractor moves forward and when it moves backward. Due to the fact that it can rotate around its axis.
The most common drawback in the operation of the plow is the fact that it is pulled to the side. How to solve this issue, see below:
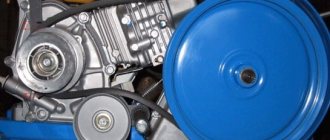
For better grip, the walk-behind tractor should be equipped with metal lug wheels. They serve as additional stabilizers during plow operation. Craftsmen make their own versions of such wheels. They simply pull chains onto standard tires, and the result is a design that, in terms of its characteristics, is in no way inferior to special metal wheels.
Safety restrictions
- work with a plow under the influence of alcohol or any other substances that reduce reaction speed or attention;
- work with a walk-behind tractor in case of malfunctions in the plow;
- work with a walk-behind tractor with loose fastenings;
- carry out repairs or any manipulations while the plow is moving.
These rules are simple and more than understandable to every sane person.
How to adjust a plow on a walk-behind tractor?
The quality of soil plowing depends on how correctly you set up the plow on the walk-behind tractor. Adjusting the attachment is carried out in 3 stages, during which you must:
- adjust plowing depth;
- adjust the tilt of the field board:
- adjust the blade angle.
Plowing depth is the depth of the plow when plowing the soil. As a rule, this value should correspond to the height of the shovel bayonet. If the depth of immersion is not sufficient, then as a result, most of the weed roots will remain underground. If the immersion height is too high, this will lead to mixing of the fertile soil layer with the soil located underneath it. Because of this, the planted plants will be left without nutrients.
The plowing depth is adjusted using three bolts connecting the lock and the plow stand. By lowering the plow down or lifting it up, you can adjust the depth of its immersion in the ground. The inclination of the plow board is often called the “angle of attack.” This parameter implies the level of inclination of the soil processing plane in relation to the ground surface. The tilt of the field board is adjusted using a screw handle. To do this you need:
- Place the walk-behind tractor with the plow on several stands;
- Turn the handles so that the field board is on the ground;
- Unscrew the handle in the other direction until the board hangs above the ground at a height of 2-3 cm.
If the “attack level” is too high, the plow will cling to the ground, which will lead to constant slipping of the walk-behind tractor. If this parameter is too small, the plow will not remove the layer of soil required for cultivation.
Having completed the previous 2 steps, you can begin adjusting the blade angle. The procedure is as follows:
- To begin, place the walk-behind tractor with the plow on the edge of the garden and go through the first furrow. This is necessary in order to determine the depth of plowing of the soil;
- While moving, try to maintain a perfectly level trajectory so that the next furrows are also level. To obtain even furrows, you can use a thread stretched between the beginning and end of the row;
- Next, install the walk-behind tractor so that its wheel fits into the furrow and the plow is perpendicular to the surface of the ground. For best results, use a square for adjustment.
By completing all of the above steps, you will set up the walk-behind tractor plow as correctly as possible, which will help you achieve the best results when plowing your garden.
Equipment setup
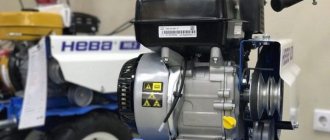
Quite often, owners of walk-behind tractors have a question about how to adjust attachments on the Neva or Farmer models. Setting up the plow is necessary to ensure that the processing of the area is of the highest quality. If you follow simple recommendations, this procedure is quite simple. In addition, there are a large number of videos showing the setup procedure.
After the walk-behind tractor is delivered to the place of work, it is necessary to replace the wheels on it with lugs. To make the change easy and quick, a stand is installed under the hitch. Next, the lugs are directly attached, and it is necessary that the narrowed part of the tread “looks” in the direction of movement. After installing the lugs, it is necessary to proceed to preparing the equipment for operation.
For high-quality plowing, the plow must be well secured to the Neva MB-2 walk-behind tractor. To do this, you need to remove the adjusting screw from the hitch and install the attachment. The stand has holes through which the furrow depth can be adjusted.
After installing the equipment, you need to adjust it. To do this, place the plow heel parallel to the ground and secure it with the adjustment bolt. The steering wheel of the walk-behind tractor should be located in the center of the adjustment screw.
Plowing the site
Before you start plowing the area, you need to mark the first furrow and visually determine its center.
The test row should be done at low speed, while observing the single-body or reversible plow. It must be strictly perpendicular to the furrow, but if this is not the case, then make additional adjustments. The furrow depth must be at least 15 cm. If the depth is less than this value, the plow should be lowered by one hole. After the first strip is made, it is necessary to turn the walk-behind tractor and install the right lug opposite the test furrow. It is necessary to plow along the right edge of the furrow, then the soil will be laid in even ridges. When working, there is no need to exert additional effort and push the unit, but you should hold the walk-behind tractor in relation to the plow at an angle of 10˚.
After you have obtained an even furrow and you have become comfortable with the control of the walk-behind tractor, you can increase the speed. In this case, the soil dump is stronger and, therefore, more even and high-quality furrows are obtained.
Some recommendations for plowing
While working, you should hold the walk-behind tractor as level as possible to avoid untreated areas.
When turning or turning, the plow must be pulled out of the soil and done at low speed.
Types of plows for walk-behind tractors
Plows used for plowing are divided into several types. These include:
- single-body designs - these products are the easiest to use. They have minimal weight and consist of a small number of parts;
- reversible or rotary plows - the upper part of such structures is equipped with a curved feather, designed to turn the soil directly during the process of plowing it. A reversible plow is most effective when processing heavy soil;
- rotary plows - attachments of this type have the most complex design. On sale you can find a double-body plow, consisting of two, and a three-body plow, consisting of three shares;
- disc plows - designs of this type are used primarily for plowing wet soil. The depth of soil cultivation with such plows is slightly less than with previous types of attachments.
Each of the listed types of plows has found application when plowing one or another type of soil. However, the double-sided reversible plow is considered to be the most universal - it shows high efficiency in cultivating any type of soil.
Types of plows for tractors and their features
Modern farms use different types of plows.
Depending on the type of installation on the tractor, plowing implements are divided into the following types:
- trailed plows - equipment of this type is driven exclusively by trailed wheels. These implements are used extremely rarely, since almost every row-crop tractor is equipped with a powerful mounted system with hydraulic cylinders, and therefore mounted plows are most often used to work with it. The main advantages of trailed plows include more uniform and smooth plowing. The main disadvantage is the rather large turning radius, which makes it extremely difficult to use a trailed and mounted or semi-mounted plow in one paddock;
- semi-mounted plows - these implements are driven by their own transport wheels and the tractor's linkage mechanism. Depending on the traction class of the tractor, a semi-mounted plow can consist of several bodies - there can be no more than 6 for a tractor whose class is 3 tons, and no more than 12 if the plowing tractor belongs to the 5th traction class. The main advantage of such plows is the large number of bodies - the more there are, the higher the productivity of the equipment. Disadvantages include a large turning radius and a rather complex design;
- mounted plows - these implements are driven only by the tractor's mounted mechanism. The number of bodies also depends on the traction class of the tractor. This type of plow has a relatively low weight and a small turning radius. In addition, they have a relatively simple design. The only disadvantage of a mounted rotary plow with a large number of bodies is that not every tractor can lift such a tool. The optimal unit for this is the B-10 bulldozer or other powerful special vehicles.
This kind of classification will allow you to select the plow for the tractor that will be optimal for plowing under certain operating conditions.
How to make a plow on a walk-behind tractor with your own hands?
Before you start making a plow with your own hands, you will need to carefully study the drawings. They should tell you how to attach the structural parts to each other.
The further procedure is as follows:
- First, make a ploughshare. To do this, take steel with a thickness of at least 5 mm and give it the desired shape. Beat the cutting part of the steel blank on an anvil and then sharpen it. This is done in exactly the same way as in the case of sharpening a hand scythe;
- Next you will need to make a homemade blade. A steel pipe with a diameter of 50 cm and a wall thickness of no more than 5 mm is suitable for this. Cut out the blank for the future dump using a cutter. To give the product the desired shape, beat it on an anvil and process it on a sharpening machine;
- Next you need to assemble the plow parts into one structure. Take a sheet of steel whose dimensions should be 50x50 cm and thickness 3 mm. Make a 4-centimeter indent along the edges of the sheet and align it so that you end up with a zero angle;
- Next, using wedges, attach the ploughshare to the sheet and make a double-sided spot weld, maintaining an angle of 25°;
- Connect the ploughshare and blade as tightly as possible. An angle of 8° should form between the top of the blade and the plowshare blade;
- After this, weld the side shield, plowshare and rear part of the blade to each other. The video will tell you more about making the plow.
After this, take accurate measurements of all angles again. Only after making sure that the connections are correct can you finally weld the plow parts. Once the structure has completely cooled, clean any existing welds.
Cost of plows for metallurgical plant
The price of plows is presented in the table:
| Model | City | Salesman | Price |
| PCH-4.5 "Almaz" | Krasnodar | AgroMash-Yug | 254 900 |
| Kemerovo | Siberian farmer | 235 000 | |
| Moscow | RosAgroMir | 195 800 | |
| PCH-2.5 "Almaz" | Krasnodar | AgroMash-Yug | 180 000 |
| Ufa | Trade House "Spetstechnika" | 195 500 | |
| Mound | Empire of Technology 2 | 224 268 | |
| PCH-6 "Almaz" | Ufa | LLC AgroSpetsTekhnika | 1 154 000 |
| Samara | TD "Agromash" | 1 143 200 | |
| Novosibirsk | Eriz | 529 000 | |
| PLN 3-35 | Ufa | LLC "AgroSpetsTekhnika" | 46 000 |
| Nizhny Novgorod | Tractor drivers | from 38 000 | |
| Krasnodar | Dedal-Agro | 48 000 | |
| PLN 4-35 | Nizhny Novgorod | Promtekhstroy | 87 900 |
| Ufa | Agroalliance | 77 000 | |
| Moscow | TractorSpetsMash | 98 000 | |
| PLN 5-35 | Nizhny Novgorod | Promtekhstroy | 123 800 |
| Ufa | Agroalliance | 97 000 | |
| Kazan | Alma LLC | 99 000 | |
| Reversible plow PO 3-40 | Nizhny Novgorod | LLC "Euro Truck" | 370 000 |
| Moscow | TractorSpetsMash | 349 000 | |
| Ufa | LLC "AgroSpetsTekhnika" | 390 000 |
The cost of the equipment may seem high, but it justifies itself and pays for itself within 2-3 years. Before buying a new unit from the manufacturer, you can find the same used equipment. This way you can save money, but you can forget about any guarantees.
In addition, you can try to find used plows in old rural farms, where the equipment is already standing idle in the open air. Sometimes a little repair is needed to get your equipment back into service. You can also make a plow yourself; fortunately, there are now many drawings, descriptions and videos of the entire process on the Internet.
Reversible plow for walk-behind tractor - manufacturing procedure
As in the first case, in order to make a rotary plow, you need to study the design diagram. Otherwise, even the slightest inaccuracy will lead to low efficiency of the finished attachment.
To make a Zykov plow, proceed in this order:
- To make the ploughshare, use sheet steel about 5 mm thick. Cut a blank from it, heat it with a gas burner and bend it as shown in the figure. The ploughshare must be removable. The cutting part of the part is beaten on an anvil and sharpened on a special machine;
- Next, make a blade. It can be made from a pipe with a wall thickness of 5 mm and a diameter of 50 cm. Using a template, cut out the dump blank using a gas torch, then sand the product with a grinder;
- After this, make a plow body from sheet steel, 3 mm thick, and assemble the structure using welding;
- Clean the weld seams with a file and sandpaper.
As a result of the work, you get a universal plow on a walk-behind tractor, with which you can cultivate not only dry, but also wet soil.
How to install and configure (adjust) a plow for a walk-behind tractor: educational program
The editors express gratitude for their assistance in preparing the article
One of the most common tasks solved using a walk-behind tractor and a cultivator is plowing the soil. The plow can be purchased for almost any model that is presented on the Russian market. In theory, everything seems elementary - grab it and go. But in reality it is not so simple - it is not enough just to attach the plow, it also needs to be adjusted correctly. Our advice will help with this.
How to make a disc plow on a walk-behind tractor?
A disc plow-hiller is a very useful device that allows you to prepare even furrows for planting potatoes and other tuber crops. Before you start making such a plow, study the drawings. Using them you will be able to control the progress of the assembly and avoid mistakes.
The procedure for manufacturing a disc plow for a walk-behind tractor is as follows:
- The support corner acts as the basis of the plow. To make it, use an equilateral corner, the shelves of which, when cold, should be brought together at an angle of 70 °;
- Weld a sock to the corner. After this, weld the heel through the thrust bar;
- Secure the cheeks to the support corner using loops. The distance between the corner and the cheeks should be such that when the cheeks are opened, their end sides do not rest against each other;
- Weld the rotating mechanism to the thrust angle so that the supporting part of the mechanism is perpendicular to the angle.
Finally, adjust the plow cheeks. To do this, fix each of them with a vice and adjust so that in the end they are bent in the opposite direction from each other.
Rotary plow on a walk-behind tractor - manufacturing features
A rotary plow for a walk-behind tractor with a support wheel is the most complex type of attachment used today for plowing. When working on it, you need to be extremely careful, since the slightest mistake will lead to poor quality of soil treatment. The manufacturing procedure is as follows:
- The working tool is a milling cutter, which can be made from a steel pipe and metal plates. The plates must be welded to the pipe in such a way that when they rotate, they grind the soil and throw it to the side;
- Next, make a frame for the plow gearbox. It can have any shape, the main thing is that moisture and debris do not get inside the gearbox;
- It will not be possible to make a gearbox - you need to purchase it. After this, the mechanism must be connected to the gearbox of the walk-behind tractor;
- Since the rotary plow is a fairly large design, separate wheels will be required to use it. They can be taken from an old moped or motorcycle.
A ready-made plow for a walk-behind tractor will serve well for many years. The main thing is to change the oil to lubricate the gearbox on time.
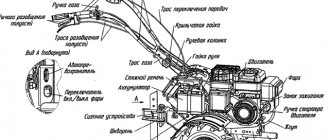
Plow design
There are several types of plows installed on the Neva walk-behind tractor, and each of them has its own design features. Currently, single-body, rotary and reversible structures are used for cultivating land on personal plots.
The single-body type of plow is the most popular design and you can find a large number of drawings of this particular type on the Internet. In addition, it is considered the most optimal option for those who do not have the appropriate skills.
Plow drawing for Motoblock KV-04
Drawing of a plow for the KV-04 walk-behind tractor. Homemade plow with the dimensions of the KV-04 walk-behind tractor.
Plow side view
Side view of the plow Front view of the plow
View from the inside The reversible design has a curved feather at the top, which allows you to immediately turn the layer over during the process of plowing the land. This design feature makes it an excellent option for working on hard soils, you can see the drawings in the article. Since such a plow has a rather complex design, only a person with sufficient experience can make it. The rotor plow design is considered the most difficult to manufacture. It is more reminiscent of a cultivator, since there is not one, but several shares attached to one axis. In the process of cultivating the soil, the axis rotates, due to which the soil layer turns over. The advantage of the design is that the soil can be cultivated at a depth of up to 30 cm using little effort. In addition, the rotary plow allows you to plow the area along different trajectories.
Video of this plow in action
Do-it-yourself plow for a walk-behind tractor from a horse-drawn one - how to make it yourself?
Unlike other types of implements, a horse plow can be made almost entirely from wood. The only metal part is the ploughshare, since the wooden element will quickly become unusable due to regular processing of the soil. The plow manufacturing algorithm is as follows:
- First, take 2 wooden beams, about 10 cm thick - they will be used to make handles. Rubber pads must be put on the upper part of the handles;
- Connect the handles to each other at right angles so that when plowing you can firmly grasp them with both hands;
- Connect the lower parts of the parts using self-tapping screws;
- Take another beam, 20 cm thick. It should be curved so that its upper and lower ends are parallel to each other;
- Attach the ploughshare to the lower end;
- At the upper end, install a hitch, which can also be made from small wooden blocks;
- Secure the double part of the handles in the middle.
Despite the simplicity of the design, the horse plow shows quite high efficiency.
True, using it to plow wet soil is quite dangerous, since wooden elements can simply break due to the weight of the soil. Regardless of the method you choose for making a plow, each of the home-made structures can be used to work with motoblocks Krot, MTZ, Salyut, as well as Neva MB-1 and MB-2.