One of the most important mechanisms of a chainsaw is the carburetor. It is designed to dose the fuel-air mixture into the engine cylinder. Without this mechanism, the operation of the internal combustion engine is impossible, and often it is the cause of unstable engine operation. To correct the situation, you will need to clean the chainsaw carburetor, which you can do yourself.
What does the mechanism cleaning procedure do?
What a chainsaw carburetor is, as well as what operating principle it has, is described in detail in this article. Today we will pay special attention to the question of how to flush the carburetor of a chainsaw, and how realistic it is to do it yourself at home.
First of all, let's find out what the cleaning procedure does for this mechanism, and how often it needs to be performed. Many owners of gas-powered tools know that the carburetor is a sensitive mechanism, the operation of which is based on various small parts.
This is interesting!
Chainsaws use membrane-type carburetors. They got their name membrane due to the use of a rubber gasket, which plays the role of a pump. With its help, the fuel mixture is pumped from the tank into the carburetor, where it is mixed with air and supplied to the cylinder.
During the operation of the tool, various contaminants enter the tank, and the fuel filter is responsible for trapping them. However, this element is not able to retain small contaminants that enter the mechanism, and thereby provoke failure of the constituent elements, and also narrow the channels. The amount of contamination inside the device increases with each subsequent use of the tool, which leads to the causes of unstable operation of the internal combustion engine. In addition to debris in the fuel, a problem such as aluminum oxidation occurs in the carburetor.
Carburetor clogging occurs not only during the operation of the tool, but also when it is stored incorrectly. One of the features of improper storage is leaving a diluted fuel mixture in the tank for a long period of time. You cannot store the prepared mixture for more than 1-2 weeks, as this leads to decomposition of the oil, which provokes various malfunctions in the form of clogging of carburetor channels.
Flushing a chainsaw carburetor allows you to remove all types of contaminants, thereby restoring the normal operation of the mechanism. After cleaning the system, the operation of the device is restored, which has a positive effect on the functioning of the engine. That is why it is imperative to clean the carburetor in order to prevent failure of the internal combustion engine, as well as to ensure efficient and productive operation of the sawing tool.
When to flush the carburetor
There are no strict requirements for how long it takes to clean the carburetor, so this procedure should be carried out when the first signs appear. In order not to have to guess what is the cause of certain chainsaw malfunctions, you should pay attention to some factors. These factors indicate the need for flushing the tool’s carburetor:
- When you have difficulty starting the engine
- If there are interruptions in the operation of the internal combustion engine, the speed fluctuates, the unit does not develop full power, and idle instability is also detected
- Dips are detected when the accelerator trigger is pressed sharply
- If the chainsaw starts, but immediately stalls when the speed increases
- If black smoke is detected coming from the muffler
- When an increase in fuel consumption is detected
- If the setup procedure does not make it possible to achieve a positive result in normalizing the operation of the internal combustion engine
- If the engine runs cold and when warmed up it starts to malfunction
It is worth noting that disassembling this mechanism without a proper reason is not recommended. When the first signs of a device malfunction are detected, it is necessary to intervene immediately, since postponing repairs contributes to accelerated engine wear.
This is interesting!
You must also understand that it is necessary to start repairing the carburetor last, after first diagnosing the tool. If, based on the diagnostics, a conclusion is made that the device in question is malfunctioning, then it is necessary to begin cleaning and repairing it.
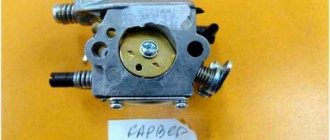
Cleaning the Husqvarna Chainsaw Carburetor
Adjusting the Husqvarna carburetor 137, 14, 435 and other models. Do-it-yourself Husqvarna chainsaw carburetor adjustment
Content
Why do you need to adjust the Husqvarna carburetor?
The carburetor is one of the fundamental mechanical components that make up the chainsaw
.
Its tasks are to mix fuel with air and supply the resulting composition to the engine. But during the operation of the chainsaw, situations arise when adjusting the Husqvarna carburetor becomes necessary. Depending on the reasons, the carburetor of the chainsaw model 142 and other series is adjusted to prevent the following situations:
- The presence of interruptions in the operation of the motor, accompanied by its shutdown;
- Excessive fuel consumption at work.
Since the carburetor affects the quality of the fuel, in the first case, the need to adjust the carburetor of the saw 137 or other professional series, such as Husqvarna 240 or 260, implies an influence on the sufficient amount of combustible raw material entering the carburetor for mixing with the air mass. It is known that maximum performance is possible only with a certain ratio of these substances. The second point in adjusting the carburetor mixer of a chainsaw is caused by a lack of incoming air, which causes the injected gasoline to fail to burn and be released in the form of thick smoke. A timely change of parameters with your own hands to reduce the amount of injected fuel will allow you to significantly faster reduce the consumption of this product.
READ How to Dilute Gasoline with Stihl Chainsaw Oil
Do-it-yourself repairs will save not only the budget, but also the time spent on transportation and queues in the workshop. The same applies to replacing various spare parts in gas-powered tools, such as a chain for a chainsaw or a universal trimmer head for a brush cutter, or oils for electric drive products.
When is it necessary to adjust the carburetor of a Husqvarna chainsaw?
Neglecting deviations in the normal operation of a gas-powered tool risks the fact that even with a strong desire, adjusting the carburetor of a Husqvarna chainsaw may turn out to be useless and either this unit or engine elements damaged by prolonged thermal or mechanical loads will need to be replaced. Therefore, as soon as the saw shows the first deviations, repairs should be immediately carried out in the form of simple adjustments. Among these changes in work we note:
How to properly adjust the carburetor on a Husqvarna chainsaw
How to tune the carburetor
on a chainsaw
Husqvarna
Adjusting
the carburetor
on a chainsaw using three THL screws.
Husqvarna 240. And again about the carburetor. Design mistake or what is it?
Chainsaw HUSQVARNA
240 problem with
the carburetor
One of the most common problems with this chainsaw. Excellent
- The chainsaw accelerates too slowly;
- The tool does not achieve maximum power, and under load it quickly drops;
- The engine often stalls;
- The chain saw makes a lot of noise when operating;
- The chainsaw releases an uncharacteristic amount of smoke, increasing with each load stage.
READ The starter on the Caliber chainsaw is broken
As soon as you notice any of the listed deviations, the carburetor
The scythe 435 or its slightly reinforced copy of the
Husqvarna
55 saw must be urgently adjusted. Timely maintenance also foreshadows the absence of waste on a complete replacement of spare parts and units of the drive and fuel system of the chainsaw motor. Therefore, if there are difficulties in the operation of the Husqvarna 340 carburetor system and all other lines, the settings will save the chainsaw, the work processes, and the owners’ funds. If necessary, you can order the infusion of mechanisms, replace spare parts, and also buy a line for a trimmer with advice on its independent installation.
Do-it-yourself Husqvarna carburetor adjustment
Husqvarna gasoline saws, is adjusted in a similar manner, since all products have the same set of mechanisms. For example, if you are adjusting systems in the 236 series of gasoline tools, the process is accompanied by a search for the highest idle speed by slowly turning the adjusting screws L - affecting the low speed jet, T - the high speed jet and H - idle adjustment. The do-it-yourself adjustment process consists of several periods, which involve turning the L and H screws that control the throttle valve for supplying the combustible mixture and adjusting the T screw that adjusts the idle speed. Depending on the entered parameter, the saw is adjusted in the following sequence:
- After warming up, turn the L screw to maximum idle speed. As soon as they are found, you should turn them in the direction of decreasing the rotation speed by ¼ turn of the screw. If the chain begins to rotate, the accompanying adjustment of screw T is carried out against the clock until the chain stops.
- Adjustment of screw H on the chainsaw carburetor takes place during a 10-second period of engine operation at full speed, making ¼ turn. If the maximum load is not reached, the operation is repeated. Under-tuning will cause the saw to squeal, while over-tuning will cause the muffler to produce more smoke.
- Adjustment of the idle speed screw T is performed by turning the clock as the clock progresses until the chain begins to rotate. As soon as this happens, the screw is tightened back until the mechanism stops.
READ Which Gasoline to Put in a Stihl Chainsaw
Of course, making carburetor adjustments will allow your tool to work as efficiently as possible, but don’t forget about lubrication. Kosa Motors recommends purchasing special-purpose chainsaw oil for mechanisms, since timely maintenance will give the tool an additional period of high-quality service.
When flushing the carburetor is no longer worthwhile
Flushing the carburetor with your own hands is the easiest way to restore the functionality of the device. However, it does not always allow you to fix various types of breakdowns. To make sure that the device really needs cleaning, and washing will help restore the functionality of the mechanism, you will need to disassemble it.
If after disassembly some factors are discovered in the form of corrosive deposits (oxidation of aluminum), as well as the formation of warping in the carburetor channels, then ordinary washing will not help here. You can use the washing procedure in a special ultrasonic bath, but even in this case the chances of restoring functionality do not exceed 50%-60%.
Drawing a conclusion, it should be noted that the need and possibility of cleaning the carburetor can only be assessed after disassembling it. Here it should immediately be noted that the carburetor cleaning procedure can be performed in two ways:
- Automatic - washing is carried out in a special ultrasonic bath. Features of the procedure are discussed below.
- Manual - this method is not always suitable, but involves cleaning the channels of the mechanism using a special carburetor cleaner. This method is only suitable in cases where there is no deformation of the carburetor channels. If the process of corrosion or warping has begun in the channels, then, depending on the complexity of the process, only washing in an ultrasonic bath can help, but not always
Buying an ultrasonic bath specifically for cleaning a chainsaw carburetor is simply irrational. That is why in this material we will consider the manual washing procedure. We will also learn from this material what cleaning with an ultrasonic bath is.
This is interesting!
Regularly blowing out the carburetor with a compressor will not do anything, so don’t console yourself with the thought that now I’m blowing out the channels and the chainsaw will work like new.
Features of washing in an ultrasonic bath
If you are wondering how to flush a chainsaw carburetor without disassembling it, then there is only one answer - nothing. An ultrasonic bath is also useless in this case, since during the cleaning process it is necessary to ensure the free removal of contaminants from the channels. If the carburetor is not disassembled, then these contaminants simply will have nowhere to go, and the result of such cleaning will simply be useless.
Some owners of gas-powered tools are looking for various flushing fluids and additives to the fuel mixture, hoping for their effectiveness. All these preparations and concentrates are simply useless, and if you really want to perform highly effective carburetor cleaning, then you should use a special ultrasonic bath. Even if your neighbor has convinced you of the effectiveness of such concentrates, then imagine the picture when all the contaminants enter the cylinder. Naturally, this will not lead to anything good, and as a result. Soon you will need to disassemble and repair or replace the internal combustion engine.
Ultrasound channel cleaning is the most effective, but even taking this factor into account, it is not possible to talk about complete restoration. It all depends on the extent of the clogging of the mechanism.
In addition, you must thoroughly know how to perform this procedure correctly. In particular, it is necessary to calculate the rinsing time as well as the temperature. The principle of washing a chainsaw carburetor in an ultrasonic bath is as follows:
- Remove the carburetor from the chainsaw and disassemble it
- It is necessary to disassemble the carburetor in order to ensure deeper penetration of the cleaning fluid into the channels
- The container fits the carburetor, except for small parts and rubber membranes
- You need to pour a special Ultra Red liquid into the container, which mixes with water
- Turn on the installation for the appropriate period of time 10-15 minutes
After completing the procedure, you will need to blow out the channels with compressed air, but carefully. After this, evaluate the quality of the flushing, and only after that assemble the mechanism.
Repair and adjustment of a chainsaw carburetor in detail in the video
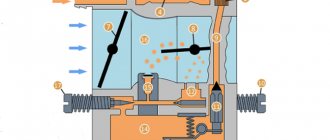
Any chainsaw is equipped with a two-stroke single-cylinder carburetor engine. Early models of chainsaws were equipped with contact ignition, but now almost all manufacturers use electronic ignition, so there is no need to constantly clean the contacts and adjust the gap between them.
The air-fuel mixture to operate the engine is mixed in the carburetor. Using a special damper, you can manually lean or enrich the fuel mixture for a specific purpose - for example, for cutting hard wood.
Both the health of the engine and the performance of the chainsaw directly depend on the good technical condition of the carburetor. Let's take a closer look at how a chainsaw carburetor works.
How to clean a chainsaw carburetor with your own hands - instructions with step-by-step description
A common situation is when, during the repair of a chainsaw, it turns out that the carburetor is the cause of the problem. Often the malfunction of this device is due to clogged channels. Components of the mechanism may also fail, which can be replaced by performing appropriate repairs. Next, we’ll find out how you can clean a chainsaw carburetor yourself without using an ultrasonic bath. To carry out the procedure, you will need to buy a special carburetor cleaner, Carbcleaner. As a last resort, you can use WD-40 solvent, but the difference between these substances is very large, and for greater efficiency it is recommended to give preference to Carbcleaner.
This is interesting!
If you don’t know how to clean a carburetor at home, then you should definitely choose a special carburetor cleaner.
For a chainsaw device, a small jar of liquid is sufficient. There are no difficulties in dismantling the chainsaw carburetor, so below are detailed instructions on how to properly clean the device with your own hands:
- Disassembly should begin from the side where the diaphragm pump is located, from where the fuel mixture is pumped. To do this, use a screwdriver to unscrew the mounting bolt.
- The top cover is removed, under which there is a membrane that plays the role of a fuel pump.
- You can immediately assess the condition of the membrane, which should be soft and elastic. If it has become hard and rough, then it should be replaced.
- After this, we evaluate the condition of the filter mesh. In most cases, it will have blockages that prevent fuel from entering the carburetor fuel chamber. In the example, the mesh has significant contamination that must be removed. To do this, the filter element is dismantled, which must be done in any case, since this channel will be cleaned
- After this, we proceed to disassemble the reverse side of the mechanism. To do this, unscrew the 4 mounting screws that secure the plate
- After removing the plate, we have another membrane that controls the needle
- This gasket, due to the rarefaction of the air, controls the needle, ensuring its opening and closing for the arrival of the next portion of the fuel mixture. The membrane must be soft and elastic, otherwise it should be replaced
- We check the serviceability of the foot that connects to the needle. If the foot has a small stroke (concave inward), then it should be bent 1 mm towards you. The small stroke of the presser foot limits the possibility of opening the needle fully, which affects the reduction in engine power and also leads to the impossibility of developing maximum speed
- To bend the tab, as well as to clean the carburetor, you will need to unscrew the fixing screw. And dismantle the part along with the needle
- After loosening the screw, remove the presser foot and needle, which are secured with a spring.
- The next step is to unscrew the adjusting screws. It is very important to remember their location, as they have a distinctive design. To do this, it is recommended to mark them with a marker. There is no need to unscrew the idle adjustment bolt
- After this, you can begin cleaning the device. It is worth understanding that carburetor designs may differ slightly, but the principle is almost identical for all
- For manual cleaning, use a special cleaner with a thin tube on a sprayer.
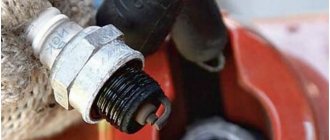
- Work with the cleaner must be carried out in special safety glasses, as well as oil- and petrol-resistant gloves. This is very important, since the cleaner is an acid that corrodes the skin. It is necessary to clean the carburetor with a cleaner, for which a jet of solvent is supplied into the holes
- The high and low speed channels from which the adjusting screws were removed are also cleaned.
- The channels on the other side of the carburetor are purged in the same way.
- The cleaning process will not be effective if the idle, low and high speed channels are not purged. To do this, the throttle valve opens and access to these channels opens, which should be purged
- If these channels are oxidized, then the cleaner may not help in cleaning them, so it is possible that an ultrasonic bath will be needed
- After washing the mechanism, the channels should be purged. This must be done carefully, holding the blow gun at an appropriate distance of 5 cm
- Next, the device is assembled. The filter mesh must be cleaned, blown out and replaced
- When installing the needle, you should also thoroughly clean it of oxides using a cleaner
- The adjusting screws also need to be cleaned using a cleaner, after which we screw them into place. They need to be screwed all the way, and then loosened 1.25-1.5 turns
A detailed description of how to adjust a chainsaw carburetor is presented in the video.
What need to do:
1. In order to clean the carburetor of a chainsaw, you need to prepare a clean, well-lit table and all the necessary tools (including special tools). Small fasteners and carburetor parts must be clean and arranged in the order corresponding to the order of disassembly.
2. First, you need to clean the outside of the chainsaw engine and the air filter housing with a brush or compressed air.
3. Remove the air filter cover, remove the filter element, remove the air filter housing . To do this, you need to unfasten the latches or unscrew the bolts. If, after examining the body, you cannot find its fastening, you need to refer to the User Manual of your chainsaw or trimmer, or find information on the details of this trimmer/chainsaw on the Internet.
4. Unscrew the fasteners that secure the carburetor to the engine. These can be either long bolts or studs with nuts and washers. Be careful not to let the nut or washer fall into the engine (it can be difficult to get out).
5. Disconnect the throttle and thrust cables from the carburetor , remembering how they were installed, so that later they can be reinstalled in the same way. If there are springs, they must be removed, being careful not to stretch them.
6. Pull the fuel hoses off the carburetor fittings. The hoses can be carefully removed using pliers. If the fuel hoses are clamped with clamps, then these clamps must first be removed.
7. Pull the carburetor off the studs , being careful not to damage the gasket located between the carburetor and the cylinder of the chainsaw or trimmer. Remember what position the carburetor was in, so that after cleaning you can put it back in the same way (usually the carburetor is symmetrical and it can be mistakenly installed upside down, but then there will be problems with connecting the hoses and throttle cable).
8. Clean the outside of the carburetor with a hard synthetic brush so that dirt and debris do not get inside the carburetor or into the chainsaw engine cylinder. Then wash off all the dirt from the outside using the same brush and carburetor cleaner (CarbCleaner).
9. Unscrew the screws securing the carburetor diaphragm cover (usually there are 4 of them). Then remove the diaphragm cover, carefully prying it up with a screwdriver so as not to damage the gasket and mating surfaces on the cover and carburetor body, so as not to break the tightness of the connection. Then lightly remove the diaphragm by the edge. Inspect the channels and cavity for the presence of dirt and debris. If there are any debris, you need to blow them out with compressed air. If there are tar deposits or coking in the form of “varnish”, they must be removed using carburetor cleaner.
10. When the diaphragm is perfectly clean, replace the diaphragm cover . If a lot of resinous deposits or “varnish” have accumulated in the carburetor and the diaphragm is torn during removal, then you need to buy a chainsaw carburetor repair kit of the appropriate brand and change the diaphragm and gaskets.
11. Unscrew the fine fuel filter at the bottom of the carburetor. You need to unscrew 4 screws (usually) and carefully remove it so as not to damage the gasket. If the gasket is damaged, you will need to make or buy a new gasket.
12. It is necessary to inspect the part of the carburetor to which fuel is supplied . If there are tar deposits or “varnish” there, you need to remove them with carburetor cleaner. If there are a lot of these deposits or they are not immediately removed, you need to take carburetor cleaner into a technical container (photobath or saucepan) and place the carburetor parts that need to be cleaned in it for a while so that the cleaner will corrode the difficult-to-remove deposits.
13. To thoroughly clean and blow out the fittings, it is better to use the tube on an aerosol can of carburetor cleaner. You can also spray cleaner into the fuel hoses where they connect to the fittings.
14. Blow all carburetor parts with compressed air to remove any remaining cleaner or contaminants.
15. Assemble the carburetor , tightening all fastening screws well.
16. Connect all hoses, throttle cable, rods and springs to the carburetor in the reverse order of disassembly. How to clean a carburetor - that's it.
17. Start the engine to check and, if necessary, adjust the carburetor.
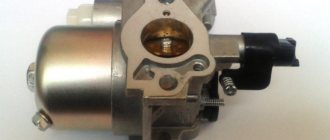
Features of cleaning carburetors on Shtil and Husqvarna chainsaws
It doesn’t really matter what brand the instrument is - Shtil, Husqvarna, Partner and others. Cleaning carburetors on all models is carried out according to the instructions described above. The only difference lies in some design features. On Stihl chainsaws, the carburetor has copper-plated or brass jets that need to be removed to clean them.
The mechanism on chainsaws from the manufacturer Husqvarna is adjusted in a similar way. The device differs only in design, but the adjustment principle is similar to that described above.
Checking that the carburetor is properly cleaned
Detailed instructions on how to clean a chainsaw carburetor show that this procedure does not present any difficulties. However, it is important to assess the condition of the device, and only then make a decision about the possibility of cleaning. The carburetor channels are very small, so during oxidation serious difficulties arise in cleaning them. In this case, you will only need to purchase a new carburetor.
This is interesting!
It is necessary to understand that not all types of carburetors can be cleaned. This is especially true for branded chainsaws and trimmers, where it is simply impossible to reach the channels.
To make sure that the procedure was done correctly, you should put the carburetor on the chainsaw and do a test run. If necessary, make adjustments using a tachometer. At the final stage, it must be said that by regularly performing such actions, you can extend the life of not only the carburetor, but also the engine of the tool tenfold.
Cleaning correctly
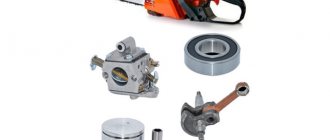
To properly clean your chainsaw, you will need the following tools:
- Phillips and flat screwdriver,
- wrenches with heads of different sizes,
- special cleaning composition, cleaning cloth,
- ultrasonic cleaner.
The set of tools can be seen in the photo.
Cleaning the carburetor of a chainsaw should be done according to the following algorithm:
- First you need to drain the remaining fuel from the fuel tank. Remove the cover of the chainsaw by unscrewing the fasteners. We take out the filter and disassemble the housing, removing nuts and clamps if necessary.
- Remove the fuel mixture supply hose from its clamp, unscrew the fasteners of the carburetor top cover. How to clean the carburetor of a stihl ms 180 14 chainsaw? And adjusting the chainsaw carburetor. Then remove the top cover and the blue gasket - this is the fuel pump membrane. The chainsaw must correctly recognize malfunctions in the chainsaw's carburetor. To the left of the body there are spring clips, remove them, and then the screws. It is advisable to label the parts and schematically record the places from which they were removed, so as not to confuse anything during assembly.
- Remove the bottom carburetor cover, unscrew the screw and remove the needle valve and the spring under it. Repairing a Husqvarna 137 chainsaw, what goes into the carburetor is how to remove the sprocket from. Then, using longitudinal force, remove the air damper and its axis.
- Remove the throttle valve, drive lever and throttle shaft.
- We lay out all the removed carburetor parts on a flat surface and inspect them to ensure integrity is maintained. Carburetor of the Husqvarna 142 chainsaw. Parts with a high degree of wear must be replaced with new ones.
- Using a specialized cleaning agent, wash the parts and dry with a lint-free cloth. The tubes must be blown under pressure using a pump.
- To achieve maximum effect, you can clean the carburetor on a Shtil chainsaw using a special cleaning bath, the basis of which is the cavitation effect. The bath is filled with diesel fuel, and the carburetor parts are immersed in it for several minutes. Finally, we dry the parts using a pump.
- Author: Maria Sukhorukikh
Rate this article:
- 5
- 4
- 3
- 2
- 1
(0 votes, average: 0 out of 5)
Share with your friends!