Welding Basics
To learn how to weld correctly, you need to understand the physical foundations of the welding process. Any welding machine creates in a small working area at the junction of two parts being welded a temperature above the melting point of the metal being welded, the so-called weld pool. In it, the part of the metal of both parts that has turned into liquid is mixed with each other and with the metal of the molten electrode. After the temperature decreases, the metal from the weld pool crystallizes, connecting the welded parts into one whole. By slowly moving the weld pool following the arc along the joint, the welder obtains a seam. High temperatures in amateur welding machines are achieved in two ways:
- electric arc;
- gas burner.
Gas-burner
How to properly solder with an electric arc
Electric welding is safer, since there is no risk of gas explosion, and is easier to learn for those who are just learning how to weld properly.
An electric arc is created by passing a high current through the air gap between the parts being welded and the electrode.
Electric welding technology
Electric welding is a process that occurs under the influence of high temperatures above the melting of the metal. As a result of welding, a so-called weld pool is formed on the surface of the metal, which is filled with a molten electrode, thereby forming a weld seam.
Therefore, the main conditions for carrying out electric welding are to ignite the electrode arc, melt the metal on the workpieces being welded and fill the weld pool with it. It would seem that in all its simplicity, it is very difficult for an unprepared person to do this. Firstly, you need to understand how quickly the electrode burns, and this depends on its diameter and current strength, and also be able to distinguish slag during metal welding.
In addition, you need to maintain a uniform speed and correct movement of the electrode during welding (from side to side) to ensure that the weld is smooth and reliable, able to withstand tensile loads.
How to strike an arc
You should begin mastering electric welding with the correct ignition of the arc. It is better to carry out training on an unnecessary piece of metal, but it should not be rusty, as this will seriously complicate the task and can confuse a novice welder.
There are two simple ways to light an arc:
- Quickly touch the electrode to the surface of the workpiece and then move it upward to a distance of 2-3 mm. If you tear the electrode away from the metal above, the arc may disappear or become too unstable;
- By striking the electrode against the surface of the workpiece being welded, as if you were lighting a match. You need to touch the tip of the electrode to the metal and move it 2-3 cm along the surface (towards the welding site) until the arc lights up.
The second method of igniting the arc is best suited for beginner electric welders, since it is the simplest. Also, briefly touching the metal warms up the electrode, and further cooking with it becomes much easier.
After igniting the arc, it should be kept as close as possible to the surface of the workpiece, at a distance of no more than 0.5 cm. In addition, this distance must be kept approximately the same all the time, otherwise the welding seam will be ugly and uneven.
Welding speed
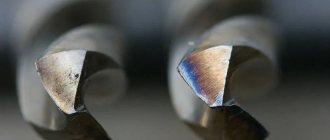
The speed at which the electrode moves depends on the thickness of the metal being welded. Accordingly, the thinner it is, the faster the welding speed is, and vice versa. Experience in this will come with time, when you learn to light an arc and start cooking in the slightest degree. The pictures below show illustrative examples by which you can understand exactly at what speed the welding was carried out.
If it is slow, the welding seam will be thick and its edges will be heavily melted. If, on the contrary, you move the electrode too quickly, the seam will turn out weak and thin, as well as uneven. At the correct welding speed, the metal completely fills the weld pool.
In addition, when practicing cooking, you need to ensure the correct angle of the electrode in relation to the metal surface. The angle should be approximately 70 degrees and can be changed if necessary. During the formation of a welding seam, the movement of the electrode can be longitudinal, translational and oscillatory, from side to side.
Each of these techniques for guiding the electrode allows you to achieve the desired seam, reduce or increase its width, and also change some other parameters.
Share on social networks
How to cook properly
To understand how to cook properly, a small amount of theory should be supplemented with a large amount of practice. It’s best to start learning by welding scraps of corners, fittings, and metal plates. Only after you “feel the seam” with your own hands can you begin to connect more or less important structures.
Arc Welding Process
There are several types of devices; in order to learn how to cook correctly, it is best to start with an inverter. It allows you to smoothly regulate and maintain a stable operating current, is slightly independent of the level and stability of the voltage in the supply network, and does not create voltage surges in this network.
Welding technology
Welding work takes place at high temperatures. The electric arc is a heat source for heating and partially melting the work area. It occurs in the air gap between the workpiece and the electrode, is maintained throughout the operation and moves smoothly along the seam line.
The occurrence of a welding arc
Structure and properties of the electric arc
Welding arc classification
The dimensions of the resulting working zone of molten metal, or weld pool, are determined
- selected operating mode;
- speed of electrode movement;
- weldable materials;
- the thickness of the parts and the configuration of the edges.
Average dimensions of the weld pool:
- width - 0.8-1.5 cm;
- length 1-3 cm;
- depth - about 0.5-0.7 cm.
To weld correctly, it is necessary to select the material and thickness of the electrode in accordance with the thickness of the parts being welded. The electrode is coated with a thin layer of flux, or coating. When heated, this flux melts and forms a protective gas region above the working area, which prevents air oxygen from entering the working area. As the electric arc is removed and the weld pool zone follows, the molten metal crystallizes, forming a seam that connects the parts into a single whole. On top of the seam there is a thin layer of burnt-out flux residue that needs to be cleaned off.
Welding processes
An electric arc is formed by an electrode and a metal surface being processed.
Taking into account the advice of the masters, you first need to take metal electrodes for electric welding. Graphite and carbon are intended for special work that home craftsmen rarely have to perform. During electric welding, several processes occur in parallel, which it is advisable for beginners to know:
- The main thing is the connection of liquid, brought almost to a boil, metal parts. As a result, a weld seam is formed;
- by moving the electrode correctly, a good seam is formed;
- Not only the metal melts, but also the electrode material. The melts flow into the working area, which is called the weld pool;
- the protective layer of the electrode surface burns out. The combustion products of the protective layer of the electrode are released in the form of gases;
- the resulting gases envelop the working area, block the access of air oxygen, preventing oxidation of the metal part;
- A molten mass of slag is formed from the oxidation products. Often slag covers the entire working area (weld pool). As a result, visibility of the melting site deteriorates.
With proper electric welding, a flow of gases blows slag from the weld point onto the seam. At the end of fusion, the solidified slag is carefully knocked down with a hammer.
In order to weld metal correctly, you need to learn how to select appropriate current values, the angle of inclination of the electrode and practice the technique of moving it in the work area.
Types of Welding Machines
There are a large number of models of welding machines of different types on the market.
Of all their diversity:
- transformers;
- rectifiers;
- inverters;
- semi-automatic;
- machine guns;
- plasma;
In a home workshop, transformers are most often used because of their low cost, and inverters because of their simplicity and ease of use. The rest require either special working conditions, achievable only in production, or special training and long-term acquisition of skills.
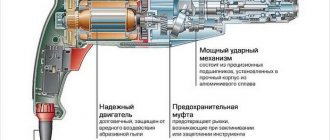
Transformer
The design of such devices is extremely simple - it is a powerful step-down transformer, in the secondary winding of which a working electrical circuit is connected.
Transformer welding machine
Transformer advantages:
- unpretentiousness;
- survivability;
- simplicity;
- cheapness.
Flaws
- very large weight and dimensions;
- low arc stability;
- AC operation;
- causes voltage surges in the supply network.
Such a device requires skill and extensive experience from the welder. It is not suitable for teaching a novice welder how to weld correctly.
Inverters
The inverter device has a much more complex design. The inverter unit repeatedly converts the input mains voltage, bringing its parameters to the required ones. Due to the transformation of high frequency current, the dimensions and weight of the transformer are many times smaller.
Inverter
Inverter advantages:
- low weight and dimensions;
- stabilized voltage and current in the circuit;
- additional anti-stick and hot start functions;
- possibility of precise adjustment of current and arc parameters;
- does not cause voltage surges in the supply network.
The inverter also has disadvantages:
- high price;
- low frost resistance.
It’s best to start learning how to cook properly with an inverter. The stability of the arc parameters and additional functions that make starting easier and preventing “sticking” will allow the beginner to concentrate on the seam and quickly master the technology.
Criteria for selecting equipment and materials
Before starting any training, it is necessary to equip a home craftsman welding station. First of all, this concerns welding machines and electrodes, and then move on to the basics.
To carry out one-time work, you can rent a welding machine from specialized companies, but if there is a lot of work to be done, the best solution would be to purchase a reliable unit with a sufficient level of power.
You can weld with gas, but this is a more expensive method. For various purposes, the industry produces the following types of equipment:
- welding machine (transformer), designed to convert alternating currents into high-power welding current. Cheap welding machines can overheat greatly even under light loads, and they produce uneven welding current with large differences;
- Rectifiers convert alternating current from the network into direct current. These are the most productive devices with good characteristics, but they cost an order of magnitude more;
- Modern inverters are capable of converting alternating current into direct current; they are distinguished by high performance characteristics with small dimensions and weight. Today this is the most affordable, reliable type of welding equipment; many welders use them. This is the best option for beginners, where you can practice the basics of working with electrodes.
Beginners need to know that electrodes are used for electric arc welding.
Information about electrodes refers to the basics of training. The success of welding depends on the quality of the electrode and a suitable core composition. The product is quite simple in design. This is a steel wire made of various materials and alloys, with a special coating applied to it.
The coating prevents unwanted gases from entering the weld pool. For household use, electrodes with a core thickness of 3 mm are most suitable. Manual welding of very thin sheet metal is carried out using electrodes with a cross section of 2 mm.
What does a novice welder need to get started?
To start training, you will have to select the appropriate equipment and equipment.
Particular attention should be paid to personal protective equipment, since welding work is a process harmful to vision and respiratory organs.
It will be necessary to equip a workplace; if it is in a workshop, then the room should be equipped with effective exhaust hood and sufficient lighting.
If you decide to start training outdoors, be sure to do so on dry ground and under a canopy that will protect you and the equipment from rain.
The workplace should be spacious, not cluttered, and not restrict the welder’s movements.
Cables should be laid out in such a way that they will not be stepped on or tripped over when moving around workpieces.
It is better to choose scraps of rolled stock and steel sheets as blanks for practicing skills. It is not recommended to start with critical structures.
How to learn manual MMA electric arc welding yourself - what you need for work
Our advice to beginners: start learning with this technology. It is less expensive, does not require special handling, and the safety instructions are simple. The process requires:
- Welding machine. You can use common, simple and inexpensive transformers, DC rectifiers or modern inverters that do not produce voltage surges and therefore offer a smooth weld.
- Wires. When choosing, pay attention to high-quality rubber insulation, plugs that are designed for your device model, and wire cross-sections - from 16 to 35 square millimeters.
- Holders for electrodes. You can make them yourself, but this is not recommended due to low reliability. “Clothespins” that firmly grip the instrument are considered optimal. Material of manufacture: brass or copper. The electrode holder will always be in the welder’s hands, so you need to try it on according to the size of your palm and its weight.
- Ground clamp. It must also be strong and reliable.
Video: how to choose a welding inverter
Tools and protective equipment
Uniforms and personal protective equipment include:
- welder's mask with a built-in light filter to protect the eyes from bright light and ultraviolet radiation from the arc;
- split-leaf gloves—gaiters to protect hands from splashes of hot metal;
- thick clothing made of non-flammable fabric;
- cap under the mask;
- durable shoes.
- a respirator to protect the respiratory system from generated gases and dust, especially when working with non-ferrous metals.
Tools, materials and equipment you will need:
- Angle grinder (grinder) for cutting workpieces and cleaning seams;
- A set of hand tools - hammers, chisels, pliers, etc.;
- Metal brush for cleaning workpieces;
- Clamps and clamps for connecting workpieces;
- Electrodes.
And finally, the inverter with the included cables and holder.
Which electrodes to choose
In order to start learning to weld correctly, you need to select welding materials in accordance with the materials being welded and their thickness. It is better to choose ordinary low-carbon structural steels as a training task. Widely used coated electrodes are suitable for them.
Electrodes for welding machines
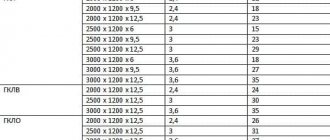
They usually study on electrodes with a diameter of 3 mm, 1.6 and 2 mm are used to work with thin-walled structures, and 4-6 mm are used for welding thick-walled workpieces.
Most often, electrodes with a diameter of 3 millimeters (three) are used at home. Thinner ones are suitable for welding thin-walled parts, and numbers four and five are for thick elements.
The power of the device must correspond to the diameter of the electrode (or its number). In the user manual (and on the device body) there is a table for determining the operating current depending on the number.
Recommendations on how to weld metal correctly
To weld metal correctly, it is not enough just to learn how to make seams. The welder must also be a materials scientist - know a lot about the properties of the materials being welded, their interaction with each other and with high temperatures.
The technology includes many operations before and after the actual seam is completed.
Before starting the main operation, the parts to be welded must be thoroughly cleaned of mechanical impurities, old paint, rust and must be degreased. It is also necessary to correctly position them relative to each other and fix them in this position.
When connecting thin-walled structures or simply long seams, the parts are clamped to each other at several equally spaced points to avoid thermal deformation.
The future welder must know and anticipate in advance:
- potential problems;
- types of defects
and think about how to avoid them.
Start with the three simplest types of connections
- Butt. The edges of the parts to be joined are in the same plane with a small gap between them, and this gap is filled with suture material.
- Overlapping. The parts are arranged with some edge overlap.
- Tavrovy. One plate is welded end-to-end in the middle of the other, usually at a right angle.
Three main types of connection
In general, a welder's job is half welding and half planning and preparation. Learning to cook properly means learning to plan and prepare.
Working with electrodes
Having an idea of the essence of the electric welding process, you can begin working with the welding machine.
You need to take all safety measures very seriously. The workplace should be cleared of unnecessary items and debris. You will have to work with high temperatures and electrical equipment. Be sure to wear special protective gloves, a mask, thick clothing and shoes. The surfaces of the metal to be welded must be cleaned.
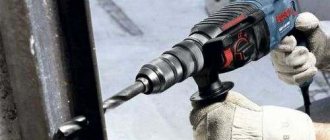
For electric welding you will need an electrode. There is no need to save money on purchasing your first copy. For novice welders, it is advisable to take a universal electrode with a diameter of 3.2 mm. It must be inserted into the welding cable clamp. How to insert is easy to figure out.
The electrode must be screwed into the screw clamp, and inserted into the spring holder into the niche that appears after pressing the key.
Check that the cables are connected correctly. In order to weld iron (this is the best option for starters), a cable from the inverter output with a “+” sign is connected to the part. The cable from the output with the “‒” sign is connected to the electrode. This connection is called direct. Cable connections are made in the reverse way when welding different alloys, for example, stainless steel. You will need this in the future.
Tips on how to learn to cook with electric welding yourself
It is possible to weld a simple metal structure in a few hours, provided that you have already mastered the technology, planned the operations of the technological process and prepared everything necessary.
To learn how to cook correctly, you should keep the following in mind:
- You should prepare and find out the necessary information about the materials you are going to cook.
- Select the appropriate operating mode and welding materials for them.
- Study the technique of performing the specific seam you have planned.
There is little substitute for attending a professional welding school and practicing under the guidance of an experienced mentor. But if for some reason this is not available, then the correct movements, position of the hands and body when working can be well studied using training videos from authoritative welding masters.
Of course, they won’t trust you to weld the body of a nuclear reactor, but you can easily handle a frame for a gate or ladder. Starting with simple seams and learning how to weld them correctly, you can move on to more complex ones, gradually gaining experience and honing your skills.
What defects are worth knowing about in order to make the correct welding seam?
Knowledge about welding defects is very important so that you recognize them in time and do not start operating a welded structure with an unreliable connection.
If the seam is welded correctly, it looks uniform and neat, with equal thickness and height along the entire length.
The following main defects are distinguished:
- Lack of penetration. Insufficient filling with suture material, and its strength is reduced. The reason is insufficient voltage in the circuit or excessive speed of electrode guidance.
- Undercut Longitudinal groove. Occurs due to excessive arc length. To eliminate the defect, you should choose the correct current strength and increase it slightly.
- Burns. Formation of through holes in the material. It is caused by exceeding the current required for a given material thickness, as well as by moving the electrode too slowly. It is also necessary to check whether the gap between the edges of the workpieces is not exceeded.
- Porosity. Occurs due to a draft in the work area, blowing away the cloud of protective gases.
Lack of penetration
Undercut
There are also other welding defects, such as longitudinal and transverse cracks
Precautions before welding with electrodes
Cooking correctly means cooking safely. Precautionary measures when welding with electrodes will help maintain the health and performance of the welder:
- Before starting work, it is necessary to inspect the device, holder and cables for mechanical damage and insulation damage.
- Work should be carried out at positive temperatures and humidity up to 80%;
- The use of personal protective equipment is mandatory.
- Fire-resistant protective clothing should be used.
- Near the workplace you should have a fire extinguisher suitable for extinguishing live electrical installations.
Careful and strict adherence to the rules for welding metal with an electrode will not require much time and will help preserve material values and people’s health.
Nuances for beginners in welding
There are several nuances that can be useful to anyone who wants to learn how to cook correctly:
- Do not forget about grounding and the importance of regularly checking the quality of contact between the clamp and the workpiece.
- Check the cable insulation regularly.
- The current strength is selected immediately after connecting the ground.
- Before igniting the arc, the electrode should be installed at an angle of approximately 60 degrees to the plane of the part, and the distance between its end and the part should be about 0.5 cm.
Electrode positions when welding
By mastering increasingly complex types of seams and joint configurations, the home craftsman will be able to learn how to weld correctly and will provide his household with all the necessary welded structures.
Step-by-step instructions for welding with an inverter
First of all, for welding you need to have protective elements:
- gloves made of rough fabric;
- welding mask with a special filter protecting the eyes;
- a rough jacket and trousers made of material that will not catch fire from sparks that appear during welding;
- closed shoes with thick soles.
Electrode position during welding.
Before you start welding with a welding inverter, you must take the necessary measures aimed at creating safe working conditions.
Proper preparation of the workplace consists of:
- ensuring the necessary free space on the table, you should remove all unnecessary objects that could get splashed;
- creating high-quality lighting;
- Welding work must be performed while standing on a wooden floor that protects against electric shock.
Then the current is adjusted depending on the thickness of the parts and the electrodes are selected. The latter need to be prepared. If they were just purchased in a retail chain and their quality is beyond doubt, then this step can be skipped.
If the rods have been in an unheated, damp room for a long time, then they need to be dried for two to three hours at a temperature of 2000 degrees. For these purposes, you can use an old oven or special equipment, if available.
After preparing the electrodes, the ground terminal is connected to the product.
To obtain a high-quality and reliable connection, the metal must be prepared:
- rust is completely removed from the edges of the product;
- using solvents, various contaminants are cleaned;
- At the last stage, the edges are checked for cleanliness; the presence of grease, paint and other contaminants is unacceptable.
Next you need to connect the welding inverter. It is better to carry out training on a thick metal sheet, forming a seam in the form of a roller. Make the first connection on metal lying horizontally on the table. Draw a straight line on it with chalk along which the seam will go.
Electrical circuit of the inverter.
In the process of training on such an object, you can significantly improve your welding technique.
The welding process begins with ignition of the arc.
There are two ways to perform this action:
- scratching on metal;
- tapping on metal.
The choice of method depends on the person’s preferences; the main thing when igniting is not to leave traces of welding outside the joint area.
After igniting the arc from contact with the metal, the arc is ignited, the welder removes the electrode from the surface of the part a short distance corresponding to the length of the arc and begins welding.
As a result, a weld is formed at the junction of two metal parts. It will be covered with scale - scale on the surface. It needs to be removed. This is very easy to do by tapping the seam with a small hammer.