The lightweight version of the drill, which has been improved to work with bolts and screws, has been breaking sales records in the markets of the former Soviet Union for twenty years. Each type of tool has its own weaknesses associated with the method of implementing design solutions. The service life of units and spare parts depends on the quality of assembly, materials used and the manufacturer’s quality control system. The electric motor for a Makita screwdriver lasts much longer than motors from unknown Chinese companies.
All cordless drill malfunctions can be divided into 4 categories:
- electronic malfunctions and breaks in the electrical circuit;
- mechanical failures;
- problems with the battery and charger;
- failure of housing elements.
Gear shift failure
Often a gearbox failure leads to failure in first gear. To make sure that this is the cause of the malfunction, you need to open the case, dismantle the gearbox and remove the back cover. Using tweezers, bend the latch and remove the plate. Having taken out all the gears, you need to carefully inspect them. As a rule, the plastic teeth on the housing are the first to fail, not the gears. Restoring the body is a thankless task, given the low cost of this spare part. Just buy a part with the corresponding article and assemble the screwdriver.
Brush wear
To diagnose this failure, you need to unscrew the bolts on the outside of the case. Remove one half of the plastic casing. Remove the reverse switch. Remove and check the gearbox. Use pliers to bend the latches of the rear engine cover and remove the brushes. The wear of these spare parts will be visible to the naked eye. Use a soldering iron to melt the contacts. Then dismantle everything that remains of the old brushes. Use a thin screwdriver to bend the holders. Install a set of new brushes and assemble the tool.
Problems with the electric motor
After several years of use, the screwdriver begins to have difficulty starting when the button is pressed. There is no discernible system in this: one day it works, the next it doesn’t. There can be three reasons for this malfunction:
- burnt contact due to loose motor mounting in the housing;
- faulty start button;
- break in the electrical circuit.
The day the tool starts working, look through the cooling slots at the engine. If it vibrates excessively, it means the contact connector is not seated tightly. It is necessary to purchase and replace connectors and housing elements. Loose engine mounting is due to a break in the inner surface of the plastic casing.
In the last two cases associated with this malfunction, you need to replace the button or “ring” the circuit. Using original spare parts for Bosch screwdrivers, you save yourself from the need to return to repairs that have already been carried out again: the resource of most of the replaced parts will be enough for the remaining “life” of the tool.
The battery has stopped charging
If, after checking the contacts, it turns out that the circuit is not damaged and the charger is working properly, you will have to replace the battery. Most often, cheap “old-style” batteries—nickel-cadmium—fail before the tool itself. Equipping a used device with a modern lithium-ion battery is impractical: the purchase price will be higher than the residual value of the screwdriver. It is better to think about purchasing a new tool model.
Has your drill stopped working for some unknown reason? What can be wrong?
There are quite a few reasons for drill failure, ranging from abrasion of the so-called “brushes” to failure of the entire mechanism.
The brushes last a long time, for example, on my hammer drill, which works constantly and under heavy loads, the last time I changed the brushes was a year ago.
Most often, the button in the drill breaks, the plug also becomes unusable, and sometimes the wire breaks.
You need to start looking for a breakdown right from this very plug; the plugs on modern drills are often not dismountable, so you will have to change the whole thing.
Feel the entire wire of the drill (naturally, the drill must be disconnected from the power supply), perhaps the wire was severely bent and it broke, inside the braid.
With a button, everything is more complicated, although you can try to start the drill directly, without a button (we connect wires of the same color that enter and exit from the button, start the drill).
If the entire engine burns out, then by the smell you can understand that things are bad (a burnt-out engine has its own specific smell, you won’t confuse it with anything else), you need to take the engine to rewind, or buy a new one.
If the drill tries to work, the motor, buttons, plug, wire, then it’s ok, the drill mechanism is broken, such a breakdown cannot be corrected on its own, you need spare parts, and original ones, they cannot be repaired, they must be completely replaced.
You can’t tell so easily, because before the stop there were some characteristic signs by which it was possible to determine what happened to her.
For example, the drill lost power, began to work jerkily, wheezed and stopped turning on at all! — the brushes are worn out, you need to install new ones!
For example, when turning it on, you had to shake the button or press it several times - it’s clear that you need to change the start button!
For example, smoke and fumes appeared during operation, after which the drill stopped working and no longer works - here, too, the stator or rotor winding obviously burned out, serious and expensive repairs are needed!
For example, the drill worked normally, but periodically made jerks - here you need to look at the cable, the plug, perhaps they were damaged somewhere, and it is also possible that the wire in the drill itself broke off from the contacts on the start button, or their weakening needs to be looked at and eliminated.
How to repair a cartridge
The chuck for each specific screwdriver model differs from similar elements of other models. The main distinguishing feature is the method of mounting the cartridge:
- Morse cone.
- Threaded connection.
- Threaded connection with fixing screws.
To determine the mounting method, it is best to use the markings that are applied to the cartridge case:
- The marking value “1–6 B10” indicates the method of fastening using a Morse taper.
- an inscription like “1.0–11 M12x1.2” or “2–13 mm ½-20 UNF” indicates a metric or inch thread.
If the cartridge is attached by means of a thread, then it is necessary to perform the following steps:
- Unclench each jaw of the chuck.
- If there is a screw, remove it.
- Clamp the L-shaped hex key (10 mm) with the short side into the chuck.
- Start and immediately turn off the screwdriver at low speeds, so that the long edge of the hex key hits the table. In order not to turn on the device, you just need to hit the hexagon with a hammer several times. This will cause the thread to shift and the cartridge to unscrew.
If there is no result, you can disassemble the screwdriver and remove the assembled gearbox from it. To do this, it is enough to use an L-shaped tubular wrench (often “19”) to unscrew the cartridge, clamping the gearbox mounting bolt with the socket heads of the keys on the other side. They provide the necessary support, making the cartridges easy to unscrew by hand.
When disassembling the cartridge, the plug at the base is removed. The plastic plugs must be carefully pryed off with a knife. Metal ones should be knocked out with a hammer, striking the base of the cartridge:
- It is necessary to provide in advance the presence of a large bolt, which should be secured in the chuck and pressed with light effort to perform alignment. The protrusion of the bolt head should be more than 2-3 cm above the chuck.
- Next, hit the surface of the bolt head with a hammer. The cartridge should pop out of the holder.
The most common cartridge malfunction:
- bits are not clamped evenly;
- backlash occurs between the bit and the cam;
- The cam extends unevenly.
To find out the causes and eliminate them, you need to perform the following steps:
- Disassemble the cartridge.
- Remove the cone nut, which consists of two elements.
- Unscrew the clamping jaw.
- Check the threads on the nut and cam and replace any defective parts.
- Completely assemble the cartridge.
It is worth considering that it is quite difficult to purchase a cam or a cone nut, since they are supplied to the market as a complete set. But they can be removed from other similar cartridges. In this regard, it is best to replace faulty cartridges with new ones. When purchasing a new element, it is recommended to go to the store with a screwdriver and a dismantled old chuck.
Gear shift failure
Often a gearbox failure leads to failure in first gear. To make sure that this is the cause of the malfunction, you need to open the case, dismantle the gearbox and remove the back cover. Using tweezers, bend the latch and remove the plate. Having taken out all the gears, you need to carefully inspect them. As a rule, the plastic teeth on the housing are the first to fail, not the gears. Restoring the body is a thankless task, given the low cost of this spare part. Just buy a part with the corresponding article and assemble the screwdriver.
Brush wear
To diagnose this failure, you need to unscrew the bolts on the outside of the case. Remove one half of the plastic casing. Remove the reverse switch. Remove and check the gearbox. Use pliers to bend the latches of the rear engine cover and remove the brushes. The wear of these spare parts will be visible to the naked eye. Use a soldering iron to melt the contacts. Then dismantle everything that remains of the old brushes. Use a thin screwdriver to bend the holders. Install a set of new brushes and assemble the tool.
Problems with the electric motor
After several years of use, the screwdriver begins to have difficulty starting when the button is pressed. There is no discernible system in this: one day it works, the next it doesn’t. There can be three reasons for this malfunction:
- burnt contact due to loose motor mounting in the housing;
- faulty start button;
- break in the electrical circuit.
The day the tool starts working, look through the cooling slots at the engine. If it vibrates excessively, it means the contact connector is not seated tightly. It is necessary to purchase and replace connectors and housing elements. Loose engine mounting is due to a break in the inner surface of the plastic casing.
In the last two cases associated with this malfunction, you need to replace the button or “ring” the circuit. Using original spare parts for Bosch screwdrivers, you save yourself from the need to return to repairs that have already been carried out again: the resource of most of the replaced parts will be enough for the remaining “life” of the tool.
Repair of the electrical part of the tool - start button
Another malfunction of the Interskol Da-14.4 ER screwdriver may be a breakdown of the start button. It manifests itself in the absence of switching on of the tool, instability of operation, or spontaneous switching on. For such repairs of a screwdriver, Interskol details how to assemble the gearbox. The cause may be metal dust formed, burnt contacts and a failed transistor.
To make sure that it is the button that is to blame for the failure of the screwdriver, you need to:
- Connect the battery and, after pressing the button, measure the voltage at its output. If it is missing, the button is faulty.
- Connect the engine and battery directly, bypassing the start button. For this purpose, the upper wire of the electric motor is removed from the button. After this, two wires are connected at one end to the battery, and at the other to the motor housing and the wire going to the button. Turning on the screwdriver means that the trigger button is to blame.
Repair, as a rule, consists of replacing the old button with a new one. You can try to troubleshoot a used button. To do this, it is disassembled and, as necessary, the chips are removed, the contacts are cleaned, or the transistor is changed.
The battery has stopped charging
If, after checking the contacts, it turns out that the circuit is not damaged and the charger is working properly, you will have to replace the battery. Most often, cheap “old-style” batteries—nickel-cadmium—fail before the tool itself. Equipping a used device with a modern lithium-ion battery is impractical: the purchase price will be higher than the residual value of the screwdriver. It is better to think about purchasing a new tool model.
The usefulness and convenience of using a screwdriver when renovating a house is beyond doubt. Using this tool, joining wooden elements is much faster and easier. Do-it-yourself screwdriver repair has become a necessity for many.
Diagram of a cordless screwdriver.
Any tool, even the best quality, will eventually fail. There are many reasons for this. Repairing an automatic screwdriver is no exception to the rule; it is a completely natural phenomenon, and you need to prepare for it in advance.
Reviews about VORTEX DA-18L-2K
Share your opinion: you don’t need to register to leave a review! Rate it on a five-point scale, tell us about the positive and negative properties and features of this model.
Pros: Fits well in the hand, light weight, lithium-ion battery, illumination of the work area, small dimensions.
Disadvantages: Haven't found any yet.
Comment: I have heard about this company for a long time, the reviews were excellent, I decided to buy it, the price was good. I'm doing renovations in the family, the batteries last a long time. Due to the low weight, long periods are used. I do not regret the purchase, I recommend it to everyone.
Pros: I work in the construction field, and I’ll tell you so far I’m very pleased with the quality. I've been using it for about 4 years now. No complaints.
Disadvantages: This was the first and last order here in the store - I ordered one thing, they sent me another. I sent a photo, spoke with the manager, they promised that everything would be as it should be. In fact, they did it haphazardly. Don't bother, take it off.
Pros: comfortable to work with, little heavy, despite the batteries
Disadvantages: with active use, the charge drops in a short time. Solved with 2 batteries from the kit
Comment: As a result, Vikhr is very pleased
. Aspects occur only when he begins to twist screws into raw wood. And when there are a lot of them, the force is really enormous, and the battery is blown out quite quickly. In this option, I put one on charge, and use the second and change them from time to time; under such circumstances, losses due to charging can be avoided.
Possible malfunctions and design features of screwdrivers
A screwdriver is used to tighten (unscrew) fasteners (mainly screws). It is sometimes used for drilling, but this is undesirable and can lead to failure. Unlike a drill, a screwdriver has a mechanism to stop rotation when a load occurs; in addition, the rotation speed of its chuck is noticeably lower than that of a drill.
Despite the variety of types and shapes, all screwdrivers have very similar designs, which differ mainly in build quality, appearance and arrangement of elements. Main elements: body with handle; a cartridge mounted on a shaft; electrical and mechanical parts.
Screwdrivers can be powered by electricity from the mains or their own batteries. In general, the electrical part includes an electric motor, a rotation reverse mechanism (direction switch lever); a trigger mechanism (button) with a speed controller and a power cord from the mains or a battery. Most often, when powered from the mains, a commutator single-phase AC motor with a voltage of 220 V is used. A starting capacitor is used to start the motor. The motor itself consists of a stator, a commutator rotor and contact brushes. Rotation from the motor shaft to the main shaft with the chuck is transmitted through a gearbox.
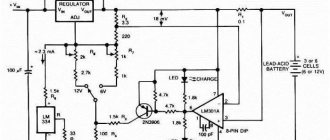
Screwdriver battery connection diagram.
The trigger mechanism combines a start button and a power regulator. The regulator is made on the basis of a transistor and changes the strength of the current supplied to the contact brushes of the electric motor. By changing the input current, the rotation speed of the electric motor is controlled. The start button is designed in such a way that a change in the force of pressing it leads to a change in the signal to the power regulator transistor.
The chuck rotation direction switch provides engine reverse. This is done by moving the lever, due to which the contact elements on the input connectors are transferred, which changes the polarity of the signal.
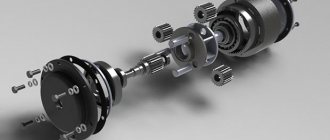
The basis of the mechanical circuit of a screwdriver is a gearbox, a bearing system and a load limiting mechanism. A planetary gearbox is installed to reduce the speed when transmitting rotation from the electric motor to the chuck. The basis of the gearbox is gears (ring and sun); satellites and carrier, and their number is determined by the number of stages of rotation speed of the cartridge. Household tools provide 2 or 3 stages. The operation of planetary gearboxes is based on the fact that a sun gear mounted on the electric motor shaft rotates a satellite, which, with the help of a carrier, rotates a ring gear mounted on the main shaft. When transferring rotation (from a gear with a smaller diameter to a gear with a larger diameter), the rotation speed decreases.
Screwdriver gearbox: do-it-yourself repair, device, what to lubricate, assembly, its parts
Any tool, regardless of model and brand, will sooner or later break down. A screwdriver is no exception: individual parts and assemblies wear out over time, and without proper care or under force majeure circumstances they may fail.
The main functional load when operating the tool is distributed through the gearbox between the engine and the chuck, so if something happens to the gearbox, the work will stop. In order not to spend money on repair services, it is enough to use the advice of specialists to restore the operation of the unit yourself.
Design and principle of operation
Device
The gearbox is a complex mechanical transmission unit through which the axis of the motor-power unit transmits torque to the cartridge.
Two or three transmission stages are installed in the gearbox.
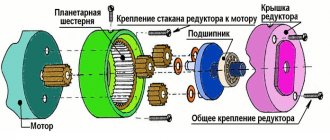
The design of the “household” dual-mode screwdriver assembly includes:
- The plastic case is a small drum that is mounted on a cartridge. The body itself is fixed motionless, and the chuck shaft is inserted into a clamp on one of the transfer plates;
- 2 or 3 transfer plates (carrier) - a round metal plate, on one side of each there are 3 protrusions for small gears. On the other side of one of them there is a clamp for the chuck shaft, and the other (or 2 others) has another so-called. a “planetary” gear that rotates three small gears;
- 6 or 9 small gears (three each: they can be of the same or different thicknesses) are the so-called “satellite” gears, which are installed and rotate freely on the projections of the transfer plates. With their teeth they interact with the sun gear located between them and with the ring gear, which is located on the inner surface of the housing;
- ring gear - a metal ring with teeth on the inside and small protrusions on one of the rings on the outside. It is placed on these protrusions and ball bearings on the inner surface of the housing.
The parts are lubricated, assembled in series and installed inside the ring gear, which lies inside the housing drum (it has a seal with recesses for ball bearings and gear lugs). After this, the surface of the open satellites is covered with a metal washer, in the center of which there is a hole into which the engine shaft enters with another gear attached to it.
During operation of the screwdriver, the gear wheel on the motor shaft rotates the upper satellites, and they, spinning around their axis and, along the ring gear, respectively, transmit movement to the next carrier. Depending on the number of plates and small gears, the rotation speed will decrease proportionally.
Kinds
As can be seen from the design of the gear unit, they are divided depending on the number of transfer plates into:
- two-stage.
- three-stage. In this case, another plate with a “planetary” gear and 3 satellites is added to the design.
Reference. The number of speed modes of the device depends on the presence of stages, and this, in turn, will affect its cost.
Another indicator by which gearboxes are divided is the material from which their parts are made.
In the production of satellite gears the following is used:
- plastic. Such structures are relatively lighter, but their reliability is lower than that of their metal counterpart;
- metal. They are durable and with proper care and lubrication they will work like a clock.
Important. The disadvantages of metal parts are a continuation of their advantages - they are heavier than plastic ones and are more expensive. Moreover, if a screwdriver is used without violating the operating rules 2-3 times a year, the master most likely will not feel the difference in what material the gearbox parts are made of.
Causes of failure
Like any mechanical unit, when the gearbox operates, the parts are affected by frictional forces, causing them to gradually wear out or wear out and lose their “adhesion.” In order to avoid this, all parts of the assembly must be properly lubricated.
Therefore, the first reason for gear unit failure is a lack of lubrication (but there may also be an excess of it).
Also, the gearbox is affected by such a “scourge” of mechanics as dust. It settles on the parts and during operation heats up along with them. This is especially dangerous for plastic gears, since under the influence of heat from dust they are subject to deformation - which leads to failure.
Finally, another nuisance for the gearbox is the ingress of foreign particles into it. Clogging between the teeth, they jam them. Because of this, when the motor shaft rotates, an excessive load is created on other structural elements, which leads to their destruction.
Reference. If one of the reasons or force majeure has led to damage to an element of the gear unit (gears, bearings or shafts), it is often necessary to install a new gearbox as a whole, since not all manufacturers have on sale individual gearbox parts to make a replacement.
DIY repair
In a home workshop, repairing a gearbox is not so difficult. Repair comes down to disassembling the unit into individual parts, checking the integrity of their structure, purging and lubrication, followed by reassembly. The process is divided into the following stages:
- Separating the gearbox from the engine and removing it (usually together with the chuck) from the screwdriver housing.
- Unscrewing the housing and removing the locking washer.
- Sequential removal of satellite gears and transfer plates (2 or 3, depending on the design).
- Removing the ring gear and checking the ball bearings (they can roll around the entire seal, but should not roll out beyond it).
After removing all the parts, they must be cleaned of “old grease,” wiped dry and made sure that they are not damaged.
Then the craftsmen recommend folding them in the reverse order “dry” and making sure that when the satellites rotate, the chuck spindle also rotates. If the rotation is carried out without twisting, then it can be assembled back.
First, bearings are placed in the recesses in the housing, onto which the ring gear is installed. Then, one at a time, the transfer plates are placed, with the satellites installed on them, and the locking washer is placed on top.
Types of electrical faults
Screwdriver characteristics table.
Electrical faults in screwdrivers can manifest themselves in the following form: the tool does not turn on when the start button is pressed; the rotation speed of the chuck is not adjustable; it is not possible to change the direction of rotation when moving the lever; When using a screwdriver, sparking is noticeable and crackling and clicking sounds are heard.
In circumstances in which the tool does not want to turn on when the start button is pressed, it is necessary to check the entire electrical circuit along the chain (from simple to complex). The first thing to do is check the battery. The tester measures the voltage at the battery output. If the voltage is below the normalized value (indicated on the battery case), then you must first try to charge the battery. If charging does not help, then the entire battery is removed and the voltage on each element is measured (the voltage should be 1.2 V). Repair in this case consists of replacing the faulty battery.
The second element in the electrical circuit is a push-button switch. Using the device, the performance of moving and fixed contacts is assessed. When the electrical signal does not pass through after pressing the push-button switch, first of all you need to clean the contacts with fine sandpaper.
If the fault remains, it is not practical to repair the button and it should be replaced.
Very often, tool repair involves replacing the brushes, as they are subject to active wear and burning. First, you should visually assess the condition of the contact brushes. If the brush wear is noticeable by more than 40% along its length, then it must be replaced. The repair consists of removing the brush holder from the body, removing the damaged one and installing exactly the same, but new brush. In addition, capacitor breakdown is common; therefore, it is necessary to check the capacitance of the starting capacitor. If the capacitance value does not correspond to the nominal value (indicated on the housing), the capacitor is replaced with a new one with the same capacitance.
Checking the functionality of the electric motor
The last thing in line to check is the electric motor as the most complex element of the electrical part. If no damage is found to the contact and starting mechanisms, and there is no doubt about the reliability of soldering and the integrity of the supply wires, then the electric motor is checked.
Diagram of a charger for a screwdriver.
Disassembling the engine begins with removing the armature from the stator. A visual inspection of the contact part of the commutator and winding is carried out. Mechanical damage or electrical short circuit and breakdown of wire insulation are noticeable by a change in color and the presence of soot. Anchor repairs are not carried out independently. It is either trusted to professionals or replaced with a new one. If no visual damage is detected, then an ohmmeter is used to check the operability of all windings separately.
The condition of the stator windings is checked in the same way. Repairing it involves rewinding the winding; here you will have to use the services of a workshop.
Repair of power control and reverse mechanisms
A situation arises when the tool turns on normally, but the rotation is not adjusted when the push-button switch is pressed differently. In this case, the cause of the damage must be found in the engine rotation control mechanism. The main causes of such damage can be failure of a push-button switch, breakdown of a transistor, or destruction of the armature brushes.
The functionality of the contact system of the start button is checked using a tester. It cannot be repaired and should be replaced.
The integrity of the transistor located on the control panel is checked by inspection (by color change) or by measuring the voltage and current of the input and output signals.
Then you should check the integrity of all soldering and the condition of all elements in the speed controller circuit diagram.
Malfunctions in the motor rotation reversal mechanism can occur due to damage to the lever mechanism or destruction of the armature brushes. The performance of the contact system of the mechanism is assessed with an ohmmeter with different fixations of the flag.
Features of engine repair
Screwdrivers use DC motors, which are manufactured using a cylindrical housing with magnets. The body contains an armature with a winding and brushes. To check the engine, you should disconnect the gearbox and the wiring that comes from the button, and measure the resistance of the armature winding using a tester. If there are no readings, then this indicates that there is a break, and in the case of an extremely low value, we can talk about a short circuit. Resistance values must be measured at the shaft end and plate surface. It must be greater than zero. A faulty armature can cause the tool to shut down during operation, and loss of power, sparking, and smoke may also occur.
It often happens that if the engine breaks down, the gear may be fine. Since many engines have a pressed gear on the shaft, it is quite difficult to remove it. To do this, you can use a special puller or use improvised means. Do not use pliers or a nail puller for this, as this may bend the shaft and damage the gear teeth.
- You can take a profile or channel and make a longitudinal section on it using a grinder.
- Insert the shaft into the groove slot perpendicular to the profile and pry off the gear.
- Place the profile on two bars so that the engine hangs down.
- Use a nail and hammer to gently tap the gear off the shaft.
- The removed gear must be put on the shaft of the new engine, using a hammer and a hard surface to put it on.
Mechanical repairs
Failure of the elements responsible for the rotation of the screwdriver manifests itself as suspicious sounds, in particular, creaking, humming, and others; noticeable vibration of the drive axle with the chuck; final or temporary stop of rotation of the cartridge (jamming). Tool repair, in this case, consists of checking and replacing the bearings in which the engine armature and the main shaft are located. Worn or damaged armature bearings cause noise, and tool jamming is usually caused by worn bearings located on the main shaft.
Mechanical damage, tool vibration, and hum are often the result of damaged elements in the tool gearbox. Typical malfunctions: curvature of the gearbox axis; damage to gear elements; collapse of the satellite mounting on the axle, etc. The repair begins with disassembling the gearbox, which is housed in a plastic case consisting of two halves. Sometimes malfunctions are explained by changes in the alignment of the satellite axes. This repair of a screwdriver is carried out by returning these axes to their sockets. Typically, violations are explained by damage to gearbox parts, as well as their significant curvature. These structural elements are not repaired, but replaced with new ones.
If you need to repair a screwdriver yourself, you should have the usual tools and equipment:
- pliers;
- mallet;
- tester;
- ohmmeter;
- a set of keys;
- sanding paper;
- bit;
- knife;
- soldering kit
Any tool can break, but this is not a tragedy. You can repair automatic screwdrivers yourself by understanding their design and understanding the basic principles of repair.
A screwdriver belongs to the category of tools that are often used not only in construction and repair work, but also in everyday life. Over time, any mechanism tends to break down, which happens with screwdrivers. If such a thing happens, then there is no need to rush to throw away the tool, since you can repair the screwdriver yourself. From this article you will learn how to repair a screwdriver without the help of specialists.
Repair of the electrical part of the tool: charger
Let's consider repairing the Interskol Da-18ER screwdriver due to a charger failure. The breakdown manifests itself in the fact that when turned on, not a single indicator lights up, and the device itself heats up. Where to begin? And you need to start, as always, with disassembly and measurements:
- To determine the cause, you need to unscrew the screws connecting the halves of the charger housing. It consists of a transformer and an electronic board. How to properly assemble an interskol hammer drill yourself. Gearbox. In addition, a temperature sensor is included in the transformer circuit, which burns out and turns off the device when the coils heat up above 130◦ C.
- B It is necessary to measure the resistance on the primary winding of the transformer. If the indicator is zero, then there is a break in the network.
- After this you need to proceed to checking the fuse. It is located under the transformer insulation.
- If the integrity of the fuse is not broken, the network cable is checked for breaks.
- If there is no damage to the supply wire, it is necessary to ring the transformer windings. If a breakdown is detected, the transformer must be replaced.
- The resistance on the secondary winding should be minimal, this indicates its integrity and performance.
- After this, you need to check the diode bridge - alternately apply the black probe of the tester to the minus, and the red one to the plus of each diode. If the measurement value is zero, then the diode must be replaced; if the zero mark is exceeded, the diode is considered working.
Screwdriver and its design features
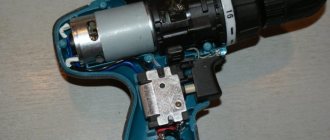
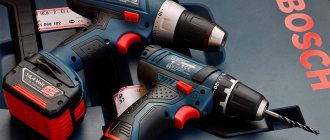
You should start repairing a screwdriver yourself by becoming familiar with its design. The main element of a screwdriver is an electric motor. Screwdrivers come in both corded and cordless types. The use of a corded screwdriver is used less frequently, due to such a disadvantage as the need to connect the tool to a 220V network. Battery-type tools are more popular, as they allow you to carry out not only repair work at home, but also outside it.
The main components of a cordless screwdriver are:
- Frame. Typically, all screwdrivers are made of durable plastic.
- Start button. It is designed in such a way that the number of revolutions of the cartridge depends on the force of pressing it.
- Electric motor. Battery-powered tools use single-phase commutator-type and DC motors. The motor consists of a rotor, a stator in the form of magnets, and a brush assembly.
- Gearbox.
- Force regulator.
- Reverse switch.
- Battery. As a rule, it is removable and is often supplied with the product in duplicate.
- Cartridge. As a rule, quick-release chucks are used.
Some models are additionally equipped with LED backlights, as well as battery charging indicators. Returning to the problems with the screwdriver, it should be noted that any of the above elements can cause the tool to malfunction. What is needed for repairs? The first step is to find the cause of the breakdown, and then make the appropriate decision to eliminate it. The tool can be divided into two parts: electrical and mechanical. Initially, you need to find out what the problem is with the screwdriver not working: mechanical or electrical. This won’t be difficult to do, so let’s look at the breakdowns in more detail.
Mechanical faults
Mechanical malfunctions of screwdrivers can be identified by such a sign as the audibility of the operation of the electric motor. When you press the start button, you can hear signs of the electric motor running, but the tool chuck does not rotate or characteristic sounds of a malfunction are heard when rotating.
The design of the screwdriver is quite simple, but a significant drawback is that all the elements are almost 2-3 times smaller than those of an electric drill. Possible mechanical failures of a screwdriver include the following malfunctions:
- Cartridge failure. Despite the fact that quick-release chucks are more versatile and easier to use, their significant drawback is their low service life. It is impossible to repair the keyless chuck, so if the tool refuses to hold the drill or bit, the chuck should be removed and replaced with a new one. This is one of the most common malfunctions of the tool, but it does not require disassembling the screwdriver.
- Gearbox failure. The screwdrivers are equipped with a planetary type gearbox. Typically, in order to save money, manufacturers make gearbox gears from low-quality plastic or metal. This affects not only the power of the tool, but also its service life. If the engine runs when you press the “Start” button, but the cartridge does not rotate, then the problem lies precisely in the planetary gearbox. To find out the cause of its malfunction, you need to disassemble the tool and then determine the breakdown. If one gear fails, the gearbox should be replaced.
- Bearing wear. The bearing is located in the planetary gearbox, so it is replaced along with the gears.
- The force regulator is broken. This device in screwdrivers is used not only to increase or decrease the traction force of the tool, but also to increase safety. If during work the working attachment becomes jammed, then instead of turning the tool, the regulator will turn. Thus, the master will not get a dislocated arm, and the electric motor will be protected from high loads, from which it can burn out.
It should be noted that the small size of the mechanical part of the instrument somewhat complicates the process of instrument repair, so be sure to be careful when carrying out repair work.
Electrical faults
Unlike drills, screwdrivers operate primarily on batteries. This means that different electric motors are used in the design of these tools. It is not difficult to determine the malfunction of the electrical part of the screwdriver. If the battery is charged, but when you press the “Start” button you cannot hear the sound of the electric motor, then the cause is an electrical failure. Let's look at the main types of electrical faults in screwdrivers.
- Battery fault. Initially, you should pay attention to the battery. As a rule, screwdrivers use low-quality nickel-cadmium batteries. They have a significant drawback, which is the need to charge it only when it is completely dead. Such batteries cannot be recharged, as this shortens their service life. If one day the screwdriver refuses to function, then do not rush to disassemble it, make sure that the battery is functional and provides a charge. You can check by connecting a second battery. The battery charge can also be checked using a tester, which should show the appropriate voltage value.
- Charger fault. There is a special charger for charging the battery. If the battery is discharged even after you have charged it, you should check the integrity of the charger. Chargers usually have indicator lights for these purposes. If they are not there, then you need to use a multimeter.
- The power button is faulty. It is necessary to check the start button, since often the reason for its inoperability is oxidation of the contacts or dust. The tool should be disassembled and then the contacts should be cleaned. The buttons on screwdrivers usually have the function of regulating the speed of rotation of the chuck, for which a transistor is installed. If the tool works, but the speed control function is missing, then the transistor needs to be replaced.
- If the reverse function does not function, the breakdown can be corrected by cleaning the contacts of the polarity switch button.
- Motor malfunction. The electric motor is one of the most expensive structural elements of a screwdriver. If everything is checked and it is determined that the problem lies in the electric motor, then the cause should be found out. Most often, the problem occurs with brushes, which simply wear out over time. The brushes cannot be repaired, so they must be replaced. The armature should be replaced if a break is detected when testing its winding terminals. No one will rewind such a small rotor, so it’s easier to purchase a new unit. The stator of a permanent electric motor is presented in the form of 2-3 magnetic plates that do not fail.
Now you know the main signs and types of screwdriver malfunctions. To repair it, you don’t need to be a specialist, but just stock up on tools and free time.
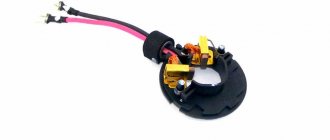
DIY button repair: tips
Diagram of the gearbox of a cordless screwdriver.
Well, now let's move on directly to the recovery process. As a rule, a button is not so easy to purchase. Often you have to pre-order it from a service center and then wait several weeks for it to arrive. That is why repairing a screwdriver button with your own hands is relevant.
It can be immediately noted that there is no need to solder the wires that come from the button. They will not interfere with the process of assembling and disassembling the structural element. So, the screwdriver is disassembled using the same technology that was indicated above, which means that the button is in close proximity, that is, various repair work can be carried out with it. First you need to remove the pressure mechanism. This must be done extremely carefully so that the base is not damaged.
The clamping mechanism is often red, but this all directly depends on the specific model of the power tool.
Electrical components of a screwdriver.
Do not remove the clamping mechanism with a sharp jerk. It is best to use slow rotational movements clockwise or counterclockwise. Here, too, everything depends on the specific model of screwdriver. Now you can proceed directly to the repair, or more precisely, to identifying the problems that led to the malfunction.
Any push-button product of this kind has a protective mechanism. It also needs to be removed. To do this, you will have to use available tools, namely a flat screwdriver and a knife. Moving in a circle, you need to release the latches. This is done extremely simply, so it should not cause any problems in the work. Now you can remove the push-button cover, under which the reverse mechanism is located. In fact, the inclusion element itself is not yet visible. You still have to get there.
To do this, you need to pick up a soldering iron and rosin. It helps to heat up the soldering area, which leads to separation of parts. In this case, you need to separate the two compartments from each other. First, the soldering iron is immersed in rosin, and then leaned against the disconnection point. As a result of these manipulations, the mechanism from a single whole is divided into two parts. Only now you can try to get to the switch. To do this, remove the cover from the corresponding compartment. Now the screwdriver switching compartment becomes completely open to the human eye.
Stages of disassembling the screwdriver button.
Next, you need to carefully remove the mechanism from its rightful place, while holding the return spring, which is installed here without fail. Now you can look inside. Each person at this moment is able to see with the naked eye that all contact pads have been erased during operation. The main reason for this is most often the low quality of the metal that is used to create these platforms. As the material breaks down, dust gradually settles between the contacts. This leads to the fact that those surfaces that were once dielectrics become electrical conductors. This is often the reason why a power tool starts spontaneously.
Since the cause has been identified, all that remains is to eliminate it. This is done quite simply. Using the most primitive and simple materials, it is worth removing dust from the surface of dielectrics. For this you can use the most ordinary cotton wool. It is advisable to pre-moisten it in alcohol. If this method does not help remove residual dust, then you will have to use a knife. You can use it to try to scrape the contacts. Some people use sandpaper for these purposes, but this is not recommended, since irreparable damage may be caused to the contact surfaces. That is, in this case, it turns out that the repair is not beneficial, but reduces the entire result to a negative value.