Do-it-yourself repair of the starter of a gas auger, lawn mower, trimmer
No matter how high-quality gasoline tools you use, anything can happen to it during the construction process, and at the most inopportune moment.
Often problems arise due to a broken starter. It happens that you are going to drill holes with a gas drill for installing fence posts or mow the grass with a trimmer, you start to start the unit, and only you have time to pull the starter handle a couple of times, when the rope breaks, and the engine, which has already managed to start, dashingly winding the remains of the cord around the flywheel, tears off the pulley, the spring bursts. - run to the store and buy a new one. But these are, of course, extremes. Today we will look at the most common case, when the breakdown is not so serious, and we will show you how to repair the starter yourself if the cord breaks without any destructive consequences or does not rewind due to the fact that the spring inside has simply flown off or become disengaged. At least, initially I want to believe in it. But in order to find out whether this is true or not, you will need to disassemble the starter.
Signs and causes of failure of the starter mechanism
The starter mechanism has two defects.
- Broken cord. With constant use of the lawn mower, this element gets frayed and torn, which will simply be seen by the user when trying to start the trimmer. To improve the situation, you need to change the cord.
- Wear of the spring and subsequent breakage or the hook coming out of the groove. You can find the fault by looking at the cord, which does not turn back or wrap around the pulley after starting the engine. To repair the trimmer in this case, it is enough to install a new spring.
In the rarest situations, the starter mechanism breaks due to careless use of the tool. The consequences can be nasty: a deformed cord
is wound around the flywheel of a running motor, the pulley breaks off, and the spring bursts. But these are isolated cases; a complete replacement of the starter is required very rarely.
Replacing the cord
To change an element, you need to find a hole in the reel for it, through which you pass the cord, and then tie a knot. Next, you will need to cock the coil with the spring, performing several turns.
For example, if the cord wraps around a circle 6 times, then in order to tension the spring, you need to turn the coil counterclockwise 6 times. Then all that remains is to thread the rope through the hole and fasten the handle to the cord.
Removal and disassembly of the unit
The procedure for disassembling the starter consists of performing a certain sequence of actions:
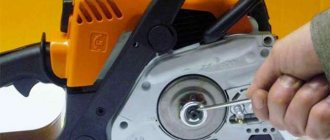
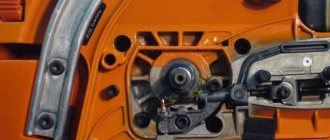
- first you need to find the screw connecting the starter cover to the pulley and unscrew it;
- later you need to remove the spring, antennae and washers;
- then you should carefully remove the pulley, holding the structure away from your face so that the spring that springs off does not injure the user;
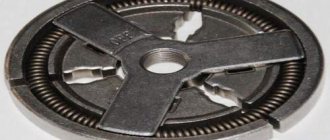
- Next, you need to inspect the spring: if it is damaged, then you need to install a new one (the price of such a part is low), and if it has jumped out of the hook, you need to return it to its original place, having previously made twists if they broke off.
Assembling and installing the starter
To assemble the starter
and install it to the starting location, you need:
- turn the pulley with the spring down and place it inside the housing so that the spring coil fits exactly into the groove of the housing;
- install the washer, then the spring, and the second washer on top of it;
- Place the cup with antennae on top of the washer and screw in the screw.
READ Show How To Thread Line Into Mower Trimmer
When assembling, be sure to install both washers; otherwise, the plastic cup will be damaged by the spring after some time, and when pulling the cord, the user will see that it is jammed. It will look as if a spring has fallen off. To eliminate such a breakdown, you will need to install a larger screw or another washer. If it is not possible to find the required parts, loosen the screw quite slightly, after which the starter will not jam. But you need to realize that these are temporary measures, and the problem should be fixed as quickly as possible.
Spring winding
Winding a spring is a complex procedure. Not everyone succeeds in installing the part in place the first time, so you should not be upset if something goes wrong. It is necessary to repeat the tests until the actions are crowned with success. If you wish, you can look on the Internet, where craftsmen carefully talk and demonstrate how simply and quickly to perform this operation.
To wind a spring, you need to place the twist in the groove, and then, turning the coil, carefully lay the part along the inner diameter of the bobbin. With all this, the spring must be constantly held with your hands - if it is not fixed, the part slips and jumps out, then the winding has to be done again. When everything is done correctly, the spring is held tightly in its seat.
How to repair the starter of a power tool with your own hands?
In the case of a broken starter cord, everything is clear: take out the old rope, take a suitable length and thickness (you can use laundry rope), thread it through the hole in the spool, and tie a knot. Next, we cock the spring to the number of revolutions we need, only then fasten the handle - and voila! More details on how all this is done are clearly shown below.
Installing or replacing the starter spring of a brush cutter, motor drill, trimmer
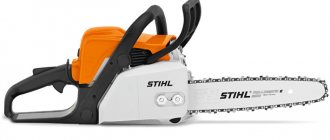
But what should we do if everything is fine with the rope, but the starter coil (pulley) does not wind up? Let's look at this question step by step using the example of a starter for a gasoline motor drill ADA GroundDrill, which has a pulley with two metal antennae for 2 hooks.
In the case of other types of manual starters of a similar design, which are widely used in gasoline lawn mowers, trimmers and motor drills, the entire process of repairing the starter will look similar, differing only in some nuances.
Starter repair: disassembly
Unscrew the screw that secures the pulley to the starter cover. We take out the antennae and the spring. We pull out the pulley itself carefully so that the spring does not bounce off in your face. Even with the most careful disassembly, it, as a rule, immediately flies out of the coil and sharply unfolds into a long metal strip or twists into rings.
Carefully pull out the white starter coil - do not get hurt by the spring!
If the spring has burst or one of its hooks has broken, then repairing the starter will not be easy or quick - the spring will need to be replaced. In order not to waste money on buying a new starter, you can only look for this one on sale.
If the starter spring simply breaks, i.e. one of the hooks is out of engagement, just insert it, if necessary, slightly pressing the hooks more tightly (just don’t break it off!) Install the spring with the outer hook in the groove of the pulley and begin to twist it, while holding it fingers inside the coil and preventing it from jumping out.
Refilling the starter spring
Pressing the spring against the pulley, wind the spring inwards in a circular motion
Installing the starter spring may not seem so easy the first time, but it all comes with experience. With a little practice, you can easily wind a spring into a pulley in a maximum of a minute.
How to assemble a starter?
The most important thing in the process of repairing a starter yourself is to assemble it correctly.
After the spring is completely wound, you need to carefully turn the coil over and insert it into the starter housing so that the second hook of the spring fits into the groove of the housing.
When installing the pulley (black in this photo), look through the hole in it so that the spring hook fits into the groove on the starter cover
Then, if there is a spring under the screw, install it first, not forgetting to place washers on the bottom and top of the spring.
Carefully insert the cup with antennae into the grooves of the coil and tighten the screw.
Make sure that the washer on the spring does not fall out. Why is it important? The fact is that the spring scratches the plastic cup with its end, as a result of which the latter wears out and begins to be pressed more tightly against the coil with the screw. For this reason, a situation very similar to a spring failure may arise: the handle is pulled out of the starter, but does not return back. However, when the starter screw is loosened, this problem disappears. Fixing such a starter malfunction is simple: just select a spring of the same diameter, but a little longer, or install an additional washer. If we simply loosely tighten the screw, it will unscrew and fly out, and this will increase the likelihood of the spring breaking, since the pulley will not fit tightly enough to the starter housing.
How to replace a chainsaw starter spring?
In order to replace the old spring in a disassembled starter, you must proceed in the following order:
- Before installing the chainsaw starter spring, you will need to remove the mechanism clip - this should be done very carefully so as not to break the part;
- Then you need to look inside the cage - in it you will see a spring wrapped around a C-shaped element. To remove the spring, fix its upper part with your finger and slightly pull the starter handle to the side;
- After removing the old spring, you need to wind a new part. At the same time, try to avoid kinks and twisting of the new spring element;
- To assemble the chainsaw starter spring, you will need to act as carefully as possible, otherwise one wrong movement can lead to the spare part unwinding;
- After you have managed to completely insert the spring into the starter, you need to carefully fix the cage.
This is interesting: How not to fall asleep while driving: advice from a driver with more than 15 years of experience
At the last stage, all that remains is to assemble the chainsaw starter and try to start the tool. It is quite possible that you will have to make from 10 to 20 jerks - this is necessary for the spring to finally fall into place.
Starter for lawn mowers: device, assembly, repair
Disassembly and assembly of starter
Disassembling and assembling the starter is not a serious problem; it just requires a little skill in handling a screwdriver and, most importantly, following some safety precautions:
1. Unscrew the screw securing the pulley to the starter cover. Remove the two antennae and the spring, then very carefully, turning your head in the other direction, remove the pulley. The specificity of this operation is such that even with careful removal of the roller, the spring instantly jumps out of the coil, turning into a sharp metal strip that can injure the repairman. Analyze the nature of the failure. If the spring is completely destroyed, the only correct solution is to replace it. A failed part can be easily purchased in online stores that sell starters and spare parts. If the spring simply disengages, you need to insert it into place, first bending the tendril. This must be done carefully, as it is red-hot and can burst at any moment if not handled carefully.
2. Return the spring back to the groove, slowly and holding it with your finger, begin twisting. At the same time, pay great attention to safety, since a torn metal strip can cause injury.
It is not easy to thread the spring the first time; it requires some experience, so if the attempt is unsuccessful, it must be repeated more than once.
3. After the spring is wound, we continue assembling the starter. Carefully turn the coil over and insert it so that the bend of the spring fits neatly into a special groove in the housing. 4. Install a washer under the screw. a spring and a washer again. Then we insert the cup with the antennae and tighten everything with a screw. The starter is assembled. It is necessary to pay attention to such a nuance as installing the washer. It should not be missed under any circumstances. If this happens, the spring will scratch the plastic cup on which, over time, a sample will appear and it will begin to be pressed tighter with the screw and wedged. As a result, it will feel like the spring has come off and needs repair. This drawback can easily be eliminated by replacing the spring with a longer one or installing an additional washer. If you don’t have a spring or a washer at hand, you can loosen the screw a little and the starter will start working without jamming. But this is a temporary measure; with prolonged use, the screw will loosen and get lost, which can lead to the spring flying out and failure of the starter as a whole. The next step is to tension the spring. To do this, you need to remove the handle from the starter rope. Next, without reeling it in, insert the rope into the groove specially designed for it in the reel. Directly tension the spring. To do this, rotate the reel counterclockwise - in the direction opposite to the direction of rotation of the reel when winding the rope. The number of revolutions must correspond to the value indicated in the starter model and the length of the rope. After the required number of revolutions has been made, we thread the end of the rope through the hole in the starter cover, install the handle and secure it with a knot. It is better to do this together with an assistant so that the edge of the rope does not wind up inside the starter. If, after the repair has been completed, the spring has flown off again and starting the chainsaw is not possible, you will have to repeat the repair procedure. But at the same time, immediately modernize the starter. To get rid of the spring flying off, you can use two methods.
The first is to use an additional metal strip, the second is to drill the coil (photo) and secure the edge of the spring with wire (video).
Starting mechanism repair
When inspecting a disassembled starter, it is necessary to inspect the following parts (assemblies) for damage:
- Drive pulley. A pulley subjected to high axial and radial loads must not have cracks or damage on the back side. If there are any, it is necessary to replace it with a new part.
- Starter spring. the spring that experiences the main loads when starting a chainsaw . Made from high-quality carbon steel and subjected to special heat treatment, it loses its properties over time. If cracks or tears are detected, a new spring will need to be installed.
- Launch rope. Made from synthetic, durable materials, the starter cord will wear out over time. If it breaks, it is necessary to install a new rope on the pulley.
The purchased spare parts must comply with the regulations of the specific chainsaw model.
After the repair work has been completed, it is necessary to reassemble the starting mechanism in reverse order. The ratchet pulley is installed on top of the spring. Before finally fixing the chainsaw starter cover, you need to wrap the rope and make several test pulls.
It must be remembered that the starter cord is first threaded through the hole in the cover.
Replacing flywheel pawls
If it is necessary to replace the pawls or flywheel links, then this is also not difficult to do. To do this, you will need to dismantle the flywheel and then remove the pawls. New pawls should only be installed as they were originally (plastic or metal). This is very important, since replacing plastic pawls with metal ones will lead to accelerated wear of the flywheel. Details of replacing the chainsaw starter dogs are discussed in the video below.
READ How to Dilute Gasoline for Echo Trimmer
It is important to note that you do not need to have any special skills or experience to repair a chainsaw starter. All work can be done independently if you treat the repair process with full responsibility. Timely maintenance of the chainsaw will allow you to avoid breakdowns when performing work in the field.
If difficulties arise when starting the tool, power is lost, or malfunctions occur in the fuel supply system, then you need to repair the chainsaw starter yourself or send the tool to a service center.
How to repair a starter on a trimmer
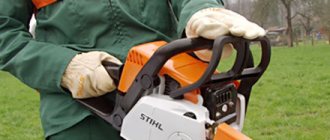
Repairing the starter of a gasoline trimmer may be required at the most inopportune moment. In this case, there are two ways to solve the problem: replace the broken part or change the entire assembly. The latter option will cost more. To repair a device with your own hands, in most cases you will only need a screwdriver with an appropriate tip. Repair work will not take much time and does not require special knowledge. It is enough to know the device, the principle of operation, the nuances of assembling and disassembling the starter on a trimmer in order to achieve the desired positive result.
Preventing problems
Sooner or later, problems with the starter arise on any trimmer - Stihl FS 55, MTD 790 or another brand. It is possible to delay the occurrence of such a malfunction, but to do this you need to handle the tool carefully. In particular, you should not make too sharp jerks, as this will lead to the cord breaking or the spring flying out. It is not recommended to subject the lawn mower to impacts or other physical impacts. If the starter housing breaks and the cord breaks, it can become wrapped around the engine flywheel. This will lead to a torn pulley and a burst spring.
So, if you discover that the starter mechanism on your lawn mower is broken, you should not immediately rush to seek help from specialists. Knowing how to fix a malfunction and/or replace a part, you can perform repair work yourself. This does not require any specific tool. At first, the procedure may seem complicated and tedious, but numerous videos on the Internet dedicated to repairing the starter will help solve the problem as quickly and easily as possible.
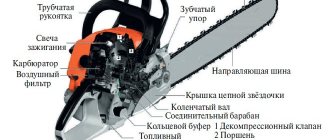
The design and principle of operation of a starter on a trimmer
The gasoline engine is, in principle, the main part of the brush cutter. Its power is in the range of 0.5-2.5 hp. The movement from it is transmitted to the shaft located inside the hollow rod, and then through a gearbox consisting of gears to a fishing line or knife (working body).
The lawn mower also has the following elements:
All parts of the brush cutter are shown in the photo below.
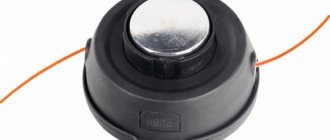
The starter on the trimmer is an integral part that starts the engine into operation. It is shown separately in two photos below.
The starting mechanisms of various models of lawn mowers work on the same principle: when starting the internal combustion engine, the protrusions, marked in the photo above with number 1, engage with pawls 3. When the engine starts to work, they return to their previous position due to the influence of centrifugal force. Wires 2 also play a similar role.
The process of returning the mechanism elements to their original position occurs due to the presence of a spring wound around an axis. It unfolds when the rope is pulled. After releasing the cord, it is retracted and wound due to the coiling of the spring. When starting the internal combustion engine of a lawn mower, the starting mechanism rotates its shaft until it starts working (starts up).
Today, gasoline lawn mowers are equipped with two types of starter mechanisms:
The first option is much more common.
The starter on the trimmer can function without breakdowns for a long time. It is impossible to clearly indicate the failure-free operation period. Everything is determined by the initial quality of the device and compliance with the rules of handling it.
Device
The chainsaw starter device includes the following elements:
- ignition system screw;
- return spring;
- starting system coil;
- deflector;
- lid;
- magneto;
- drum;
- spark plug;
- the electronic unit;
- wiring;
- power button;
- handle and cable.
Main parameters of the chainsaw starting system:
- power - from 2000 to 2500 W;
- maximum number of revolutions per minute - 3000;
- weight - 0.5 kg.
After pressing the power button, the flywheel begins to rotate along with the magnet that is located on it.
An electromotive force appears in the system. The resulting current is converted by an electronic unit into electrical signals that are transmitted to the moving elements. A spark is formed, which provokes ignition of the fuel-air mixture.
How to install a spring
In order to install a new spring, you must perform the following steps:
- Carefully remove the mechanism clip.
- Inspect the inside of the cage, in which the spring mechanism is located near the C-shaped element.
- Fix and tension the upper part of the spring with your finger and pull the trigger handle to the side.
- Remove the worn mechanism and wind a new spring. Kinks and twisting of the element should be avoided.
- Assemble a new spring mechanism. It is recommended to do this slowly so that the mechanism does not unwind.
- Thread the spring and insert it into the starter mechanism.
- Carefully secure the clip.
READ Stihl trimmer does not develop speed and stalls
Replacing the cord
In order to replace the cord, you will need the following tools:
- Screwdriver Set;
- rope.
Replacing the starter cord is done as follows:
- You need to unscrew the mounting screws that hold the side cover in place using a screwdriver.
- Then remove the starter from the tool body.
- After this, you need to turn the lid and inspect it.
- Then remove the clamp and spring.
- You should untie the knot on the rope.
- You need to pull out the pulley on which the cord is wound. Remove the cord and replace it with a new one.
- Then put the pulley in place and tie the rope into a knot. Install the clamp and spring.
- After this, tighten the cover using the mounting screws.
- Finally, install the starter in place and tighten the mounting screws.
Basic malfunctions of the trimmer starter
It is not difficult to determine the cause of the breakdown of the trigger device. There are several main options:
These parts are shown in the photo below.
It may happen that the starter mechanism is accidentally broken. The consequences will be disastrous if a broken rope is wound around the flywheel of a running internal combustion engine: then the spring will burst and the pulley will break. But such cases when a complete replacement of the starter assembly is required are extremely rare. In most cases, to repair the mechanism, it is enough to install a new spring or replace the cord.
Removing and disassembling the starter, replacing broken parts
To repair the trimmer starter, you will need to first disassemble it and then reassemble it. This process is not particularly difficult. To work, you will need a screwdriver with a tip of the desired shape.
Everything should be done carefully, observing safety precautions, mainly so that the spring does not injure the technician if it accidentally flies out.
Disassembly of the starter unit
The starting mechanism is disassembled in order to install new parts instead of broken ones in the following sequence:
To change the spring, you should work carefully and carefully: it may accidentally burst under the influence of the force caused by installing it in place. Even if you carefully remove the roller, the spring strip very quickly flies off the reel and can injure your hand with its sharp edges.
It is not always possible to immediately put the spring plate back in its original place. It often slips, so attempts must be repeated until the desired result is achieved.
Starter assembly
Assembly of the starter unit is carried out in a number of stages:
Starter replacement
Procedure for replacing a chainsaw starter:
- Remove the assembly from the tool body.
- Unscrew the mounting bolts and remove the side cover.
- Unscrew the mounting screw that secures the starter .
- Remove the clamp and spring mechanism of the starting system.
- Remove the pulley with cord.
- Replace all worn and damaged elements.
- Wind the pulley.
- Install a new starter.
- Reinstall the pulley with cord, clamp and spring.
- Screw the side cover and install the unit on the chainsaw body.
Before installing a new starter, it is recommended to inspect it for defects, check the quality of assembly and the presence of a guide bushing.
An indispensable tool for cutting firewood and felling trees is a chainsaw. Following the manufacturer’s recommendations and taking the necessary preventive measures will ensure a long “life” of the unit. But even the most reliable mechanism develops problems over time, most of which can be fixed with your own hands without the help of specialized centers. One of these malfunctions may be in the chainsaw starter, which can be repaired independently if a certain sequence of operations is followed.
How to install a spring
In order to install a new spring, you must perform the following steps:
- Carefully remove the mechanism clip.
- Inspect the inside of the cage, in which the spring mechanism is located near the C-shaped element.
- Fix and tension the upper part of the spring with your finger and pull the trigger handle to the side.
- Remove the worn mechanism and wind a new spring. Kinks and twisting of the element should be avoided.
- Assemble a new spring mechanism. It is recommended to do this slowly so that the mechanism does not unwind.
- Thread the spring and insert it into the starter mechanism.
- Carefully secure the clip.
Device
The chainsaw starter device includes the following elements:
- ignition system screw;
- return spring
- starting system coil;
- deflector;
- lid;
- magneto;
- drum;
- spark plug;
- the electronic unit;
- wiring;
- power button;
- handle and cable.
Main parameters of the chainsaw starting system:
- power - from 2000 to 2500 W;
- maximum number of revolutions per minute - 3000;
- weight - 0.5 kg.
An electromotive force appears in the system. The resulting current is converted into electrical signals using an electronic unit, which are transmitted to the moving elements. A spark is formed, which provokes ignition of the fuel-air mixture.
Disassembly of the starter unit
The starting mechanism is disassembled in order to install new parts instead of broken ones in the following sequence:
Quick trimmer starter repair
- use a screwdriver to unscrew the screw that secures the pulley with the starter cover;
- remove the spring and antennae;
- carefully remove the pulley (you need to turn your head away or work while wearing glasses and gloves);
- determine why the trigger mechanism broke down;
- if the spring has collapsed almost completely, then it is replaced;
- when the spring leaves the hook, it is installed in its original place, bending the antennae first (the photographs show the installation process);
- After the spring plate is installed inside the groove, carefully twist it.
To change the spring, you should work carefully and carefully: it may accidentally burst under the influence of the force caused by installing it in place. Even if you carefully remove the roller, the spring strip very quickly flies off the reel and can injure your hand with its sharp edges.
immediately put the spring plate back in its original place. It often slips, so attempts must be repeated until the desired result is achieved.
Replacing the cord
In order to replace the cord, you will need the following tools:
Replacing the starter cord is done as follows:
- You need to unscrew the mounting screws that hold the side cover in place using a screwdriver.
- Then remove the starter from the tool body.
- After this, you need to turn the lid and inspect it.
- Then remove the clamp and spring.
- You should untie the knot on the rope.
- You need to pull out the pulley on which the cord is wound. Remove the cord and replace it with a new one.
- Then put the pulley in place and tie the rope into a knot. Install the clamp and spring.
- After this, tighten the cover using the mounting screws.
- Finally, install the starter in place and tighten the mounting screws.
Dismantling, disassembling the trimmer starter, replacing parts
First of all, the repair process begins by removing the entire starter from the trimmer .
This process is not inherently complicated and will only require unscrewing a few screws with a suitable plumbing tool.
It should be noted that when dismantling the starting mechanism of the lawn mower, safety precautions must be observed, since the compressed band spring has sufficient energy to injure a person.
Typical breakdowns and repairs of a chainsaw starter
The appearance of various starter malfunctions leads to the inability to start the chainsaw. The most common starter failures include:
- The starter pulley has completely burst or has cracks;
- The spring burst;
- The starter cable is broken.
To fix each of these faults with your own hands, you will need certain tools. You must have a set of screwdrivers and a spare cable with you. You need to remove and inspect the starter for a chainsaw in the following order:
- To find the cause of the breakdown, the starter from the chainsaw will need to be removed. To do this, you need to unscrew the screws with a screwdriver that hold the protective cover with the starter attached to it;
- After removing the cover, you must carefully unscrew the screw that secures the starter to the protective cover;
- the starter smoothly - to do this, remove the spring and clamps from it;
- Next, the reel with cable is removed from the starter for inspection.
READ How to Calculate Fuel Consumption for a Gasoline Trimmer
As a result of the inspection, you may discover a number of typical faults. These include:
- Various damage to the pulley in the form of breaks or cracks, mainly in the rear part of the part - they interfere with the normal operation of the entire starter;
- Damage to the starter spring for easy starting - in such cases, not only the spring itself may be faulty, but also the place where it is fixed - this is the most vulnerable part of the spring;
- The starter flywheel pawl is damaged.
In any case, any faulty part must be completely replaced with a new part.
Removing and disassembling the starter, replacing broken parts
To repair the trimmer , it will be useful to first disassemble it and later reassemble it. This process is not particularly difficult. How to replace the cord on a trimmer. How to replace the cord on Replacing the spring and starter cord on. A screwdriver with a tip of a suitable shape will be useful for this work.
Everything should be done carefully, observing safety precautions, especially so that the spring does not injure the technician if it accidentally flies out.
Installing or replacing the starter spring of a brush cutter, motor drill, trimmer
But what should we do if everything is fine with the rope, but the starter coil (pulley) does not wind up? Let's look at this question step by step using the example of a starter for a gasoline motor drill ADA GroundDrill, which has a pulley with 2 metal antennae for 2 hooks.
In the case of other types of manual starters of identical design, which are widely used in gasoline brush cutters, trimmers and motor drills, the entire process of repairing the starter will look similar, differing only in certain aspects.
Starters for lawn mowers: design and installation features
A manual starter for a lawn mower or gasoline trimmer is a mechanical unit that includes a pulley mounted on a ratchet. A rope is wound around the pulley in its original position. When starting, it is pulled outward. The pulley is spring-loaded - as soon as you let go of the end of the rope, it will rewind. A flat strip rolled into a ring is used as a spring. It resembles the spring in a large mechanical watch that is wound once a day. The starter itself is often located at the rear rather than closer to the front end of the mower or trimmer. In order to correctly perform all manipulations with the starter for a lawn mower, you need to know the features of the device and installation.
Design features and principle of operation of the starter
A chainsaw starter works on a fairly simple principle. The basis of its device is a reel and a cable wound on it, previously passed through a standard groove in the plastic handle. When the operator suddenly lifts the handle, the cable is intensely pulled. At the same time, the ratchet mechanism is activated. The built-in ratchet is equipped with a drum, which, when the mechanism is gradually started, transfers the created force to another drum, equipped with splines originally placed on the shaft.
READ How to Wind Line on a Huter Trimmer
At the moment the chainsaw is started, the engine crankshaft has time to make several uniform full revolutions, and the filled fuel mixture between the standard cylinder head and the factory piston is compressed. When the starter handle is released, the contact between the built-in splines and the ratchet is broken, causing the crankshaft to quickly stop.
In some cases, to facilitate the pre-start of powerful professional chainsaws, well-known brands use the following options:
- function of preliminary enrichment of fuel with air - for this purpose, an additional damper is provided in the fuel system;
- additional steel spring , responsible for accelerated unwinding of the crankshaft while pulling the cable;
- primer - a pump necessary to pre-supply the used fuel into the factory engine cylinder.
How to wind the starter spring of a brush cutter.
The presence of these functions makes starting the chainsaw engine easier, making it smoother and safer.
How does the starter of a lawn mower or trimmer work?
The starter is a generally unified and universal mechanism for lawn mowers, trimmers, gasoline and diesel generator sets. It’s not a problem to equip it even with a car, motorcycle or scooter, if you have free space in your vehicle to install it. It’s not for nothing that many Soviet cars and trucks were equipped with a starter tool that vaguely resembled a double-bent pry bar.
A modern handbrake is started from a cord - it is tied to the mechanism and cannot be lost.
The starter assembly has the following parts:
Repair of the mower bar. Primary diagnosis of the trimmer.
The proper operation of the engine and the lawn mower as a whole is influenced by a huge number of factors, which are usually interconnected. If you cannot determine the malfunction, contact a trusted service center.
I would like to note that before starting disassembly and serious repairs, you should check the basic consumables. These “little things” often affect the work and, perhaps, repairing the trimmer will cost a little money, so to speak.
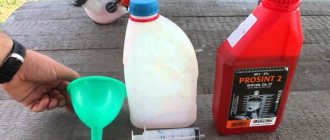
Spark plug - no carbon deposits, electrode gap (0.5-0.6mm - or according to instructions), good spark
Fuel filter – no contamination, mechanical damage, good throughput. Periodic replacement according to the maintenance schedule in the operating instructions
Air filter – free of sawdust and dirt. Periodic cleaning in soapy water and high pressure blowing. Replacing the air element according to the operating instructions
- A cozy and stylish DIY chair.
- Homemade sausage in FOIL.
- Tips for all occasions!
- How to insulate an attic?
- Cucumbers for May and cucumber secrets of collecting seeds.
- Salt in the garden.
- Interior design of a two-room apartment for evaluation.
- DIY petrol mower repair. How to repair a lawn mower if the engine does not start
- Repair of the mower bar. Primary diagnosis of the trimmer.
- The device of a brush cutter. Gasoline trimmer device
- Repair of Chinese lawn mower. Construction of a lawn mower
- First launch at the beginning of the season
- Video repair of lawn mowers with your own hands: analysis of faults and methods for eliminating them yourself
Replacing the Chinese trimmer oil seal on the starter side:
We unscrew the spark plug and block the movement of the piston with a stopper. Remove the starter (item 31). Using a 13mm socket, unscrew the starter ratchet (item 35). Traces of gasoline mixture on the oil seal indicate its necessary replacement. Using a thin flat screwdriver (an awl, or any similar object that is at hand), we remove the old oil seal (item 36), pry it with a screwdriver from the crankshaft side and remove it.
Before installation, apply a small amount of oil to the inner surface of the new oil seal (you can use the oil that we use to prepare gasoline mixtures)
We blow and degrease the seat under the oil seal, and evenly install the new oil seal.
Replacing the petrol trimmer oil seal on the flywheel side:
We unscrew the spark plug and block the movement of the piston with a stopper.
For convenience, remove the crankcase cover (item 58) by unscrewing 4 screws (item 61)
Unscrew the 2 screws securing the clutch (item 57) with washers (item 56), remove the clutch assembly and the washers under it (item 53)
Unscrew the nut (item 52) of the flywheel (item 51), but not completely. With a gentle blow to the nut, we “knock it off the crankshaft.” Unscrew the nut, remove the flywheel and key. Let's inspect the surface of the oil seal - traces of moisture or wet contaminants, abrasions and other damage on it are a signal to replace it.
READ Two Stroke Engine Trimmer Design
Using a thin flat screwdriver (an awl, or any similar object that is at hand), we remove the old oil seal (item 50), pry it with a screwdriver from the crankshaft side and remove it.
Before installation, apply a small amount of oil to the inner surface of the new oil seal (you can use the oil that we use to prepare gasoline mixtures).
Replacing oil seals on a Chinese trimmer.
One of the main reasons for air leaks into the engine is the crankshaft oil seals. In general, this problem is the most common on Chinese trimmers and in some cases the seals begin to leak air already in the first year of service. This is all due to the low-quality rubber products of such mowers, and natural wear and tear has not been canceled either.
Oil seals of different sizes are installed on both sides of the crankshaft (12227mm small and 15307mm large). You can safely blame the seals if it starts to “snotty”. Another indicator of their malfunction is floating speed when running “hot”. Next, we will consider the replacement process in detail.
Worst case scenario
There are cases when the starter is still operational, but may break, for example, a worn cord. The ratchet has not yet had time to work when starting the engine, and the remains of the cord are immediately wound onto the reel, the return spring loses its hooks, and the grooves in the starter housing break. The result is replacement of both the spring and the housing.
If a model of a lawn mower or trimmer has been discontinued for a long time, it will be difficult to find exactly the same spare parts, and the entire starter needs to be replaced.
Starter for chainsaw. Learning to do your own repairs
To quickly start any chainsaw, a starter is required. When the crankshaft of the tool is accelerated, the fuel-air mixture supplied to the engine is compressed and subsequently ignited. Therefore, the normal operation of a chainsaw starter determines the performance of the entire mechanism.
How to install a spring on a chainsaw starter?
Fitting the starter spring into the correct groove is not an easy task even for an experienced user. First, the spring should be twisted to its previous diameter and installed in the cavity of the drum hub. The outer end of the spring is fixed by the limiting protrusion, and the outer end should be positioned opposite the hole in the lock using a screwdriver. Using a screwdriver, align the loop at the inner end of the spring with the hole, after which the disk is lowered. By rotating the disk, check whether the ratchet pawl is in place. Next, the ratchet itself is assembled.
After installing the spring, it is necessary to adjust its tension. To do this, a cable is inserted into a groove on the circumference, and a return spring is twisted around it. After removing the slack, it is better to wind the spring an additional few turns to ensure the required tension on the part.
Sources:
https://specmahina.ru/benzopila/remont-startera-svoimi-rukami.html https://vdartebe.ru/benzopila/remont-pruzhiny-startera-benzopily.html https://muzhik-v-dome.ru/ tehnika-i-tehnologii/remont-startera-svoimi-rukami/ https://vichivisam.ru/?p=22092 https://proinstrumentinfo.ru/starter-dlya-benzopily-husqvarna-stihl-remont-ustrojstvo/
How tight is the spring?
You can give the spring the required potential force necessary for clear and quick winding of the cord by determining the length of the cord in turns. To prevent the cord handle from hanging down, add 1-2 more turns to the number of turns. So, if the cord has a length of 5 coil turns, then when charging the spring, rotate the coil 6-7 full turns.
Assembling the brushcutter starter
When servicing and repairing a starter, it is important to assemble it correctly - as if the device was assembled by the manufacturer. Any of the parts, if installed incorrectly, will not allow you to fully use the trimmer or brush cutter.
If you do not protect the compartment where it moves when the starter cord is wound and unwinded with washers from the main spring, the coil often jams when you try to start a gas trimmer or brush cutter. Loosening the coil bolt will result in its loss.
To learn how to assemble the starter for a lawn trimmer, watch the video.
Determine the category of your project
No matter how great your idea is, it has no meaning until you can turn it into a physical product that other people can use. Kickstarter only allows you to raise money for projects that have a final goal and that will lead to a final product.
READ How to Replace Bearing on Trimmer Video
These projects must also fit into one of the Kickstarter categories: Art, Comics, Dance, Design, Fashion, Film, Food, Gaming, Music, Photography, Publishing, Technology and Theatre.
In addition, your campaign cannot raise money for the following:
Projects may not offer financial, medical or health advice.
These recommendations will help you narrow down your ideas for crowdfunding projects. It may also turn out that Kickstarter (Kickstarter.com) is not the best platform for your project. If your project is related to games, music or non-profit organizations, it is worth considering other platforms for funding.
How to assemble a new lawn mower starter?
To assemble the starter, perform the following manipulations.
Once you have completed assembling the starter, pass the free end of the cord through the hole in the housing intended for the coil. Pass the same end again through the hole in the handle by which the cord is pulled. Tie a strong knot on the handle. Check the operation of the starter handbrake.