Features of removing bits when they jam on screwdrivers from different manufacturers
In general, all models of screwdrivers are quite similar, therefore the methods for removing a bit when jammed are similar.
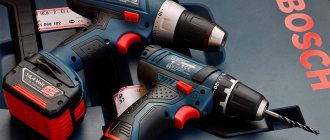
- Bosch. In Bosch screwdrivers, you can get the bit by using two keys after preparatory lubrication of the chuck.
- Makita. The tools of this company are reliable and have a long service life. The bit jamming usually occurs as a result of debris getting into the chuck . In this case, you can solve the problem by pouring lubricants into the inside of the cartridge. If there is no result, other methods are used.
- Interskol. Products manufactured under this brand work well and last a long time and rarely break down. It is easy to remove a jammed bit using the methods described.
- Other manufacturers. There are many instruments on sale from different brands - Metabo, Whirlwind, DeWALT, Diold, Caliber, Hammer. There are as many ways to remove the bat when a problem occurs as with other models. It is permissible to try all methods to cope with the problem.
How to unlock a jammed screwdriver chuck
When the described problem occurs, a logical question arises about how to remove the drill from the screwdriver when the element is jammed.
At the first stage, professionals recommend pouring universal lubricant like WD-40 into the inside of the chuck (touching the surface of the cams). You can also use kerosene or machine oil instead. It is recommended to use such solutions in any case of jamming.
Jamming often occurs due to improper use
After 10-15 minutes, the cartridge and jaws must be carefully tapped through the gasket with a regular or rubber hammer. Typically, the grip loosens and the drill comes free.
If this does not happen, then you can slightly warm up the cartridge with a hairdryer and try to remove the bit again. The method is suitable for owners of screwdrivers with standard and quick-release fasteners.
You can also remove a jammed bit using two adjustable wrenches. After the lubricant is added inside, fairly simple steps are performed:
- The first key is used to compress the base of the cartridge,
- Second, carefully rotate the upper part.
It is recommended to place soft spacers between the parts so as not to damage them while they are being unscrewed.
Attention! In some cases, dealing with jamming is quite simple - it is necessary that the cartridge cools down well after work. As a result, the cams will open and the bit will come out easily.
There is another method by which you can cope with a similar problem. It is necessary to completely immerse the tool in a container with machine oil (even vegetable oil will do) or gasoline for one hour. After this period of time, remove the product and use the described methods to remove the bit from the clamp.
If you cannot carry out the procedure yourself, then it is better to contact a specialist so as not to damage the instrument.
There are several methods for removing the drill from the chuck.
Why can a bit get stuck in a screwdriver?
Whether the tool is expensive or cheap, jamming of the clamping device is not uncommon. This happens in several cases:
- When you try to use a drill of the largest allowable size, the chuck jaws are moved to the maximum value, after which it is often impossible to compress them normally.
- A jammed drill or bit cannot be removed because the jaws cannot be opened - in most cases due to their uneven compression.
- The jaws may jam due to free movement during compression and expansion. This is due to debris, shavings, and scale that have gotten inside and fall under the shaped parts of the cams.
Unfortunately, in such situations it is impossible to work with a screwdriver, despite its working order. You can cope with the problem yourself; in severe cases, it is better to contact a specialist service center.
How to insert a drill into a screwdriver?
An indispensable power tool with a self-explanatory name, the screwdriver is actively used in construction work. The most common procedure with such a device is replacing the drill. Sometimes it seems that this process is very complicated and almost impossible. However, in reality, replacing a drill in a screwdriver will not be difficult, the main thing is to follow the instructions step by step and pay attention to the details.
Do I need to repair a screwdriver if a bit is stuck there?
Regardless of what model of screwdriver (Makita, Bosch or Metabo), at the initial stage you can try to get the bit yourself. You need to pull out the element very carefully so as not to damage the remaining parts.
Before removing the bit from the screwdriver , it is recommended to carefully inspect the tool. If necessary, you should clean it, and then try to remove the stuck bit. As a rule, with a similar problem, the screwdriver remains in working order, so it does not need a complete repair.
You should always inspect the tool before use.
The screwdriver chuck won't unscrew? This may help you.
You will have to take the tool to the workshop if you cannot remove the element yourself, and further attempts may cause damage.
With keyless chucks, removing and inserting drill bits is fairly easy. In such devices, the sleeve operates by manual rotation. To prevent the cams from tightening too much, they are often equipped with locking elements.
Experts recommend that before installing the selected bit in its place, make sure that the tool is working. It is necessary to turn off the product from the network.
Attention! The jamming of a bit in a screwdriver most often occurs due to the fault of the owner. To prevent this from happening, it is recommended to regularly service the tool and monitor its condition.
It is absolutely important to check that there is no debris stuck in the cartridge and to clean it in a timely manner. When working, you need to ensure that the product does not overheat and give it time to cool. If necessary, additional diagnostics are carried out in order to identify possible problems in a timely manner.
In difficult situations, it is not recommended to disassemble it yourself, otherwise you can completely damage the instrument. It is better to contact specialists to do the work.
Master of Architecture, graduated from Samara State University of Architecture and Civil Engineering. 11 years of experience in design and construction.
- Ideas and methods for painting the stairs in a house to the second floor
- How to properly make internal partitions in a wooden house
READ Converting a screwdriver to Li-ion
.-
2013–2021 © Self-construction - a site for those who build!
Frequent screwdriver malfunctions
Since all modern screwdrivers have a standard device design, their malfunctions, as a rule, are also typical. The main defects of this tool include:
- battery failure;
- brush wear;
- button failure;
- cartridge runout;
- lack of response to attempts to turn on or off;
- work intermittently.
You can fix all these breakdowns yourself if you have experience working with measuring and soldering instruments. In some cases, you will have to change the components completely, since not all parts are sold separately. If repairing a gearbox or motor is too complex an operation for you, these elements can be completely replaced or taken to a workshop.
How to disassemble a screwdriver chuck
Despite the fact that today there are many models of screwdrivers on the market, they have the same general approach to removing such an element as a cartridge. Now we will briefly describe it.
In order to unscrew it, you need to remove the screw securing it to the shaft. It is located inside the cartridge; the screw should be rotated clockwise. After you have unscrewed the screw, you should jerk the cartridge in the opposite direction.
Attention! If you try to unscrew it manually, you must set the drill to second speed if it is two-speed. When purchasing a tool, it is advisable to lubricate the screw with machine oil. In some cases, when this element does not want to give in, then you should put the tool on first speed, hold it in your palm, and turn the reverse to the left. The cartridge should come off the thread easily.
Replacing the cutting tool
The “tail” of the screwdriver is fixed in the chuck. It comes in different sizes, as do attachments. If the cutting tool is installed incorrectly, the screwdriver can cause damage to the work process and harm to health. For example, due to the “wrong” drill, holes of different sizes may result with a damaged surface. A sharp element flying out of the cartridge will cause serious injury.
Most modern screwdrivers have jaw chucks. They consist of a cylindrical body, as well as a sleeve and cams. When the sleeve rotates clockwise, the cams simultaneously press the drill.
The process of replacing it is simple, but has a number of individual features. The whole process can be described as follows:
- it is necessary to select the necessary attachment (bit) for the drill;
- then you need to take the cutting tool and install it in the center of the chuck (between the open “cams”);
- after this, it should be secured by turning the sleeve clockwise (with a key-type cartridge, the key is installed in the recess);
- twist the sleeve until the nozzle is secured.
READ Convert a Screwdriver to a Lithium Battery
Changing a drill is easy, but first you need to pull out the previous one. There are the following options for the development of the situation:
- standard removal of the drill (the chuck is not damaged);
- pulling out the drill in the absence of a key;
- removing a stuck cutting element.
If the screwdriver , there should be no problems when replacing its working tool - the operation is elementary. To do this, you need to take a key, which is designed to loosen the cartridge, and insert it into the recess. Turn counterclockwise. Unwinding is carried out due to special teeth that are found on objects. There is also another option for removing the drill. To do this, turn on the reverse rotation mode on the screwdriver, hold the outer body of the chuck and press the “start” button. This will allow the drill to come out easily.
If you do not have a special key, the drill can be removed using a Phillips screwdriver or a nail. It must be inserted into the recess on the cartridge and fix its half. We twist the opposite part of the cartridge by hand. However, if such unwinding does not bring results, then we take a gas wrench or a vice - these tools will help increase the rotation of the cartridge. If the previous options for pulling out the drill failed, then you should resort to “heavy artillery.” In some cases, external damage to the drill makes it difficult to get out. In this situation, it is necessary to relax the “fists” using gas wrenches and a vice. We completely clamp the cartridge with the keys and rotate (unscrew).
The simultaneous use of both a wrench and a vice is encouraged in this process. You can also take a hammer and apply light blows to the cartridge - the vibration from the blows promotes relaxation.
A radical option in the most hopeless situation would be to twist the cartridge from a screwdriver . To do this, you need to squeeze it in a vice and forcefully knock out the cutting tool from the inside using a punch. Naturally, after such a procedure, the screwdriver should be taken for repair. To summarize, it is worth noting that the procedure for inserting a drill into a screwdriver is quite simple and even someone who has never done this can handle it. The main thing in this process is to follow the recommendations.
To learn how to insert a drill into a screwdriver, see the following video.
How to remove a cartridge with a threaded connection
Let's look at how to remove a chuck from a screwdriver , in which the cylinder is attached to the spindle using a thread.
unscrew the threaded fastener using an L-shaped hexagon; insert the key (usually 10 mm) with the short part into the cylinder and securely fix it with cams; turn the screwdriver on and off at low speeds; in this case, the free part of the hexagon should hit the support.
As a result, the threaded fixation will loosen and the clamping cylinder can be easily removed from the spindle.
If the mount is very strong and all three methods do not work, then you need to disassemble the tool.
How to remove the sleeve in this case is described above.
Situations requiring disassembly of a drill or screwdriver arise when preventive maintenance is neglected - routine removal and cleaning of the “clamp”.
In addition, it is recommended to rest the instrument at least every 15 minutes.
Then the repair can be postponed, and unnecessary difficulties with removing the clamping device can be saved.
Often, when the engine fails, the gear remains intact. Since in most engines it is pressed onto the shaft, its removal is difficult. Buy a special puller or use improvised means. Do not try to do this with pliers or a nail puller - you will bend the shaft and ruin the gear teeth.
- Take a piece of profile or channel. Make a longitudinal groove with a grinder.
- Insert the shaft into the groove perpendicular to the profile and, as it were, pry the gear.
- Place the profile on two hard surfaces so that the engine hangs between them.
- Take a nail and use a hammer to gently tap the edge of the shaft. The gear will slip off easily.
- Drive the gear onto the new motor using a hammer and a hard surface.
How to disassemble a screwdriver chuck
To perform this operation, you need to remove the plug at the base.
It is enough to pry off the plastic part with a knife.
The metal one can be knocked out with a heavy object by hitting the base of the clamping sleeve.
take a large bolt and insert it into the cylinder, after which it is slightly centered with a small clamp of the cams; in this case, the head of the bolt protrudes a couple of centimeters above the sleeve; hit the bolt with a hammer.
After this, the most interesting part remains - disassembling the cylinder itself.
It is necessary to divide it into its component parts - sleeve, base, washer, bearing and nut.
The design may be slightly different, but in general the part consists of these elements.
In rare cases, it is impossible to disassemble the cylinder without damaging it and being able to reassemble it in the same form.
But if the design suggests such a possibility, then you can use the following method.
Instructions on how to disassemble the cartridge in the simplest and most effective way - using a hammer drill:
some kind of adapter is inserted into the hammer drill; the role of the latter can be played, for example, by a broken drill with a diameter of 10-12 mm; put the cartridge on the adapter with the back side - the one opposite the cams; remove the cams and rest the cylinder against a hard surface, but always through a shock-absorbing buffer (rubber, foam, etc.); turn on the hammer drill in impact mode.
Thanks to vibration, we disassemble the cartridge in a matter of seconds.
As a result of manipulations, the sleeve flies off the cylinder, exposing other parts.
After cleaning, the elements are easily put back together.
It is important not to mix up the cams - although they are similar, during the operation of the tool the parts grind in and require correct assembly.
Some complex designs require sawing of the coupling.
After maintenance or repair work, the halves are assembled using a makeshift “tire”.
But in most cases, the indicated method - using an impact drill or hammer drill - works.
Chuck repair
The chucks in different models of screwdrivers may differ slightly from each other. They can be attached to the shaft in three ways:
- Morse taper.
- Threaded connection.
- Threaded connection with fixing screw.
To determine the method of mounting the cartridge, you need to read the inscription on its sleeve:
- The marking “1–6 B10” means a Morse taper. Nozzles with a shank diameter from 1 to 6 millimeters are used. The coding "B10" indicates the size of the cone. Take a hammer and knock out the cartridge by hitting the body;
- inscriptions like “1.0–11 M12x1.2” or “2–13 mm ½-20 UNF” mean metric and inch threads.
If the cartridge turns out to be threaded, you need to perform the following steps:
- Unclench the jaws of the chuck.
- If there is a screw inside, unscrew it clockwise (the screw has a left-hand thread).
- Take a 10mm L-shaped hex key.
- Insert the short edge into the chuck and clamp tightly in your jaws.
- At low speeds, start and immediately turn off the screwdriver so that the long edge of the hexagon hits the table. Instead of turning on the device, you can simply hit the key with a hammer. The thread will move and the cartridge will unscrew.
In order to remove the cartridge, you need to hold the hex key in it and start the engine at low speeds until the key hits the table
Why and how to adjust the ratchet
A screwdriver ratchet is a clutch designed to limit the force when rotating the chuck. Its presence in a power tool can be determined by a rotating ring with numbers. Some users do not understand the meaning of the clutch and do not touch it. Using a ratchet, you can adjust the depth of screwing in the screw. If the material is too soft, the head of the fastener is easily recessed and can pass right through. When using small fasteners, very high torque can destroy it. The ratchet prevents the slots of the screws from being cut off and the screwdriver bits from wearing out. To determine the desired value on the adjusting ring, make several passes, starting with the minimum.
READ How to cut the inside corner of a skirting board
If the screwdriver has a drilling mode, then the last icon on the coupling will be a pictogram with an image of a drill. This position uses maximum torque.
Types of bits for a screwdriver: how to choose
To choose the right nozzles, you need to study their varieties. First determine the shank shape type and diameter. It ranges from 1/4 to 1 inch.
- basic;
- special;
- combined.
- splined. They differ in the width and thickness of the slot;
- crusades. They have different angles at the base and shapes;
- hexagonal. The main characteristic of the bit is the distance between the sides of the hexagon;
- tetrahedral;
- asterisks. This shape improves adhesion between the nozzle and the fastener.
- tri wing or triangular;
- double pin. Similar to spline ones, but with a notch in the middle;
- torq set. Like trihedral, but with four rays;
- end Usually performed with a magnet;
- for drywall. They have a persistent limiter;
- with spring lock.
Combination bits have two types of shank shapes or one, but of different sizes. For example, a splined shank and sprocket.
READ Converting a 12V Screwdriver to Lithium 18650 Batteries
Determine the length of bit you need for the job. It ranges from 10 to 200 mm.
Depending on the shape of the shank, the nozzles have a certain marking:
- Sl (Slot) – splined;
- Ph (Philips) – cross-shaped universal;
- Pz (Pozidrive) – cruciform with additional thin ribs;
- T (Torx hole) – sprockets;
- H (Hex) – hexagonal.
An important characteristic is the grade of steel from which the bat is made. The nozzle may have a protective coating
The strength of the equipment depends on this. The main types of steel and coatings that should be preferred:
- Cr-v - chrome vanadium steel. The most common, with increased hardness;
- Cr-Mb - chromium-molybdenum steel. Less common. Very durable material;
- Ni - nickel coating. Increases resistance to corrosion;
- WC - tungsten carbide coating. Increases strength;
- Tin - titanium nitrite yellow coating. Increases strength.
Nozzles vary depending on the purpose:
- twisting and unscrewing;
- drilling;
- riveting;
- polishing;
- milling.
Considering all the parameters considered, you can easily select the necessary bits.
Attachment to shaft
The attachment of the chuck to the tool shaft is also different. It is not always possible to find a mention of this important design feature of your screwdriver in the instructions. When it is inevitable to replace a cartridge, you often have to deal with this difficult issue yourself. There are several types of fastening, as well as the cartridges themselves.
Threaded fastening is quite common. To remove such a cartridge, you need to clamp a hex key of the largest possible size in it. By turning the key counterclockwise, you should unscrew the cartridge from the shaft. Sometimes quite significant force is required to remove the assembly. In some cases you will have to resort to using a hammer.
No less popular is fastening with a fixing screw. To determine this type of fastening, you need to move the chuck jaws as far apart as possible, which will open access to the head of the screw with a left-hand thread. Unscrewing will require some effort; during operation, the left screw is tightened quite strongly. Well, don’t forget that the thread is left-handed.
The old Morse taper mount is also found. This method of connecting the cartridge and shaft has been known since the end of the 19th century and still remains quite common. The shaft has a cone such that the reverse cone must be on the chuck. The angles of the cones must match. A screw with a left-hand thread is also used to secure the unit. Cartridges with this mount may be marked: B10, B14, etc., from 4 to 45.
The numbers encode the size of the cone. The numbers next to it indicate the diameter of the shank of the working part, which can be clamped by this unit. During long-term operation, the cones can rub against each other quite tightly. Often you have to use a hammer to separate them, and sometimes you have to disassemble the tool itself, removing the drive shaft. Further manipulations will be much more convenient. Sometimes the chuck has edges for a wrench, this greatly simplifies the work.
Important! If it becomes necessary to remove the chuck, you need to wait until the tool cools down. Any material expands when heated, and tool steel, from which the parts of any power tool are made, is no exception. Attempts to remove hot components may result in unnecessary effort and, as a result, breakage of parts that were not intended to be replaced.
Determining the mounting method
Note that fastening is carried out by three methods:
- Morse taper;
- using a fixation bolt;
- thread.
Read also: Pro Mig 500 setup
The Morse cone got its name from the name of its creator, who invented it in the 19th century. The connection is made by interlocking the parts of the cone with the hole and the shaft due to the identical cone shape. This type of fastening is used in a variety of cases due to its reliability and simplicity.
In the case of threads, they are usually cut into the chuck and shaft. And the alignment is carried out by screwing it onto the shaft.
The last option is an “improved” threaded mount. To make the connection as reliable as possible, it should be fixed using a bot. Usually the screw is taken under a Phillips screwdriver with a thread on the left. The screw becomes accessible only when the cams are fully opened.
If we talk about determining the fastening method, then this usually happens during a visual inspection. For example, the markings on a Morse cone are usually 1-6 B22. In this case, the first numbers will be the diameter of the nozzle tail that is used, and the second number will be the size of the cone itself.
In the case of a threaded connection, an alphanumeric designation is also available. For example, it will look like 1.0 - 11 M12x1.25. The first half indicates the diameter of the nozzle shank that is used, and the second indicates the metric size of the thread. If the screwdriver is manufactured abroad, the value will be indicated in inches.
Solving problems with the cartridge
It is not necessary to replace the problematic mechanism with a new one.
Let's look at the main problems associated with cartridges and ways to solve them.
One of the common problems is the device jamming.
Over time, the cams stop compressing completely.
hold the cylinder in your hand and sharply hit it one or several times against a hard object (preferably wooden); this method also works with tight “clamps”; clamp the body in a vice and the cartridge with a gas wrench; after that, rest the tool on the table and turn on the screwdriver; try to thoroughly lubricate the element; This is quite common with Bosh products.
A common cause of tight clamping is sawdust and other small debris trapped inside the mechanism.
If the cartridge is supposedly jammed due to sawdust, the part can be held over a fire or dried with a hair dryer.
After this, the cartridge must be thoroughly lubricated.
It also happens that the element scrolls.
The reasons for this may lie in problems with various parts of the tool.
If it is the cartridge that is to blame, then it is likely that the teeth on the locking coupling are worn out.
To solve the problem, you can remove the coupling and drill holes in place of the licked teeth.
After this, you need to screw the screws into them and remove their protruding parts with pliers.
Then the dismantled element is returned to its place and the operation of the mechanism is tested.
Incomplete release of the cams or one or two of them is another common problem.
If it is in this sense that the quick-release chuck or key mechanism is jammed, then the reason lies either in the worn teeth on the cams, or in the licked threads on the nuts that clamp the three components.
To understand what's wrong, you need to disassemble the cylinder.
After disassembly, you can see the nut, which consists of a couple of parts.
Worn threads cause the jaws to slip when clamping.
The result is incorrect alignment of the elements.
The solution to the problem is to replace the nut or cams with new ones.
In this case, you will have to buy a new cartridge.
In some situations, when solving problems, the cylinder does not unscrew.
Others require disassembling the device.
There are also situations that require a complete replacement of the mechanism.
But almost always the problem can be solved without replacing the entire screwdriver .
A screwdriver is one of the most popular tools not only in production, but also in private households. It can be used for a variety of work, including minor home repairs, as well as furniture assembly and installation.
Drills are used with it, and the grinding attachment is fixed. Despite the fact that this mechanism is one of the most reliable, some difficulties with its operation may arise. They are usually associated with replacing the cartridge. How to remove the chuck from a screwdriver, select and install a new one yourself will be discussed in this material.
1.1 What attachments can be used with a screwdriver chuck?
The set of attachments for the operation of such a device depends on what kind of work the master performs with it. As a rule, these include the following:
- crosses of various articles; for self-tapping screws;
- hex drills for the corresponding recesses on the screw heads;
- devices for installing bolts and nuts;
- triangular bits;
- Spitz samples for ordinary wines;
- special drills for working on drywall (having special stops that prevent the material from being damaged by careless work).
Your kit may also include a sanding attachment. It is only important when purchasing this part to identify with which particular cartridge this particular attachment can be used in order to easily use it.
When replacing such parts in a chuck, regardless of whether it is a key chuck or a quick-release chuck, you must turn off the device’s power supply (to avoid accidentally turning on the device) and follow safety precautions to avoid injury.
Immediately after replacement, it is recommended to additionally recharge the power supply again and only then return the device to operation and test the drill. Please note that charging must be 100% before further work.
READ How to make a brush cutter from a screwdriver
After this, you can test a new bit and grinding attachment. to menu
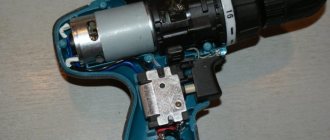
Screwdriver and its design features
You should start repairing a screwdriver yourself by becoming familiar with its design. The main element of a screwdriver is an electric motor. Screwdrivers come in both corded and cordless types. The use of a corded screwdriver is used less frequently, due to such a disadvantage as the need to connect the tool to a 220V network. Battery-type tools are more popular, as they allow you to carry out not only repair work at home, but also outside it.
The main components of a cordless screwdriver are:
- Frame. Typically, all screwdrivers are made of durable plastic.
- Start button. It is designed in such a way that the number of revolutions of the cartridge depends on the force of pressing it.
- Electric motor. Battery-powered tools use single-phase commutator-type and DC motors. The motor consists of a rotor, a stator in the form of magnets, and a brush assembly.
- Gearbox.
- Force regulator.
- Reverse switch.
- Battery. As a rule, it is removable and is often supplied with the product in duplicate.
- Cartridge. As a rule, quick-release chucks are used.
Some models are additionally equipped with LED backlights, as well as battery charging indicators. Returning to the problems with the screwdriver, it should be noted that any of the above elements can cause the tool to malfunction. What is needed for repairs? The first step is to find the cause of the breakdown, and then make the appropriate decision to eliminate it. The tool can be divided into two parts: electrical and mechanical. Initially, you need to find out what the problem is with the screwdriver not working: mechanical or electrical. This won’t be difficult to do, so let’s look at the breakdowns in more detail.
Mechanical faults
Mechanical malfunctions of screwdrivers can be identified by such a sign as the audibility of the operation of the electric motor. When you press the start button, you can hear signs of the electric motor running, but the tool chuck does not rotate or characteristic sounds of a malfunction are heard when rotating.
Read also: Rubbers report on chemistry briefly
The design of the screwdriver is quite simple, but a significant drawback is that all the elements are almost 2-3 times smaller than those of an electric drill. Possible mechanical failures of a screwdriver include the following malfunctions:
- Cartridge failure. Despite the fact that quick-release chucks are more versatile and easier to use, their significant drawback is their low service life. It is impossible to repair the keyless chuck, so if the tool refuses to hold the drill or bit, the chuck should be removed and replaced with a new one. This is one of the most common malfunctions of the tool, but it does not require disassembling the screwdriver.
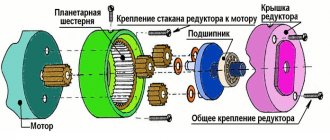
- Gearbox failure. The screwdrivers are equipped with a planetary type gearbox. Typically, in order to save money, manufacturers make gearbox gears from low-quality plastic or metal. This affects not only the power of the tool, but also its service life. If the engine runs when you press the “Start” button, but the cartridge does not rotate, then the problem lies precisely in the planetary gearbox. To find out the cause of its malfunction, you need to disassemble the tool and then determine the breakdown. If one gear fails, the gearbox should be replaced.
- Bearing wear. The bearing is located in the planetary gearbox, so it is replaced along with the gears.
- The force regulator is broken. This device in screwdrivers is used not only to increase or decrease the traction force of the tool, but also to increase safety. If during work the working attachment becomes jammed, then instead of turning the tool, the regulator will turn. Thus, the master will not get a dislocated arm, and the electric motor will be protected from high loads, from which it can burn out.
It should be noted that the small size of the mechanical part of the instrument somewhat complicates the process of instrument repair, so be sure to be careful when carrying out repair work.
Electrical faults
Unlike drills, screwdrivers operate primarily on batteries. This means that different electric motors are used in the design of these tools. It is not difficult to determine the malfunction of the electrical part of the screwdriver. If the battery is charged, but when you press the “Start” button you cannot hear the sound of the electric motor, then the cause is an electrical failure. Let's look at the main types of electrical faults in screwdrivers.
- Battery fault. Initially, you should pay attention to the battery. As a rule, screwdrivers use low-quality nickel-cadmium batteries. They have a significant drawback, which is the need to charge it only when it is completely dead. Such batteries cannot be recharged, as this shortens their service life. If one day the screwdriver refuses to function, then do not rush to disassemble it, make sure that the battery is functional and provides a charge. You can check by connecting a second battery. The battery charge can also be checked using a tester, which should show the appropriate voltage value.
- Charger fault. There is a special charger for charging the battery. If the battery is discharged even after you have charged it, you should check the integrity of the charger. Chargers usually have indicator lights for these purposes. If they are not there, then you need to use a multimeter.
- The power button is faulty. It is necessary to check the start button, since often the reason for its inoperability is oxidation of the contacts or dust. The tool should be disassembled and then the contacts should be cleaned. The buttons on screwdrivers usually have the function of regulating the speed of rotation of the chuck, for which a transistor is installed. If the tool works, but the speed control function is missing, then the transistor needs to be replaced.
- If the reverse function does not function, the breakdown can be corrected by cleaning the contacts of the polarity switch button.
- Motor malfunction. The electric motor is one of the most expensive structural elements of a screwdriver. If everything is checked and it is determined that the problem lies in the electric motor, then the cause should be found out. Most often, the problem occurs with brushes, which simply wear out over time. The brushes cannot be repaired, so they must be replaced. The armature should be replaced if a break is detected when testing its winding terminals. No one will rewind such a small rotor, so it’s easier to purchase a new unit. The stator of a permanent electric motor is presented in the form of 2-3 magnetic plates that do not fail.
Now you know the main signs and types of screwdriver malfunctions. To repair it, you don’t need to be a specialist, but just stock up on tools and free time.
How to choose a new cartridge
screwdriver chuck is selected based on a number of aspects. When choosing a suitable part, you should be guided by the following recommendations:
if bits have to be changed frequently, it is better to choose Honor quick- or self-clamping cylinders; otherwise the work will go slower; gear-rim design - the choice of those who strive for maximum cartridge reliability; if 100% fixation of the bit is a priority, it is better to purchase a key cartridge; when choosing a part, it is necessary to take into account its characteristics; parameters are regulated by relevant GOSTs; the larger the clamping cone, the larger the number with which it is marked; it is necessary to take into account the country of origin - the alphanumeric designations of foreign models differ from domestic ones.
If it is difficult to decide on the type of “clamp” on your own, it is better to seek advice from a specialist.
Is the cartridge jammed? How to unclamp drill chuck without tools and replace
An incorrect choice is tantamount, at a minimum, to incorrect operation of the tool.
In the worst case, it is possible not only to re-spend on a new cylinder, but also to replace the entire screwdriver.
Can it be repaired?
The possibility of restoring a failed unit depends on the specific design. In some models, repairs are provided by the manufacturer. Others are conditionally repairable, that is, they can be carefully disassembled and reassembled, but the question is the availability of a spare failed part. There are also monolithic cartridges that are poorly or not at all recoverable.
As can be seen from the information provided, most often the screwdriver chuck does not clamp the bit due to wear of the fasteners. The most realistic option is to replace the entire broken unit. The possibility of repair depends on the specific modification of the electrical appliance.
Subscribe to TechnoCouncil on social networks so you don’t miss anything:
How to determine the fastening method
Before you figure out how to unscrew the chuck from a screwdriver, you need to determine the method of fixation.
A tool that uses a clamping device with a Morse taper fastening type may be marked B10, B12, B14, etc.
According to GOST, there can be 9 standard sizes - from B7 to B45.
Next to it, in millimeters, the range of diameters of the shanks of fasteners that are suitable for fastening in this screwdriver is indicated.
screwdriver chuck with a threaded fastening has a different marking.
On domestic models you can find the type designation 1.0-11 M12x1.25.
The numbers before the letter indicate the permissible shank size, the rest - the thread size.
Foreign screwdrivers use the inch designation.
For example. the part can be marked as follows: 2-13 mm ½-20 UNF.
Here the first numbers are the diameter of the bits, the fraction is the diameter of the thread in inches, 20 is the number of threads in each inch.
How to replace the chuck in a drill with your own hands?
To attach the chuck to the drive shaft of the drill, a threaded connection or Morse taper is used. A visual inspection of an electric drill will not always help indicate how to secure the drill chuck. This can be indicated by the marking on the cartridge: it is stamped on its surface.
Replacing the conical type of part
The standard size of the Morse cone (according to GOST 9953–82) consists of 9 values: from B7 to B45. The larger the number after the letter B, the larger the diameter of the cone.
Thus, having found the marking “B” on the surface of the cartridge, we can conclude that this is a device with a conical mounting base. With this method of attachment, the cartridge can be easily removed. It is enough to use a drift and a plumber's hammer.
Video: how to remove a chuck with a cone from an electric drill?
Replacing the reversible threaded chuck
To secure the drill clamp to an electric household drill using a threaded joint, two types of threads are used:
- inch (for foreign models);
- metric (from Russian manufacturers).
The following marking is applied to the surface of the threaded clamping chuck body: 1.5–13 1/2 – 20UNF or 1.5–13 M12x1.25.
The reversible threaded cartridge for fixation has a screw with a left-hand thread. You need to know this nuance when removing a broken cartridge. In order to get to the screw head, it is necessary to recess the cams into the collet completely. As soon as the head of the screw is visible, use a hardened Phillips screwdriver to unscrew it to the right clockwise. Then hold the hex key in your fists and hit it sharply in a counterclockwise direction. After the cartridge is torn from its place, it can be easily unscrewed.
Video: how to remove a chuck from a reverse drill or screwdriver?
On other models there are other options for mounting the cartridge on the thread. In some cases, the cartridge is twisted entirely from the threaded end of the shaft. In other cases, the screw can be fixed with a special thin key using a narrow groove. The main difficulty is to move the cartridge from its place when unscrewing. Sometimes this is very difficult to do. In any case, to remove the cartridge you need: a mechanic's tool, the necessary skill and patience.
Tool Features
The popularity of this power tool is due to a number of its advantages, the main one of which is versatility. You can screw in (unscrew) screws, screws, self-tapping screws using a wide range of different bits. You can insert a drill and drill a hole in both wood and metal. There are other attachments that expand the range of use of a screwdriver. The next advantage of the tool is mobility. Having a removable battery, this electric device can be used where it is impossible to turn on a conventional electric drill due to the lack of an electrical network.
The device is equipped with a number of regulators. You can adjust the speed of rotation of the bit or drill and the force with which the impact on the working tool will occur, as well as the direction of rotation of the shaft. And in some models there is also a flashlight; such a tool can be used in rooms where there is no artificial electric lighting.
In specialized auto repair shops and enterprises, pneumatic screwdrivers are often used. A special feature of this option is the drive from a compressed air flow. For the tool to function properly, you need a compressed gas cylinder or a compressor that will supply air through a hose. The advantage of this product is its high productivity. If during a work shift you need to constantly tighten and unscrew many screws and nuts, a pneumatic screwdriver is indispensable.
A more common household appliance with a replaceable battery, whose performance is limited by the electrical capacity of the battery, is, of course, not intended for industrial-scale work.
Such an instrument requires periodic cooling and short but regular breaks in operation. Which completely satisfies any home craftsman, and most repair teams get by with ordinary, albeit professional, screwdrivers with a removable battery.
Drill design - what do you need to know about the tool?
Convenience and ease of implementation ensured the popularity of the cam mechanism. But it is not without its shortcomings. One there is the difficulty in working with small drills. A short product may simply fall inside. You can still secure it by placing the drill in a horizontal position, but you cannot put too much pressure on its surface while working. If another drill was inserted into the drill, there is an option to remove it by turning the adjusting ring in the appropriate direction. This can be done manually from time to time; for this purpose there is no special key that acts as a lever, increasing the force. When tightening a drill without a key, it is also not recommended - the larger the diameter of the drill, the more securely the fastening must be made.
READ How to properly chamfer a pipe with a grinder
How to disassemble a screwdriver chuck
To perform this operation, you need to remove the plug at the base.
It is enough to pry off the plastic part with a knife.
The metal one can be knocked out with a heavy object by hitting the base of the clamping sleeve.
take a large bolt and insert it into the cylinder, after which it is slightly centered with a small clamp of the cams; in this case, the head of the bolt protrudes a couple of centimeters above the sleeve; hit the bolt with a hammer.
After this, the most interesting part remains - disassembling the cylinder itself.
It is necessary to divide it into its component parts - sleeve, base, washer, bearing and nut.
The design may be slightly different, but in general the part consists of these elements.
In rare cases, it is impossible to disassemble the cylinder without damaging it and being able to reassemble it in the same form.
But if the design suggests such a possibility, then you can use the following method.
Instructions on how to disassemble the cartridge in the simplest and most effective way - using a hammer drill:
some kind of adapter is inserted into the hammer drill; the role of the latter can be played, for example, by a broken drill with a diameter of 10-12 mm; put the cartridge on the adapter with the back side - the one opposite the cams; remove the cams and rest the cylinder against a hard surface, but always through a shock-absorbing buffer (rubber, foam, etc.); turn on the hammer drill in impact mode.
Thanks to vibration, we disassemble the cartridge in a matter of seconds.
As a result of manipulations, the sleeve flies off the cylinder, exposing other parts.
After cleaning, the elements are easily put back together.
It is important not to mix up the cams - although they are similar, during the operation of the tool the parts grind in and require correct assembly.
Some complex designs require sawing of the coupling.
After maintenance or repair work, the halves are assembled using a makeshift “tire”.
But in most cases, the indicated method - using an impact drill or hammer drill - works.
Sources:
https://fishing-caravan.ru/sad-i-ogorod/remont-patrona-shurupoverta-svoimi-rukami.html https://mahnem-ru.ru/ustrojsTVo-bystrozazhimnogo-patrona-shurupoverta/