What are liquid nails
A distinctive feature of adhesives in this category is the presence of mineral fillers, which provide increased adhesion, as a result, reliable bonding of elements. In the first compositions, which were produced in certain regions of the United States, special clay was taken from local deposits for filling.
Subsequently, manufacturers, in the absence of clay, began to use available mineral compounds, in particular chalk, which has a different chemical formula, but as a result of modified technologies also provides good adhesion.
Note! Multicomponent composites from the group of liquid nails, in addition to the inorganic base, contain synthetic substances and solvents with different characteristics, which causes differences in recommendations for use.
There are many trade names for liquid nails, each of which stands for the product of a specific manufacturer, often implementing the production process according to the specifications of the enterprise. When purchasing liquid nails, you should carefully study the composition, conditions of use, and intended use. Only in this case can you count on increased connection strength.
Liquid nails for wood should not be used to fix ceramic tiles, because they will not stay on the surface and will soon fall off, to the great chagrin of the owners and craftsmen.
Construction of houses
Liquid nails are a type of construction adhesive intended for joining homogeneous and dissimilar materials and capable of withstanding quite large loads. This product got its name from the American brand Liquid Nails (translated from English as liquid nails), created back in 1968 by Macco.
The development appeared on the domestic market in the mid-nineties and since then has been an indispensable assistant in the professional field. Liquid nails have also been used in everyday life. True, without knowing how to use liquid nails, you can seriously damage the surfaces being treated. Therefore, it is imperative to study what the material is and what the technology for working with it is. It would also be useful to know how to wash liquid nails if something suddenly goes wrong.
Table of contents
- Composition of liquid nails
- Types of liquid nails
- What are they for?
- Subtleties of choice
- Liquid nails: instructions
- Special pistol
- How to remove liquid nails?
Composition of liquid nails
The basis of the “mixture” is synthetic rubber and various polymers.
In the classic version of the “product,” the filler is a special clay with increased plasticity. It is mined in the USA, in the state of Texas. Here, in fact, the key production capacities of “local” manufacturers of liquid nails are concentrated.
A number of developers use calcium carbonate instead of “miracle clay” (in simple terms, just ordinary chalk). According to many experts, this does not have the best effect on the strength characteristics of the product.
Types of liquid nails
The power, adhesion and resistance of liquid nails to external factors is determined, first of all, by their chemical composition.
On this basis, it is customary to distinguish between organosoluble and water-soluble adhesive compositions.
Water-soluble products are made on the basis of polyurethane, PVC or acrylic copolymers. It has good adhesion to many building surfaces and is characterized by fairly high environmental friendliness. The main disadvantage of water-soluble formulations is intolerance to the freeze-thaw cycle. With it, their base is completely destroyed. Before purchasing, you should pay attention to some restrictions regarding the scope of application:
- polyurethane-based adhesives are poorly compatible with Teflon and polyethylene;
- acrylic and PVA-acrylate compositions are effective exclusively on porous surfaces.
Organosoluble liquid nails are based on synthetic rubber. They are more durable, set faster than water-soluble ones, and demonstrate stability at temperatures below zero. Unfortunately, organosoluble formulations are not without drawbacks. Firstly, they have a strong, unpleasant odor. Secondly, they are fire hazardous during the application/curing period. It is permissible to work with liquid nails of this type only in well-ventilated areas, away from electric heating devices and open flame sources.
After watching a video about liquid nails, you will definitely understand what’s what.
What are they for?
Most often, liquid nails are used for gluing wood, fiberboard, chipboard, ceramics, metal, brick structures, polystyrene, glass. They perfectly connect together even those materials that cannot fit tightly together. Capable of withstanding loads up to 80 kg/cm2.
It is not recommended to install structures made of damp and damp wood using liquid nails.
If you need to glue heavy wallpaper, for example, made from natural bamboo, liquid nails are your best choice. And even an unprepared surface will not be a problem: you just need to remove the peeling paint or chalk plaster and you can get started.
The composition is applied to the back of the wallpaper, after which it is applied to the wall and tapped with the palm of your hand. Then the wallpaper is removed so that the glue dries a little (up to 10 minutes). Next, the final installation of the material is carried out. If liquid nails have leaked along the edges of the panels or between the bamboo, do not rush to remove them immediately. This will be much easier to do when the coating dries.
You can also “install” ceramic tiles using liquid nails. The degree of reliability of such a connection will be slightly higher than that demonstrated by traditional tile compositions. But since the price for liquid nail glue is 2-5 US dollars per tube (standard - 310 milliliters), using the product in large volumes is unprofitable. With their help, it is optimal to install fallen tiles and replace individual structural elements.
When gluing heavy objects to vertical planes, they should be supported with wooden supports until the adhesive seam has completely hardened. How long does liquid nails take to dry? Depending on the type and brand, from 12 to 24 hours.
Neoprene liquid nails should be stored in a cool, dry place; when using them, do not neglect protective equipment - goggles, rubber gloves.
Subtleties of choice
All recommendations for the purpose and consumption of liquid nails can be gleaned from the instructions on the packaging. But imagine, you came to the store, and there were dozens of their varieties. Re-reading everything is not an easy task. What to do? Especially considering that sales consultants are not always competent - not only in small stores, but also in large construction markets. Of course, study the necessary information first.
Quite often, customers are offered to purchase universal neoprene-based adhesive - “Moment Installation Extra-Strength” (Henkel). This is a really good choice for holding heavy cladding such as metal siding, natural stone, wood, etc. But if you need to glue foam materials, such as polystyrene, this option will not work. The best liquid nails in this case are water-based “Moment Installation Super-Strong” (please note that they are not suitable for gluing Teflon, polypropylene and polyethylene!).
Adhesive “Liquid Nails”: types and applications
Liquid nails are called glue, which consists of a special composition. This glue received this name because its use allows you to achieve a gluing effect that can be compared to joining with nails. Liquid nails ensure the tightest possible connection of surfaces to each other, which is reflected in an increase in the level of moisture resistance. If we compare the strength of the composition of liquid nails with the well-known PVA glue, the difference can exceed 10 times.
Liquid nails have found their use not only in construction, but also in everyday life. Particularly popular is the variety for gluing plastic or plaster structures. The material is absolutely harmless to people, so it is used in both non-residential and residential premises.
There are two main types of such glue:
- Water-based, which is absolutely harmless.
- On organic solvents.
It is important to know! Liquid nails containing organic solvents emit an odor that is harmful to humans. If the adhesive gets on your skin, it can be harmful, so you should immediately wash it off with water.
Organic solvent adhesive allows you to connect or secure ceramic tiles, glass, fiberboard, chipboard and even brick. The material on water is used for fastening baguettes, plastic, and foam tiles. This type of glue is recommended for use only in residential premises.
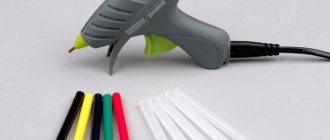
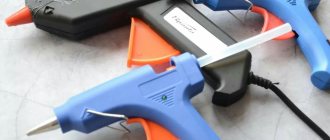
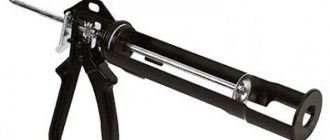
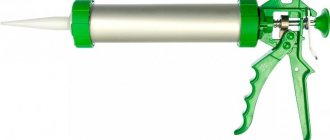
Special devices are produced for liquid nails, which simplify their use. They are called mounting guns, and one of them should definitely be purchased along with consumables.
The design of the pistol and the principle of its operation
How to use liquid nails correctly is indicated in the instructions for use. To do this, you will need a special gun, which can be mechanical, electric or even pneumatic. The most popular are mechanical pistols, as they are very practical and inexpensive. Electric guns are used when large volumes of work using liquid nails have to be performed daily.
The design of the pistol is very simple, and consists of the following components:
- Frame.
- A rod with a spring and a disk that distributes the load on the piston of the glue tube.
- A fixing tab that secures the rod.
- A trigger, when pressed, the glue is squeezed out.
- Lever.
The operating principle of a conventional mechanical gun (also called a skeletal gun) is to squeeze out glue by applying pressure to the tube piston. The disk is connected to the rod and trigger. When you press the lever, the rod moves, which presses with the help of a disk on the piston of the tube with glue, pressure is formed in the tube and the glue begins to come out from the hole made in the tip of the tube. Using a gun makes it much easier to squeeze the glue out of the container.
It is important to know! The glue tube should be unpacked after it has been installed in the device. If this is done in advance, the glue may leak out during installation.
How to use this gun
Very often, beginners who have been advised to use special glue have a question about how to use liquid nails with such a gun. Initially, it should be noted that mechanical pistols may differ in appearance, but the principle of operation is the same for all. First, you need to insert a tube of glue into the gun, then unscrew the cap or cut off the cap and screw the cap back on, and then squeeze the required amount of glue onto the surface for gluing.
Now let's look at the features of applying glue to the surface. Using liquid nails with any type of gun, you can supply glue in two ways:
- Constant feed, resulting in a continuous line. To do this, you need to pull the trigger of the gun constantly with the same force.
- Intermittent feed. This feed allows for spot application of glue to the surface. This option is more popular, as it allows you to significantly save consumables.
Extrusion method independent of tube size
A suitable homemade extruder can be made in a few minutes using the following components:
- A steel ring with a thickness of at least 4...5 mm, which can be freely placed on the tube spout.
- Synthetic flexible cable.
- Bolt with a diameter of M20 and a length of at least 80 mm.
The container is first fixed on a suitable bracket. The ring is tied on both sides with a cable, both ends of which - left and right - must be the same. A bolt is inserted from the opposite side of the container with sealant, which is firmly connected to the cable. Having securely tightened this connection, you should gradually press the head of the bolt onto the inner valve of the tube. To ensure uniform pressure along the edges of the cable, loops are made into which two wrenches are inserted (or other steel objects: they will act as levers). When the cable is twisted, the bolt will begin to move and, acting on the valve, squeeze the sealant out of the spout.
It should be noted that both options for impromptu squeezing out sealant will require significant effort from the worker. However, the answer to the question - how to squeeze out sealant without a gun - is still possible.
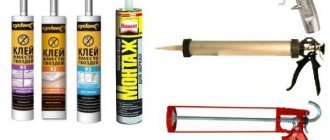
Sealants are a whole group of products that are a synthetic adhesive mass. They are used to fill cracks, seams and joints of parts. The sealant is packaged in special tubes or cylinders. There is also soft packaging in bags, but it requires special tools and a closed case.
For household purposes, sealant in rigid packaging is mainly used. To apply the product to the surface, you need a special gun that will squeeze it out of the tube. However, there are situations when the sealant is needed for one time or when there is simply no tool at hand.
What to do in such a situation? Is there a solution to the problem?
How to use
Before gluing, any surfaces must be cleaned, degreased, and dried; with porous materials, procedures must be carried out especially scrupulously, given the increased tendency to become dirty. It is recommended to prime rough materials the day before to increase adhesion to the composite. Viscous building bases such as concrete must completely harden and form before gluing any elements to them.
The further algorithm of actions when using liquid nails is shown in the instructions for use and consists of the following steps:
- remove the cap from the tube-shaped package;
- destroy the insulating membrane;
- temporarily close the resulting hole with a cap;
- open the packaging immediately before starting work;
- apply dots, mesh or strips of glue to the surface;
- press the parts;
- keep for the time indicated on the package;
- Leave the glued structure alone for several days.
It is impossible to say exactly how long it takes for connecting seams to dry. The speed of the process depends on the temperature and humidity of the surrounding area.
A week is guaranteed to completely complete the polymerization reaction, after which the glued structure can be used under high loads.
There is a slightly different way of working with materials such as heavy wallpaper, which consists in applying an adhesive composition to the surface of the coating, pressing the canvas against the wall for a minute so that the composite is distributed on it. Then the wallpaper is separated from the wall for a few minutes until the composition dries slightly, noticeable by an increase in viscosity. After which the wallpaper is firmly pressed against the wall and held for several minutes.
If you need to wash off liquid nails, then use the solvent that is included in the adhesive. It contains acetone - try using it; if the glue is water-based, you can try rinsing it off with warm water. You need to wash it off before the glue hardens too much; the more time passes, the more difficult it will be to wipe it off.