How to set the ignition on the trimmer
Often, owners of gasoline scythes are faced with the fact that the ignition on their equipment does not work. In most cases, the problem really lies in this node. To fix it, you need to adjust the ignition on the trimmer. But at the same time, it is not uncommon that the ignition coil is working properly, and the breakdown must be looked for elsewhere. The ignition system is designed in the same way on four-stroke and two-stroke internal combustion engines, so troubleshooting this unit is carried out in a similar way. In addition, equipment from different brands has almost the same design of this most important component of the tool, which means the adjustment process will be identical for both Soyuz and Foreman trimmers, as well as for Huter or samples of other brands.
Ignition on the trimmer - operating principle and possible malfunctions
If the owner of a lawn mower wants to adjust the operation of the ignition system on his own, he should understand the principle of operation of this unit. In an internal combustion engine, it consists of a flywheel and a magneto (coil). In turn, the flywheel includes an impeller that performs the function of cooling the motor and a number of permanent magnets .
Operating principle
When the flywheel rotates, an electric current is generated in the magneto, creating a spark at the spark plug as the magnets pass under the coil.
Typical faults
Before you start adjusting the trimmer ignition, you need to cut off other possible causes of failure and make sure that the problem really lies in this unit. To do this, you need to carry out a number of actions in the following sequence:
- inspect the ignition coil housing for damage and defects;
- make sure that all nodes and elements that conduct current are free of contamination;
- check the integrity and insulation of wiring, contacts, fastening strength, the presence of rust at the joints;
- inspect the spark plug cap, as it regularly comes off the high-voltage wire, and they try to restore it manually, and any unreliable connection reduces the power of the spark plug's electric arc;
- check the spark plug, since the quality of modern gasoline very quickly damages this part, but there is another possible problem - the spark plug is wet;
- Make sure the circuit breaker is working.
Having eliminated all possible malfunctions, you can proceed to adjusting the ignition of the coil.
When adjustment is necessary
It is necessary to adjust the ignition system so that the fuel ignites in the combustion chamber at the right time.
Important! When the piston compresses the fuel and almost reaches the dead center at the top, a spark appears in the spark plug. Further, when it passes the maximum upper point, the fuel ignites, as a result of the explosion, energy is generated and directs the piston downward.
If the flywheel is shifted on the shaft relative to its original position, the fuel ignites faster than the piston overcomes top dead center. As a result, the piston moves backward and the crankshaft rotates in the opposite direction. Early fuel combustion can be determined by a broken starter cord, broken starter assembly, or other damage .
Sometimes the ignition is late. The piston compresses the unignited fuel and then goes down, and only then a spark is formed. As a result, the engine either does not work, or its power decreases, and the speed increases much more slowly.
Usually the flywheel with magnets is installed in an ideal position, precisely coordinated with the action of the piston, and is carefully fixed to avoid displacement. This allows us to state that incorrect installation of the part is impossible. But if the flywheel displacement is a confirmed fact, then it is a failure or an accident. Thus, setting the ignition timing is not necessary, since problems with early or late ignition of the fuel are very rare.
Important! Adjusting the ignition system is very simple. There is no need to calculate the ignition timing. The maximum that needs to be done is to correctly set the gap between the flywheel and the coil.
Magneto diagnostics
Magneto is a key component in engine ignition systems. It is a coil with a core that is surrounded by a primary and then a secondary winding. If this part is faulty, there is no spark at the spark plug and the fuel will not ignite.
First way
You can check the performance of the magneto using a tester. To do this, you need to perform the following sequence of actions.
- Set up the tester correctly: use the resistance measurement function and set it to 200 Ohms to take measurements of the primary winding.
- Direct the first electrode of the measuring device to the magneto ground, and the second to the output contact. If the primary winding is working properly, the readings should be from 0.4 to 2 Ohms.
- Set the tester switch to 20 Kohm to diagnose the secondary winding. Then point the first probe into the spark plug cap, and the second one to ground. If everything is in order, the indicators will vary from 4 to 6 Kom, depending on the trimmer model, be it Patriot 547, Husquarna 128 r, or equipment of another brand. If the circuit is broken, infinity will appear on the tester screen. And if a short circuit occurs, the display will show zero.
Second way
If it is not possible to use a tester, there is another way to carry out the test. It is important not to touch the cylinder with the electrode, otherwise the coil will be damaged.
- It is necessary to remove the cap from the spark plug. You should not unscrew the spark plug, as this will maintain compression.
- Then you need to pick up a nail with the head removed and insert it tightly into the cap.
- Next, the cap with the nail should be securely tied to the cylinder with a dielectric. In this case, the electrode should be at a distance of 5.5-7 mm from the cylinder body, but not touch the mass.
- Then you need to use the starter to simulate starting the engine with the ignition button on. In this case, you need to carefully monitor whether a spark appears and try to determine its color.
Important! A strong spark that is white or has a blue tint indicates that the magneto is working properly. If it is weak and orange or yellow, the magneto is damaged.
There is one important point that must be taken into account when diagnosing: an unheated magneto in any condition can form a powerful spark. However, if it is faulty, then, when it warms up, it stops creating current, and the trimmer does not start. Later, when it has cooled down, the coil returns to its operating level, the walk-behind tractor turns on and runs for some time at idle or under load until the magneto temperature rises again. In this case, the part must be replaced with a new one.
On a note! In some situations, the heating problem is not the fault of the coil, but the spark plug. This means that both parts must be checked.
How can you check the coil on a lawn mower?
Many people today use a tester to check the parameters of the mechanism. But not everyone is familiar with a multimeter, in fact, a similar device that includes an ammeter, ohmmeter and voltmeter; accordingly, they can determine voltage, current and resistance. This complex device will answer the question: how to check the ignition coil on a lawn mower . The procedure goes as follows:
- Checking the primary winding. The device is configured to measure resistance and is connected to the positive and negative contacts of the winding.
- The average indicator should appear in the range from 0.4 to 2.0 Ohms - regardless of the manufacturer of the device.
- If the resistance value is 0, then a short circuit is the main cause of the coil failure.
- If it demonstrates infinity, then you need to look for a broken chain.
- The secondary winding is checked by connecting a multimeter to the high voltage wire terminal and the positive terminal.
- Here the normal value should fall within the range of 6 to 8 kOhm. For other types of coils, the parameter can reach 15 kOhm.
Features of adjustment on different models of trimmers
The ignition system is designed in a similar way on vehicles from different brands, so the process of adjusting it will look the same. The differences, if any, will be minor. They are mainly associated with disassembling equipment. For example, removing the casing from the engine is performed with some differences on different trimmers. So, on Patriot devices, you first need to unscrew the bolts and disconnect the air filter housing using a slotted screwdriver. After this, the plastic casing will be very easy to remove. A detailed diagram and structure of a trimmer of a certain model is usually shown in the operating instructions for the tool.
So, you can adjust the ignition for a gasoline trimmer yourself. This process is simple if you know the correct procedure. But first you need to exclude possible malfunctions of other components and parts, for example, spark plugs or magneto, which may be the reason for the mower’s engine not starting. However, when disassembling equipment from different brands, you need to take into account possible differences in design, which are described in detail in the user manual.
Proper care of a chainsaw
There are no unnecessary phrases in the operating instructions; everything that is offered is aimed at the smooth operation of the gasoline pump. Cleaning all parts after each work cycle makes it easier to remove unhardened residues and dirt. Clean only cooled parts. This method contributes to the quality of air cooling of the engine and gearbox.
For refueling, you must use fuel with the recommended oil in the instructions. If the fuel mixture remains in the fuel tank, the oil will float and, upon startup, land on the damper, impairing its adjustment. The mixture may settle and clog the fuel in the carburetor.
READ Stihl Trimmer Oil And Gasoline Proportions
When storing equipment for the winter, inspect and lubricate the gearbox and piston system, wrap the entire saw in an oiled rag and store it in a dry place.
It is impossible, and dangerous for the tool and the health of the mower, to use a metal cable instead of a fishing line. It cuts more efficiently, but the load on the gear and motor increases. The frayed piece of wire flies at the speed of a bullet while being disconnected. Effective mowing can cause rapid wear on the engine piston. For greater mowing efficiency, it is suggested to use the “star” profile of the mowing line.
When caring for their garden, sometimes people have to deal with the fact that their lawn mower will not start. There are several reasons for the failure of this tool.
Diagnostics of lawn mower filters
Another reason why a gas scythe stalls may be the air filter. To eliminate this, try removing the filter and starting the trimmer without it. If it works out, then you will have to change the air filter to a new one, or at least blow out and thoroughly clean the old one.
A gasoline not start due to contamination of the fuel filter. This is the next stage of our algorithm. Here we check the condition of the filter element and, if necessary, replace it with a new one. When replacing, try not to leave the suction pipe completely without a filter; this is prohibited by any operating instructions. Haste can result in repair of the engine piston group.
How does the ignition system on a trimmer work?
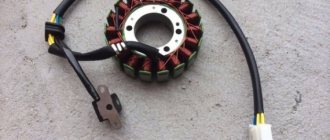
The ignition system of a two-stroke internal combustion engine consists of 2 elements: a flywheel and a coil (magneto). The picture below shows what they look like.
The flywheel contains an impeller that acts as a fan to cool the engine. Also on one side of the flywheel there are permanent magnets, shown with an arrow in the figure.
When the flywheel rotates, an electric current is generated in the coil, which serves to produce a spark at the spark plug. The spark appears when the magnets are directly under the magneto.
Walk-behind tractors
Manufacturers install contactless electronic systems on modern walk-behind tractor models. They consist of a magnetic circuit in the flywheel, a coil, a high-voltage cable and a spark plug. All settings are set at the factory and often do not require adjustment. How to adjust the ignition on a walk-behind tractor with electronic ignition? By analogy with automotive systems.
You can also adjust the gap between the coil and the magneto element. This gap is adjusted using two screws and the displacement of the coil. On modern walk-behind tractors, the gap should be no more than 0.8 mm.
On some models of such agricultural machines, adjustments are not provided at all. For example, in DM type engines the manufacturer did not provide the opportunity to regulate anything. But modern technology provides such an opportunity. How to adjust the ignition on a walk-behind tractor - by changing the gap between the magneto and the coil.
READ Petrol mower Elitech T 750v Video
Why do you need ignition adjustment?
In some cases, when the engine does not start, ignition adjustment will be required. Of course, first you need to check the serviceability of the spark plug and the high-voltage cable with a cap.
It is necessary to regulate the ignition on a two-stroke engine in order to ensure timely ignition of the fuel in the engine combustion chamber . Below is a diagram from which you can understand the principle of operation of the internal combustion engine.
A spark in the spark plug should appear at the moment the fuel is compressed by the piston, when it just barely reaches top dead center (TDC). When the piston passes TDC, the fuel mixture ignites, causing the piston to move downward under the influence of the explosion energy.
Therefore, if for some reason (mostly this occurs due to the displacement of the flywheel on the shaft relative to its original position) fuel ignition occurs before the piston passes TDC, then it returns back, and the crankshaft rotates in the opposite direction. This movement may damage the starter assembly, break the starter cord, etc. In this case, early ignition of the fuel occurs.
There may also be late ignition on the trimmer: the piston, after compressing the fuel that has not ignited, goes down, and at this moment a spark appears. In this case, the engine either will not start or will significantly lose power and will have difficulty gaining speed.
But such problems with early or late ignition on two-stroke internal combustion engines are quite rare, since the flywheel with magnets is already installed in the correct position, which is perfectly synchronized with the movement of the piston. In addition, the flywheel is fixed to the shaft using a key and a nut. Therefore, incorrect installation of the part is excluded.
Basically, ignition adjustment consists of setting the correct gap between the magneto and the flywheel.
Where to start diagnosing a lawn mower
If the lawn mower does not start or stalls immediately after starting, it is necessary to sequentially check all the main components and assemblies. The verification algorithm is as follows:
There is no spark in the STIHL trimmer. The trimmer will not start. There is no spark in the trimmer. Solving the problem
These nodes are most often the source of the main problems, which can be eliminated after a thorough inspection.
How to check the serviceability of the magneto
The magneto is the main component in the engine ignition system and is a coil with primary and secondary windings located around a core . Often, due to a malfunction of the magneto, the spark at the spark plug disappears and the fuel does not ignite. To check the coil, you will need to use a tester and follow these steps.
- On the tester, having switched to resistance measurement mode, you need to set it to 200 Ohms. This method will test the primary winding.
- Connect one electrode of the tester to the ground of the coil, and the second to the contact coming out of the magneto. Normally, the resistance should be from 0.4 to 2 ohms.
- To check the secondary winding, you will need to set the device switch to 20 com. Next, one probe of the device is inserted into the spark plug cap, and the second is connected to ground. Normally, resistance values should be in the range of 4-6 kohms and higher (depending on the model).
If the circuit is open, the device will show infinity, and if it is closed, it will show 0 (zero).
If you do not have a tester, then you can use the following method, being very careful so that the electrode does not touch the cylinder, otherwise the coil will burn out.
- Remove the cap from the candle. There is no need to remove the spark plug to maintain compression.
- A nail without a head must be inserted into the cap. The nail should be of such a diameter that it fits well in the cap.
- Tie the cap with a nail to the cylinder using a dielectric, so that the gap between the electrode and the cylinder body is in the range of 5.5 to 7 mm (but in no case touches ground).
- Using the starter, simulate starting the engine several times. The ignition button must be turned on.
- Observe whether a spark appears and what color it is.
Normally, the spark should be strong, white or have a bluish tint. If the spark is weak and its color is orange or yellow, this indicates a faulty magneto.
You should also take into account the fact that sometimes a magneto can produce a good spark when cold. But after heating, due to internal faults, it stops producing current. As soon as the coil cools down, the trimmer starts again and runs for a while until the magneto heats up again. This coil needs to be replaced.
Sometimes the spark plug can cause a similar heating problem even if the coil is good, so you need to check both parts.
Common problems are the reasons
Malfunctions that most often occur with the magnet are typical for trimmers from different manufacturers. As a rule, this is a weak spark or its absence, as well as interruptions in this process.
Unstable sparking
If the magnet flashes periodically, check the contacts first. They may be burned or greasy. Detected carbon deposits are cleaned with a file, and the oil is wiped off with chamois leather pre-soaked in gasoline. The second possible cause of the problem. Incorrect registration. Gap between contacts. To fix this, you need to set the correct distance.
If the spark appears intermittently, it may also mean that the shift lever cover is worn. To troubleshoot, replace the lever with a new one. In addition, the gap should be adjusted as with any other possible cause of failure. Adjust the contour.
Making your way through the capacitor can also cause interruptions in spark formation. In this situation, the damaged part must be replaced as it cannot be repaired and charged.
No sparking
If the magnet does not emit sparks at all, the main reason is a break in one of the transformer circuits (primary or secondary). To repair a hedge trimmer, replace the faulty part. If this happens to be a short grounding of the primary circuit, this can also cause a lack of spark. You must fix this to solve the problem.
READ How to Make a Snow Blower Out of a Petrol Mower
No sparking
A weak spark on the magnet is caused by a damaged capacitor. To eliminate the malfunction, it is necessary to replace the faulty part.
Ignition control algorithm
The ignition on the trimmer is adjusted quite simply.
- Remove the casing from the engine by unscrewing all the bolts holding it in place. For example, on the Patriot PT 2540 lawn mower, to remove the casing, you will need to unscrew the air filter housing and use a flat screwdriver to remove it from the latches. After this, the plastic case can be easily removed.
- Using a screwdriver, unscrew the 2 bolts (no need to completely unscrew) holding the magneto.
- Turn the flywheel so that the magnets are at the top.
- Next, in order to correctly set the best gap between the flywheel and the coil, you can use a regular business card or pocket calendar. If you don’t have either one or the other on hand, then to set the ignition, you can use a sheet of A4 paper, folding it 2 times (in the end, you will get 4 sheets thick). This thickness will be enough to obtain the optimal clearance and adjust the ignition. Insert a business card or paper between the spool and the magnets.
- The magnetic field will attract the coil to the flywheel. Hold the magneto in this position with your fingers and tighten the bolts holding it in place.
- Remove the business card. After this, the ignition on the trimmer will be adjusted.
A tricky way to set the gap between the flywheel and the ignition coil on a chainsaw
They brought a chainsaw for repair, the flywheel of which was touching the ignition coil. The person could fix everything on his own, but did not know what gap to set.
Good afternoon, dear subscribers and guests of the channel.
There are only two reasons why the flywheel begins to rustle the contact of the ignition coil. The first is an incorrectly adjusted gap or loosening of the coil mounting screws. The second is wear of the crankshaft bearings, as a result of which excessive play occurs and the flywheel will touch the coil. In this case, adjusting the gap will not help; you need to disassemble the engine and change the bearings.
You can notice the malfunction by the characteristic stripes on the flywheel (in the area of the magnets) that remain from the contact to the ignition coil. They are clearly visible in the photo below.
The first step after detecting characteristic stripes is to check the play on the crankshaft bearings. To do this, remove the starter, rotate the flywheel so that the magnets point away from the ignition coil in the opposite direction, and try to shake the flywheel together with the crankshaft.
If there is play, even not much, then you need to remove and disassemble the engine; if there is no play, then just make an adjustment and the problem will disappear.
The gap between the coil and the flywheel should be in the range of 0.25 to 0.35 mm. Less is possible, there will be nothing wrong with that, unless, of course, the flywheel touches. No longer desirable, because this will affect the quality of the spark, which in turn will affect the operation of the engine. As you can see in the photo, in my case there is no gap at all.
It is practically impossible to set such a gap by eye; you need to use a special device, at least that’s what chainsaw manufacturers recommend. But we are frugal people and are not used to paying for something that we can do without. Let them pay over the hill, and we will use cunning and ingenuity and make do with available means, fortunately we have enough of them.
To adjust, we will need to make a spacer from a material that is not magnetic and has a thickness of 0.25 mm. A piece from a plastic lemonade bottle is ideal for this. I usually cut from one and a half racks. This is roughly what she looks like.
Now we install this spacer between the flywheel and the ignition coil, having previously aligned the magnet and the coil contact. Due to the force of the magnet, the coil will be reliably pressed to the flywheel through a plastic spacer, the gap will be equal to 0.25 mm (in some cases even less, because now bottle manufacturers have begun to save money and make very thin bottles).
All we have to do is tighten the fastening screws securely.
This clever adjustment method can be used for all chainsaws, brush cutters and other devices with a two-stroke engine of a similar design.
That's all, anyone who has any suggestions or comments, write in the comments and we'll discuss it.
Also, do not forget to rate the publication and subscribe to the channel so as not to miss the latest materials.
Setting the ignition on the trimmer
Gasoline trimmers use both two-stroke internal combustion engines (ICE) and four-stroke ones. But the ignition system in them is no different from each other, so the repair and adjustment of this fuel ignition system will be the same for different types of internal combustion engines.
How does the ignition system on a trimmer work?
The ignition system of a two-stroke internal combustion engine consists of 2 elements: a flywheel and a coil (magneto). The picture below shows what they look like.
The flywheel contains an impeller that acts as a fan to cool the engine. Also on one side of the flywheel there are permanent magnets, shown with an arrow in the figure.
When the flywheel rotates, an electric current is generated in the coil, which serves to produce a spark at the spark plug. The spark appears when the magnets are directly under the magneto.
Why do you need ignition adjustment?
In some cases, when the engine does not start, ignition adjustment will be required. Of course, first you need to check the serviceability of the spark plug and the high-voltage cable with a cap.
It is necessary to regulate the ignition on a two-stroke engine in order to ensure timely ignition of the fuel in the engine combustion chamber . Below is a diagram from which you can understand the principle of operation of the internal combustion engine.
A spark in the spark plug should appear at the moment the fuel is compressed by the piston, when it just barely reaches top dead center (TDC). When the piston passes TDC, the fuel mixture ignites, causing the piston to move downward under the influence of the explosion energy.
Therefore, if for some reason (mostly this occurs due to the displacement of the flywheel on the shaft relative to its original position) fuel ignition occurs before the piston passes TDC, then it returns back, and the crankshaft rotates in the opposite direction. This movement may damage the starter assembly, break the starter cord, etc. In this case, early ignition of the fuel occurs.
There may also be late ignition on the trimmer: the piston, after compressing the fuel that has not ignited, goes down, and at this moment a spark appears. In this case, the engine either will not start or will significantly lose power and will have difficulty gaining speed.
But such problems with early or late ignition on two-stroke internal combustion engines are quite rare, since the flywheel with magnets is already installed in the correct position, which is perfectly synchronized with the movement of the piston. In addition, the flywheel is fixed to the shaft using a key and a nut. Therefore, incorrect installation of the part is excluded.
Basically, ignition adjustment consists of setting the correct gap between the magneto and the flywheel.
How to check the serviceability of the magneto
The magneto is the main component in the engine ignition system and is a coil with primary and secondary windings located around a core . Often, due to a malfunction of the magneto, the spark at the spark plug disappears and the fuel does not ignite. To check the coil, you will need to use a tester and follow these steps.
- On the tester, having switched to resistance measurement mode, you need to set it to 200 Ohms. This method will test the primary winding.
- Connect one electrode of the tester to the ground of the coil, and the second to the contact coming out of the magneto. Normally, the resistance should be from 0.4 to 2 ohms.
- To check the secondary winding, you will need to set the device switch to 20 com. Next, one probe of the device is inserted into the spark plug cap, and the second is connected to ground. Normally, resistance values should be in the range of 4-6 kohms and higher (depending on the model).
If the circuit is open, the device will show infinity, and if it is closed, it will show 0 (zero).
If you do not have a tester, then you can use the following method, being very careful so that the electrode does not touch the cylinder, otherwise the coil will burn out.
- Remove the cap from the candle. There is no need to remove the spark plug to maintain compression.
- A nail without a head must be inserted into the cap. The nail should be of such a diameter that it fits well in the cap.
- Tie the cap with a nail to the cylinder using a dielectric, so that the gap between the electrode and the cylinder body is in the range of 5.5 to 7 mm (but in no case touches ground).
- Using the starter, simulate starting the engine several times. The ignition button must be turned on.
- Observe whether a spark appears and what color it is.
Why does the gasoline trimmer not start?
The reasons why a gasoline trimmer stopped starting may be different, so it is necessary to carry out a step-by-step diagnosis of the device.
Insufficient compression
If the compression is insufficient, then in most cases it will not be possible to start the engine. To check the compression, you can use a car compression gauge.
- Unscrew the spark plug from the internal combustion engine cylinder.
- Screw the compression gauge in its place.
- Start pulling the starter cord as you would when starting a lawn mower. Do this until the needle on the measuring device stops moving upward. This value will show the compression strength of this engine.
What compression should it be? Normally, compression should be no lower than 8 kg/cm 2. Although even at 8 kg/cm 2 some engines do not idle and stall because fuel is not pumped sufficiently. If your lawn mower does not pump above 8 kg/cm2, then you will have to check the cylinder, piston and rings.
Also, poor compression may be due to a loose carburetor. Check if it is wobbly. If so, tighten the fasteners holding it in place well. Also, if the carburetor is not screwed on properly, you may notice that gasoline drips during operation.
Breather
The breather is a check valve that is designed to equalize the pressure in the gas tank. If it is clogged and does not allow air to pass towards the tank, then a vacuum forms inside the fuel container and fuel stops flowing into the carburetor. To check the serviceability of the valve, remove the hose that goes from the reservoir to the carburetor. If gasoline does not flow out of the tank, it means the breather is clogged.
Trimmer users often wonder: where is the breather? This valve is usually located in the gas tank cap and looks like the following figure.
Cleaning the breather is very simple: disassemble the valve and wash all its components. In some lawn mowers, this valve may be located directly on the fuel tank. It will not be possible to find it right away, since it is hidden from view under the starter housing. This breather can be cleaned using a regular needle.
Fuel filter
This filter cleans the fuel from possible contaminants. If it is clogged, then gasoline does not enter the cylinder, and, accordingly, the unit does not work or stalls after starting. The fuel filter is located at the end of the intake hose that is located inside the fuel tank. To get to the filter, you need to remove the plug with the tubes coming out of it.
When removing the plug, the intake hose may become detached and remain in the tank. It is removed using tweezers.
Next, remove the old fuel filter from the hose and put a new one, purchased in advance, on it. You can also clean the fuel filter if you don't have a new one. The filter must be secured to the hose using a spring clamp.
Install the intake tube onto the plug and insert the latter into the tank.
It should be noted that in some trimmer models the intake hose is not located on the plug, but inside the tank. You can remove it using tweezers or a hook bent from wire.
Malfunctions of electric trimmers
Since the design of an electric mower is much simpler than a motor trimmer, there are few reasons for its failure.
It should be noted that it is better to entrust the elimination of some of them to a specialist.
Basically, the trimmer stops working normally in the following cases:
- electrical cable fault;
- control button is faulty;
- burnt out motor stator winding;
- broken contact connections on the engine.
The gap between the ignition coil and the flywheel of the brush cutter
Gap between ignition coil and flywheel
Spare parts for chainsaws and trimmers with delivery by mail to Russia throughout the country with cash on delivery. SDEK, PEK, Prepaid business lines
Selection by model
- Chainsaws
- Spare parts for Chinese chainsaw 45, 52 cc. Cm
- Spare parts for Chinese chainsaws 38 cc.
- Spare parts for Chinese chainsaw 25 cc.
- Spare parts of Chinese Calm 660
- Spare parts for partners 350, 351, 352, 371
- Spare parts for partners 340S, 350S, 360S
- Spare parts for Husqvarna 137, 142
- Spare parts for Husqvarna 230, 235, 236, 240
- Spare parts for Husqvarna 365, 372
- Spare parts for Calm 180
- Spare parts for Calm 210, 230, 250
- Spare parts for Calm 290
- Spare parts for Cali 361
- Trimmers
- Spare parts for Chinese trimmer 33, 43, 52 cc
- Spare parts for Chinese trimmer 26 cm3.
- Spare parts for Husqvarna 125, 128
- Spare parts for Champion T283, T284
Consumables
Motors
Ignition coil (magneto). Checking functionality and adjusting the backlash.
We often encounter situations where device users have a faulty ignition. Often this actually turns out to be faulty, but often the ignition coil has nothing to do with the failure of the tool. The steps to check the functionality of the ignition coil are described below.
Assessment of the current state of the coil.
Before working with the ignition coil, it is worth checking the functionality of the entire circuit. Follow these steps:
- visually assess the absence of cracks and visible defects on the reel body
- contamination of conductive elements and components
- operability and insulation of high-voltage wires, wire contacts, reliability of their fastening, absence of rust at fastening points
- check the condition of the spark plug cap: it is often disconnected from the high-voltage wire and attempts to restore it using “impromptu” methods. Remember: any “snot” in this place reduces the quality of the electric arc of the spark plug
- check the serviceability of the spark plug. The quality of our gasoline does not allow the candle to “live long”,
- check the functionality of the circuit breaker. This is especially important for Chinese saws and trimmers.
The point of these actions is to exclude from the list of possible failures all elements of the circuit, with the exception of the coil. If everything is ok, we move on.
Related Posts
Ignition of the brush cutter (flywheel and magneto)
Brushcutter ignition coil
.
This ignition coil
.
Installing an ignition coil on a ROSTEC brushcutter
Installing the ignition coil
for
brushcutter
.
Why is a good spark needed?
The quality of the spark determines its ability to ignite a properly formed air-fuel mixture under operating conditions. A weak spark under conditions of high pressure and temperature in the combustion chamber cannot do this. Ignition occurs later or does not occur at all. There is unevenness in the engine, the engine does not pick up speed, there is vibration, detonation, the starter may have a “back kick” effect.
The insidiousness of such a breakdown is that the diagnostics given below do not give one hundred percent confidence in the efficiency of the ignition coil. Such an implicit breakdown, when there is a spark, but it is not entirely correct, is often misleading and makes you write off problems with the ignition coil as a result of a carburetor malfunction. Typical actions in such cases. This. It turns out that a spark can ignite such a spark, but the right one doesn't have one. But the use of an enriched mixture leads to rapid wear of the cylinder-piston group and muffler. Therefore, in such controversial situations, check both the carburetor and the ignition coil again.
Checking the ignition coil.
To avoid possible failures on the wiring side and the shutdown buttons, you can disconnect the control wires from the coil for the duration of the test.
- Coil resistance measurement. This method is not always applicable: firstly, you need to know the coil resistance parameters. Secondly, the ignition, in addition to the inductor, contains semiconductor elements to form the desired high-voltage pulse. Therefore, when you try to call a tape recorder through the high voltage and negative wire, we either get a “Chain break” indication or a huge resistance. If the circuit still rings, it is most likely a sign of a problem.
- Using a device that tests for spark. It is mounted in open circuit between the spark plug and the high voltage ignition coil. The device is expensive and is used mainly in serious service centers.
- With a candle. Remove the spark plug and attach its body to the cylinder. Pull the starter and watch for a spark between the contacts. This method is approximate and does not give a complete picture of the condition of the ignition coil, since the spark plug is not under pressure and the flywheel will rotate faster due to the lack of compression in the engine (plug is turned out)
- "Barbarian" way . It is used at your own peril and taking risks in desperate situations.
- Remove the lid from the candle and insert a nail into it. Be careful not to damage it. then he put it on the candle and exploited it. It’s better to bite your hat off. Otherwise it may be difficult to remove it.
- place the nail 6-7mm from the cylinder.
- “Start” the engine, that is, follow normal factory procedures. This will make the ignition system work. Please note that the candle must be screwed into the candle hole.
- Look at the presence and color of the spark. Ideally, the spark should be “strong” and bright blue. Anything else is a sign of a problem.
- Important points:
- the spark plug cannot be twisted: no compression will lead to faster rotation of the flywheel, which will not correspond to real operating conditions