The benefits of an ice drill for winter fishing
In winter, all reservoirs are covered with a crust of ice, which is an obstacle to fishing. If the ice is thin, then it can be broken, but it will require a lot of effort. Every experienced fisherman knows that one hole is not enough for a good catch, so a day you will need to make at least 10 holes in the ice to find your lucky spot.
The use of hand-held ice axes or rotators is popular, but only in those places where the ice thickness does not exceed 50 cm. If the ice thickness is more than 50-60 cm, then drilling the ice by hand is quite difficult and cumbersome. A useful tool such as a screwdriver, which probably lies idle in the garage during the winter, will help you drill through ice quickly and efficiently.
This is interesting!
Screwdrivers are powered by lithium-ion, hydride and nickel-cadmium batteries, which cannot withstand low temperatures and lose not only capacity, but also power.
If the garage is not heated, and the winters in your region are quite cold, then you need to store power tools or batteries in a dry and heated place. For fishermen, ready-made hand ice axes are produced, the cost of which is about 1000-1500 rubles. This unit is designed to be operated manually. In order not to have to buy a factory ice screw, there is a worthy and no less reliable alternative. This alternative is an ice ax made from a screwdriver, which you can make entirely with your own hands without additional financial costs. The principle of making a homemade ice drill is simple and straightforward, but to make it, you will need to choose a suitable power tool, as well as components for constructing the attachment itself. It's worth noting that many people prefer to use a hand-held ice auger, which requires only minor modifications to connect it to a power tool.
What are the advantages of a homemade ice auger?
Many fishermen who cannot imagine their life without fishing and a good catch want to know how to make an ice screw from a screwdriver. Winter is the best time to go fishing. However, an obstacle to the catch is a thick crust of ice, to break through which you can use a regular drill to dig holes in the ground for installing posts. Only this hand tool requires not only physical strength, but also time. An automatic device made from a screwdriver allows you to drill a hole in a matter of seconds, which is the first and main advantage of a homemade product.
The second advantage of homemade products is the ability to manufacture them without additional costs. In addition, this does not require any special knowledge or skills. The main costs that are needed to make a homemade product are the costs of electricity consumed by the welding machine during welding work.
This is interesting!
The cost of a factory-made manual ice drill starts from 1 thousand rubles.
The greater the number of turns on the screw, the correspondingly higher the price of the device. The number of turns on the device depends on the thickness of the ice being drilled. By making your own device, you can save a decent amount of money, as well as make the required length of drilling equipment.
Before you begin to implement your idea, you must first pay attention to the tool, that is, the screwdriver. This low-power device must meet certain requirements, which are described in the next section.
Choosing the right screwdriver for an ice auger
Drilling holes in ice requires the appropriate tool. A screwdriver is used as such. It has the following advantages:
- Autonomy, which is realized through the use of removable batteries
- Light weight, which is very convenient if you go fishing on foot
- Easy to use - the device does not need to be started, refueled or configured, like a chainsaw
- Reliability - if you choose the right tool for the job, there will be no problems with its use
- Quiet operation - if you compare it with a chainsaw, the difference in the sound of the motor is significant, and, as you understand, when fishing you need silence
When choosing a screwdriver you need an appropriate approach. For an ice drill you will need a power tool that meets the following requirements:
- Power - the higher the power of the tool, the better. The amount of power depends on the voltage, and the higher it is, the more durable the device is. For ice drills, experts advise choosing screwdrivers that operate on batteries with a voltage of 18V or higher. If you use a device that has a voltage of 9V or 12V, then with a high probability the electric motor in the device will quickly fail
- Torque - the higher the value, the better. The minimum value is considered to be 50 Nm, and for normal operation, it is better to take screwdrivers that have a torque value of 80-90 Nm
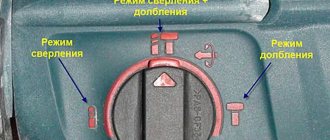
- Chuck rotation speed - the rotation speed of the chuck should be low, therefore, if there is a regulator, drilling work with an ice drill should be done at first speed. The rotation speed of the cartridge at first speed is from 300 to 500 rpm, which is quite enough to make a hole with an ice drill. If the rotation speed is high, then you will need to make or buy an additional planetary gearbox to reduce the rotation speed of the ice drill. The lower the speed, the higher the torque, and therefore the more efficient the tool. The use of a reduction gear allows you to use a power tool in tandem with a drill for drilling soil. An example of using a screwdriver for drilling soil is shown in the video at the end of the material
- The presence of a handle - usually such handles are found on drills and rotary hammers, but expensive models of screwdrivers, which can also be used for drilling holes, have an additional handle included. With such a handle it is convenient to work with an ice auger, which weighs several times more than the weight of the tool.
Of course, it is better to take a tool with metal hydride batteries, since they are more durable and reliable, however, nickel-cadmium batteries can also cope with the task of drilling ice, but we will get acquainted with the types of batteries on screwdrivers further.
Requirements for screwdriver parameters
The following requirements apply to the screwdriver:
- High performance characteristics typical for products of the Metabo and Makita brands and a number of domestic manufacturers.
- The minimum battery voltage should be 18-36 V. More powerful devices are much more expensive, so you can buy a tool with several 18-volt batteries.
- The torque should be in the range from 80 to 90 N*m. If the indicator is lower, a person will experience significant difficulties when drilling a dry and thick bottom. You can increase the torque four times and use a household screwdriver with a torque of 12-16 N/M using a gearbox.
- The optimal capacity of the power source is 2.5 - 4.0 A*h. The larger this value, the longer the tool will work without recharging.
- For safety, the screwdriver should be provided with an additional handle, thanks to which the device can be held with both hands.
How to choose a battery?
One of the main parameters of a screwdriver is the battery, which can be:
- Lithium-ion (Li-Ion). Pros: short charging time and light weight. Cons: intolerance to cold. However, there are models designed to be used at sub-zero temperatures. When choosing, you need to carefully familiarize yourself with the operating ranges, and be prepared that the battery will still have to be periodically heated under clothing.
- Nickel-cadmium (Ni-Cd). Advantages: frost resistance. Disadvantages: heavy weight.
- Nickel metal hydride (Ni-MH). In its properties it is a cross between Li-Ion and Ni-Cd. It is more resistant to cold compared to the former and lighter than the latter.
Read Chum salmon or coho salmon caviar - which caviar is better?
What kind of battery should be on an ice drill?
The effectiveness of the fishing tool depends on the type of battery, or rather its filling. It is irrational to buy another power tool if it does not fully meet the fishing requirements, so the tool that is available is used. If you are buying a new screwdriver, then it would be a good idea to find out what differences there are depending on the types of batteries. Manufacturers produce screwdrivers with the following types of batteries:
- Lithium-ion batteries are expensive, which is due to their advantages: high charging speed, light weight, and large charge capacity. However, they have one significant drawback - sensitivity to negative temperatures. If the battery is in the cold, then a self-discharge effect occurs, so it will not be possible to operate a screwdriver with such batteries for a long time in the cold. You can extend the use of the tool by making a special wool insulation, which is placed on the screwdriver battery
- Nickel-cadmium - have high resistance to low temperatures, which is their main advantage. However, they are large, have low capacity, and also take a long time to charge
- Metal hydride batteries are resistant to frost and also have a large supply of capacity, so screwdrivers with such batteries are best suited for winter fishing
Don't forget to take a second battery with you, which will definitely ensure uninterrupted operation of the tool when needed.
Gear adapters for ice augers
Despite the advantages that an adapter for an ice drill for a screwdriver provides, anglers also note some disadvantages. First of all, for more or less prolonged drilling, the screwdriver must be powerful enough. The instructions recommend using 18 volt screwdrivers with a battery capacity of 3 A*h and a torque of 40–70 N*m. It should also be remembered that not all types of batteries operate in the designed mode at subzero temperatures. Therefore, you have to carry spare batteries with you, which, moreover, you need to try to keep warm.
However, the main problem is the need to use a powerful tool. After all, not every fisherman has an expensive professional screwdriver. Buying it specifically for fishing is expensive. The solution may be to use an adapter with a gearbox.
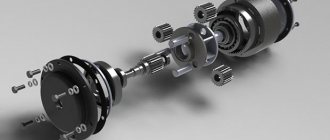
The Icebite adapter, which uses a planetary gearbox, increases torque by 3.2 times. The device weighs less than one and a half kilograms including handles. Using adapters, it can be mounted on almost any type of modern ice drills - Heinola, Rapala, Lazer, Nero, Mora, Leningrad or Tonar. The gearbox housing and elements are metal. The most important thing is that the adapter with a gear allows you to use household screwdrivers for drilling ice, and almost everyone has this tool today. The price of such a device is 4.5-4.8 thousand rubles.
The use of a reduction gear turns out to be simpler and, as a result, more accessible. The rotation speed of the screw, of course, decreases, but the load on the tool also decreases. Due to the increase in torque, it remains possible to use screwdrivers that are not of the highest power, and the design of the gearbox itself is simpler. The geometric dimensions of the gearbox will not allow the ice auger to fall under the ice. You can assemble this kind of adapter for an ice drill for a screwdriver yourself, but they are also available for sale. The price of a gear reducer equipped with handles for holding during operation is 3–3.5 thousand rubles.
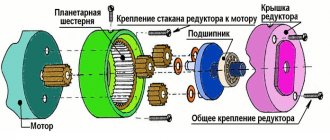
Screwdriver and ice screw - how to connect them
When planning to make an ice auger from a screwdriver, a very pertinent question arises about how to connect these two devices. To ensure the transfer of torque from the screwdriver chuck to the ice drilling attachment, you will need to use a special adapter. This is a metal adapter that you can buy or make yourself. To make such an adapter, you need a cylindrical steel blank, the shank of which must be sharpened to a hexagon.
The size of the hexagon should be such that it fits inside the keyless chuck of the screwdriver. It is not recommended to use cylindrical shanks, since they can rotate in the chuck when the drill rotates.
This is interesting!
Many fishermen complain that the drill falls out of the chuck after making a hole in the ice.
To prevent this from happening, it is recommended to use a key chuck instead of a quick-release chuck, which is more reliable and effectively holds the nozzle shank. To connect the adapter to the ice auger, you need to use a threaded connector. A simple way to connect is to drill a hole with a diameter of 6-8 mm in the side of the nozzle and cut a thread. A bolt is screwed into this thread and serves as a clamp for the adapter inserted inside the ice auger. So, when all the nuances of constructing a nozzle for drilling ice for the appropriate tool have been identified, all that remains is to make it yourself.
Homemade products, what you can do with your own hands, where to adapt the gearbox
A significant number of mechanisms operate at shaft speeds after the grinder gearbox. there are more options for using an angle grinder gearbox for the operation of other devices . Together with non-standard ways of using an entire grinder for homemade projects, masters of technical creativity create interesting compositions . Some are presented by the authors in specially filmed videos.
To the trimmer
Owners of summer cottages and garden plots will be interested in the following video. Many of them use trimmers to maintain the area in proper order. The possibility of failure of the electric motor installed on such a device cannot be ruled out. The author suggests using a grinder instead. Why is a bracket made from waste materials, which is mounted in place of the burnt out engine. In addition to the bracket, you should make an adapter from the angle grinder spindle to the flexible trimmer shafts. A grinder is attached to the installed structure and the trimmer is ready to mow overgrown grass.
The number of revolutions of such a modernized design is about 10,000 rpm . At such speeds, grass mowing is carried out quite efficiently. It is possible that the use of grinders of the minimum power range to reduce the weight and overall characteristics of the trimmer will lead to overheating of the grinders during operation. You should monitor the temperature of the grinder gearbox and take breaks if necessary.
Cultivator drive: Mole and more
Land owners will benefit from the experience of the author of the following video. of the cultivator failed . In its place, the author came up with a mount for the grinder and connected the spindle of the grinder gearbox to the cultivator gearbox . The speed of the grinder is certainly higher than that of a gasoline engine. However, the performance improvement advertised by the author is unlikely to occur. The problem of overheating of the commutator motor will remain and frequent stops, as a protection against it, will remain. Although for owners of relatively small plots the use of such a cultivator will be effective.
Machine
One of the structural elements of the drilling machine is a gearbox from an angle grinder (!you will learn how to disassemble the gearbox here). Working in tandem with an electric motor from a washing machine makes it possible to obtain drill speeds in accordance with the required technological conditions for processing materials. The rotor of the angle grinder is cut to the length necessary to securely fasten the rubber bushing, which acts as an elastic coupling. The other end of the bushing is attached to the motor shaft. Fastening is done using clamps.
The machine has several degrees of freedom . In addition to lifting up/down using a handle and spring-loaded suspension, the lever system allows you to change the location of the cutting tool in the horizontal plane. It is advisable to use it as a tabletop device for making holes in metal and wood parts.
Plasma cutting attachment
A plasma cutter is used to cut round pieces. The frame structure, as shown in the following video, serves as a device for securing and adjusting the diameter of the resulting workpieces. The “trick” in using an angle grinder gearbox is that its conical pair changes the direction of rotation by 90° . Thus, the manual drive creates rotation in the horizontal direction, and the gearbox transfers it to the vertical direction and ensures the correct functioning of the plasma cutter.
For electric bike/motor
If you are tired of pedaling a bicycle, an idea with a grinder drive is in the next video. Here the author installed a grinder on the frame, and installed a drive sprocket on the spindle for chain transmission to the driven sprocket on the rear wheel. The power source is a rechargeable battery , which is paired with an inverter voltage converter from 12 V to 220 V. The bicycle handle is mounted with a pull rod for turning on the electric drive through an inverter converter, which regulates the rotation speed at partial load modes on the bicycle. An original solution to stabilize the maintenance of the grinder's operating mode using an elastic element in the form of an elastic band requires a more detailed refinement of this unit. In stationary mode, this design is functional, but in “combat” conditions a lot of modifications will be required, especially in terms of adjustment in transient conditions.
For outboard motor
The gear ratio of the angle grinder allows the propeller to give the necessary speed for efficient operation . Electric motors from many household devices are suitable for the production of a homemade boat motor. In the following video, an electric motor powered by a car battery transmits rotation to the propeller through a long shaft in a pipe and a gearbox connected to it.
The grinder gearbox is not intended to work in the water element. It is imperative that it be revised . Firstly, make a seal at the output of the spindle from the gearbox, and secondly, plug the place where it is necessary to remove the mechanism for securing the angle grinder from turning when changing tools. Such measures do not guarantee 100% no water getting inside the gearbox. However, more frequent changes of lubricant will make it possible for the grinder gearbox to work as a component of a boat motor for quite a long time.
For a screwdriver
The screwdriver used by the author of the following video already has to work under extreme loads . The use of a reduction gear from an angle grinder increases the amount of torque and allows you to cut threads in more comfortable conditions. Here we use a burnt angle grinder , where the rotor is cut to a length that at the same time allows us to securely fasten the end of the cut shaft in the screwdriver chuck and fit the plastic body of the angle grinder tightly onto it. For a more thorough connection, the screwdriver is attached to the body of the angle grinder with fasteners, while the gearbox bearing of the angle grinder fits into its seat. Drilling and cutting threads with tooling prepared for such work does not require any additional effort.
Sliding gate drive
The following video shows one of the options for driving sliding gates based on a gearbox from a burnt angle grinder and an old screwdriver. The drive is equipped with an automatic device for controlling the opening/closing of the gate. The chain drive with a drive sprocket on the gearbox spindle operates at high speeds to perform the gate control function, therefore creating increased noise during operation.
On a chainsaw, how to use an angle grinder as an attachment and other options
The various capabilities of angle grinder attachments to perform technological operations (cutting, stripping, grinding, polishing and others) are reduced to zero in the absence of power supply. The grinder performs its functions only in the presence of electricity. However, in outdoor conditions there is a device in the form of a chainsaw on which angle grinder attachments can be installed. Why do the following with a chainsaw:
- remove the standard chains and tires from it;
- install a pulley instead of the sprocket;
- put the belt on the pulley and press it with the lid;
- tension the belt using a special device.
The following video shows the installation of an angle grinder attachment with a cutting disc and the tools used for this.
On a scooter
For people obsessed with technical creativity and who want to make their young children or grandchildren happy, the idea of creating an electric scooter is in the next video. a cordless grinder that is not currently in use , and materials for making the scooter itself. Of course, the main thing in the success of this homemade product is that the master has universal skills of a mechanic, turner, welder and many others. By the way, the grinder can be easily removed and used for its intended purpose.
How to make an ice drill from a screwdriver yourself using improvised means
The manufacturing scheme of the nozzle in question is quite simple. To do this, you need to take a drill to make holes in the ground for installing posts, and in its likeness make a device for drilling ice. The main components of the future device:
- The cutting part is the head, which is designed to deepen the tool in the thickness of the ice and cut through the strong ice cover. Sharpened plates made of hard steel are used as the cutting part (it is better to use alloy or tool steel)
- Auger part - has a helical design, the main purpose of which is to lift the layer of ice cut by the cutting part outward
- The shaft is the base on which the auger is mounted, and also with its help the attachment is connected to the power tool
In order not to make an ice screw yourself, you can buy one. They are sold for drilling ice manually, and after purchase all that remains is to perform minor modifications to connect the power tool to the auger. However, next we will consider the process of how you can make your own ice drill and connect it with a screwdriver. To make a homemade ice drill, you will need the following materials:
- Hollow steel pipe with a diameter of 15-20 mm
- Steel plates from which the auger will be made. It should be noted right away that galvanized sheet steel is not suitable. For such purposes, you need a material with a thickness of at least 1.5-2 mm. If this requirement is not taken into account, the screw will simply “squeeze” when operating the tool.
- Steel knives or plates that will be attached to the end of the auger part
The tools you will need to take are a grinder for stripping sheet material, as well as a welding machine and a grinder. A drill may be useful to drill a hole to connect the screwdriver to the bit and also to secure the blades.
At the initial stage, the sheet material is polished. This is done so that at the end of the work it is possible to open the material with paints. This will extend the service life of the homemade product (by eliminating the occurrence of corrosion processes), as well as prevent its premature destruction. The manufacturing process is performed in the following sequence:
- First you need to measure the required length of the pipe and cut it. The optimal length is 1 meter, which is enough to drill through thick ice
- Sheet material is welded onto the pipe and bent into the shape of a screw. To simplify this task, the sheets should be cut into 20 cm pieces and successively welded to the base of the pipe. Boil the joints thoroughly and then clean them with cutters or files.
- The number of turns depends on the thickness of the ice that is planned to be drilled. Usually 5-6 turns are enough to make a good ice drill
- It is recommended to sharpen and weld the end of the pipe near the head to prevent water from getting inside
- Weld or attach 1-2 cutting knives (plates) to the base of the finished auger. If there are two plates, then they should be positioned at the same angle, which will ensure high performance of the device
- Finally, a mount is made on the shank for connection to the adapter and power tool chuck
At this point, the process of making an ice drill is completed, and all that remains is to clean up the welding seams and paint the nozzle to provide additional protection. After the paint has dried, you can go for testing. As practice shows, every third avid fisherman makes ice augers in this way. The time has come to implement the idea yourself, because there is nothing difficult about it. If difficulties arise with the manufacture of a screw, then you can seek help from an experienced welder who will make a screw of any shape and size. Video on the manufacture of the device in question in the material.
This is interesting!
In order not to lose a homemade drill, which can jump out of the chuck and go to the bottom (literally), you should weld a large diameter washer to the shank. The diameter of this washer must be larger than the size of the hole that is drilled with an ice drill. When the nozzle jumps off the cartridge, the washer will hold it, thereby preventing it from “sinking to the bottom.”
How to properly care for a homemade ice auger
In order for a homemade unit to serve for a long time and effectively, it is necessary to provide it with proper care. The nozzle does not require constant maintenance, and so that every year with the onset of winter it is always on the move, the following recommendations and storage tips should be taken into account:
- Store in a dry place
- Never throw or wrap the attachment in a plastic bag or film if the tool has not been dried
- In summer, you can treat the ice drill with machine oil.
- Work on drilling holes in ice should be carried out with uniform load distribution
- Hold the screwdriver firmly with both hands when drilling holes in the ice
Knowing the features and principle of making a homemade ice auger, it will not be difficult to make it in one day, so that tomorrow you can go on a long-awaited fishing trip. If you are wondering what is better to make an attachment for - a screwdriver or a chainsaw, then you should definitely choose the first option. A chainsaw has many disadvantages, so its use is not entirely advisable.
The chainsaw has high speeds, so this tool must be used in conjunction with a gearbox. Manufacturing the gearbox is an additional cost and expense. However, if you set such a goal, then you can figure out how to make an ice drill for a chainsaw. In any case, the homemade option is not only cheaper, but also more reliable than the method of buying attachments from China, which do not always meet the quality requirements. If you don’t want to bother making an ice drill, you can order a ready-made attachment for a screwdriver in online stores.
Rules for caring for a fishing drill
In order for the ice auger to work as long as possible, it must be properly cared for. Basic Rules:
- Wipe the instrument dry after each use. The procedure is necessary for products with and without anti-corrosion coating.
- For storage, use a special case made of thick fabric and with ventilation slots.
- In summer, the drill should be lubricated with a thin layer of machine oil, paying special attention to the legs.
- Do not knock ice and snow off the knives to avoid dulling them.
- Regularly lubricate parts of the folding structure that experience maximum loads with oil to prevent jamming.
- Immediately replace loose nuts after detecting a defect.
- Paint over scratches to prevent corrosion of the protective layer.
When drilling holes, distribute the loads evenly, always take into account the parameters of ice thickness and the rotation speed of the tool’s working head. The quality and speed of drilling will largely depend on the model of the auger and the technical parameters of the screwdriver itself.
Source