History of the compass
We all used compasses at school in geometry and drawing lessons to draw circles and arcs.
As a rule, compasses are made of metal. It consists of two “legs” of equal length, at the end of one of them there is a needle, and the other – a stylus. There are also compasses with one leg with a needle at the end, and the second is a pencil. However, compasses are used not only for drawing circles, but also for measuring distances, for example on maps. In this case, use a compass with needles at the ends, without a stylus.
The Latin word "circulus" means "circle, circle." The word “compass” probably came into the Russian language through the Polish or German languages - from the words “cyrkul” or “Zirkel”.
We can say quite confidently that compasses, as well as rulers, were used in ancient times, about three thousand years ago. This is evidenced by buildings and images in Ancient Babylon and Assyria. Lines and circles have such regular shapes that they could hardly be made without these tools.
The history of the compass began several thousand years ago. Legends and myths of Ancient Greece tell us that this device was invented by Talos, the nephew of Daedalus. Talos invented a device that allows you to draw an absolutely perfect circle by connecting two rods of equal length. It can be assumed that Talos inherited a penchant for invention from his uncle. After all, according to legend, it was Daedalus and his son Icarus who flew into the sky with the help of the wings they invented.
During excavations of an ancient mound in France, archaeologists found a compass that is about two thousand years old. The age of bronze compasses found during archaeological excavations of the ancient Greek city of Pompeii is slightly younger. Their age is about 1900 years.
Throughout the history of compasses, several types of compasses have appeared:
- circular (drawing) – for drawing circles with a diameter from 2 to 80 mm;
- proportional – designed to change the scale of linear size;
- dividing (marking) – allows you to measure linear dimensions.
Few people know that compasses are widely used not only in cartography and drawing, but also in medicine. Doctors use compasses to measure the skull, hips and other parts of the human body. To do this, they use thick compasses - large and small. Using the so-called caliper caliper, you can even measure the thickness of the subcutaneous fat layer. Weber's compass is also used to study discriminatory sensitivity, that is, it is used to determine a person's sensitivity threshold.
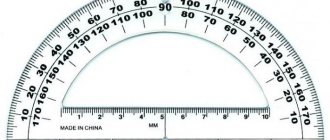
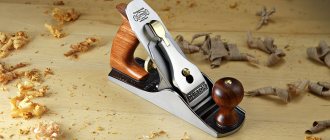
Large drawing caliper
It consists of two smooth metal legs with needles, the angle between which is fixed with a special screw. Designed for marking by applying notches and allows you to do without applying a ruler.
Often used for cutting grooves, tenons and marking wooden boards into equal elements. The needles are fixed at the tips using screw clamps.
If necessary, one needle can be replaced with a stylus and you can get a regular compass for drawing circles.
Myths and legends of Ancient Greece
The legends of Ancient Greece briefly describe how the compass appeared. Each of us knows the story of Daedalus and his son Icarus. But few have heard that Daedalus also had a nephew, Talos, the son of his sister. The talent of invention was in their blood: the nephew left after his death two rods connected to each other and capable of drawing a perfect circle. This was the first compass.
Talos invented the potter's wheel when he was only 12 years old. He also owned the creation of the saw: the skeleton of a fish was responsible for this feat. If it were not for the death of Talos at a young age, many of the tools or mechanisms known to us would have appeared much earlier. But historians claim that the instrument is at least 3 thousand years old. The Assyrians and Babylonians used compasses and rulers in architecture, depicting straight lines and regular circles on temples, house walls, on dishes and cups. History does not name a specific source telling how the compass appeared, but without it it was impossible to draw an even circle either three thousand years ago or now.
History of appearance
Judging by the finds of archaeologists (discovered geometric figures of ideal shape on ancient structures), we can conclude that compasses have been used by humans for thousands of years. The first calipers were found during excavations in Pompeii. The device was similar to a traditional compass, but had certain design differences.
The instrument got its name from two words: the German “Krone” and the Latin “Circulus”. The first word is translated as “crown”, the second means “circle”.
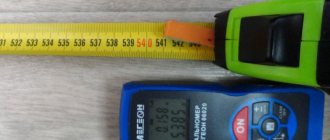
Since the invention of the caliper, it has remained virtually unchanged in appearance and principle of operation. Although it is not used in modern life as often as before. However, in some situations it may not be replaceable. With the development of modern technology, the way of measuring parts has changed - digital calipers have appeared.
What compasses exist today?
Now not all varieties of this tool are associated with constructing circles, but the name still remains - they can conditionally be classified as compasses. This is because the working part of all compasses, regardless of modification, consists of two movable legs (or jaws), the distance between which can be changed when they are closed or opened. But the shape of the working part already determines the function of the tool. You will learn more about each of them from the table.
| Name | Description |
| Marking compass | The simplest device for measuring lengths and transferring them from a drawing to a part. It has two pointed legs that open and close due to a hinge joint. The design may also include a screw, with which you can fix the legs in the desired position for more accurate transfer of dimensions or comparison of parameters of several parts. |
| Drawing compass | Its structure resembles a marking pen; its distinctive detail is the pencil ring attached to one of the legs. Having fixed the pencil on one leg and stuck the other into the surface on which the drawing will be made, you need to select the required distance between the legs and draw a circle, moving the pencil around the axis of the support leg. |
| Calipers for external measurements | It consists of two legs bent inward, between which the part to be measured is clamped. Even when the ends of the compass are closed, there is a large distance between the legs, which allows you to take measurements of hard-to-reach areas of the workpiece. If you need the most accurate data, it is better to choose a product with a fixing screw. |
| Calipers for internal measurements | Consists of two legs, separated in different directions at the ends. This design is ideal for measuring the width of holes, grooves and recesses. By placing the legs inside and spreading them apart until they rest against the walls, you can get accurate measurements, which is impossible to achieve using a ruler. This tool is also called a bore gauge, since it is intended only for internal measurements. Do not confuse it with a device called an “indicator bore gauge,” since it needs to be used differently and is designed differently. |
| Calipers | It consists of a ruler (a rod with a division scale), at one end of which there is a fixed jaw, and a movable one moves along the ruler. By holding the part between them, you can get its outer size. Most calipers have additional upper jaws that are designed for internal measurements. Thus, the device combines measurement with a bore gauge and calipers. You can measure not only the length and width of parts, but the thickness of metal sheets or wires. |
| Vernier depth gauge | It looks like a caliper, but is designed to measure the depth of holes, grooves and grooves. To determine the depth, you need to place the working part inside the hole until it stops; if you need to determine the height of the ledge, then the working part needs to be leaned against it and determine the value using the notch scale. |
It would seem what a simple device underlies all of the listed instruments, and how many different measurements can be taken! Moreover, using a regular ruler, it will not be possible to achieve such accuracy - the contact method of measurements is much more effective. That is why compasses are still indispensable hand-held measuring instruments in production and workshops when making workpieces, processing parts, and monitoring compliance with the declared parameters of finished products. Moreover, the master may need several devices, since he has to perform various tasks, such as: measuring grooves in wooden blanks with a bore gauge, determining the depth of holes with a depth gauge, comparing the sizes of two parts using a caliper, etc. Therefore, it is necessary to choose the right tool, depending on the specifics of the work.
The design of the compass may vary depending on its purpose. In the most common version, it consists of 5 parts:
- Holder.
- Rod mounts.
- Barbells.
- Needles.
- Nozzles
The holder is the central element of the compass. It is a pin with notches, which directly grips the tool during operation. When drawing circles, the rotation of the compass is performed by turning the holder with your fingers.
The compass has 2 rods that have a rotating attachment to the holder. Due to this, it is possible to dilute them up to almost 180 degrees. By increasing the distance between the rods, you can increase the radius of the circle being drawn.
There are tips at the end of the rods. One is a needle, and the second is a writing tip. The first may not be removable or replaceable. It is less sharp than a sewing needle. The purpose of the needle is to act as a reference point. It is placed in the center of the future circle and, due to its sharpness, is slightly immersed in the surface. This prevents it from shifting when turning the compass. At the moment of rotation, the writing tip draws an ideal circle on the surface, the beginning and end of which fall on the same point.
The writing attachment of the compass can be a fastening mechanism for installing a lead with a diameter of 2 or 0.5 mm. Instruments for schoolchildren usually have a thick lead, as it better withstands mechanical pressure. A thin nozzle of 0.5 mm is more accurate; it draws a clear line, which is important when making drawings. There are also compasses with clips into which you can insert a pencil, ballpoint pen, or rapidograph.
The design of the compass provides a rigid mechanism for fixing the position of the rods. The presence of play in it would lead to a mismatch between the beginning and end of the circle. It should be noted that this happens when using a cheap tool, especially in the absence of proper experience in using a compass.
How to use
Compasses are mainly used for drawing regular circles, as well as quickly marking segments of the same length. Unlike the template ruler with inner circles, it is adjustable and more compact.
To draw a circle of a certain diameter with a compass, you need a ruler. It is necessary to move the tool shafts apart so that the distance between the needle and the writing lead is half the diameter, that is, the radius. Then the needle is pressed against the surface at the center of the future circle. After this, you need to rotate the compass 360 degrees so that its writing head draws a circle.
When drawing, you must hold the tool strictly by the holder. Pressure on the rods is not allowed, as this may cause them to move away from each other. As a result, the correct circle will not work.
You can also draw equal segments using a compass. It is necessary to stretch the tool shafts so that the distance between the needle and the writing tip is required for transfer. For example, they can be installed at the beginning and end of the segment that needs to be copied. To transfer these indicators, it is necessary to deepen the needle of the compass in a new place and leave a stroke on the surface with a writing nozzle. These points are then connected by a line drawn along a ruler. This method of transferring distance is very accurate, since there is no rounding of data when using it.
These are the basic techniques for using a compass for drawing. There are also more complex ways to use it. The tool is used to measure distances on maps, plot routes, etc.
Purpose and use
The main task of the device is to determine the dimensions of parts and parts of various objects:
- heights;
- length;
- width;
- thickness;
- diameter
This is necessary primarily in order to compare the obtained values with the reference ones. The device is very often used in conjunction with a caliper and a ruler. This is necessary to measure:
- external linear dimensions;
- walls of complex parts with protrusions;
- intervals;
- jumpers;
- steps.
The device is also used:
- when marking workpieces;
- when roughly measuring the diameters of various parts during rough turning on a lathe.
When performing linear measurements, you should spread the legs of the instrument to the desired state. Then they are brought together until they touch the walls of the object that needs to be measured. Next, using a ruler, you need to determine the distance between the ends of the device’s legs. When making markings, the length of the solution is set using a caliper or ruler.
Use in medicine
Since the compass appeared long ago, it has not undergone fundamental changes, but the scope of its application has expanded significantly. Medicine is a science that uses different types of this instrument. There is a thick compass: it can be large and small. They serve to measure the human body and head, its transverse dimensions. A caliper is used to measure the thickness of subcutaneous fat deposits. It is especially often used in obstetric practice: the size of the pelvis of pregnant women is measured. Weber's compasses are already a tool for psychophysiologists: they measure the threshold of human skin sensitivity.
Makeup
Used by makeup artists to shape eyebrows. To prevent distortion when plucking or painting, their symmetry is determined using the device. Such instruments are made of transparent material (for example, plastic). Less often you can find models made of metal. A distinctive feature of such calipers is the presence of three legs. The two outer legs are used to measure the span of the eyebrows, and the central one is used to mark the break line.
Using compasses in geometry
No one thinks long about the answer to the question of what a compass is for. This subject is familiar even to primary schoolchildren. The main purpose of a compass is to draw circles of various sizes. Older schoolchildren already know that compasses not only draw circles, but also solve many different geometric problems.
For example, dividing a segment into two equal parts without drawing tools is very difficult. Using a compass, you can divide a segment into two parts that are absolutely equal in length. As you can see, for such an operation it is necessary to make the points indicating the ends of the segment the centers of intersecting circles. Draw a line through the intersection points of these circles along the chord. The intersection point of the line and a given segment will divide this segment exactly in half.
Here's another example of what a compass is for. Let's say you have given the sides of a triangle that needs to be constructed on paper. It is impossible to determine by eye the correct angles that such a triangle will have.
Using a compass to construct a figure is very easy. Take a segment equal to one of the sides of the triangle. From the ends of the segment we draw circles, the radius of each of which is equal to the given length of the side of the triangle. The intersections of the circles will become the angles of the triangle we need.
Now you have an idea of what a compass is for. The pictures above illustrate its use.
Types of compasses
There are many types of compasses. Depending on the functions performed, the working part of the tool changes. Below we consider the main types:
- Marking. Either dividing or measuring. A simple tool with which you can measure the length and transfer it from the drawing to the part. Both rods are connected by a hinge and end with needles. Using needles, you can mark many materials.
- Drawing. The instrument that people begin to use in school. There is a needle on one rod, a stylus on the other. The needle fixes the barbell on a sheet of paper, allowing you to draw arcs and circles and perform constructions.
- Calipers for external measurements. Its pointed rods are bent inward, and the part to be measured is clamped between them. A fixing screw is used to improve accuracy.
- Calipers for internal measurements. The rods are bent outward at the ends. Allowing you to measure the width of holes, recesses, grooves.
- Calipers. It has a structure that is different from the usual one. It is a ruler (bar) with a scale. One jaw is fixedly attached to one end of the ruler, and the second one moves along the ruler. There are also additional small jaws for internal measurements. The tool is used both as a bore gauge and as a caliper.
- Vernier depth gauge. Looks like a caliper. The difference is that it is intended to determine the depths of holes, grooves, and grooves. To take measurements, the working part is placed inside the hole until it stops.
There are types of tools, modified depending on the activities in which they are used, for example:
- Carpentry. It can be marking, that is, with needles at the ends of the rods, or it can be drawing, with a stylus on one rod and a needle on the other. It differs from the drawing ones primarily in size. These are quite large instruments.
- Locksmith. Used in plumbing. They can also be marking or with a writing tip.
Sources
- https://separett.su/instrumenty/vidy-cirkulej-2.html
- https://FB.ru/article/162952/kak-poyavilsya-tsirkul-istoriya-proishojdeniya-kratko
- https://www.vseinstrumenti.ru/ruchnoy_instrument/izmeritelnyj/shtangentsirkuli/articles/1252/
- https://tehpribory.ru/glavnaia/instrumenty/cirkul.html
- https://lesoteka.com/instrument-i-oborudovanie/tsirkul
[collapse]