Do-it-yourself accessories for a hand-held circular saw - Metals, equipment, instructions
It’s hard to imagine a carpentry workshop without a circular saw, since the most basic and common operation is longitudinal sawing of workpieces. How to make a homemade circular saw will be discussed in this article.
Introduction
The machine consists of three main structural elements:
- base;
- sawing table;
- parallel stop.
The base and the sawing table itself are not very complex structural elements. Their design is obvious and not so complicated. Therefore, in this article we will consider the most complex element - the parallel stop.
So, the rip fence is a moving part of the machine, which is a guide for the workpiece and it is along it that the workpiece moves. Accordingly, the quality of the cut depends on the parallel stop because if the stop is not parallel, then either the workpiece or the saw blade may become jammed.
In addition, the parallel stop of a circular saw must be of a rather rigid structure, since the master makes efforts to press the workpiece against the stop, and if the stop is displaced, this will lead to non-parallelism with the consequences indicated above.
There are various designs of parallel stops depending on the methods of attaching it to the circular table. Here is a table with the characteristics of these options.
| Rip fence design | Advantages and disadvantages |
| Two-point mounting (front and rear) | Advantages: · Quite rigid design, · Allows you to place the stop anywhere on the circular table (to the left or right of the saw blade); · Does not require the massiveness of the guide itself. Disadvantage: · For fastening, the master needs to clamp one end in front of the machine, and also go around the machine and secure the opposite end of the stop. This is very inconvenient when selecting the required position of the stop and with frequent readjustment it is a significant drawback. |
| Single point mounting (front) | Advantages: · Less rigid design than when attaching the stop at two points, · Allows you to place the stop anywhere on the circular table (to the left or right of the saw blade); · To change the position of the stop, it is enough to fix it on one side of the machine, where the master is located during the sawing process. Disadvantage: · The design of the stop must be massive in order to ensure the necessary rigidity of the structure. |
| Fastening in the groove of a circular table | Advantages: · Quick changeover. Disadvantages: · Complexity of design, · Weakening of the circular table structure, · Fixed position from the line of the saw blade, · Quite a complex design for self-production, especially from wood (made only from metal). |
In this article we will examine the option of creating a parallel stop design for a circular saw with one attachment point.
Preparing for work
Before you begin, you need to decide on the necessary set of tools and materials that will be needed during the work process.
The following tools will be used for work:
During the work you will also need the following materials:
- Chipboard.
- Plywood.
- Solid pine.
- Steel tube with an internal diameter of 6-10 mm.
- Steel rod with an outer diameter of 6-10 mm.
- Two washers with an increased area and an internal diameter of 6-10 mm.
- Self-tapping screws.
- Wood glue.
The entire structure consists of two main parts - longitudinal and transverse (meaning relative to the plane of the saw blade). Each of these parts is rigidly connected to the other and is a complex structure that includes a set of parts.
The main technological solution of this stop is the principle of jamming using an eccentric and tightly pressing two transverse guides with an oblique end.
Fixation occurs by turning the eccentric mechanism.
The pressing force is large enough to ensure the strength of the structure and securely fix the entire rip fence.
The entire design is not trivial and consists of a large number of different parts, each of which has its own purpose and size.
From a different angle.
The general composition of all parts is as follows:
- The base of the transverse part;
- Upper transverse clamping bar (with an oblique end);
- Lower transverse clamping bar (with an oblique end);
- End (fixing) strip of the transverse part.
- Planar sliding element (laminated chipboard, 2 pcs.);
- The base of the longitudinal part;
- Eccentric
- Eccentric handle
Preparation of blanks
It all starts with the fact that it is necessary to cut the workpieces to the specified dimensions.
A couple of points to note:
- flat longitudinal elements are made from laminated chipboard, and not from solid pine, like other parts.
- Two blanks of clamping strips are made with “oblique” ends (not 90º, but 63.5º).
Thus, we get the following set of blanks.
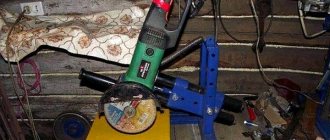
Eccentric clamp
Let's start making an eccentric clamp that rigidly fixes the guide.
We glue two blanks measuring 80x80 mm together.
Press with a clamp and let the glue dry. In the toga you get something like this.
Using a 22 mm feather drill, we drill a hole in the end for the handle.
In the center of the workpiece you need to make a blind (not through) hole 5 mm long.
It is better to do this by drilling, but you can simply hammer it with a nail.
The circular saw used for work uses a homemade movable carriage made of laminated chipboard (or, as an option, you can whip up a false table), which is not too bad to deform or damage. We hammer a nail into this carriage in the marked place and bite off the head.
Thus, we have an improvised axis of rotation for our part, called the “eccentric” (although in this case, the filled hole is located strictly at the geometric center).
Then, putting the workpiece on an axle made of a nail, we begin to grind off the corners and excess material.
As a result, we get a smooth cylindrical workpiece that needs to be processed with a belt or eccentric sander.
We make a handle - it is a cylinder with a diameter of 22 mm and a length of 120-200 mm. Then we glue it into the eccentric.
Transverse part of the guide
Let's start making the transverse part of the guide. It consists, as mentioned above, of the following details:
- The base of the transverse part;
- Upper transverse clamping bar (with an oblique end);
- Lower transverse clamping bar (with an oblique end);
- End (fixing) strip of the transverse part.
Upper transverse clamping bar
Both clamping bars - upper and lower - have one end that is not straight 90º, but inclined (“oblique”) with an angle of 26.5º (to be precise, 63.5º). We have already observed these angles when cutting the workpieces.
The upper transverse clamping bar serves to move along the base and further fix the guide by pressing against the lower transverse clamping bar. It is assembled from two blanks.
They are collected with glue.
And they are additionally fixed with self-tapping screws.
Lower transverse clamping bar
The lower transverse clamping bar is rigidly fixed to the base and serves to fix the guide by pressing against the upper transverse clamping bar.
Like the top bar, it also consists of two blanks.
We also assemble using glue and screws.
Both clamping bars are ready. It is necessary to check the smoothness of the ride and remove all defects that interfere with smooth sliding; in addition, you need to check the tightness of the inclined edges; There should be no gaps or cracks.
With a tight fit, the strength of the connection (fixation of the guide) will be maximum.
Assembling the entire transverse part
The cross guide bar of the cross guide is directly fixed to the circular table.
A transverse base is attached to this bar.
We assemble the entire structure using glue and screws.
Longitudinal part of the guide
The entire longitudinal part consists of:
- Planar sliding element (laminated chipboard, 2 pcs.);
- The base of the longitudinal part.
Planar sliding element
This element is made from laminated chipboard because the surface is laminated and smoother - this reduces friction (improves sliding), and is also denser and stronger - more durable.
At the stage of forming the blanks, we have already sawed them to size, all that remains is to refine the edges. This is done using edge tape.
The technology for edging chipboard is simple (you can even glue it with an iron!) and understandable.
The base of the longitudinal part
The base consists of four longitudinal elements, as well as two vertical ones for installing an eccentric.
If you break it down into details, you get the following diagram.
We collect the previously sawed blanks for glue.
We also additionally fix it with self-tapping screws. Do not forget to maintain a 90º angle between the longitudinal and vertical elements.
Assembly of transverse and longitudinal parts
First you need to attach the substrate (longitudinal element) to the upper transverse clamping bar.
We fix it with glue and screws.
Here it is VERY!!! It is important to maintain an angle of 90º, since the parallelism of the guide with the plane of the saw blade will depend on it.
Then we install the longitudinal base on the substrate.
We also fix it with glue and screws.
Installation of the eccentric
The eccentric is installed between two vertical elements on the longitudinal part.
How to install the saw correctly
The next step is to properly position the saw on the top surface of the saw table. To do this, the contractor must perform the following actions:
- Install the tool so that its working part fits into the pre-prepared groove.
- Mark the locations for the M8 plowshare bolts with countersunk heads (they will be used to secure the saw blade).
- Drill the plywood from the top to make equal holes with a diameter of about 8 mm.
- Make a countersink to countersink the bolt heads.
- Carefully install the metal saw blade and carefully tighten the bolts from the bottom using nuts and lock washers.
The work of making a machine requires great concentration and concentration. The slightest mistake can lead to having to start all over again.
After securing the structure to the table, you need to install a block to turn the circular saw motor on and off. A hole is cut in the housing, the switch is secured with bolts and universal glue. There should be two separate cables coming from the unit. One to the instrument, the other to the nearest electrical outlet.
When assembling such a unit yourself, it is worth taking into account the performance of the motor, as well as the maximum power of the electric motor. In this case, experts advise choosing a motor whose power does not exceed 1000–1200 W, otherwise operation may be unsafe. And a more powerful saw means a heavier and more stable table.
READ Screwdriver Operation From Network 220
Do-it-yourself accessories for a hand-held circular saw - Metalworker's Guide
How to make a circular saw with your own hands from a hand-held circular saw
If a person lives in a private home or has a garden plot, then having a stationary circular saw in the home craftsman’s arsenal is not only better, but sometimes even necessary.
The simplest homemade guide bar for a circular saw or DIY. Unfortunately, the price of an industrially made standard of such a saw does not correspond to the frequency of its home use, and for some Russians it is simply not affordable.
At the same time, making a “circular” with your own hands is quite simple, using the drive of a sewing machine or an ordinary electric drill. Selecting a saw blade for a circular saw blade. The disc is needed for Selecting a 190mm disc for.
But the quality of work performed and the range of operations performed depend almost entirely on the circular saw .
Bed design
The simplest circular saw frame, the drive power of which does not exceed 0.8...12 kilowatts, is quite easy to make with your own hands from thick plywood and wooden blocks. Below are several ways to make a table from a hand-held circular saw.
For the drive, you can use an electric drill “BOSCH GSB 19-2” (power 0.85 kilowatts) or “DWT SBM-1050” (power 1.05 kilowatts), which is attached to under the stove using a special bracket. The length of the bed will depend on the length of the material being cut.
For the table, you must purchase bakelite plywood with a thickness of at least 50.0 millimeters. DIY table for a circular saw. DIY guide for a hand-held circular saw.
Of course, a wooden bed is not suitable for professional work, but in order to unravel boards and quickly saw through bars, such a homemade design is quite sufficient.
In general, the bed will consist of a base and a tabletop (desktop). Of course, when manually making a circular saw , you must strive to simplify the design as much as possible.
The design of the work table will primarily be determined by the design of the cutting blade mounting unit. DIY guide bar for a hand-held circular saw.
Homemade circular devices use either a circular disk mounted directly in the chuck of an electric drill, or (more preferably) a two-support shaft driven into rotation by an electric motor through a belt drive.
Making a countertop
At the first stage of making a frame with a wooden tabletop with your own hands, the existing sheet of plywood is placed in accordance with the existing sketch or drawing.
In order to reduce the number of cuts, markings are carried out from the edges of the sheet. DIY accessories for circular saws.
The tool used is a fine-toothed hacksaw or a jigsaw.
A few simple accessories for a hand-held circular saw. Part 1
These simple and very useful devices
for
a hand-held
circular
saw
- rip fence,
device
.
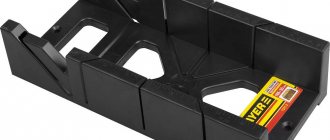
Do-it-yourself miter box or miter cutter for a hand-held circular saw
Group VK This is an easy-to-manufacture device
, for sawing at different angles, c.
A slot for the disk is marked on the underside of the sawn piece. The cut can be made with a finger cutter, securing it with your own hands in the chuck of an electric drill. DIY circular table made from a hand-held circular saw. DIY table for a circular saw.
In order to maintain the straightness of the cut edges, a simple homemade copier made from two metal corners is attached to the tabletop with clamps. Further work depends on the mechanism for attaching the circular
saws.
The easiest way is to install it manually on two bearing supports, and drive it through a belt drive from a separate electric motor or from an electric drill.
To add additional rigidity to the tabletop, it is advisable to attach stiffening ribs along its edges, which can be made from bars or aluminum corners. The stiffeners are fastened to the table using self-tapping screws.
To give greater strength to the entire structure, an additional layer of epoxy glue can be applied to the joint, which will fix the block to the tabletop along the entire plane of the joint.
The distance from the edge of the tabletop to the block should be 2.0...4.0 centimeters.
After this, in accordance with the selected drive design, the circular disk support assembly is attached.
For reliable fastening, it is better to fix the bearing housings to the frame using a screw, threaded connection.
In this case, the countersunk screw heads are located on the upper plane of the tabletop and should not protrude above its plane. The upper working surface of the desktop should be coated with wear-resistant varnish and polished.
For greater safety when working with a homemade device, it is advisable to install a swinging protective cover over the cutting edge of the disk.
Base design
For safe operation of a homemade circular saw, the table must be installed on a sufficiently rigid and durable base.
To make it manually, the master’s imagination is given complete freedom.
The base can be made in the form of a wooden base, but it is better to weld it from a corner (such as an aquarium frame) in accordance with the size of the tabletop.
Some manufacturing nuances
The main parameter that determines the design of a homemade “circular saw” is the thickness of the boards being cut. A circular saw is a circular hand saw for sawing boards, like.
For household work with your own hands, it is usually not necessary to saw wood thicker than 15.0 ... 20.0 millimeters.
To change the depth of the cut, you can use and/or make a special mechanism for lifting the disk, but this will significantly complicate the design of the homemade product.
Using a belt drive, you can change the speed with your own hands.
If you plan to use an electric drill as a drive, then preference should be given to models with variable chuck rotation speed, then use a DIY circular saw like this
, it will be a pleasure.
Conclusion
Despite the primitiveness of the described design, it will significantly facilitate DIY homework, from carpentry operations with boards to cross-cutting thick branches cut from garden trees.
Homemade device for precise cutting of boards with a hand-held circular saw
With a standard hand-held circular saw it is extremely difficult to make precise cross-cutting of boards. A simple homemade device, easily made from scraps in your home workshop, allows you to get the perfect cut in accordance with the markings.
The saw is designed for perpendicular cuts of boards ranging from 100mm to 250mm wide in 50mm increments, but can be easily modified to suit your needs.
How does a handheld circular saw attachment work?
The device in question is extremely simple and consists of only a few parts: a base for the saw, a guide rail, a thrust block and an eccentric clamp that ensures reliable fixation even on lumber that has been loosened with slight deviations in width.
Diagram of a device for a hand-held circular saw.
The homemade product is very easy to use. First, markings are made on the board.
Then a homemade device is installed on top, the lower stop of which is pressed against the edge of the workpiece, and the right edge is aligned with the mark.
Photo of a device for a circular saw.
Next, the plywood base is securely secured by turning the lever of the eccentric clamping mechanism.
Photo of the device - view from the bottom.
Now all that remains is to place the circular saw on the base and make the cut, pressing the edge of the sole against the guide side stop.
Cross cutting of boards using a manufactured device.
The result will be a perfectly even cut that exactly follows the markings.
With this device it is convenient to make many cross cuts when you need to frequently move the tool to a new cutting line, for example, when making grooves in beams. It is also useful if it is necessary to reduce the length of the workpiece by several millimeters, and it will cope with this task no worse than a miter saw.
How to make a device with your own hands
The cutting device is made for a specific model of power tool. On your circular saw, measure the distance from the engine to the bottom plane of the sole and subtract 5 mm. The result obtained is the height of the guide stop.
Removing the required dimensions of the circular saw.
Prepare a plywood base with right angles and wooden slats with parallel edges according to the dimensions.
Blanks for assembling a device for cross-cutting with a circular saw.
Measure the distance from the cutting blade to the edge of the sole.
Add an allowance of 6–10 mm and install a guide rail at this distance from the right end of the plywood. Secure the plank with countersunk screws, ensuring its strictly perpendicular position.
Screw the stop block on the back side and fix the device on the workbench.
Cut the plywood to the final width with a circular saw, creating a reference edge for precise positioning of the jig along the markings.
Draw a template for the cam clamp cam on paper.
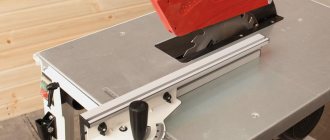
Circular saw guide
Diagram of a homemade workbench (front view).
The simplest device is a guide bar. You can easily get a clean, straight cut. For manufacturing you will need an even straight bar of the required length. It is attached to the material being processed using self-tapping screws (if permissible) or clamps. The fastening must be carried out at such a distance from the required cutting line that the position of the saw blade coincides with the marking when the side sole of the circular saw rests on the block. This method is suitable for a one-time cut, however, when repeating the same type of operations, the procedure for marking and installing the block will need to be repeated each time.
The guide bar can be improved by securing it to a sheet of durable plywood 6-8 mm thick. When working, one edge of the sheet will align with the cutting line. At a distance equal to the distance between the saw blade and the edge of the circular saw sole (working distance), a guide block is attached to the plywood with self-tapping screws. When working, you only need to align the working edge of the plywood sheet with the cutting line and secure the opposite edge with clamps.
DIY circular
With a standard hand-held circular saw it is extremely difficult to make precise cross-cutting of boards. A simple homemade device, easily made from scraps in your home workshop, allows you to get the perfect cut in accordance with the markings.
The saw is designed for perpendicular cuts of boards ranging from 100mm to 250mm wide in 50mm increments, but can be easily modified to suit your needs.
How to make accessories for a circular saw with your own hands?
It is also useful if it is necessary to reduce the length of the workpiece by several millimeters, and it will cope with this task no worse than a miter saw.
Do-it-yourself circular: drawings, video, description
At 35 it cuts much better, especially thick materials.
The reach of the saw, as can be seen in the photograph, is about 9 millimeters. If you replace the table material with a thinner one, this distance can be increased even more.
To check, the following were successfully sawed:
- fiberglass - 2 pieces 10*5 centimeters
- plexiglass - 1 sheet A4
- six-layer birch plywood
The first two materials were cut easily and quickly, without the use of guides, simply by following a line drawn with a thin marker. Birch is sawed slowly, but still sawed. The power of the engine and the lack of guides have an effect: with such thick material the disk will be clamped at the slightest misalignment.
Next up is sawing other materials and converting the machine structure to a completely metal one. So it’s quite possible to make a homemade circular with your own hands, and it’s very simple.
4 like it? 2
Method of using the guide bar
The ruler with the base is fixed to the workpiece in one of two ways - the part of the material to be cut is located on the side of the saw blade or under the base with a guide ruler attached to it.
Next, along the length of the material being processed, two marks are made at the distance where the cut should be located.
With all this, the distance between them should be maximum, and when marking, it is necessary to take into account the width of the saw blade.
The base of the ruler is installed along those two marks, after which it is secured with clamps.
In order for the saw to freely come out of the material at the end of the work, in each specific situation there must be a certain height of the jaws of the clamps.
This device is only suitable for working with materials that have a large width and length.
Therefore, you will not be able to cut the board into beams using this design.
If the length of your guide ruler is too long, then it will not be convenient for it to make a cross cut.
It would be advisable to make a smaller device.
Each size of material being processed has a suitable guide ruler size.
For example, to work with cabinets that are 60 centimeters wide, a guide 1 meter long is suitable.
I recommend the following video, in which the author independently makes several different accessories for a hand-held circular saw:
Accessories for a circular saw: description, device, principle of operation, photo
When you have your own house or summer cottage, a static circular saw will be an excellent assistant for you. With its help, you can quickly and efficiently carry out complex work on cutting various products. Such a tool can be purchased if your budget allows. Or you can create it yourself. It is also important to have the necessary equipment for it.
A circular saw. Concept
A circular saw is a special electric tool that allows you to quickly and smoothly cut wood products, plywood, laminate and various boards.
There are household and professional models. The former can function with pauses. Their engine needs breaks of 15-20 minutes. They cannot withstand significant loads.
The latter have more powerful engines. They can work intensively for a very long time. Therefore, they are usually used in production.
For personal use, household modifications are used. And keeping professional versions is unprofitable.
The level of work and its types are determined by the frame of this tool.
About the elements of the frame
The attachments for a circular saw are different. The main one is the bed. If the power of the saw is insignificant (no more than 1.2 kW), such a frame is not difficult to build yourself. Its length is affected by the length of the material going for cutting.
A Bosch electric drill is suitable for the drive; its parameter is 0.85 kW. It is mounted under the stove using a special bracket.
The accuracy and evenness of the cut is better when the workpiece rests entirely on the table surface. And if the table has too large parameters, it will fill the entire work area. Here you need an average value. The height is selected according to your height to make it more convenient to work.
For the table, buy bakelite plywood with a minimum density of 5 cm.
In addition to this you will need:
- Board 5 x 10 cm.
- Bars 5 x 5 cm.
- Clamps.
- Set of self-tapping screws.
- Glue and varnishes.
- Manual circular.
- Electric jigsaw.
- Manual router.
- Drill.
Making a table
When you need to assemble accessories for a circular saw with your own hands, the first step is to create a frame. It consists of a base and a table top.
The design of the second element is influenced by the structure of the working disk fastener.
The process of creating a key fixture for a circular saw takes place in several stages. They are outlined below:
- A functional table (table top) is created from a plywood sheet. Work proceeds according to the selected parameters. Markings are made on the sheet using a pencil along a ruler. The sheet is cut with a jigsaw. The edges are processed with a router. The created workpiece is polished.
- Marks for the saw are indicated on the bottom plane of the tabletop. The completed workpiece is turned over. A saw without a blade is placed on the intended area. The parameters of the sole are indicated.
- Using a router, an 8-10 mm opening is created in this material according to the designations of the landing area.
- Trying on a saw. If necessary, the parameters are adjusted. Then the areas of its fasteners and the slot for its disk are designated. If the material will be cut at different angles, this must be taken into account when marking the slot. She will receive a section in the shape of a trapezoid. The top will rush down.
- The pencil marks the stiffening ribs. The legs will join them later.
- Work on the stiffeners. To create them, boards 5 x 10 cm are used. They are placed around the perimeter at a distance of 7-10 cm from the extreme side of the table. The board is applied to the tabletop. Circled on both sides. Its main line is marked along the ruler. The positions of the screws are marked on it. They are as follows: 5 cm - from the extreme side of each of the existing ribs. In this case, a distance of 15-20 cm is maintained along the entire length of the rib. Through holes are drilled according to the created markings.
- Longitudinal stiffening ribs are installed. To do this, boards are marked and sawn. They are glued to the tabletop. They are tightened with clamps.
- The side stiffeners are marked. The boards are sawn and glued as in step 7.
- The clamps are held in place. The structure is pulled using self-tapping screws through the created holes, which are pre-drilled from the outside. This way the heads of the screws will be completely sunk into the table top.
- The stiffening ribs are tightened together with two 5 cm self-tapping screws. The tightening occurs from all sides. Clamps are removed. It turns out to be a tabletop.
Creating legs
Assembling a full-fledged device for a circular saw is not limited to these stages.
For the legs you will need a board 5 x 10 cm. Their height is 1-1.2 m.
The board is cut along the longitudinal vector. In this case, a slight angle is maintained on one side.
The legs are fitted to the tabletop. During installation they should be slightly apart.
They are attached outside the stiffeners. Fastening method: bolted. To increase their stability, you will need ties. They require a 5 x 5 cm block.
The hand saw is placed in the previously created groove from the lower area of the tabletop. The sole is fixed with bolts. The disc is placed in the slot.
The table is varnished in 3-4 layers. This is a measure against moisture.
Turning on and off
The assembly of the main circular saw attachment is almost complete. All that remains is to set up the startup and shutdown of the tool. The simplest solution here is this: the start key is pulled together with a wire, and the saw is turned off with a power cord.
A more complex method is to bypass this key. And the control buttons are located on the outer plane of the front stiffener.
Trimming issue
The miter saw attachment is especially useful when you need quality cross cuts.
Such a device can be made independently using the proposed technology:
- The base is being assembled. Two parallel strips of 2.5 x 5 cm are glued to the upper zone of plywood with parameters 1.8 x 30 x 122 cm. They are attached with screws.
- Corners are attached to them (their material is aluminum). Fastening method: countersunk screws. The mounting angle is 90 degrees. The fastening occurs parallel at a distance identical to the width of the saw base.
- The tool is adjusted to cut the planks to a shallow depth at the base.
- The device is fixed with clamps. A workpiece is placed under the corners. The cut is made.
If the saw does not work well, this area can be coated with paraffin, but with a thin layer.
Question about long cuts
Creating an attachment for a hand-held circular saw that will help make long cuts is important for many home craftsmen. It greatly simplifies the work.
It's easy to do. Fiberboard is taken. A sample is cut from this material. It is identical to the distance from the outer side of the tool base to the outermost part of the disk from the inside.
When cutting, you need to rely on the length of the tool base.
The edge of the sample is aligned with the cut mark on the workpiece. A straight piece is applied to the second side. This is the guide. It is fixed with a clamp.
On the second marking, this operation is duplicated, but on the opposite side of the workpiece.
To create a template, it is optimal to use a router or jigsaw.
Solving the problem with chips
If the disc chips while working, you cannot do without the following device for a hand-held circular saw, assembled with your own hands.
Technology:
- The hardboard element is cut out. Its density is 6 mm. When cutting, you need to focus on the width of the tool base.
- The disk is retracted. The protective cover rises. The result of step 1 is attached to the base with double-sided tape. After this, the saw starts. The disc fits smoothly into the hardboard. This results in zero gap in operation.
Sawing should be done with little impact on the created base.
Tenoning device
A tenon-cutting device for a circular saw increases the efficiency and accuracy of the production of tenon and groove joints. They are involved in the assembly of various carpentry products: furniture, doors, frames, frames, etc.
Thanks to this device:
- The workpieces are positioned without distortion.
- Operations are repeated scrupulously.
- The final result is of high quality.
You can purchase such a device or make it yourself. Experts recommend the first option. This is a full guarantee of achieving excellent results.
The following models are often purchased: Felisatti FTJ and Festool VS 600 GE.
This is a reliable and proven technique.
Sharpening question
The circular saw needs to be sharpened when the following symptoms appear:
- It becomes harder to work with her.
- It leaves black marks on the material.
- There is a nasty smell and smoke.
Ideally, it should be sharpened on a professional machine. If you don't have one, you'll need a tool for sharpening circular saws.
Required set for work:
- Vise.
- File with flat functional side.
- Beam.
You should work with gloves.
Sharpening stages:
- Rigid fixation of the disc. It is removed from the saw and secured in a vice. In this case, wooden dies are used. You can leave it in the saw, but stick a block between its teeth. The block rests on some surface.
- The initial tooth is marked.
- The back of the tooth is processed with a file. They need to swipe it several times. The effort is small. Each tooth is sharpened in turn. The movements are uniform, the number of strokes with the file is the same.
- The front parts of the teeth are processed. The principle is the same.
The tips of the teeth should be perpendicular to the surface of the disc.
All teeth are then inspected for defects. The edges should not be shiny. If so, they are smoothly filed with a file.
After this, the disk is checked in action. It fits into the saw. It turns on. A test block is used. If the saw is light, smooth and quiet, then the sharpening is of high quality.
Otherwise, you need to check the height of the teeth. To align them, you need to bring the marker to the working edge. Then the disk must go through the entire revolution in the other direction from the rotation. A mark remains on all teeth. You can use it to adjust their height. The highest teeth are carefully processed with a file.
Step-by-step instructions for making the machine
The technology we offer does not involve the use of complex woodworking machines and equipment; this makes the process much easier for beginners. Before starting, it is recommended to make a simple device in the form of a large wooden square. It is made from a 10×30 mm block and a 10×50 mm strip of plywood. It will greatly simplify the process of marking and checking the correct dimensions of individual machine parts.
The table is made from old laminated chipboard, but special moisture-resistant plywood for concrete work is excellent. If you have the opportunity, buy this material, you won’t regret it. It is better to choose foreign manufacturers, but it will cost more.
Step 1. Cut out the material for the tabletop.
Cutting the material for the tabletop
The specific dimensions do not matter much; proceed from the size of the shield and the free space in the workshop. You need to understand that workpieces are better held on a long table, which makes cutting long boards easier.
To ensure an even and perpendicular cut, use the prepared device, the rail should rest against the edge of the chipboard, and the saw should slide along a strip of plywood secured with a clamp.
Fixed rail
Sawing off chipboard
Our central part of the machine table is 36 cm wide, two side parts are 18 cm wide. Between them, wooden slats made of hardwood will be installed for attaching the cross-cut carriage. This carriage makes trimming and cutting parts much easier.
Measuring the distance for sawing chipboard
Sawing process
Three parts of the tabletop, between which there will be loose slats that move along with the carriage while cutting materials
Step 2. Place the saw on the center of the table and use an awl to trace the outline of the metal pad.
Marking
Step 3. Drill holes in the corners of the table; this can be done with an ordinary drill or on a drilling machine.
Drilling holes
Step 4: Using an electric jigsaw, carefully cut out the opening for the saw.
Cutting an opening for a saw with a jigsaw
Using this as a template, draw the liner and use a jigsaw to cut it out.
Liner markings
Cutting out the liner
There are options not to make an insert; in this case, the maximum cutting depth is reduced. Make a specific decision depending on the planned use of the saw, but practitioners always advise relying on maximum parameters. The fact is that no one can foresee the requirements for a machine in the long term.
Step 5. Attach the saw to the table. Adapt various available materials for this, select them according to length and thickness.
The saw needs to be secured
Photo of a saw on a tabletop
Important. Never screw screws into chipboard without first drilling a hole. The slab is not designed to withstand such loads and may crack.
Secure the saw to the back of the table.
The saw is secured with a block and a metal plate
Bottom view
Step 6: Reinstall the liner. It is made from durable material, preferably steel or aluminum, but plastic will also work. The liner must withstand strong shock loads that occur during sawing; chipboard cannot cope with such tasks.
Liner markings
Hardware used for fastening
The part is fixed to the saw blade, you need to prepare holes and use various hardware.
Fixed liner
Step 7. Make markings for the sides of the tabletop; they will be fixed using self-tapping screws. Attach all parts of the table to the cross rods with glue. On the front side, they are additionally screwed with self-tapping screws with countersunk heads; the holes for them must be countersunk.
Step 8: Check the movement of the wooden slats. If they jam in some places, then you need to find the cause and eliminate it. The slats should slide freely, but without wobbling.
Checking the travel of the racks
Practical advice. It is much easier to install metal profiles instead of slats. This requires less time, and the quality of the machine’s work increases significantly.
Example of a table for a circular saw, metal profiles installed
You can buy profiles at any hardware store; if possible, purchase aluminum elements. They have a low coefficient of friction, which is very important for the smooth movement of the cross-cut carriage.
Step 9. Attach chipboard or plastic boards to the bottom of the table; they prevent the slats from falling out.
Test the operation of the machine. Temporarily place it on a flat surface, plug it in and cut a few boards.
Switch for easy switching on of the saw
Immediately pay attention to uncharacteristic sounds and vibrations. It is necessary to find out the reason for their appearance and eliminate them immediately. At this stage of manufacturing a stationary circular saw, adjustments are much easier to make than on a fully assembled mechanism. Everything is normal - continue assembling the equipment.
Video - Simple sawing machine
Video - Circular saw table
Manufacturing of table side supports and sawing devices
Once you have corrected any problems found during testing, use your saw to make blanks for the sides of the table. The sizes are arbitrary, you can link them to your actual needs and the parameters of available materials.
Step 1. Prepare blanks for the sidewalls.
Practical advice. To speed up the trimming process, attach a temporary device to the saw - attach a small piece of flat board under the square to the rail with self-tapping screws.
After trimming the workpieces, the temporary device is removed and the machine returns to its previous state.
Step 2. Place the table on permanent legs, drill holes and countersink them for countersunk screw heads.
Step 3. Attach boards of the appropriate length to the bottom of the sides. They strengthen the structure and increase the support area. This increases the stability of the structure, which is very important for a compass machine.
Interesting fact. Have you ever wondered why all the old machines have a heavy cast frame? In those days, the domestic industry could not produce precise parts for high-speed mechanisms, because of this, beats inevitably appeared during their operation. The heavy bed dampened vibrations and improved the quality of processing. This is to point out how important the quality of all circular elements is.
Step 4. Test the structure again, this time applying maximum loads.
Device for feeding sawn materials
Side support of the table
Video - Homemade stop for a circular saw
Making the carriage
Carriage diagram
It is made from a chipboard shelf 16 mm thick.
Step 1. Drill holes for the runners along the edges and countersink them. The distance between fasteners is approximately 10 cm.
Step 2. Screw the base of the carriage to the wooden slats installed on the tabletop. Check its progress; if there are problems, the sliding wooden surfaces can be smeared with soap or paraffin. Large jams will have to be sanded with fine sandpaper. Work very carefully, check the progress, do not remove excess material.
Step 3. Screw the two backs, constantly measure the corners, they should all be straight.
Step 4: Cut the hole for the saw. This is done in several stages.
- Place the carriage in the grooves, lift it up, the plane should not touch the saw teeth.
- Turn on the saw and slowly lower the carriage. The hole is sawed until the carriage is lowered to a horizontal position.
- Carefully make a hole along the entire length of the carriage.
- Check the angle, achieve the correct position. If everything is normal, then you need to additionally secure the carriage backs.
Step 5. Install a stop parallel to the saw and make sure it works.
Carriage for table circular saw
Front view. For ease of movement, the carriage is equipped with a handle
The stationary circular saw is ready for use; you can make various wood products with your own hands. This is a very exciting and rewarding process.
How to saw a board evenly lengthwise and crosswise
Video - Carriage for circular saw
A stationary circular saw greatly increases productivity and improves safety. Every novice craftsman should have such a machine; it can be made using a minimal set of tools. We talked about only one option for making a saw, but there are many other equally interesting solutions. How to make different types of tables for a circular saw can be read on the pages of our website.
Preparation of materials
If you decide to make a table for a circular saw with your own hands, then first you need to take care of the availability of some materials and tools, among them the following should be highlighted:
If you decide to start making a table yourself, you must have wood cutting skills. As for plywood, its thickness should be 20 mm or more. When looking for a board, you should pay attention to the one whose dimensions are 50 x 100 mm. But the block should have a square cross-section with a side of 50 mm. You will need it for the legs.
You should also stock up on an electric jigsaw, a screwdriver and a hand router. Self-tapping screws will serve as fasteners. After manufacturing, the structure will need to be varnished to extend its service life. Before you make a table for a circular saw with your own hands, you must decide on its dimensions, which will depend on the length of the workpieces being processed.
The cut will be smoother and more accurate if the workpiece rests on the entire plane of the table. However, the parameters of the working surface should not be too large, since the design will clutter the space. You need to come to an average value, but the height of the table is usually selected individually, it depends on the height of the operator.