Quick conversion of a trimmer head for a chainsaw chain
Many people today do not bother to mow the grass on their property using a hand scythe.
After all, a trimmer copes with this task perfectly. As a result, not only time is saved, but also energy. In addition, the grass is mowed with a trimmer right to the ground. As a result, there is no need to do this work often. However, there is one thing. When working with a trimmer, some people encounter certain problems. For example, only grass does not always grow on the site. In most cases, there is also a growth of trees, which also grows quite rapidly.
Eliminating it using a fishing line, even a thick one, is usually problematic. It is possible to remove only the tops and then finish the job with pruning shears. Of course, you can rearrange the knives. But everyone wants to do everything quickly and not bother with reinstalling nozzles every couple of meters.
And why do all this if you can use a chainsaw chain instead of fishing line on the trimmer. This will require a little effort. You need to prepare a welding machine, a drill and a set of metal drills, a vice, a ruler and a black marker. You also need a concave cup that secures the trimmer blades, a nut, a flat washer and, of course, a chainsaw chain.
Water pump for pumping water from the trimmer
You can use the motor from a trimmer to transport water from a well, lake or river for watering garden beds. To do this, you will need to purchase an attachment called a pump for a brush cutter, and attach it instead of a spool to the tool bar. The performance of such devices is not as high as that of a full-fledged motor pump, but the equipment paired with a trimmer motor copes well with raising water to a height of up to 8 meters and pumping it over a distance of up to 30 meters.
Motor pump
There are two types of pumps for brush cutters:
- Fixed to a bar - when choosing them, it is important to know the diameter of the lawn mower bar, as well as the number of splines on the drive shaft. Such devices are characterized by low performance and low cost. The photo above shows just such an option.
- Connected to the motor housing. Such pumps are more expensive due to their high performance. There is no need to select such attachments for the tool, since they are driven directly from the clutch of the lawn mower. The photo below shows how the pump is attached to the trimmer.
The pump is equipped with a built-in filter for large particles, which prevents premature failure of the impeller. The body of the equipment is made of aluminum, so the service life of such devices is quite long. The nozzle will be useful not only for summer residents caring for vegetable gardens and orchards, but also for owners of private houses, for example, when it is necessary to pump out water from a flooded cellar or fill a shower container.
Installing a chainsaw chain on a trimmer: increasing efficiency
First, preparatory work is carried out and the washer is processed. To do this, using a ruler, mark a straight line along the diameter. After which the washer is clamped in a vice. In this case, one of the markings should be located upward.
It is advisable to mark the location of the holes with a core in advance, then the drill will not slip while drilling. Holes are created on both sides. It is important to first make them thinner with a drill, and then thicker. As for the diameter of the hole, the chain from the chainsaw should fit well into it.
Next, the chain is threaded through the hole. It is worth placing it inside the washer so that it does not interfere with the drive axis of the trimmer.
You should approach the choice of chain size as responsibly as possible. It needs to be measured accurately. It is important that it is no larger than the required size. Otherwise, the protective shield will fragment, and then a new problem will arise. From the inside, the chain is welded directly to the washer.
At this point, work on installing the chain in the trimmer can be considered complete. A flat washer and a modified washer are put on the trimmer axis, and all this is secured with a nut.
Important information
If in doubt, it is better not to use this tool not according to the instructions. All this can lead to dire consequences. But at the same time, some craftsmen still dare to upgrade their trimmers and, as a result, achieve an improvement in their efficiency.
With such a trimmer, not only will there be no grass and weeds on the site, but also small bushes will no longer seem like an obstacle.
Source
How to repair a trimmer mowing head
In this article, we will describe in detail the procedure on how to remove the trimmer coil. Step-by-step instructions with the attached video will help novice and experienced users independently remove the system element and clean it or replace it with a new one. Before removing the trimmer coil , you must turn it off - for gasoline samples or turn off the power - for electric trimmers. We will demonstrate one traditional dismantling scheme, but the method of attaching the coil to the tool may differ for different trimmer models. With your own hands, you can not only remove the old coil sample, but also replace it with a new one, if such a need arises. So, step by step scenario:
It is necessary to remove the bobbin in cases of damage, winding of the fishing line (which is undesirable and indicates an illiterate selection of equipment), as well as when it is necessary to wind a new cord on a new reel or replace the cutting tackle. The KosiKosa store will always offer you an inexpensive option to buy a trimmer reel.
How to make metal trimmer blades
Once again, while mowing the grass at my summer cottage, I came across a piece of iron sticking out of the ground with a trimmer. The result of such a “meeting” is a broken tool coil. There is no spare part, nowhere to buy it, but it needs to be mowed.
I had to be smart and repair the device.
EVERYTHING YOU NEED FOR THIS ARTICLE IS HERE >>>
I thought over and drew a drawing of a new cutter (see figure on page 18). Based on the sketch, I made the necessary parts from a metal plate. I assembled the finished unit and secured it to the trimmer’s working shaft (instead of the coil).
To do this, I pressed a sleeve onto it (photo item 1) with a welded washer (2). I screwed the knives to the latter with M4 bolts (3). To prevent the mechanism from turning while the shaft rotates, I additionally secured it with a cotter pin (4)
It is better to drill the hole for the cotter pin (4) after installing the unit on the trimmer shaft.
When using a tool with such an attachment for a long time and repeatedly, it is necessary to monitor the wear of the fastenings (bolts) of the knives and change the fasteners in a timely manner.
Changing the vein on the trimmer
If, when you lightly hit the trimmer coil button on the ground, the line does not lengthen, then the following reasons for this may occur.
Option 1 - snacking came out, i.e. clamping the cord between the turns. This problem usually occurs if the user wound the fishing line onto the reel unevenly, with crossed turns, or wound it with insufficient tension. In the latter case, when the mowing head rotates at high speeds under the influence of centrifugal force, the cord begins to tighten, under the influence of which you clamp the line between turns. To solve the problem, you will have to disassemble the reel on a trimmer and rewind the cord correctly, in other words, in even turns with good tension.
Homemade protective casing
If you are making a homemade mower, then you will definitely need a protective cover. It will protect your eyes, body and legs from injury from small pebbles and knife fragments if they break.
The trimmer housing can be made from a sheet of aluminum or thin sheet metal.
- First, in the corner of a metal square, you need to drill a hole of the required diameter (depending on the type of drive of your unit) using a crown.
- Then you will need to make markings for the fasteners. As a base to which the homemade protection will be screwed, you can use a standard casing from an angle grinder if you are making a trimmer from it.
- Clamp the workpiece with a clamp and, using a tape measure and a pencil, draw the first circle with a radius of about 270 mm. The center of the circle will be the corner of the workpiece. It is impossible to give exact recommendations regarding the radius, since it will depend on the diameter of the cutting tool that you will use with the unit. Therefore, first decide which knives you will use and what line reach will be optimal.
- Next, draw a second arc (this will be a bend), slightly retreating from the first. In this case, 5 centimeters. This way you measured the height of the future shield. In general, it is recommended to make the height of the casing such that when you place it flat on the ground, the cutting tool does not reach it by about 2 cm.
- After marking the second line, you need to cut a workpiece along it using a hacksaw or a jigsaw with a metal file.
- In addition, it is necessary to make radial cuts (up to the first arc) and bend the resulting parts with pliers at an angle of 90°.
- Next, the shield is attached to the protective casing of the angle grinder, the cutting tool is installed, and the unit is ready for work.
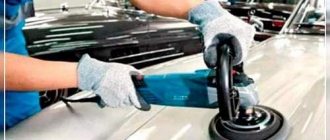
Read also: Polishing paste for metal
In this way, you can make and install a protective cover on a trimmer purchased in a store if the shield has cracked for some reason. The shields in factory devices are made of plastic and often break if you unsuccessfully hit the trimmer head on the ground to lengthen the fishing line.
How to thread line into a trimmer reel
Winding the mowing line will take approximately 10-15 minutes. What is a trimmer coil? Plastic case with a cassette inside, which has a special hook for easy winding of fishing line. Almost all trimmer reels have a similar fastening principle; this is a central screw button; when pressed, it becomes possible to remove the fishing line of the required length. The photo below shows a few examples of different spool trimmers.
The studs of trimmers whose motor is located on the ground have different attachments to the axis of rotation; they have two buttons on the reel, located on the sides, which need to be unscrewed, otherwise replacing the thread is no different from other cassettes.
The principle of correct winding of the mowing line is similar in all of the above
cases, so, for example, consider the standard version with two antennas.
To remove the spool using the fishing line, you need to unscrew the screw located in the center, but note that the thread remains there, so you will have to return it clockwise, this was done specifically so that during operation it does not open under the influence of centrifugal force.
Next, using a screwdriver, remove the head and remove the coil that directly wound the string
. Having measured the required length and folded it in half, you need to insert the fishing line into the reel, finally bringing its ends opposite each other (for this there are special slots for fastening).
After this, you should reassemble the head in the reverse order, breaking the end of the cord into two corresponding holes.
If you have doubts or it is not entirely clear how to load the line onto the trimmer, we recommend that you take a look at: how to properly wind the line into the trimmer. In this detail, step by step, the instructor will open the trimmer head
, measures the required amount of mowing line , usually from two to four meters, and demonstrates the collection and installation on the trimmer.
How to remove the head on the BlackDecker GL716 trimmer.
The trimmer has a top motor and a curved boom. For convenience, turn it upside down or lay it horizontally. We disassemble the mowing head. To do this, simultaneously press the side latches and remove the top cover. Disabling the mowing line spool
READ How to Repair Starter on Bright Trimmer
A slightly recessed dark screw is visible in the middle of the body of the head. We fix the head body with one hand and use the sprocket attachment to unscrew the screw counterclockwise. If you don't have a sprocket handy, you can do this with a wide flathead screwdriver.
Advantages and disadvantages
The cultivator attachment for a gas trimmer, regardless of its type, increases the weight of the assembled unit to 5-6 kg. This is a product that is quite in demand among buyers and is easy to maintain. This device is characterized by a more reasonable cost compared to equipment for a motor cultivator. The cultivator attachment for a gasoline trimmer is convenient in greenhouse conditions; it not only loosens the soil, but also saturates it with oxygen.
Considering that this device is made with high-quality assembly, it is durable, which cannot but please the user. The devices themselves really simplify the work of the summer resident and allow him to speed up his work.
Using this device, you can loosen the soil in a flower bed, flower garden, greenhouse, small beds and even around bushes and trees. On average, the device is capable of capturing soil up to 25 cm wide in one pass.
As for the disadvantages of cultivator attachments for gas trimmers, many buyers note their weight. The lack of weight of the device is the reason that, when faced with difficult soil, it may not go deep into the soil at all, but only scratch its top layer. In addition, as practice shows, with such attachments it is impossible to press the cutters to the ground. This risks the rod starting to spring back, and, as a result, the equipment quickly wears out.
If you try to press the device to the ground more strongly, the rod cannot stand it and bends, which can cause the scythe or the working attachment itself to break. The drive rod is quite long; vibrations cannot be avoided during cultivation, the magnitude of which is directly related to the length of the rod itself. In addition, it depends on the complexity of the area being processed, because the load on the discs and cutters will be greater in the case of dense soil.
Holding a vibrating tool for a long time is difficult, as is managing it. In this case, it is also worth knowing that constant work with a vibrating tool can be fraught with negative consequences for human health. For example, constant vibration can damage the blood vessels and nerves in the fingers of those who have problems with blood supply. When using a brush cutter with a cultivation attachment for a long time, problems can also occur in healthy people.
If you are going to take a hitch for cultivating land, then it is better to choose the disk option. It is equipped with a safety guard, although this makes the user's work somewhat more difficult. As for making the nozzle yourself, this process does not always give an effective result. In addition to the fact that the work of making a hitch for soil cultivation is labor-intensive, it is not always of high quality and reliable. In addition, home-made products do not always cope with turf.
Do not use the device without the protective casing. During tillage, it is necessary to ensure that not only stones, but also glass fragments do not fall on the knives themselves and protective devices. If this happens due to negligence, it is necessary to immediately stop the engine and disconnect the wire from the spark plug.
To wash the cutters, you need to remove the equipment. In addition, the device needs to be lubricated with oil from time to time. Given the sharpness of the blade, you should wear gloves. During soil cultivation, you cannot go to high speed. In order to correctly put on a protective screen with a line stop, you need to remove the stop nut from it, insert the bracket into the slot and rotate the screen until it passes through the groove of the bracket. After this, you need to tighten the wing nut tightly onto the bolt.
To install the attachment on the brush cutter, you need to remove the plug from the attachment rod. After this, the connection is made so that the locking (releasing) button fits into the recess on the hitch. The nozzle is pushed forward until the button snaps into place. Before starting the work process, you need to tighten the handle tightly by turning it clockwise. If the holes do not fit, this attachment cannot be used for your existing gas trimmer.
Depending on the type, the device may or may not have cutters. Based on this feature, it can be classified into gear or disk. Products of the first type are characterized by the presence of cutters, which are located on both sides of the drive shaft. The second options work using cutting discs. However, the presence or absence of cutters does not affect the functionality - cultivator attachments for a gasoline trimmer are purchased for loosening the soil.
The differences between varieties lie in the type of soil that the cultivator attachments themselves can handle. For example, gear-type varieties are lighter in weight, however, because of this they are not able to process difficult soil. Disc analogues can work not only with light soil. These nozzles are characterized by greater rigidity, they are stronger and more durable.
It is easier to process long beds with nozzles of this type, since in this case there are fewer turns. These devices are not universal, and therefore you need to purchase them for a specific model, because in this case everything will depend on the number of slots. Also, it is imperative to take into account the power of the trimmer itself.
Trimmer heads: types and principle of operation
The domestic market offers trimmer owners several types of reels: manual, semi-automatic, automatic and universal. They differ from each other both in the method of feeding the fishing line and in the principle of its charging . You can also wind the fishing line in different ways. According to this principle, coils are classified into fast-charging and collapsible.
Before you purchase a trimmer and/or buy spare coils for it, you should definitely familiarize yourself with which consumables are suitable for a particular model. This is important, since bobbins from different manufacturers may differ not only in the methods of feeding and threading the cord, but also in the fastening axis, the type of thread, and the diameter of the fishing line used. For example:
Advice! Experts recommend using string heads equipped with ball bearings, as they have an extended service life, while reducing wear on the included components. In this case, for replacement, it is best to choose a reel from the manufacturer that is indicated in the trimmer’s operating manual, which in turn will allow you to correctly install the head on its drive.
Manual reels
The manual mowing head is a reel in which the cutting cord, when worn, is pulled out by the owner of the trimmer independently. To do this, you need to turn off the tool, remove the head and use your hands to pull the line to the required length. However, despite some inconveniences, this type of head is considered the most reliable.
Design and mounting options
The design of such a device is usually equipped with one or two pairs of cutting parts. Instead of a gearbox, they are attached to the trimmer at the bottom of the rod or near the motor of the device. Weeding with a brush cutter is done by burning liquid fuel. In order to enhance the strength and reliability of the structure, it has a straight reinforced rod, the diameter of which is at least 25 mm. The bar is designed for optimal working load.
Based on the type of device, it often provides for adjusting the grip width of the cutting elements. As a rule, its indicators vary between 13-25 cm. As for disk cultivator attachments for a gas trimmer, their design can be equipped not only with a pair, but also with several disks with blades attached to them, bent at a certain angle. As a rule, these hinges also have a protective flap that prevents soil from entering during operation of the device.
Read also: Structural steel what is it
The design of gear attachments can also have more than two cutting elements. Curved knives can be arranged in a row. At the same time, an increase in the number of knives increases the weight of the cultivator attachment. On average it weighs about 5 kg.
The transmission of torque from the gas trimmer engine to the attachment is carried out via a shaft arranged in the rod. Such a unit is not interchangeable; moreover, it differs in the number of splines available at the end of the rod. There are 7 or 9 of them. This feature is taken into account when selecting an attachment for an existing gas trimmer. A cultivator attachment for a brush cutter with an input shaft of 9 splines and a 26 mm rod is attached instead of the lower gearbox.
The spline method of connecting disks allows freedom of movement of cutting parts. This is convenient specifically for soil cultivation, since it allows loosening the soil with a wide grip in one pass. In this case, there is no need for a large amplitude of movement of the rod.
Typical malfunctions and their independent elimination
Naturally, during operation, trimmer owners encounter certain malfunctions of the mowing heads. However, most often they are associated with certain difficulties when pulling (elongating) the cutting cord from the reel. The most common reasons for the lack of line feed is its “biting” between turns or sticking together .
If the string does not feed
In this case, the cause of the defect is incorrect winding of the cutting cord. The line may be wound with insufficient tension, which causes the turns to cross each other and tangle the string. When the reel rotates, the cutting cord is tightened under the action of the resulting centrifugal force, which in turn leads to the free end of the line being clamped between the turns. To eliminate this malfunction, you need to dismantle the coil, disassemble it and rewind the string so that the turns lie in even rows, pressed tightly against each other.
If the string is stuck
Sticking of line turns directly in the mowing head can be caused by:
Advice! To avoid sticking of the cord inside the mowing head, experts recommend that after threading the string into the reel, apply a thin layer of silicone grease to its surface. In addition, it is better not to use fishing line from unknown manufacturers.
If, however, the user was unable to avoid the line sticking together, then for repairs the trimmer reel must be removed and the existing cord replaced with a better one.
Lawn aerator attachment for lawn mowers - what is it and what is it used for
Owners of private houses will find a useful device such as a lawn aerator attachment for a trimmer. Its main purpose is to saturate the soil layer with air. This is done to improve the growth of lawn grass. The action of the aerator is absolutely safe for vegetation.
Aerator
Externally, the nozzle resembles a rake, but its main purpose is to restore the breathability of the soil to saturate the root system of plants with air. The device can also be used for uniform distribution of organic fertilizers.
The cost of the aerator is about 10 thousand rubles, which depends on the manufacturer.
Making your own bobbins
Quite often the trimmer is operated far from places where you can purchase spare parts for the mowing head if it breaks down. In this case, instead of a broken mechanism, you can install a self-made coil that is simple in design. To do this you will need a sheet of plywood (textolite, metal, etc.), eyes, screws or screws . The process includes several stages.
Important! It must be remembered that it will not be possible to tighten or unscrew the nut without rigidly fixing the shaft.
To replace the fishing line on a homemade reel, you will have to loosen the fixing screws, insert a new piece of string and tighten the fastenings again. It is not necessary to remove the coil from the trimmer shaft, but it is necessary to exclude the possibility of the motor starting spontaneously.
So, above, the methods for repairing a string head were described step by step with pictures. As you can see, the process is not complicated. And most breakdowns are directly related to careless threading of the string and its unsatisfactory quality. You can clearly see all stages of the process in the video.
Replace the fishing line with a disk or knife
When finishing gardens, park areas and other places where you need to mow various types of plants, you often have to change the cutting tool in the trimmer. This is because the standard cord installed in the mower head can only work on grass. But when a bush or young tree sprout appears in the worker’s path, the fishing line cannot cope with this task and must be replaced with a more efficient cutting tool.
Manufacturers of trimmers have foreseen similar situations and supplemented their products with a mass of attachments in the form of knives with several “petals” or in the form of disks similar to circular saws.
If you replace the line with a knife with several “petals”, then this tool can mow both tall grass and plants with thick and dry stems. And by changing the line on the disc, the user gets the ability to use the mower to trim bushes or small trees.
Knives and wheels are installed according to the following algorithm.
READ How to Calculate Gasoline Trimmer Fuel Consumption
You can watch this video to better understand the tool changing process.
Source
From a chainsaw
Many different attachments have already been invented for chainsaws that expand the capabilities of this unit, for example, a cultivator, a drill, a boat motor, and also a scythe attachment. You can see what it looks like in this video. If you want to make a trimmer out of a chainsaw, the most you can make is a lawn mower on wheels, since the engine of the unit is quite heavy, and it will not be possible to apply the above-described options for making trimmers (with a bottom drive) to it.
Therefore, the trolley is made first. It can be welded from a 25x25 mm corner. The frame dimensions should be 500x600 mm. The wheels are attached to the corners of the frame.
Next, you need to unscrew the “steering wheel” and tire from the unit. The cart handle can be made from water pipes. The “steering wheel” is screwed to it. It is also necessary to lengthen the fuel hose and throttle cable.
When installing the trolley handle, make sure that it does not block the winder (starter).
The gasoline engine is installed (screwed through the holes to secure the tire) onto the frame so that the gearbox is rotated 90 degrees and the shaft is at the bottom.
Now all that remains is to attach the cutting tool to the shaft of the unit. This is done as follows.
- It is necessary to weld a small piece of pipe, 80 mm long and 50 mm in diameter, to the “star” of the device. It is better to cut the pipe on a lathe so that the ends are perfectly straight.
- Next, find a pipe with a slightly larger diameter - equal to 58 mm. It also needs to be cut to a length of 80 mm. Thus, you will receive a telescopic shaft, which is connected using 2 bolts (m6) located opposite each other. The bolts must have locknuts. Below is a diagram of how the trimmer head is made, which is used to secure the cutting tool.
Several holes need to be made in the telescopic pipes so that the height of the knives above the ground can be adjusted.
It is better to make a knife of such a design as in the following figure.
Due to the fact that movable knives are attached to the disk with rivets, they will simply bounce off when they encounter a stone or a dry branch . This will protect the shaft and gearbox from damage that may occur when the tool jams.
The rivets that hold the knives to the disk must be metal.
The diameter of the disk (made from 4 mm sheet steel) should be 180 mm. The knives are made from strips 30 mm wide and 120 mm long, cut with a grinder from a hacksaw blade for wood.
Trimmer blade attachment
Going shopping in search of spare parts is a thankless task, and I immediately abandoned this idea. What's the point of wasting time and money if the new part will last no longer than the previous one, but only until the first meeting with some piece of iron lurking in the grass. It’s better to immediately replace the broken coil with a homemade nozzle with stainless steel petal knives (see photo)
.
The design of the nozzle is very simple. To make it, it was necessary to make only four parts: a central bushing, a washer and two petal knives (see figure)
.
I made the central sleeve from a piece of ordinary water pipe. To adjust its internal diameter to the diameter of the shaft, I made a through longitudinal cut on one side of the workpiece and lightly hammered it down. The bushing should fit tightly on the shaft, without play.
I cut the petal knives from stainless steel sheets 1 mm thick. The knives are attached to the washer with rivets. They must be steel. I used M4 screws as rivets. They must be riveted so that the knives are not tightly pressed to the washer, but can rotate freely. This is a very important point. If the knives are fixed tightly, they will probably bend or break at the first meeting with a stem that they cannot cut in one revolution of the trimmer shaft.
The assembled nozzle is put on the trimmer shaft and secured with a copper cotter pin ∅3 mm. It is better to drill the hole for the cotter pin locally.
The first tests of the trimmer with the new blade attachment confirmed its effectiveness. The knives easily “took” almost any grass. And during leisurely work, the electric motor was practically not overloaded. In a word, what you need!
However, we should not forget that metal knives pose a more serious danger than a thin, almost weightless fishing line. Therefore, it is advisable to mow the grass around the house when there are no people or pets nearby. And, of course, you need to constantly monitor the wear of the knives and the rivets that secure them.
Boat motor from a gasoline trimmer
Fishermen who have a boat, but have not yet had time to purchase a motor, can take advantage of the rational offer from modern manufacturers of gasoline-powered tools. Attention should be paid to the attachment of the outboard motor for the lawn mower. The equipment is suitable for propelling wooden, rubber and even metal boats, but it all depends on the power of the motor of the trimmer used.
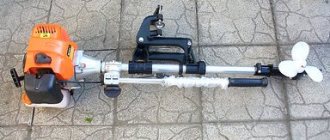
boat propeller
The attachment is also called a “boat propeller”, as it is a rod with a fixed three-blade propeller, which is driven by a trimmer motor. The gas of the tool is output to the handle, which also serves as a steering wheel. Only the motor is used from the trimmer, so the rod is completely detachable. The internal combustion engine is attached to the nozzle using four bolts. The device with the engine is fixed to the boat using a built-in clamp.
Naturally, a boat with such a drive will not develop high speeds, but it is quite suitable for going out into open water to a fishing spot. The maximum speed developed by the drive, consisting of a boat propeller attachment and a trimmer motor, is up to 20 km per hour, which depends not only on the power, but also on the load of the vessel. Fuel consumption does not exceed 1 liter per hour, so the equipment is recommended to all fishermen as an alternative to expensive outboard motors.
This is interesting! For metal boats, it is better not to use such a drive, since due to heavy loads, rapid overheating of the internal combustion engine and failure of parts cannot be ruled out.
Do-it-yourself trimmer reel and line threading
In modern agrarian farming, there are many different tools that are created to make life easier for summer residents and amateur gardeners. In my opinion, a lawn mower such as a line trimmer is one of the very simple and ingenious inventions that can turn your weed-filled garden plot into a well-groomed lawn in a matter of minutes. But no matter how thoughtful the invention is, it needs care and repair. I am not a supporter of alterations of industrial tools, but in order to save money, I came up with and am describing a useful addition to the line trimmer.
Line trimmer, DIY repair:
When you start a power tool on your farm, you should immediately understand that in addition to the electrical part, there is also a mechanical part, which requires timely care, cleaning, cooling and lubrication. An electric line trimmer is no exception. I’ll tell you a little about my trimmer, I don’t indicate the model and parameters - this is not so important. The first thing that was covered in it was the button, when I took it apart, there were obvious signs of melting, I think this was caused by power surges in the network and the processes occurring at the time of switching. To put it simply, it was of poor quality. Like many other parts of the trimmer, the button can be replaced with another one that is suitable in terms of parameters (current and design). The line for the trimmer, well, like other attachments, is a consumable material, and it is quite natural that I ran out of it too. Like a typical Kulibin, I started putting everything I could get my hands on there, starting from an ordinary thick fishing line and ending with a thicker and more durable special line for a trimmer. Despite my natural curiosity and inquisitiveness, I acted within the framework of the instructions I had read, but even this did not save my reel from destruction.
Reel from my trimmer
Reel side view
It seems that the reel (meaning the part itself where the fishing line is wound) did not suffer much during the process of my experiments, but the special grooves holding the fishing line were simply ground off, which is not surprising because they are plastic, and I have been using the trimmer for a long time and quite often. Of course, even for older models of trimmers, spare parts are sold, ranging from fishing line to engines. But the new reel seemed a little expensive to me, the price was, frankly speaking, “biting”, and I was not happy with the fact that it was impossible to thread 5mm thick fishing line into it (my trimmer is designed to use 2mm thick fishing line).
DIY trimmer attachment
For many summer residents, the trimmer has long become a familiar and almost irreplaceable technique. But it is not always possible to purchase a model that can satisfy all needs. It happens that the trimmer easily copes with fresh young vegetation, but there is a desire to clear a place behind a fence or along the driveway, and tall, mature grass turns out to be too tough for the equipment.
DIY trimmer attachment
We offer the option of making your own trimmer attachment from simple (almost improvised) products.