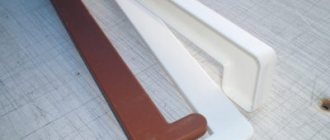
Basic rules for cutting plywood or chipboard
The most suitable tools are circular or band saws.
There are many cutting tools, and not just one, but several will be used at once.
To get a clean cut, you need to follow the rules:
- saws with fine teeth are suitable for work;
- First of all, the material is sawn across the grain, then along. This method will prevent corners from splitting;
- on the front side the material is sawed with a hand or band saw;
- from the wrong side - saw with a contour or disk tool;
- when working with a circular saw, it is necessary to ensure high speed and low material feed ratio;
- the teeth of the circular saw should penetrate shallowly into the surface;
- in order for fewer creases to appear on the board, you need to guide the saw along the cutting line, with light pressure and slight kickback;
- adhesive tape attached along the cutting line will protect the material from chipping.
In practice, two professional interchangeable tools are used - a jigsaw and a jigsaw.
In a home workshop you can achieve an even cut. But it is better to entrust work with dimensional sheet materials to professionals with specialized equipment.
How to cut a tabletop without chips using a hacksaw
A regular hacksaw will work to cut the tabletop. However, when working, you need to take into account that you need to leave a margin of at least 100 mm. The tool must have fine teeth. It would be better if it was a hacksaw for metal.
You can saw off the tabletop with a hacksaw.
Attention! The teeth must be hardened and set apart by ½ the thickness of the material.
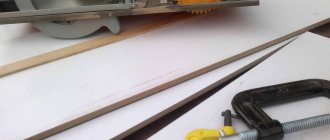
To work, you will need paper adhesive tape, a file for rough cuts and sandpaper for finishing.
Take several measurements to ensure an even cut.
How to properly cut a tabletop with a hacksaw:
- Mark a cutting line with a sharp tool;
- stick paper adhesive tape along the markings to protect the top decorative layer;
- direct the movements of the hacksaw at an acute angle to the surface of the sheet (no more than 30 degrees);
- cut smoothly, with medium pressure.
All irregularities can be hidden with sandpaper.
If chips appear, they need to be processed with a file, moving from the edges to the center. Sand any remaining minor defects with fine-grained sandpaper.
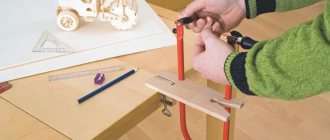
Can I cut with a jigsaw?
The tool is suitable for making small cuts. You will need a tool for working with metal, with fine teeth. The cut is made along the front side: this way there will be fewer chips on it, and there will be small irregularities on the back side.
When working with a jigsaw, the cut is made from the reverse side due to the direction of the teeth on the file.
When working, the tool is not set to maximum speed, but slightly above average. The tool must be moved with smooth movements, with light pressure.
Important! The method is not suitable for cutting long materials, since it is difficult to maintain an even cut line.
Dull saws need to be replaced.
Methods for laying parquet boards
The coating can be laid in three ways - adhesive, floating and using fasteners (nails, self-tapping screws).
Laying with fasteners
Fixing the parquet board with nails or self-tapping screws can be used in the case of laying the covering on logs or a solid wooden base, and not on a screed. Slats with a thickness of at least 20 mm are suitable for this, since thin boards can be easily damaged. The logs are laid in increments of no more than 60 cm and strictly in the same plane, since even small differences in height cause squeaks when walking. The space under the flooring must be well ventilated to avoid the accumulation of condensation and dampness.
When laying, the lamellas are positioned so that their ends meet only at the joists. The nails are driven into the grooves at an angle, and the heads are deepened with a hammer so that the fasteners do not interfere with the tight fit of adjacent boards. Such fasteners provide the necessary strength of the connection, but make it difficult to subsequently replace elements during repairs. If complete dismantling becomes necessary, the coating cannot be reused due to damaged edges.
To fasten individual parquet strips, nails are used, the length of which is 40 mm and the thickness is 1.6 - 1.8 mm
How to cut with a circular saw
The tool can make long cuts, but during operation more chips are formed (compared to cutting with a jigsaw). You will need a saw blade with fine teeth.
You should work with electrical appliances carefully.
As a rule, the side where the teeth cut remains clean, but chips appear on the opposite side.
You should start cutting from the front edge (facade) to avoid chipping on this part.
It is more convenient to work with a saw fixed on the table. This way you are not busy with the tool and you can use the guide. This will increase the cutting accuracy and allow you to make several parts.
Use tools correctly.
Chips that form after cutting can be processed with a file and sandpaper.
Features of work
A hand-held circular saw cannot be classified as a carpentry tool that is heavily equipped with electronics. For example, only some models have electronic speed control, since this function is not particularly important for woodworking.
More modern professional tools have a system installed that maintains a constant blade speed during operation. Its task is to maintain speed regardless of the load on the engine.
Models with an overload protection system monitor the temperature of the motor windings and, if necessary, turn off the machine. Expensive professional equipment is equipped with this function.
Almost any saw can be equipped with a guide bar, with which you can achieve high precision in your work. They are supplied by tool manufacturers as additional equipment.
Some hand saw models can be converted into a permanent installation. To do this, it is enough to screw the protective disk casing to a workbench table or a long board with special clamps.
Features include the presence of a removable network cable, which is convenient not only during transportation, but also in case of damage. It will be more convenient to purchase a new cable rather than contact a service center.
Start with a good drive
For clean cross-cuts in solid wood, decorative plywood and other sheet and plate materials, replace the standard 24-tooth blade found on most models with a 50-60-tooth blade. And for most cuts where quality requirements are not too high, use a 40-tooth blade. And only for longitudinal sawing of solid wood, install a regular 24-tooth blade again.
Get rid of chips in one of three ways
The teeth of the saw blade rotate in a forward and upward direction. The underside of the workpiece, where the teeth enter the material, is almost always left clean, free of chips. In contrast, the top side is usually so defaced with chips that it cannot be used in visible areas of the product (compare three photos with varying degrees of chip severity). Therefore, if possible, always place the sheet or face down for cutting. And if you need to see on the front side, use one of these methods to keep the edges of the cut clean.
READ How to Cut Laminated Chipboard Without Chips
Sawing with a router
A great way to get a clean cut. First, the material is cut with a jigsaw at a distance of 2-3 mm from the marking line. Then a cutter is used to align the line according to a pre-prepared template. A cutter with a bearing is suitable for the job.
When cutting simple chipboard, no complications can arise, but with laminated chipboard everything is much more complicated.
This method can be used to make not only straight, but also curved cuts, and to produce radius parts.
We select a saw blade with the largest number of teeth to ensure an even cut.
Among the disadvantages of the method: it is necessary to apply precise markings, file the workpieces in advance and place the template under the router. That is, it is inconvenient for the tool to cut off several identical parts.
Sawing with a format saw
The most suitable tool that can be used to cut boards and pressed materials of different thicknesses. The cuts are precise and multiple parts can be stamped.
Professional machines are used for industrial purposes.
They are small in size and weight (up to 20 kg), and easy to install. If necessary, the machine can be removed and moved to another location. The tool is suitable for longitudinal cutting to a depth of up to 8 cm. Also, in a home workshop, you can saw the tabletop with a circular saw with an extended work table.
At home, household machines are usually used.
They are more convenient than household ones, as they allow you to make cuts not only along longitudinal, but also along transverse lines. The maximum cutting depth is 9 cm. When working, you need to apply precise markings and follow safety precautions.
Types of working attachments
When sawing logs with a chainsaw, various attachments are used.
- Attachment for longitudinal sawing. It is used for sawing logs lengthwise, the process takes place in a horizontal position. After work, the master receives the same thickness of the product. The finished materials undergo a drying process, after which the boards are used in construction. In appearance, the device is a small frame; it is attached to the tire on each side.
- Drum debarker (debarker). With the help of such an attachment it is easy to dissolve the log; it works due to a V-belt drive. Attached to belts on both sides, special pulleys are used for this. The speed of rotation of the shaft depends on the size of the pulleys, so the performance of the attachment is easy to change. This technology forces the master to carefully monitor each stage of the process; some specialists use an assistant during this cutting. But this option requires increased security measures.
- Sawing with a lightweight nozzle. The method is not very productive, but is used quite often. The element is fastened on one side, but the workpieces are slightly uneven. Such materials are necessary for the construction of sheds or fences.
Trimming sawing method
This method also involves using a circular saw, but a plunge-cut saw is more suitable. You will need a double ruler: it is fixed to the workpiece with clamps. The principle of operation is the same as that of a format-cutting machine: two cuts are made along the same line.
This is what the ruler-bus is used for. It is installed along the marking line, the laminate is lightly cut without disturbing its texture. Then the material is sawed along the marked trace.
By the way! Thanks to the cut on the laminate, no chips will form during the second deep cut.
The cut area can be sealed with an edge.
Using this method, you can cut the tabletop into one or more parts. Minimal chips are possible, but they can be easily removed by regular sanding or hidden with a decorative overlay.
Round cuts can also be masked.
Disadvantage: This method can only make straight cuts.
Make cuts without stopping
It is advisable not to stop while cutting wooden parts. The circular saw should move smoothly through the material and not be interrupted. Otherwise, there will be unevenness and cuts on the boards that will interfere with the further use of the wood.
The movements should be smooth and soft so that the disc does not become dull and moves smoothly along the board. It is also advisable to check the length of the cord in advance. If it does not reach, use an extension cord. Otherwise, the tree will also not be cut evenly.
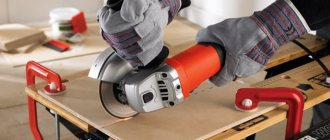
What cannot be sawed
A grinder or an angle grinder is something you should not use to saw a tabletop. Some masters recommend this method to save time. However, it has more disadvantages than advantages.
Use a level to make precise cuts.
Firstly, the quality of the parts is low: due to the sudden movement of the disk, many chips appear. Secondly, if large discs are used, there is a high risk of injury.
Professionals will make better cuts thanks to the availability of special devices.
In addition, after work a lot of dust remains, which is unacceptable at home.
How to lay parquet boards: methods and technology for proper installation of parquet boards
One of the main advantages of parquet boards is that they do not require additional processing after installation. The material is sanded, scraped, varnished and other operations are carried out in the factory, so all that remains for the consumer to do after purchase is to correctly lay the boards on the subfloor. Thanks to a convenient locking system, installation technology is noticeably simplified, but in order to create a high-quality and durable floor covering, you need to study all the intricacies of this process.
Floating method
Laying of the covering is carried out without fixing the parquet board to the rough base. The lamellas are attached to each other using a tongue-and-groove system or a special locking connection. A small gap must be left around the perimeter of the room to prevent the floor from deforming during thermal expansion. There is a layer of waterproofing between the coating and the base; noise-absorbing materials can also be laid.
This method is considered the most convenient and fastest, therefore it is used by most craftsmen, and is also ideal for those who do not yet have construction experience. If the installation technology is followed, the coating can withstand changes in humidity and temperature, which means that the risk of deformation is reduced to zero. If individual slats are damaged, replacing them will not be difficult; the main thing is to choose the right boards based on tone and pattern. Complete dismantling of the coating will also not require much effort; in addition, the material can be reused.
Laying parquet boards using the floating method