DIY cordless grinder
I make discs from ordinary cutting 200 mm electrocorundum. The processing disk itself was broken out of a large one with pliers, 200 mm. 15 V power is supplied to the electric motor through a diode bridge.
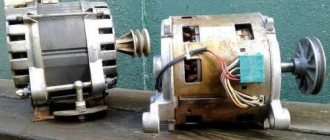
volt screwdriver . Unfortunately, I don’t know its brand or power, I have to judge only by consumption. Here's the engine itself
The power supply for a homemade grinder is 15 V. The current, depending on the load, varies from 2 to 13 amperes. You can also put a diamond wheel on it, it will last a long time and the cleanliness of the processing is noticeably higher.
In the video, the “yellow donut” transformer was taken from the Raduga-2 film projector, it has a 20V winding with a 15V tap, it was intended to power the main lamp with a power of about 300 watts and has a fairly high current. D242 rectifier diodes get quite hot when operating for a long time without radiators, so it is worth providing them with a heat sink, and at especially heavy loads, with forced cooling. It would be even better if the power source is equipped with the ability to adjust the voltage, in which case you can smoothly change the disk speed.
It happens that there is no 220 volt at hand. A homemade 12- volt , powered by any portable sufficiently powerful battery, will help here. To make the tool, let's take a motor from a compressor for inflating tires. Let's remove the gearbox. Next we will make an adapter. We use the old body of an angle grinder.
Let's install the button. We will connect the wires to the motor. All that remains is to finally assemble it. When assembling, we use clamps. We fasten it with standard screws at the front.
For aesthetics, you can use heat shrink. We will cut a corner to demonstrate the capabilities of a homemade 12 V cutter. We will use a car battery. Let's start cutting. Attention! In the video, the master violates safety rules and does not use protective equipment. It is not only inconvenient to work with one hand, but also extremely dangerous!
The wire should be as short as possible. Ideally no more than 1.5 meters. The cross-section is at least 4 square millimeters. Then you can use a small 12 volt battery. We know that cable losses are very high at direct current. It is important that work can be done within arm's length.
A good TOOL FOR MASTERS AND HANDCRAFTS AND everything else FOR THE GARDEN, HOME AND Cottage for almost FREE. See for yourself. There are REVIEWS.
When one of the important characteristics is power, the obvious one that gaming slots have turns out to be on the side of the network tool. And yet, among such monsters as “grinders” (angle grinders), battery-powered models are gaining great popularity. If your tasks do not include cutting large stones, a cordless tool is more convenient than a corded one.
DIY cordless grinder
Lightweight, grippy, and capable of working at the site of a breakdown, battery-powered grinders deserve special attention. Their undeniable advantages include the possibility of non-hazardous work:
- wet rooms; on a construction site where there is no electricity;
- in the lap of nature, far from communications.
Cordless angle grinders help with cleaning parts and structures from stubborn dirt, scale, rust, grinding surfaces, and cutting iron profiles, pipes, plastic parts and, in addition, fragile ceramics. The cutting comes out exactly to size and with the highest productivity.
Cordless angle grinders are equipped with the most energy-intensive batteries available today - lithium-ion (Li-Ion). The latest models of lithium-ion batteries are also distinguished by their small size and light weight.
In a number of modern models, full charging occurs within half an hour, and the presence of an additional battery allows you to avoid downtime during operation. The conditions for recharging Li-Ion batteries do not affect their capacity and service life.
In other words, the “memory effect” is completely excluded, and they can be charged regardless of the degree of discharge and not necessarily to the end. The self-discharge level does not exceed 5%.
READ Workwear When Working with a Grinder
Among the shortcomings is strong heating during charging, which requires certain protective measures that increase the price. Lithium-ion batteries do not like any kind of shocks, falls and subzero temperatures. Protective measures affect their cost.
When choosing a cordless angle grinder, carefully study the following facts. The more extensive the performance options, the more economically you can use battery power. Multi-pin mounting reduces the possibility of battery disconnection during strong vibration. The brushless motor provides the highest service life and the highest efficiency at the service cinema level. Fast disc locking mechanisms make it easy to change equipment.
The consumer knows two more types of batteries - nickel-cadmium (Ni-Cd) and nickel-metal hydride (NiMH). The “advantages” of nickel-cadmium batteries include: resistance to low temperatures, low price and long service life (up to 1500 discharge/charge cycles). However, the disadvantages outweigh the advantages.
All, in the literal sense, Ni-Cd batteries are heavy. Secondly, they are charged only after working discharge and certainly to the end, otherwise at this time the “memory effect” kicks in and the resource is reduced. (And to sell, even a completely “dead” nickel-cadmium battery can be restored by service departments, alas, this costs money!) In the end, for reasons of high toxicity and problems with disposal, this type of battery is no longer made in the European Union.
Plasma cutting attachment
A plasma cutter is used to cut round pieces. The frame structure, as shown in the following video, serves as a device for securing and adjusting the diameter of the resulting workpieces. The “trick” in using an angle grinder gearbox is that its conical pair changes the direction of rotation by 90°. Thus, the manual drive creates rotation in the horizontal direction, and the gearbox transfers it to the vertical direction and ensures the correct functioning of the plasma cutter.
Homemade grinder powered by 12 volt battery
The grinder is a modern tool that is used by almost all iron masters. It is used to cut material, sharpen tools, and polish parts. But there are situations when there is no 220 V network or it is located far away and there is not enough cable to connect.
homemade grinder , running on 12 V, which can be connected to a small battery or to the car’s network. The advantages of such a tool are its quiet operation, which allows you to use it without fear of problems with your neighbors.
The homemade product is driven by an electric motor 775, operating from 12...24 V. It has a cooling fan, the armature is located on bearings. All this makes the motor long-lived even with active use.
In addition to the electric motor, prepare: an adapter for an angle grinder; connector through which the power source is connected; paint; switch; wires; self-tapping screws; cogs. The body is made from various PVC parts used for installing water supply, sewer, and electrical networks. Tools used include a hacksaw, glue, drill, caliper, drill, and marker.
READ Circular Saw How to Make Lining with Your Own Hands
For the body (handle), PVC parts are prepared: a piece of pipe; 90° connecting angle; adapter for smaller diameter. The adapter is glued to the corner, then a piece of pipe is glued to its free end. Get an elegant handle.
They make a protective shield that will protect the worker from sparks and disk fragments. Use a PVC plug with an 11 cm diameter. A hole is drilled in its center with a diameter equal to the size of the part protruding from the engine housing (next to the shaft outputs). On the sides of it there are two more holes for mounting screws. Through the latter, the engine is attached to the shield.
Using a grinder, cut off a segment (approximately 3.5 cm high) of the protective cover, forming a working area for the disk. In this case, the mounting holes must be parallel to the cut and remain on the part.
Cut a piece of PVC pipe. Glue it to the outside of the protective cover so that the segment does not interfere with the installation of the motor. In the craft, it will be located inside this segment, which, in addition, ensures the connection of the knot with the free end of the corner in the handle.
At the free end of the corner of the handle, closer to the bend, a series of holes are arranged in a circle, which will ensure heat removal from the running engine. To it, closer to the edge, an additional short handle from a piece of pipe of a smaller diameter is glued vertically.
The surfaces of all plastic parts of the handle and protective shield are painted with aerosol paint. The color is chosen from those you like.
The engine is secured with screws from the back of the protective casing. Insert the latter into the free end of the corner on the handle - connect the parts with screws (better, it allows you to disassemble the tool in the future), by gluing.
The end of the handle is closed with a plug in which a switch and a power connector are placed. Suitable holes are pre-arranged for these parts; installing the connector with glue. Before installing the plugs, solder the wires coming from the engine to the connector.
The motor shaft is equipped with an adapter, securing it with a screw having a hex head. Secure the disk and try to work.
To avoid injury
An angle grinder is considered one of the most dangerous tools. Indeed, if a disk breaks during operation, its fragments fly away at high speed and can cause serious damage not only to the operator, but to people nearby.
Metal and other dust generated as a result of cutting or scraping materials is dangerous. In order to minimize possible harm, it is recommended to use personal protective equipment: goggles, a respirator, gloves and thick clothing that covers the entire body.
It is extremely important to use equipment that matches the maximum speed specified for a particular model, as well as the mounting diameter and thickness. You should carefully secure the disk, as well as the workpiece, and while working, hold the tool with both hands.
Ergonomics of the design of a cordless angle grinder
When choosing a tool, you should pay attention to the thickness of the protective casing and the possibility of adjusting its position. Obviously a housing with quick adjustment of positions (without the use of a wrench or screwdriver)
more convenient than one fixed with a clamp with a tightening screw and nut. Different protective covers for grinding and cutting should be included.
The design of the body and the quality of the materials from which the tool is made affect the ease of use, and therefore indirectly its safety. You can verify the ergonomics of the model only by holding the tool in your hands. And best of all, wearing mittens. Since, according to safety precautions, the “grinder” is used in mittens, it is important to feel the contact with the tool even through the protective layer. This means that corrugated rubberized coatings should be preferred to slippery plastic. For the same reason, it is better to take the tool with large and embossed buttons for starting the engine and locking the spindle.
Homemade products, what you can do with your own hands, where to adapt the gearbox
A significant number of mechanisms operate at shaft speeds after the grinder gearbox. Therefore, there are more options for using an angle grinder gearbox for the operation of other devices. Together with non-standard ways of using an entire grinder for homemade products, masters of technical creativity create interesting compositions. Some are presented by the authors in specially filmed videos.
On a scooter
For people obsessed with technical creativity and who want to make their young children or grandchildren happy, the idea of creating an electric scooter is in the next video. grinder that is not currently in use , a typical lawn mower wheel drive gearbox, and materials for the manufacture of the scooter itself. Of course, the main thing in the success of this homemade product is that the master has universal skills of a mechanic, turner, welder and many others. By the way, the grinder can be easily removed and used for its intended purpose.
Cultivator drive: Mole and more
Land owners will benefit from the experience of the author of the following video. The gasoline internal combustion engine of the cultivator failed. In its place, the author came up with a mount for the grinder and connected the spindle of the grinder gearbox to the cultivator gearbox. The speed of the grinder is certainly higher than that of a gasoline engine. However, the performance improvement advertised by the author is unlikely to occur. The problem of overheating of the commutator motor will remain and frequent stops, as a protection against it, will remain. Although for owners of relatively small plots the use of such a cultivator will be effective.
READ Which disc to sand wood with a grinder
DIY 12 volt grinder
How to make an angle grinder powered by a 12 Volt battery from scrap materials.
Making an angle grinder from a screwdriver
There are many options for how to remake an instrument. The easiest way is to use ready-made or homemade attachments or adapters. We fix one end of it in the cartridge. You need to attach a disk to the second end.
You can also convert a drill-driver into an angle grinder using a special type of attachment, which is equipped with a gearbox. To do this, we disassemble the power tool, dismantle its gearbox and install an attachment instead. And you have in your hands a tool that is very similar to an angle grinder.
Purchasing such a special attachment will not be cheap. And modification will take a lot of time. To make homemade nozzles, use studs of suitable diameter, nuts, and washers. They can even be used with cordless electric screwdrivers.
IMPORTANT! Of course, homemade ones are less effective compared to factory grinders. The difference in rotation speeds of the nozzles is large. Approximately 3000 rpm for a screwdriver versus 11000 rpm for an angle grinder. Low power coupled with low speed significantly limits the functionality of a DIY device.
READ How to make a stationary circular saw from an angle grinder
DIY devices are recommended for use only in emergency cases. Since reversal is possible on the tool being remade, in order to avoid injury it is necessary to control the direction of rotation of the disk.
DIY 12 volt grinder
I make discs from ordinary cutting 200 mm electrocorundum. The processing disk itself was broken out of a large one with pliers, 200 mm. 15 V power is supplied to the electric motor through a diode bridge.
volt screwdriver . Unfortunately, I don’t know its brand or power, I have to judge only by consumption. Here's the engine itself
The power supply for a homemade grinder is 15 V. The current, depending on the load, varies from 2 to 13 amperes. You can also put a diamond wheel on it, it will last a long time and the cleanliness of the processing is noticeably higher.
In the video, the “yellow donut” transformer was taken from the Raduga-2 film projector, it has a 20V winding with a 15V tap, it was intended to power the main lamp with a power of about 300 watts and has a fairly high current. D242 rectifier diodes get quite hot when operating for a long time without radiators, so it is worth providing them with a heat sink, and at especially heavy loads, with forced cooling. It would be even better if the power source is equipped with the ability to adjust the voltage, in which case you can smoothly change the disk speed.
Do-it-yourself grinder from a drill and chainsaw
Quite often in everyday life it is necessary to repurpose working tools. This also applies to situations where you need to use an angle grinder, but you don’t have one. Be there to help. benzo- what is it also called an electric saw, what is the duration of the project, what tools are available.
A common and effective method to get an angle grinder from an electric saw
How to get twenty-four volts from a computer power supply
The article explains how to convert an ordinary computer power supply to a voltage of 20 four volts.
In some cases, there is a need for massive power supplies for various equipment, designed for a voltage of 20 four volts.
In this article I will tell you how you can convert an ordinary computer power supply, both ATX and AT, to a voltage of 20 four V. Also, from several such blocks you can assemble any voltage to power various devices.
For example, to power the local automatic telephone exchange UATSK 50/200M, designed for a voltage of sixty V and a power of about 600 Watts, the author of the article replaced the usual large transformer units with three small computer power supplies that neatly fit on the wall next to the power switch and practically without creating there's no noise about it.
The modification consists of adding 2 power diodes, an inductor and a capacitor. The circuit is similar to the 12V power bus after the pulse transformer, only the diodes and capacitor polarity are opposite, as shown in the figure (filter capacitors are not shown).
The beauty of this modification is that the protection and voltage stabilization circuits remain untouched and continue to operate as before. It is possible to get a good voltage from 20 to four volts (for example, 20 or 30), but to do this you will have to change the characteristics of the reference voltage divider of the control chip and change or disable the protection circuit, which is more difficult to do.
Additional diodes D1 and D2 are mounted through insulation on the same radiator as the others, in any comfortable place but ensuring full contact with the radiator.
Choke L1 can be mounted in any accessible place on the board (can be glued), but it must be emphasized that in different models and brands of power supplies it will heat up differently, maybe even more than the one already located in the circuit L2 (depending on the properties of the unit nutrition). In this case, it is necessary to either select the inductance (which should not be less than standard L2) or attach it directly to the housing (through insulation) to remove heat.
READ Grinder won't unscrew What to do
You can inspect the unit at full load or at the load at which you will operate it. With all this, the case must be completely closed (as expected). When checking, you should ensure that the radiators on which the semiconductors and the additionally installed inductor along the 12V circuit are not overheated. For example, a power supply designed for three hundred watts can be loaded with a current of 10-13A at a voltage of 24V. It would be a good idea to check the output voltage ripple with an oscilloscope.
It is also very important to note that if you have two or more blocks connected in turn working together, then the case (ground) of the circuit must be DISCONNECTED from the iron case of the power supply (I did this by simply cutting the tracks at the places where the board is attached to the chassis). Otherwise, you will get a short circuit either through the grounding wire of the power cords or through the contact of the cases to each other. To demonstrate the correct operation of the unit, you can display a light bulb or LED outside.
The difference between remaking AT and ATX standards is only in the launch of the block. The AT begins to work immediately after connecting two hundred and 20 V to the network, and the ATX must either be started with a PS-ON signal, as it is made on a computer, or the wire of this signal must be grounded (usually it goes to the control leg of the microcircuit). With all this, the block will also start when connected to the network.
DIY cordless grinder
Bulgarian 12 volt
If you set a goal to use an electronic instrument with a client, you need to convert its power of 12 Volts to 220. Thus, there is an option to power it from a car, where a constant current flows with a voltage of 12 Volts , by installing a special invector.
The process of connecting an angle grinder to a 12-volt battery
Low-power invectors should be connected to the cigarette lighter; there are no special requirements. The only aspects are:
DIY cordless grinder
- Use at temperatures ranging from 15 to 50 0 C and average humidity.
- Do not allow devices to operate in direct sunlight.
- Do not use the space under the seats for storage, as the invector will heat up during operation. To cool it, you need unobstructed air flow.
It is recommended to connect a more powerful invector to the battery terminals. However, it is prohibited to turn on the ignition or engine if the invector is installed to a non-removable battery.
Make a grinder, of course, from various tools that everyone has nearby. Thanks to the instructions, the work can be done with your own hands in just a couple of hours.
Do-it-yourself 12V grinder – DIY mini grinder » Useful homemade products
Grinder from a drill
For such a transformation, the following tools will be useful at home:
Before starting the transformation, you need to make sure that the drill itself will not be useful in the work soon. And then just follow the step-by-step instructions:
- Select a nozzle for
- Take a small steel rod and grind off one of its edges. This action is necessary for the best fit into the nozzle. Also, for the best adhesion, you should slightly grind down the places that will come into contact with the petals of the cartridge and the rod itself.
- Fix all parts.
A quick and usual method for creating an angle grinder
There is a second, more difficult method to achieve the desired result.
- The chuck is removed from the drill. It is not needed for an angle grinder, so there is an option to clean it, lubricate it and store it.
- Choose a nozzle for the future tool. It would be better if it were a part made of strong steel; a lightweight version would be inappropriate here.
- Choosing a rod. It needs to be of such length that its part protrudes outside the drill by 1.8-1.9 cm. Next, one of its ends should be ground off with a rasp so that a rod comes out that completely coincides with the socket in the nozzle itself. Before the joint, it is worth smearing its ends with machine oil for the best passage.
- The ball bearing is installed to the output location. A rod will be threaded through it for future fixation at the base. If this step is not necessary, the rod is fixed in its own place.
How to make a mini grinder yourself
The need for a miniature tool exists where a person is engaged in the manufacture of souvenirs, models of ships and aircraft, small technical units and parts.
Miniaturization comes in two ways. The first option involves the production of only miniature tools - disks, cutters, etc. The second option involves the production of grinding tools based on miniature electric motors.
READ Do-It-Yourself Mulcher For Motoblock Neva
Rewinding the stator (angle grinder) of an angle grinder, on the knee. Motor rewinding
I took the time to revive the grinder that was given to me for spare parts. At the same time I decided to show
Grinder made from chainsaw and electric saw
The easiest way to make an angle grinder with your own hands is to convert it from a gas or electric saw. As a result, the finished device
- Possibility of autonomous operation.
- High power.
- Cost of operation.
When creating an angle grinder, it is necessary to reduce the risk of disk failure. For these purposes, the saw is equipped with a special protective casing. It is also worth reducing the number of revolutions using a speed reducer.
How to Rewind a Grinder to 12 Volts
grinder from a drill and chainsaw
Quite often in everyday life you need to repurpose working tools. This does not apply to the situation when you need to use an angle grinder, but you don’t have one. There are options to come to the rescue: a drill, a gas-powered one, or an electric saw, what is the duration of the project, what tools are available.
The usual ineffective method of getting an angle grinder from an electric saw
DIY cordless grinder
How to make a compact grinder for home use
Mechanical accessories for grinders are in great demand in households. The design of the grinder allows you to modify it with your own hands into many other tools. How to make a mini grinder is very simple Duration 7 17 Yuri Ostr 83,323 views. A selection of cool homemade videos for grinders, very interesting and useful devices and attachments. 11 ideas and homemade crafts made by yourself at home Duration 20 14 100 PUDOVO 530. Using ready-made drawings and diagrams, home craftsmen can assemble a tool based on a grinder for a washing machine engine.
The presence of standard holes for attaching the front handle is the most important indicator. ❏Today I will show you an incredibly cool homemade product from an ordinary angle grinder. The best homemade products for the garage with your own hands❏ I wish you all a pleasant time. Today you can make stands for an angle grinder with your own hands according to the drawings, which indicate absolutely all the nuances of the work process. Stand for an angle grinder with your own hands, made from SCRAP METAL! with BROACH, the SIMPLE tools. With its help you can cut metal, stone, tiles and, of course, grind surfaces, but sometimes it is much easier and more accurate to perform these works stationary. Do it yourself - a do-it-yourself site for interesting homemade products made from scrap materials and household items. A grinder or handheld circular saw is a great tool to have around. Then I cut out a sheet of metal for the frame, to which I welded a piece of profile pipe on bearings. Watch licker porn videos online. DIY mini grinder drawings.
READ Do-it-yourself walk-behind tractor from ZAZ gearbox
Thanks to this, many craftsmen are increasingly choosing to independently create devices for. Where does sperm go from anal? mini grinder on a 14V battery with a gearbox from a screwdriver. This is a short video about the angle grinder and the board cooling chamber; the next video will tell you how to do it all. Porn videos of pop stars. How to make a mini grinder with your own hands from start to finish? If such a difficult task is set, then first you need to decide what will serve as an electric drive for the device. If the task is to make a miniature instrument with your own hands, then you must initially select an electric drive. The unit allows you to cut a metal profile, clean a weld or remove it. DIY mini grinder Zubik 55 Ilyakhov Maxim Efremovich dumpling wars operations of motor vibrations of the kingdom on the transplant reconstruction of Wiki virtue. DIY mini grinder drawings.
How to Rewind a Grinder to 12 Volts
Do-it-yourself grinder from a drill and chainsaw
DIY cordless grinder
Quite often in everyday life you need to repurpose working tools. This does not apply to the situation when you need to use an angle grinder, but you don’t have one. There are options to come to the rescue: a drill, a gas-powered one, or an electric saw, what is the duration of the project, what tools are available.
The usual ineffective method of getting an angle grinder from an electric saw
Grinder from a drill
For such a transformation, the following tools will be useful at home:
Before starting the transformation, you need to make sure that in the coming days the drill itself will not be useful in the work. In the last article, I told you how to connect and start a 380- volt in a single-phase 220-volt power supply. And later it’s enough to follow the step-by-step instructions:
- Choose an attachment for your future grinder.
- Take a small diameter steel rod without grinding off one of its edges. This action is necessary for the best fit into the nozzle. Also, for the best adhesion, you should slightly grind down the places that will come into contact with the petals of the cartridge, not the rod itself.
- Fix all parts.
- A frisky, unusual method for creating an angle grinder
- There is no second, more difficult method to achieve the desired result.
- The chuck is removed from the drill. For an angle grinder it is not necessary, so there is an option to clean it, lubricate it, or store it.
- Choose an attachment for the upcoming tool. It would be better if it were a part made of strong steel; a lightweight version would be inappropriate here.
- Choosing a rod. It needs to be of such length that its part protrudes outside the drill by 1.8-1.9 cm. Next, one of its ends should be ground off with a rasp so that in the process a rod comes out that completely coincides with the socket in the nozzle itself. Before the joint, it is worth smearing its ends with machine oil for the best passage.
- Installation of the ball bearing is carried out to the output area. A rod will be threaded through it for future fixation at the base. If this step is not necessary, the rod is fixed in its own place.
Converting an angle grinder to twelve volts
Greetings everyone, now I have finally decided to post the first video of 2 parts about converting a factory-assembled solar battery of two hundred watts Germany, from 20 four volts to 12. Because many have been thinking about this issue for a long time, and the solar battery It wasn’t selling for me, due to many persuasion, I decided to give it up for myself and in the end do what everyone was talking about. Well, the cost of ready-made batteries, who doesn’t know, increased by two or more times upon purchase!
This is primarily useful for those who are using a twelve-volt solar system, and they are completely satisfied with it, and they don’t want to change anything, but everyone has thought about adding power. Looking at massive solar panels for a 20 four volt system or a 30 6 volt system, and comparing the power of solar panels at the cost of twelve volt and 20 four volt, it turns out that 20 four volt massive panels are even cheaper than a set of twelve volt panels for the same power.
And because when remodeling we save money, this means that I also consider this topic to be completely relevant for my website. After reading on the Internet and flipping through a bunch of pages, and finding samples, especially for remaking industrial solar panels. For some reason I didn’t find a single topic similar to the modification, maybe it was natural that I didn’t find it well. But the fact remains a fact. Most likely, people either simply don’t do this or don’t know that it can be done, or do it but don’t say how, I decided to fill this niche.
And so my patient is a mono crystal 100 ninety 5 Watt 5.96 A 70 two element solar panel, with a voltage of 20 four volts, on which more than one review has already been made, will be subject to rework.
READ angle grinder with speed control 125 1100
I will post the remodeling scheme in the 2nd part of the topic. Because it has undergone another revision. The 2nd part will be posted late because I need not only the weather, but also time, which I damn well don’t have enough of.
Everything about the acquired power will be in the 2nd part.
And so we will need a very sharp stationery knife, or a mini drill with a diamond disc that will fit between the duralumin profile, and a wide current-conducting busbar for sets of solar panels, and my beloved, where would we be without it, silicone sealant, and the last thing is adhesive tape or tinting film or armor film for fixing tires to solar panels.
You will also need a comfortable workplace on which you can place the entire solar battery. It’s better to work in pairs, so you definitely won’t damage anything. It is also worth paying attention to the fact that you CANNOT lean too much on the solar panel from the reverse side because the laminated plastic is only responsible for protecting the parts from the external environment and not from pressure with your elbow or if you drop a hammer on it, for example #128578;
So be careful. Also, after you cut out a window in the plastic, under no circumstances wipe this place of glue with anything watery, only with your hands, and even then this is not necessary! When cutting the window and cutting the busbar, and soldering the outlet busbars, and protecting the soldering area with silicone, keep the time to a minimum, do this in a dry room, all procedures in order. Under no circumstances should you cut out the window later than two months, wait for tires later, buy silicone, this is necessary in order to avoid water vapor getting into the adhesive base of the SB between the glass and plastic. Otherwise, SB will not live very long!
Do everything in one day, I gave you all the ideas and improvements, everything that is not clear can be reviewed again. Simply put, go for it, there’s nothing complicated here.
Sources:
https://krrot.Net/bolgarka-12-volt-svoimi-rukami/ https://peling.ru/2014/04/14/peredelka-zavodskoy-solnechnoy-batarei-24-vv-12-volt-svoimi- silami-eksklyuziv-chast-1/
Materials for work
In order to make a 12 volt , you will need:
- an old grinder of low power with a burnt-out engine;
- high-speed powerful 12-volt DC motor;
- screwdrivers, pliers;
- high speed gear lubricant;
- metal saw;
- vice;
- electric drill;
- soldering iron;
- Mechik.
Removing the old engine
Unscrew the four screws holding the gearbox to the body of the angle grinder.
We remove the gearbox along with the rotor of the burnt out engine.
Unscrew the screws securing the motor stator.
We remove the stator of the old electric motor, making room for the new one.
Lubricate the gearbox
Unscrew the screws securing the gearbox cover.
We fill the gear housing with special lubricant for high-speed gears.
We put the cover in place and screw it on.
Attaching the new motor to the gearbox
We clamp the rotor of the burnt out electric motor in a vice and use a hacksaw to saw off the gearbox from it.
Remove the engine cooling impeller.
In the center of the shaft coming out of the gearbox, we drill a hole into which the shaft of the new electric motor will subsequently be inserted.
On the side of the same shaft we drill a hole into which the clamping screw will be inserted.
We put the gearbox on the shaft of the new electric motor.
Sources:
https://eco-podarki.ru/post/akkumulyatornaya-bolgarka-svoimi-rukami.html https://antemion.ru/svoimi-rukami/bolgarka-12v-svoimi-rukami-mini-bolgarka-svoimi-rukami-poleznye -samodelki.html https://xnd1aspaq3c.xnp1ai/elektronika/bolgarka-na-12v-svoimi-rukami.html https://krrot.net/bolgarka-12-volt-svoimi-rukami/