Cleaver, its types, characteristics, recommendations for choosing this tool and rating of popular models.
Considering that the majority of the population of developed countries lives in cities, there are people who have no idea how firewood is collected for the winter.
In fact, in order to simply warm up the bathhouse, you need to prepare a decent amount of wood fuel, which is impossible with an ax.
And although there is an opinion that an ax is the main tool for preparing firewood, in fact it is intended for cutting down trees.
But the cleaver, the purpose of which is hidden in the name, is used to split logs and sawn tree trunks, turning them into logs in one movement.
Main characteristics
The cleaver is not an ax in the full sense, but it is directly related to it.
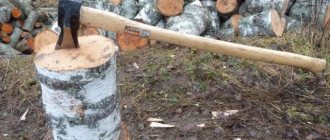
A hand tool has an ax handle on which a wedge-shaped working part (head) is mounted without sharp sharpening.
The cleaver is designed for a single blow, after which the log will split into pieces.
What is important here is not the sharpening of the blade, but the force of the blow.
Externally, the cleaver resembles more a sledgehammer than a classic axe.
One side of the head is flat (butt), and the opposite is wedge-shaped, made in the form of a double-sided cut at an angle of 40 - 50 degrees.
The weight of the cleaver reaches 5 kg, which allows it to cope even with large logs.
The meaning of this design lies not in cutting through the wood fibers, but in their delamination.
The thickness and length of the ax depends, first of all, on the size of the cleaver's head.
At the same time, the size of the handle directly affects the efficiency of work, since a long ax paired with a heavy head concentrates a decent impact force on a small area.
Blade
As already mentioned, the blade of the cleaver does not have a sharp edge.
Depending on the shape, wedge-shaped (wedge-shaped) and eared options are distinguished.
The second type, as the summer residents themselves note, is much inferior to the wedge-shaped ax in terms of ease of use.
It is noted that the head, due to the presence of “ears” set apart, often gets stuck in logs, after which it is difficult to remove.
The manufacturers themselves respond to this claim by saying that this design is designed to work with dry wood.
In reality, the owners of a private house use a tool to split raw, recently cut trunks, which is incorrect.
The piercing edge can be straight or rounded.
The first version of the cleaver is suitable for working with large dry logs.
The rounded blade has a larger size, which allows it to cope with resinous and damp wood.
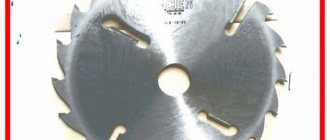
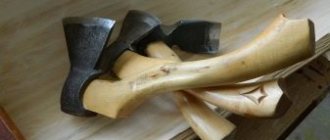
The cleaver's head is made using the following methods:
• Stamping
Medium carbon steel is used.
In most cases, stamped cleavers weigh more than 2.5 kg, and their center of gravity is concentrated in the head. This allows you to use such a tool for working with large logs.
• Casting
The blade is made of hardened steel and is usually smaller in size compared to the option mentioned above.
They come in both straight and rounded.
Cast axes are more reminiscent of an axe.
Handle
The wooden ax handle is a classic.
It has always been used and will remain relevant for decades to come.
Unlike metal, wood has the beneficial property of absorbing shock and vibration.
In addition, wooden handles are relatively cheap and easy to manufacture.
All this affects the cost of the instrument for the better.
However, among the disadvantages it is worth noting the fact that the ax handle, if the technique of working with the cleaver is incorrect, splits.
An alternative to wood is fiberglass, a composite material with good strength properties.
Some models are produced with a rubberized handle, thereby increasing ease of use.
At the same time, it is lightweight, which allows you to shift the center of gravity of the instrument towards the head.
Fiberglass handle is a suitable solution for heavy cleavers.
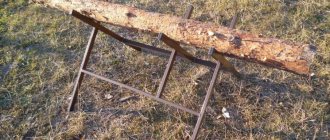
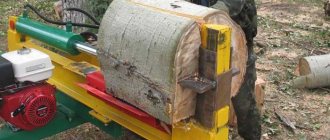
How to make a wood splitter on a spring
We already wrote above that the frame design is chosen arbitrarily, the main thing is stability. But before making a lever, you need to calculate the main dimensions according to the force distribution scheme. The goal is to achieve the perfect balance between the length of the boom, the weight of the load at the end and the distance from the hinge to the spring. The mechanics of this system is described by the equation:
- M – counterweight mass at the end of the beam, kg;
- F – spring elastic force;
- l – distance from the hinge to the spring, m;
- L – total length of the lever, m.
If you neglect the calculation, then 2 scenarios are possible: you will have to put a lot of effort into swinging the arrow, or the cleaver will hit very weakly. Physical meaning: the farther the spring is from the hinge and the higher its rigidity, the longer the lever and the mass of the load will be required.
Calculation diagram of the length of the lever and the weight of the load at the end
An example of determining the main dimensions of a beam. We take a spring from a Zhiguli car, compressed with a force of about 200 kg (the weight of the car is 0.8 tons), and move it away from the rack by 30 cm. We calculate the remaining indicators using the selection method - we take the length of the boom to be 2 m, then the weight of the load is 30 kg, including the mass of the cleaver and lever. Let's check: 30 / 200 = 0.3 / 2 = 0.15.
To assemble a lever wood splitter, use simple materials:
- spring from a small car (VAZ, Tavria and the like);
- a finished blade from a hand cleaver or a blank made of low-carbon steel 20 mm thick;
- a pipe according to the diameter of the spring - for the manufacture of cups;
- various rolled metal products for the frame - angles, round and profile pipes with a wall thickness of 3 mm.
Advice. It is not necessary to use a shaft on bearings as a hinge; this is overkill. The mechanism is quite rough, so a simple shaft-bushing articulated pair, as shown in the photo, will do. Similar parts are placed on garage doors as awnings.
The assembly process is quite simple and does not require detailed description. Based on the drawing, weld a stable frame, make cups and install a spring with a lever. Finally, attach a weight and a splitting blade to the beam.
If the structure turns out to be unstable, simply place additional pipes on the horizontal supports. For an overview of the finished cleaver with dimensions, see the video:
Main types of cleavers
Hand cleavers can be divided into types depending on the size and shape of the head.
Modern instruments, due to their design features, can have several types of features at the same time:
Big cleaver
Large massive head and long handle.
Weight can reach 5kg.
Mini cleaver
It weighs from 1.5 kg and has a relatively short handle, up to 60 cm, which limits the scope of use of this tool.
Not suitable for working with large logs, and for thin branches it is preferable to use an ordinary ax.
“Iron”
A classic of domestic production.
A large tool with a hole for the handle located close to the butt.
Sledgehammer
A heavy tool designed for working with large logs.
The presence of a striking butt allows the tool to be used for driving in wedges.
Wedge-shaped
It has straight bevels and looks like a wedge.
Eared
Thin blade, like an ordinary axe.
At the same time, there are special “ears” on the head, designed to sharply expand the crack during an impact.
Chinese
The Chinese cleaver deserves special mention.
It is distinguished by a narrow nose, which, in fact, is a wedge with a handle.
It gets stuck into wood the first time, but often gets stuck tightly.
You can remove the head by hitting the butt on a log or by rocking.
As a result, you can observe a burst eye or a violation of the attachment of the ax to the cleaver.
Firewood splitter: making a wooden handle with your own hands - Man in the House.Ru
It is not easy to choose a new wooden ax for a cleaver, the configuration of which is largely determined by individual preferences.
A truly comfortable handle would be a custom-made handle, made using accessible technology that does not require special skills.
Tools used
Wood processing can be easily done on a carpenter's workbench or on a workbench that replaces it. The list of the most necessary tools is as follows:
- Wood hacksaw;
- Carpenter's axe;
- Plane;
- Hammer;
- Chisel;
- Knife;
- Roulette;
- Sandpaper.
Using a power tool (grinder, circular saw or electric plane) will make the process of making a cleaver handle much easier, but you can do without them.
Wood for an ax
The type of wood and the drying of the workpiece determine the durability of the ax for the cleaver. Freshly cut lumps are not suitable for handles: when the wood dries out, it becomes much thinner, cracks and warps. At home, a natural drying method is used, which allows you to prepare the workpiece in a dry shed for two years and in one year if you keep the wood in a heated room. The harvested wood is sawed off 15–20 cm longer than the future ax for the cleaver, in order to subsequently remove the ends covered with cracks.
Among the available tree species, ash has the best properties: its handle is strong, elastic and does not dry out much over time. It is easier to find a suitable birch log, but it takes longer to dry, and it rots faster. A maple ax handle is less loose, and is slightly inferior to a birch one in terms of impact strength, but is more durable and easy to process.
Shape and dimensions of the ax
A firewood cleaver should have a slightly curved handle 50–70 cm long for medium logs and 80–100 cm for large stumps. The ax handle is made of an oval cross-section, consisting of two semicircles connected by straight sections. This handle provides a confident grip and tactile control over the trajectory of the cleaving axe. Only the seating part of the ax for the cleaver is ovoid in shape, corresponding to the hole in the metal tip. A bend is made in the tail part of the handle in order to better hold the cleaver, which tends to slip out of the hand during strong blows. In addition, the downward-pointing end causes less twisting of the hand at the final moment of the blow.
Making your own handle
First, a block of dried lump is made from a thickness of 3–5 mm greater than the width of the mounting hole. The reserve will allow you to later adjust the workpiece in case of mistaken removal of excess wood somewhere. If it is necessary to remove a thick layer, use an ax or a circular saw, then plan the surfaces with a plane, simultaneously leveling the planes.
On the resulting workpiece, mark the outline of the ax handle with the same margin of a few millimeters.
For convenience, the piece of wood is clamped and transverse cuts are made with a hacksaw in increments of 35–40 mm, not reaching the marking line by 2–4 mm.
Next, use an ax or chisel to knock down pieces of wood in small pieces, following the direction of the chip and not allowing it to go deeper than the drawn contour.
The shank is filed perpendicular to the axis of the ax handle to reduce the likelihood of chipping the wooden product.
Having completed the rough processing, mark the dimensions of the mounting hole.
Why find the center at the end of the workpiece and align the tip along it.
The final shapes are given to the workpiece by planing the convex surfaces with a plane, and the sunken parts are selected with a sharp knife.
Working carefully, remove thin shavings and periodically turn the part over to change the direction of the cut. As a result, you get an almost finished ax handle.
Now the upper end of the handle is chamfered for approach.
They try to lightly insert the handle into the eye, after which marks will remain on the wood, showing how much material needs to be removed.
Focusing on these marks, they continue to adjust the axe. Then another test attachment is made to identify areas of chipping.
Subsequent fine-tuning of the handle is carried out with sandpaper, smoothing out all irregularities and bringing the surfaces to a smooth state.
The tip is finally placed on the finished ax handle, ensuring an even fit. The protruding end of the piece of wood is cut off with a saw.
Place the cleaver vertically and hammer in a wedge, the length of which should not exceed the size of the butt to avoid cracking. If the wedge is not completely buried in the wood, the excess is cut off with a hacksaw.
The handle of a firewood cleaver is impregnated with a protective and decorative compound, leaving the surface rough. Do not use varnishes or oil paints that form a glossy finish.
Making slip protection
To protect the ax from accidental slips, a plate is made from a steel plate 2–3 mm thick. The metal is bent with a hammer, holding the part in a vice along with a suitable iron blank.
The overlay is “finished” directly on the tool handle with light pointed blows of a hammer.
The protection is fixed to the handle with screws through pre-drilled holes.
A well-repaired cleaver with your own hands will be a good helper when preparing firewood.
The condition of the wooden handle should be checked before each splitting of logs. You should not risk your health by working with a tool with an ax that is shriveled and dangling in its socket.
muzhik-v-dome.ru
Rules for working as a cleaver
Having even the most expensive branded cleaver at hand, you will not be able to work effectively without experience.
However, at first, the following tips will help you cope with this problem to some extent:
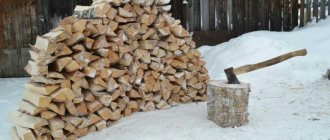
• The widest log with a flat cutting area serves as a stand for logs. Installed in a stable vertical position.
• To make the work easier, you need to wait until the freshly sawn logs dry out. Otherwise, the wood will be viscous, and this will lead to jamming of the tool. In winter, it is better to let the raw material freeze. So it will become loose.
• For rational fuel consumption, it is better to chop the lumps into pieces with a diameter of about 10 cm.
• It may not be possible to split large logs in half the first time. To save time, it is better to chop off pieces along the edge and then cut the “core”.
• If there is a crack in the log, it is advisable to hit it with a cleaver. When working with knotty material, it is necessary to hit the tool either along one of the branches or between them.
• An old cleaver with a wooden handle must first be soaked in water. The ax handle at the junction with the head will swell and securely lock, preventing the metal part from falling off during operation.
• The handle of the tool always has an extension at its end. This is done so that the hands do not slip when struck. You should take the tool right at the extension in order to achieve maximum impact force using the lever.
A tool stuck in the deck can be removed in several ways:
• Loosen.
• Hit the butt with a sledgehammer, which will cause the wood to split.
• Swing the cleaver together with the block, turn the tool in the air and hit the butt on the log stand.
Due to the enormous impact force, working with a cleaver carries the risk of serious injury.
By following the simplest rules, you can significantly reduce or eliminate the risk:
• The block of wood must be placed on the edge of the deck on the far side. If you miss, the instrument will stick into the stand.
• You need to hold the cleaver by the edge of the handle, keeping your legs wide apart. Again, if you miss, the blade will go into the ground, not into your leg.
• To avoid shock absorption by the deck - stand, it must be installed on a hard surface (asphalt, concrete).
• The work area must be clear of foreign objects. It is better to immediately remove already split logs from under your feet.
• The presence of people in the immediate vicinity of the workplace is unacceptable, since wood chips flying in all directions are dangerous.
How to chop wood in a car tire
How to chop wood? At first glance it is simple. Take an ax or a cleaver. You place a log on the deck (stump). Hit and done! The log fell in two. All that remains is to collect the logs from the ground and take them to the woodshed. Stop. Is this convenient? See how simply, quickly and conveniently splitting birch firewood in a tire is done by a FORUMHOUSE user with the nickname AndreyPYSH, and take this “folk” life hack into service.
The benefit of this method: the split logs do not fly apart, you do not have to bend down after each flying log, the load on the lower back is reduced.
AndreyPISH
Tires can be fastened to each other or, pull the bottom tire onto the deck, choosing the diameter. It is convenient to stab thick stumps in a tire.
OlegN FORUMHOUSE user
I saw this option for chopping wood a long time ago and also tried it. My recommendations:
- Buy a good axe. The bad one gets stuck in the log.
- The optimal height of the log is 1/3 sticking out of the tire.
- Try to split the log in one blow.
For stability and to make it higher, I placed the deck on a car rim.
You can pick up old tires for free from tire shops.
How to choose a cleaver
A cleaver is not a universal tool.
For this reason, there is simply no general advice on choosing the best model.
It is necessary to build on the shape of the blade, the length of the handle and the weight of the head.
The kinetics of the impact directly depends on them.
However, before you buy a specific cleaver you like, which in theory will perform the task, you need to check it for mechanical damage and absence of cracks.
The ax handle should sit tightly in the head; any play is unacceptable.
The handle should be comfortable and long enough, well polished.
Some models come with a case that will ensure safe storage and transportation of the tool.
It must cover the blade and sit securely.
Recommendations for making your own cleaver
The design and type of device are influenced by:
- working conditions;
- availability of materials;
- financial resources.
Some tips for economical manufacturing:
- they prefer a simple budget model with a manual drive (relevant in case of power outages);
- for the option with an electric drive, a motor with a power of up to 3 kW is suitable;
- For people without physical training, a hydraulic tool is suitable (the only drawback is the expensive components).
How to sharpen a cleaver correctly
The question of sharpening the blade of a cleaver ax remains open today.
Is it worth sharpening it at all?
The thickness of the blade, as a rule, does not exceed 5 mm over the entire surface, and experts advise using a floating sharpening (sharpness increases towards the center of the tool blade).
This will allow you to cope with wood of various species.
The sharpening angle also matters.
For most cleavers, the wedge is sharpened at an angle of 40 - 60 degrees.
At the same time, an angle that is too sharp is not suitable for working with soft and wet material.
The tool will get stuck in the fibers.
An obtuse angle is not suitable for frozen and dry logs, as the tool will simply bounce off.
The blade is sharpened with an electric sharpener at low speed.
Periodically, you need to moisten the wedge of the tool with water, which will prevent it from overheating during friction.
How to make an ax handle with your own hands?
An ax is one of the most famous and accessible tools in the arsenal of most summer residents and professional craftsmen. If you use it correctly, you can simplify many work processes, resulting in excellent results. You can not only buy an ax ready-made in a specialized store, but also make it at home. This will not take much time, effort and money. Today we will look in detail at how to properly make an ax handle with your own hands.
Many jobs are impossible without a well-sharpened and strong axe. This tool is often needed in both household and larger-scale work. In retail outlets you can find many different models of such tools, because there are quite a lot of types of axes themselves. It is possible to choose the ideal option in accordance with any requirements.
But there are also cases when the consumer could not find a suitable tool for himself. Many people in such situations find a simple way out - they make an ax themselves. For a tool to be of high quality, reliable and durable, it must consist of good elements. So, to create an ax handle, it is very important to choose the right material.
Not every type of wood is suitable for creating this ax part. It is believed that a true master will go around the entire forest before he finds the very tree from which he can make an axe. In most cases, this element of the ax is constructed from the root section of a birch tree, and even better, if you use the growths that are present on its trunk. These parts are distinguished by a very dense and curled structure.
Birch is not the only tree that can make a good ax handle. Instead, it is permissible to refer to trees such as oak, maple, acacia, ash and other deciduous trees that are classified as hardwoods. According to experienced craftsmen, beech, oak, larch, walnut and elm produce the most reliable, comfortable and durable high-quality handles. But it’s not enough to find the ideal material for making an axe. It is still necessary to properly prepare it for the upcoming work.
The workpieces must be thoroughly dried. This is done only under natural conditions, and it often takes a lot of time - on average 3-4 years, and better yet longer (5 years will be enough). Wood should be dried exclusively in a dark and dry place with good ventilation. Precipitation, dampness and water should not penetrate into the space where natural material will be prepared. Otherwise, such drying simply won’t do any good, and you won’t be able to make a good axe.
If you have the material already prepared and dried to the required degree, then you should move on to the next stage of creating an ax handle. Next, you will need to competently make a convenient template, which will be an excellent assistant in further work.
Here it is important to take into account the fact that there are quite strict standards regulating the shape of the ax based on the main type of device. Thus, light tools, the weight of which usually ranges from 0.8 to 1 kg, are usually made with a handle having a length of 0.4-0.6 m. As for more “serious” heavy axes, there is a length of 0.55-0.65 m. It is also necessary to take into account the fact that all existing types of axes are divided according to their main functionality.
So, the following types of these tools are distinguished:
- carpentry;
- lumberjack;
- knotty;
- cleaver;
- butcher's
Before you start designing such a tool yourself, it is recommended that you familiarize yourself with detailed drawings of different models of handles.
When making a template, a number of important features should be taken into account.
- So that during the work the ax handle does not slip out and does not jump out of the hands at the moment of swing, its “tail” must be made a little wider than the gripping point.
- When making an ax for a cleaver, you need to make a part 0.75-0.95 m long. Carpentry tools are made short. Their handle generally reaches 0.5 m.
- Another 8-10 cm should be added to the handle length parameter for the butt for allowance. It will be possible to cut it off after installing the butt. It is very important to ensure that the tree does not begin to split at this moment.
The template with its correct shape and all dimensions will need to be applied to paper or cardboard.
It is not difficult to prepare an ax handle with your own hands. To do this, you need to adhere to a not very complex technology for carrying out work. Let's get acquainted with it:
- mark the workpiece using a template;
- after this it can be carefully cut out with a jigsaw or other similar tool;
- Next, the prepared part will need to be turned on a special machine and polished.
There are a number of important rules that must be followed as work progresses.
- Processing the fixing area of the ax must be done as carefully and carefully as possible, so as not to accidentally remove excess part of the wood. Otherwise, the butt simply will not be able to be firmly fixed in place. It is better to periodically try the handle against the eye, so that in the end you get a small margin (no more than 2 cm).
- You should not use a file while finishing the part. This will lead to inevitable loosening of the wood. Because of this, it will be more difficult to work with him further. It is better to use fine abrasive sandpaper and a grinder rather than a file. You will need to move the tool along the wood fibers.
- It is necessary to give the final, correct and beautiful shape to the fastening area of the handle, taking into account the angle of the butt attachment. As for the cleaver, the specified angle for it should be approximately 85 degrees. For a standard ax – 75 degrees.
When making an ax yourself, you need to act very carefully. There's no need to rush. If desired, you can decorate the handle of the tool with patterns and carved decorations (for example, you can wrap it with jute cord - it will hold the blade more securely). When the ax handle is ready, you will need to correctly install the cutting part on it.
Let's look at how this should be done.
- Adjust the top of the piece to the eye of the blade. Remove the excess wood with a knife. Be careful.
- On the handle, set horizontally, the cutting part should be placed on top. Then you need to make a mark on the handle with a pencil until it will be driven in. Divide the segment and make another mark.
- Secure the handle in a vertical position using a vice. The wide part should be at the top. Prepare a hacksaw for metal. Make a cut exactly to the second wedge mark.
- At a specialized retail outlet, pick up a wedge made of metal or make it yourself from wood.
- Place the board on a separate tabletop. Point the blade at it. Place it upside down. Place the prepared ax handle over this part, tapping it on the board. Now turn the tool over and tap the handle on the board. The part will continue to be seated. These steps should be repeated many times. As a result, you will be able to thoroughly drive the ax into the eye.
- Then place the part in a vertical position. Install a wedge into the cut. Hammer it in with a mallet. Saw off any excess protruding parts
The wood from which the ax handle is made, like other similar materials, is susceptible to rotting. Such problems always arise over time or in inappropriate storage conditions for the instrument. It is important to take care of your homemade ax in advance, protecting it from rotting. It is strongly not recommended to use compositions such as varnishes or paints to protect wooden handles. The ban on the use of such compounds is due to the fact that their presence on the handle can lead to it slipping out of the hands during certain work. The reason for this is the glossy smooth texture.
The optimal solution for protecting the ax from rotting would be other suitable impregnations. You can coat the handle with linseed oil or good old linseed oil. There are other highly effective antiseptic agents that will extend the life of natural wood. But we must take into account that they will need to be applied periodically. Don't forget this procedure.
Some craftsmen add red pigment to antiseptic protective products. People turn to such a trick not at all to give the instrument a more interesting appearance. After this coating, the ax will be much easier to find in the grass, because its color will become brighter.
Please note that the ax handle should be made so that its cross-section has a characteristic oval shape. Only by observing this condition will you be able to successfully hold it without straining your hand too much. In this case, blows with an ax will be more accurate and easier. It is recommended to make wood blanks for creating an ax handle in late autumn. It is during this period that the movement of sap is reduced to a minimum (almost stops), which means that the tree becomes, as it were, dehydrated.
Many inexperienced craftsmen neglect drying wood to build an axe. As a result, this ends up with the handle changing in size, and the metal part with the butt on it holds very poorly. It is permissible to use undried material only in special situations, when the handle needs to be built urgently, and this spare part is made as a temporary one.
When making a brand new ax handle yourself, you need to draw up a detailed drawing/template of the future tool. If you have a very convenient old ax in your arsenal, then you can remove all parameters from it. This will make it much easier and more convenient. Do not rush to turn the cutting edge of the tool. First you need to make sure the metal is sufficiently hard. If it turns out to be too soft, then it will need to be additionally hardened under the influence of high temperatures.
It is permissible to begin sharpening the ax blade only after installing it on the ax handle.
It is very important to use a ready-made ax (both homemade and store-bought) correctly. Experienced craftsmen strongly do not recommend trying to cut various metal parts with such a device. Even if you plan to cut wood, it is better to make sure that there are no solid particles inside that could harm the tool.
It is strongly recommended not to throw the finished tool onto hard surfaces, especially from a great height. It is not recommended to leave the ax in the open air. Precipitation or aggressive sunlight can negatively affect the quality of the wooden part. Keep this tool in a dark and dry place. Only under this condition will the ax serve you for many years.
If the ax handle fits into the eye too easily, this may indicate that during the work the master made a serious mistake somewhere (most likely in the calculations). An incorrectly prepared template often leads to this problem. In such a situation, even one more installed wedge will not change anything. That is why it is so important to take your time to do all the calculations and make the template correctly.
Do not forget to process the wooden ax handle at the end of all work. Please note that processing of this part must be carried out in several approaches. Each new protective layer should be applied only after the previous one has been completely absorbed. This is the only way to reliably protect wood from rotting and destruction. Stock up on enough wood to make an axe. You don’t need to make just one piece - it’s better to build several pieces. This is necessary because during the work some of them may not work out and be rejected. There should always be at least one more blank in stock.
To make an ax handle, you cannot use a wooden block that has a large number of knots. Because of them, noticeable cracks may form on the material. Over time, the branches begin to dry out, and the entire material loses its strength. Making an ax handle yourself is not at all difficult. If you doubt your abilities, are afraid of making a mistake and translating natural material, then it is better to refuse experiments. Buy a ready-made model or contact an experienced craftsman who will make a good tool for you.
To learn how to make an ax handle with your own hands, see the following video.
stroy-podskazka.ru
How to properly store a cleaver
Storing a cleaver is no different from storing an ordinary axe.
Branded models are paired with plastic or leather cases, which allows you not only to store, but also to safely transport the instrument in a car or even public transport.
The metal part is coated with lubricant to prevent rust formation.
A tool with a large head can be safely coated with a thin layer of automotive oil.
For branded expensive models, a special lubricant for the ax is sold.
Tools with a wooden ax should not be stored in direct sunlight.
It is also not recommended to work in temperatures below -20.
It is best to store axes in rooms with average humidity.
Tools and materials
When making a cleaver with your own hands, you need to take into account the characteristics of local wood in order to achieve the best result when splitting. List of tools that may be needed when making a homemade cleaver:
- Bulgarian;
- abrasive sharpening tools (emery, sandpaper, file and others);
- hacksaw;
- hammer;
- knife;
- welding inverter (in some cases).
The materials for making the chopping part of the cleaver can be:
- old ax (without cracks in the butt and base of the blade);
- spring element.
The handle is made of hard wood:
The material for the ax is prepared in advance - several months before the start of making the cleaver. The tree is selected during the period of suspension/stopping of sap flow - this will reduce the likelihood of the workpiece breaking when drying.
Unusual splitting ax from an old ax
Materials and tools used by the author:
List of materials:
- old axe; - a piece of pipe; — steel plate with a pattern; — fittings; — rubber from a car tire; — paint for metal; - screw.
Ax making process:
Step one. Remaking an old ax
We take an old ax and cut off the blade from it. The author's ax has already been digested many times, and therefore it is time for him to retire. We also cut off a piece of a round pipe and use a hammer to flatten it a little, this is where the handle will go. We also cut out a triangular part from thick sheet steel and weld all the parts well.
Finally, to increase strength and for decorative purposes, the author welds a steel plate with a pattern to the axe.
Subtleties of sharpening
Sharpening the blade of a cleaver differs from sharpening a regular axe. It is not the sharpness that is of primary importance, but the angle. The cleaver has a blunter angle - about 70 degrees.
The sharpening angle of the cleaver can be combined.
In this case, on the side that is closer to the handle, it is sharper. On the opposite side - as blunt as possible. This allows you to achieve the best splitting results. The sharper part meets the wood first and penetrates it. This allows the thicker side to penetrate deeper into the block and increase the sliding effect. So with fewer blows you can achieve more splitting.
How to make a cleaver from an ax with your own hands, see the video below.
Every owner of a house heated by a stove, fireplace, or owner of a bathhouse knows that from time to time you have to work on chopping wood. Naturally, there is a desire to speed up this work and make it easier and more comfortable. For this purpose, a special tool was invented - a firewood cleaver. It significantly reduces the time spent preparing logs for kindling and does not overwork physically.
Read also Program for designing a land plot
Brief contents of the article: